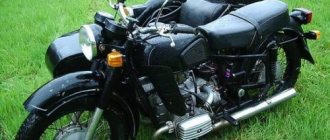
Craftsmen assemble fashionable ATVs from various motor vehicles of the last century. This will allow you to breathe new life into old motorcycles and mopeds, making them more functional and efficient. So, for example, you can assemble an ATV from the Dnepr. This legendary road motorcycle with sidecar will be a good donor for new motorcycles.
To assemble an ATV from the Dnepr with your own hands, the drawings of the future design should be worked out in detail. This is a heavy motorcycle that had a four-stroke two-cylinder engine. Depending on the modification, it had power from 22 to 36 hp. With. This allows you to create an all-terrain vehicle that can conquer tough off-road conditions, transport significant loads, and also cultivate the soil. This is multifunctional heavy equipment, the characteristics of which are not inferior to popular factory models.
The ATV can be made all-wheel drive or rear-wheel drive. The second option is preferable, as it is easier to assemble. To improve the all-wheel drive system of the model, it will be necessary to seriously alter the existing design, so in this case it is impossible to do without the help of professionals.
To assemble an ATV from a working Dnepr motorcycle you will need:
- Cross steering rod.
- Levers for the front suspension.
- A pair of front hubs from a rear wheel drive car.
- Pipe with a wall thickness of 3 mm.
- Axle shaft or driveshaft.
- Rear axle.
The master must have a welding machine and be able to handle it. During the work, electric and manual tools are used.
ATV from MT motorcycle
ATV built on the basis of the Dnepr MT motorcycle: photo, description, test video.
Craftsman Alexander Gilyanov assembled a homemade ATV with his own hands; the donor for the homemade product was a heavy-duty motorcycle Dnepr MT.
The Dnepr motorcycle is ideal for building an ATV; it is equipped with a 2-cylinder, 4-stroke, boxer engine with a power of 32 hp and a gearbox with reverse gear.
The photo shows the main stages of assembling an ATV.
The motorcycle was completely disassembled and the front end had to be lengthened.
The suspension arms are welded from a square pipe.
Shock absorbers from a motorcycle are installed.
Hubs and wheels from VAZ.
The rear axle is also from a VAZ classic.
During testing, the homemade ATV performed very well.
Also attached is a video of the author, which shows his homemade ATV from MT.
Do-it-yourself ATV - we sort out all the difficulties when creating an all-terrain vehicle
Unfortunately, not every person has the opportunity to purchase an ATV in a store. All more or less interesting models are now quite expensive, and buying a used ATV is always a certain risk.
In this regard, many motorcyclists advise making a four-wheeled all-terrain vehicle with their own hands, using an engine and spare parts from some old Soviet motorcycle. Earlier, we already told you about how to make an ATV from a Ural motorcycle.
In today's article, we will talk about other donors that can be used if you decide to assemble an ATV with your own hands.
Why is it worth assembling an ATV with your own hands?
Assembling a four-wheeled all-terrain vehicle by yourself definitely helps solve several problems. The first reason why people decide to make a homemade ATV is, of course, a small budget.
If you analyze the market prices for ATVs, you can understand that such vehicles can be considered almost a luxury. Prices for the simplest and lowest-power models start from 150 thousand rubles, for example, Yamaha Blaster YFS200.
In principle, such a single-seat “quad” will be enough, but the power will always be in short supply.
But ATV models with engines with a volume of 500-800 cm3 will cost much more, approximately 500 thousand rubles. You can also consider Chinese models, such as the Russian manufacturer Stels, but you will have to carefully monitor them. New all-terrain vehicles of this brand will cost approximately 300-400 thousand rubles, but the engines are much more interesting - 45-70 hp.
Nuances when operating a homemade “quad”
If you definitely decide to make an ATV with your own hands, then you should know about the intricacies of its operation. In principle, if you need an all-terrain vehicle for driving in impassable places where patrol cars have never been, then there’s probably nothing to worry about.
You will have to face problems if you plan to drive even through small settlements, which are sometimes visited by patrol cars. If they catch you without documents for this vehicle, then with a 99% probability they will take it away from you.
The whole difficulty lies in registering a homemade ATV, because the traffic police will most likely refuse you. In a good way, it is possible to register a homemade product, but it is extremely difficult to do.
Therefore, assembling a homemade ATV only makes sense if you operate it in some wilderness.
Making a choice
So, how to make an ATV with your own hands? When creating a homemade ATV, we need to decide on the donor, that is, the motorcycle that will form the basis of our project. Old Soviet motorcycles are perfect for a four-wheeled all-terrain vehicle.
From them we can borrow an engine with a gearbox, a frame, a steering wheel and, if desired, such parts as a tank, a seat and other elements.
Since we already had an article about a homemade ATV from a Ural motorcycle, in this review we will talk about how to make an ATV based on an IZH motorcycle.
For our purpose, almost all models of motorcycles from the Izhevsk plant are suitable for us. The only thing that is important to understand is the engine power.
Still, the end result will be a rather heavy structure, so the best solution would be to use the latest models - IZ Jupiter 5 or IZ Planet 5.
There is no point in considering more interesting models, like the IZH Planet Sport, because they are quite difficult to find, and if possible, it is better to restore them, because the motorcycle is quite rare and interesting. Let's move on to the main thing, how to make an ATV and what you need for this.
Rear suspension
Once you have decided on the donor, in our case it is IZH Jupiter 5, you need to completely disassemble the motorcycle. After disassembly, we will need a frame on which everything was supported, including the engine. It is logical that to increase the reliability of the structure, the frame needs to be strengthened in several places.
Now it is necessary to weld the rear axle so that instead of a wheel, a block of bearings with a chain drive can be installed on the axle. You can see an example in the photo.
As a suspension, you can use ordinary shock absorbers from a motorcycle, and for the rear axle, parts from an old Lada car are suitable.
You can take a more complicated route and install a monoshock absorber, but then again you will have to look for spare parts from a car, for example, from the same Zhiguli or Oka.
Front suspension
Once the rear suspension is finished and installed, you can move on to the front part of the bike, where things get a little more complicated. In the case where we were dealing with the rear suspension, we had the opportunity to choose how much shock absorber was installed. When creating the front suspension, we have only one option - to use two shock absorbers.
Oka's car is perfect as a donor for the front part of the ATV. From it we will need shock absorbers, swivel units and a steering linkage.
However, be prepared for the fact that spare parts will still have to be changed - something must be welded, sawed off, or filed. Also a good and simpler option would be to install a monoblock with fixed wheel planes.
Then you won’t have to look for a steering linkage, couplings, hinges and other spare parts.
A monoblock is a really simple option, because installation will take literally an hour of time. The only disadvantage of this front suspension design is the heavier mechanism. Turning the steering wheel will be somewhat more difficult than with a suspension with shock absorbers.
Do-it-yourself homemade ATV: how to make a decent device
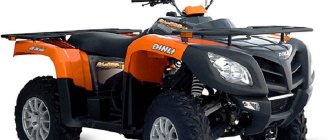
An ATV is a vehicle equipped with four wheels. The main manufacturers of mini cars are: Yamaha, Polaris, BRP, CF Moto. Utilitarian quadrics are used as all-terrain vehicles, and stunt models are used for fast driving. The categories differ from each other in technical characteristics, which is taken into account when you need to assemble an ATV with your own hands.
Necessary homemade products from the Ural motorcycle
Motorcycles produced back in the Soviet era are already considered a rarity. It is unlikely that he will be able to interest any of them as a vehicle. A museum piece, nothing more! Such equipment is sold very cheaply, a little more expensive than scrap metal. Despite the fact that the old “horse” has already served its purpose, it’s time, as they say, to retire, but I don’t want to part with it. Common situation? Often such a vehicle does not have documents, you cannot go far from home in it - troubles from the police are guaranteed.
Not everyone will think that an old Ural motorcycle, gathering dust idle in the garage, can be turned into a practical unit. Such a homemade product from the Urals does not require huge financial investments, but a certain amount of patience and a few hours of free time will be very useful.
Description of the vehicle
A modern ATV is equipped with four or six small wheels, but with increased maneuverability. The main technical characteristics include: light weight, all-wheel drive and low gear. Due to the unique configuration, the vehicle can easily travel on country roads. It can be used in summer and winter.
To make a homemade ATV, it is recommended to decide on its type:
- Utilitarian. The model has a lot of weight and good maneuverability. The vehicle easily carries several people and accelerates to 90 km/h.
- Stunt. Equipped with a narrow platform and radiator. The car weighs little and can accelerate to 137 km/h.
Vehicle assembly is carried out taking into account technical characteristics, equipment, and operating conditions. To perform independent work, you will need to have skills in working with a welding machine and a lathe. To build a car, you will need a spacious garage. Taking into account suitable parameters, a do-it-yourself drawing of an ATV is prepared.
Preparatory stage
When assembling the structure yourself, the power of the motor, the type of suspension, and the need to install a trunk are taken into account. To perform the upcoming work you will need: a welding machine, drill, grinder, keys, hammer, pliers, jack. As a basis you can take:
- Motorcycle Ural.
- Motorcycle Izh.
- Scooter.
- Oka or Niva car.
If necessary, transport is assembled from motorcycle and car parts. If the frame is made independently, special equipment will be required to deform the pipes. In this case, it is recommended to separately make drawings of the frame for the ATV with your own hands. This will simplify the process of assembling components:
Selection of systems
The brake system uses new parts or with minimal mileage. It is dangerous to install old brakes. The muffler is removed from the old car or made independently from a pipe. If a frame from another machine is used, it must be securely bolted to the bottom of the motor. The power unit is installed at the rear or front. Experts advise securely attaching the drive and transmission to the frame.
If the frame requires reconstruction, the component elements are dismantled. The front part needs to be extended onto the frame. At the next stage, the components of the frame are welded. When reconstructing the frame of a motorcycle, the seatposts are moved back by 40-45 cm. Racks are cut out of metal and welded, which are then fixed to the frame. The resulting homemade quad part can be painted with any paint.
To make your own frame, use a regular pipe with a wall thickness of up to 3 mm. It is better to make the spars from a pipe with a diameter of 25 mm, and the struts from a 20 mm pipe. The elements are fixed by spot and then solid welding. In a similar way, the ears from the levers and shock absorbers are welded to the frame. It is recommended to fix the brackets when installing other components and assemblies.
“Ural Phenomenon”: 10 most unusual custom motorcycles based on the Russian “Ural”
practically
over the years, either externally or internally, and at the same time, no matter how you look at it, remains relevant. Someone will say that for compatriots “Ural” has long become something completely inaccessible, and that the only consumers are foreign buyers who buy motorcycles with sidecars for fun. But this is not entirely true, because firstly, that same “Ural” has long received a bunch of technical bells and whistles, from the injection system and brakes to (recently) updated engine components. And besides, the brand’s managers got into electric exercises, presenting the famous motorcycle with a sidecar, equipped with an electric motor and batteries.
Despite all the reviews, the car remains popular; various images atypical for the Ural regularly appear on the Internet, in which it appears either without a stroller or with one.
Power unit
The motor is removed from a sports or regular motorcycle, scooter, or car. Auto mechanics advise using a four-stroke engine with a power of more than 15 hp. With. The power units of scooters differ from other analogues in their low fuel consumption. An ATV based on a scooter weighs little, so it can be pulled out quickly if it gets stuck in sand or mud.
To transport cargo or drive off-road, a stronger motor is installed:
- from Izh-1, Izh-2 or Izh Jupiter with a power of 24 hp. With.;
- from the Urals 32 or 36 l. With.;
- from Oka two-cylinder engine 35 liters. With.
Front and rear suspension
Homemade ATVs are equipped with front or rear suspension. It is easier to mount a ready-made front suspension from an old motorcycle. You can use other options:
- Rear axle from the car. It must be shortened to fit the parameters of the quadric. The advantage of this method is the presence of a differential. The disadvantage of the bridge is its large mass.
- Cardan + gearbox on the rear axle. An independent suspension with high ground clearance is suitable for an all-terrain vehicle. In this case, the suspension arms are fixed to the frame using bolts.
To prevent the ATV from turning over while driving, it is recommended to tilt the front suspension strut. The shock absorbers are from Izha. If you have the financial opportunity, it is better to install gas-oil shock absorbers with pumping. They provide suspension adjustment based on the road surface.
The steering system of an ATV is similar to that of a car. A steering wheel or motorcycle handlebar is installed . Some experts advise combining 2 types:
- motorcycle handlebars, shaft and lever at the top;
- parts of the steering system from the car are below.
You can make the steering shaft with your own hands. For this, a pipe with a diameter of 20 mm and a wall thickness of 3 mm is used. You will need to install a travel stop at the bottom of the part.
Homemade snowmobile from the Urals
Most craftsmen who have tried to build a snowmobile with their own hands are faced with the problem of choosing a lightweight engine with high power. It is also difficult to find a track track.
Important criteria that a homemade snowmobile must meet:
You can use one of two motorcycle engines for a homemade snowmobile: the light IZH-Planet or the heavy Ural. Experiencedly you come to the conclusion that the latter option is much better.
Features of a homemade snowmobile
- When selecting and modifying the chassis, you can use the Buran snowmobile diagram. The track system is in the form of rollers, but only one of them was needed for the homemade unit.
- The implementation of power transmission from the gearbox to the drive shaft is made possible through a chain.
- In the front part there is a pair of racks, which are designed so that there should be skis instead of wheels. The struts are equipped with springs from the rear shock absorbers of the Izh-Planet motorcycle.
- The mileage of the homemade snowmobile over 3 thousand km did not affect the operation of the engine - there was no overheating. Traveling a distance of 90 km, a snowmobile consumes almost 10 liters of gasoline.
When the snowmobile was equipped with an Izhevsk engine, the result was much worse. Making homemade Ural motorcycles on tracks or skis is a difficult task, but doable.
Gearbox and brakes
If the quad is assembled on the basis of a car, the chain drive is replaced. This greatly simplifies vehicle maintenance. A manual transmission is installed, as it improves maneuverability. The input shafts are directed to the front and rear axles. Wheels can be removed from small cars: Oka, Niva.
The brake system is selected taking into account the mounted wheels. The steering knuckles are removed from the Niva or Oka. To assemble an all-wheel drive model, you will need: car steering, transmission drive and differentials. In this case, the frame is not used. It is better to weld the structure to suit the engine size.
The suspension is also removed from the car. A gearbox is installed on the front-wheel drive model. The next stage is the manufacture of the body. For this you will need fiberglass, fiberglass. Experts advise using the first material, as it is easier to work with.
A drawing is pre-prepared and body elements are cut out from polystyrene foam. To fix them together, glue or foam is used. Fiberglass is glued to the foam. The resulting structure is attached to the frame. The body is well dried, primed, sanded and painted.
Tires of the required size are selected. If the vehicle will be used off-road, it is necessary to create the appropriate ground clearance (distance from the bottom to the surface of the earth). For this, R17 wheels are installed.
The resulting ATV is equipped with turn signals, headlights, a dashboard, and a battery. Electrical equipment is connected according to a pre-designed diagram. For this, wiring and a multimeter are used to check the voltage in the network. The next step is to install the seats. The vehicle is checked for serviceability, and the data displayed on the drawings is compared. A quadric, correctly assembled, is not inferior in technical and operational characteristics to finished vehicles.
How to make an ATV from Dnepr?
Craftsmen assemble fashionable ATVs from various motor vehicles of the last century. This will allow you to breathe new life into old motorcycles and mopeds, making them more functional and efficient. So, for example, you can assemble an ATV from the Dnepr. This legendary road motorcycle with sidecar will be a good donor for new motorcycles.
To assemble an ATV from the Dnepr with your own hands, the drawings of the future design should be worked out in detail. This is a heavy motorcycle that had a four-stroke two-cylinder engine. Depending on the modification, it had power from 22 to 36 hp. With. This allows you to create an all-terrain vehicle that can conquer tough off-road conditions, transport significant loads, and also cultivate the soil. This is multifunctional heavy equipment, the characteristics of which are not inferior to popular factory models.
The ATV can be made all-wheel drive or rear-wheel drive. The second option is preferable, as it is easier to assemble. To improve the all-wheel drive system of the model, it will be necessary to seriously alter the existing design, so in this case it is impossible to do without the help of professionals.
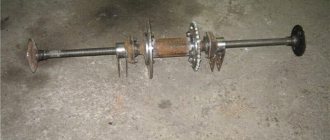
To assemble an ATV from a working Dnepr motorcycle you will need:
- Cross steering rod.
- Levers for the front suspension.
- A pair of front hubs from a rear wheel drive car.
- Pipe with a wall thickness of 3 mm.
- Axle shaft or driveshaft.
- Rear axle.
The master must have a welding machine and be able to handle it. During the work, electric and manual tools are used.
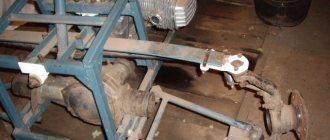
Rear suspension assembly
How to make an ATV from Dnepr? It is worth considering that it is recommended to take the front hubs and rear axle from the same car. Thanks to this, there will be no need to adjust to the mounting discs. Parts from VAZ are best suited for these purposes.
The old motorcycle is disassembled, placing its parts neatly on racks. The steering wheel and shock absorbers are removed from the frame, and then assembly begins. The suspension can be on leaf springs, springs or a rigid type. Driving comfort depends on the choice of this part, so it is best to make a suspension with a spring-type shock absorber.
It is best to purchase the missing parts separately so that they cope with their task in full. The suspension is fixed to the frame, for which you will need to calculate the weight of the ATV. It will be quite heavy, so the structural elements are chosen accordingly. In this case, shock absorbers will be able to provide a smooth ride when driving off-road.
Frame assembly
The frame is assembled almost from scratch from pre-prepared pipes, which should be light, but at the same time durable. Some structural elements are taken from the Dnepr, but the structure is partially supplemented with appropriate material. Pipes from an old motorcycle are ideal if they are well preserved. Such structural elements have sufficient strength and flexibility.
Additional pipes should not be too thick, as their weight will make the ATV clumsy and heavy, lacking maneuverability and good dynamics.
ATV from Dnepr: engine and gearbox
The engine from an old motorcycle is suitable for creating a powerful ATV, as it has high performance and endurance. Thanks to this motor, the equipment will be functional and productive. If desired, it will be possible to attach a plow and other attachments to it, since the motor power is enough to withstand such loads.
The transmission needs to be the same one that was used with this engine, since otherwise the system will not work smoothly. The gearbox has reverse gear and 4 speed shift stages.
Brakes
Since the donor motorcycle may have significant mileage or simply be of advanced age, brakes cannot be taken from it. This is unsafe, since a worn-out system may not work at the right time. Brakes are purchased at a specialized store, in accordance with the characteristics of the future ATV.
Steering
The Dnepr steering wheel can be used in the design of a future ATV, but some modifications will have to be made. Now you need to connect drives to all 4 wheels of the vehicle. To do this, the design is supplemented with ball joints and levers, which can be taken from an old VAZ or Oka. Additional components are available for free sale. The steering must be installed so that it accurately responds to all driver movements, is comfortable and smooth.
ATV from "Dnepr": wheels
They also take ATV wheels from an old car, which are quite wide, unlike motorcycle wheels. Such tires provide vehicle stability and good cross-country ability, which is especially important in off-road conditions. The diameter of the wheels can be large, up to cargo size. The Dnepr engine has good power and endurance, so such modifications that increase the load will not affect its operation. At the same time, the speed will remain quite high.
Electrics and body kit
When the frame is ready, all components and assemblies of the system are installed on it using metal brackets. Each of them must be firmly fixed in its seat. Otherwise, due to vibration, parts and mechanisms can quickly fail. It is also important to distribute the load correctly to keep the ATV stable.
To make the appearance of a homemade vehicle spectacular, the body kit can be made independently from polymer materials. To do this, a mold is created from foam plastic, onto which fiberglass is applied in several layers. A metal mesh is installed between them, which will serve as reinforcement. After installing the plastic parts, the driver's seat, headlights, and lanterns are installed, which are also removed from the old motorcycle. The electrical system is carried out, after which it is necessary to check its functionality. If everything is functioning correctly, you need to test the new equipment, gradually increasing the load.
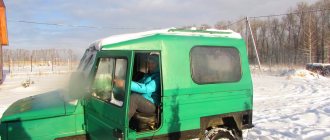
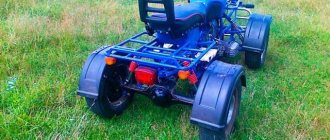
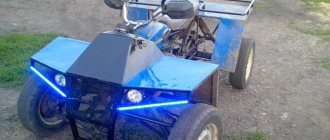
Homemade ATV ICE Dnepr
Dear visitors to the “ Samodelkin Friend ” website, today we will look at another homemade ATV with an engine from a heavy-class motorcycle “Dnepr” with a 4x2 wheel arrangement. More than 100 step-by-step photos of assembling the ATV and video tests.. This all-terrain vehicle was designed and assembled by Oleg from the village of Vyselki, Krasnodar Territory, registered on the DRIVE2 website under the nickname “Krik Dushy.” If you are interested, you can find the author and check directly with him for the nuances and subtleties of building an ATV.
First of all, the master and his friends bought an old homemade ATV in a neighboring village, which had been standing in the garage for a long time without wheels and would not start. The purchase cost only 5 thousand rubles, then the author began a large-scale redesign and modification of the old quad design, namely, the frame and suspension were completely redone, the oil filter was replaced with an air filter, VAZ wheels with a deeper cut tread (herringbone) were installed.
The levers, balls, hubs and brake calipers with discs are all borrowed from the VAZ classic, the shock absorbers were initially installed from IZH Jupiter-5, but were later replaced with original ones from the Dnepr. The author turned the steering bipods over so that the ground clearance was higher and the calipers also had to be swapped. The brakes are classic, disc brakes in front, drum brakes in the rear. The axle shafts are shortened by 32 cm, 16 cm on each side, respectively.
And so, let's take a more specific look at the step-by-step process of assembling an ATV with a Dnepr 650 cc 0.6 l, 36 l/s engine.
Materials
- ICE Dnepr MT-10
- rear axle VAZ
- professional square pipe
- charging relay (classic)
- air filter for 150 cc from a moped
- VAZ wheels
- disc and drum brakes
- bolts, nuts and other small items
Tools
- welding inverter
- Angle grinder (grinder)
- drill
- set of wrenches
- plumbing and measuring tools
- skillful hands and a bright head)
Homemade ATV from the Urals
Heavy Ural motorcycles are not very popular. One of the reasons is the huge consumption of gasoline. Many motorcyclists and bikers are not satisfied with the large dimensions of the Urals. Despite this, folk craftsmen are interested in such motorcycles. Points such as the presence of reverse gear and a fairly powerful four-stroke engine are very tempting in terms of converting an old Ural into an ATV. Its cost is ultimately much lower than its European counterpart, and the engine power is much higher. Such homemade products from the Ural motorcycle will appeal to everyone who likes to create with their own hands.
Design Features
Craftsmen from the city of Barnaul received a successful version of a homemade ATV:
- The Ural motorcycle was taken as a basis; in particular, the frame with the engine was left.
- The reinforced gearbox was removed from the motorcycle of another model of the domestic motorcycle - “Dnepr”.
- The drive had to be made of a cardan type, due to the fact that options with sprockets and chains are less reliable.
- Two pairs of wheels fit well from the Gazelle car. The appearance of the ATV turned out to be rough and uncouth.
Preparation for work, tools and equipment
First of all, you need to carefully consider when, where and for what purposes the future ATV will be used - hunting and fishing, motorcycling in nature, transporting goods, etc. It is on this basis that you need to make a choice of a “donor” vehicle, deciding how powerful the engine is needed, what kind of suspension is suitable, what kind of trunk, etc.
You can take ready-made drawings from the Internet, create them from scratch yourself, or combine both options and ready to remake them at your own discretion.
List of required tools:
- welding machine;
- Bulgarian;
- drill;
- a set of keys;
- various small tools - calipers, hammer, knife, screwdrivers, pliers, etc.
To make your own frame, you will also need equipment for bending pipes. If you don’t have one, you can rent it or outsource the necessary work to another craftsman. Only with remarkable skill can you bend the pipes manually by heating the bend with a gas cutter or torch.
- engine;
- frame;
- rear and front suspension;
- steering;
- brake system;
- cooling system;
- muffler;
- electrical equipment - battery, headlights;
- body, body kit
It is quite possible to make a muffler yourself. Everything else is to purchase used parts on the shadow market.
Parts selection
ATV frame
Depending on the “donor” and the design of the quad, you either have to make the frame yourself, or you can reconstruct a finished, used one.
The most important thing is that the engine is securely bolted to the bottom along the frame, which can be located either front or rear. The transmission and drive should also be firmly attached to the frame to avoid play.
Homemade frame
The material used is ordinary water and gas pipes with a wall thickness of no more than 3 mm:
- for spars - 25 mm;
- for crossbars and struts - 20 mm.
The pipes are connected using spot welding, followed by solid welding. Ears for attaching shock absorbers and levers are welded to the frame immediately. Brackets - during installation of units and components.
Reconstruction of an existing frame
To reconstruct a finished frame, you should remove everything, leaving the frame, dismantle the back part and build up the front. Then weld elements for fastening a complete set of components and assemblies of the ATV. When reconstructing a motorcycle frame, the seatposts should be moved back by 40 - 45 cm.
The front and rear luggage racks are cut out of a metal sheet and welded to the frame. Finally, the finished frame is painted; there is no need to varnish it.
Additionally, we recommend reading our expert’s article on how to choose a roof rack for your car.
Homemade tricycle from the Urals
The main advantages of a tricycle based on the Ural:
- good handling;
- the ability to develop sufficiently high speed;
- high power;
- comfort during long trips;
- a spacious body for transporting cargo weighing several hundred kilograms.
The predominant part of the components belong to motorcycles; the engine for the trike is suitable from a ZAZ-968. The most labor-intensive process is making the frame. In the design, it is a kind of connecting link on which all components and parts are installed.
Design Features
For inexperienced designers, when assembling a tricycle, the drawing will be an excellent guide to action. It is important to think carefully about the size issue.
The rear shock absorbers, which are similar to their automobile counterparts, are mounted on the upper beam. When driving on a road with uneven surfaces, the shock absorbers will react sensitively to them. The glasses are fixed to the beam by welding, which provides the desired comfort. The pipes are welded at the end together with reinforcing gussets - the fastening will be reliable.
Due to the fact that the power unit is installed in the rear, the center of gravity is there. With a sharp increase in engine speed, the front wheel lifts off the road and the tricycle rears up. This effect can be eliminated by placing the balance closer to the front wheel.
If the engine is slightly tired, it needs to be repaired a little. The exhaust system in this case is homemade, and the cooling system can be chosen as water or oil type.
Since the right hand is busy adjusting the gas, the gear shift lever, naturally, should be on the left side.
Assembly sequence
Stages of assembling an ATV
To create a homemade ATV with your own hands, you need to go through 9 stages of work step by step:
- Acquisition and preparation of everything necessary;
- Welding (alteration) of the frame;
- Installation of suspensions, brakes, chassis, shock absorbers, wheels;
- Installation of engine, gearbox, drive assembly;
- Installation of the fuel system;
- Installation of electrical equipment - turn signals, headlights, dashboard, battery;
- Case manufacturing;
- Priming, sanding and painting the body, (if desired) sophisticated custom tuning;
- Installation of the body and seat.
After the final stage, the finished miracle of home-made equipment will need to be thoroughly tested, gradually making road (and off-road) conditions more difficult.