Setting the timing belt on a delta moped
1. Install a new cylinder head gasket.
ATTENTION!
The cylinder head gasket is made of soft metal (copper, aluminum) and after tightening the cylinder head nuts it is deformed, thereby ensuring a tight connection. Reinstallation of the cylinder head gasket is not permitted.
2. Install the timing chain guide.
3. Install the cylinder head.
4. Set the piston to TDC according to the marks on the flywheel. This is usually the "T" mark on the flywheel. Align the mark with the tide on the engine crankcase.
ATTENTION!
The following operation is one of the most important when assembling the engine. It is important to align all the marks very accurately. An error in installing the chain even by 1-2 teeth will result in the engine not working correctly, and it will probably even lead to serious damage to the timing and cylinder-piston gas parts when trying to start the engine!
5. After making sure that the timing chain has not jumped off the drive sprocket on the crankshaft, install the camshaft into the cylinder head, at the same time putting a chain on its sprocket so that the marks on the camshaft sprocket are parallel to the plane of the edge of the cylinder head, and the cams are directed downward (inside the head).
6. Install the rocker arm support, orienting it according to the installation marks. Lubricate the cams and camshaft bearings.
On the rocker arm support are the letters “EX” - which means “EXHAUST” - release. The "EX" mark should be located above the exhaust valve.
ATTENTION!
• Check the correct axial alignment of the camshaft (make sure that the camshaft bearings are correctly positioned on the beds). Probably, on some scooter models, the holder will have a mark “IN” - “INTAKE” - inlet. Accordingly, the “IN” mark must be located above the inlet valve.
ATTENTION!
If the copper washers are severely deformed (flattened), they must be replaced, since if the washers do not fit tightly due to oil leakage, the pressure in the lubrication system will drop and the motor will quickly fail. Sealing this connection with any sealant is unacceptable.
7. Install sealing copper washers on the studs.
8. Screw on all four cylinder head nuts without tightening them.
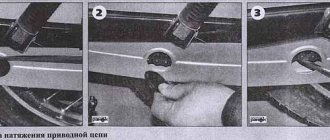
9. We recess the working rod of the timing chain tensioner inside the housing.
10. Reinstall the timing chain tensioner and tighten its mounting bolts.
11. Insert the working bolt and the timing chain tensioner spring, tighten it. In this case, you can hear characteristic clicks - the ratcheting mechanism of the tensioner working rod will be activated, which, under the influence of a spring, will come out of the housing and tension the timing chain.
12. Sequentially, crosswise tighten the cylinder head nuts in 3-4 steps. The final tightening torque is 10-15 Nm (More accurate values can be found in the repair instructions for the specific scooter model).
13. Screw in and tighten the additional cylinder head bolts.
14. Using a socket wrench for the central bolt of the flywheel, or with your hands holding the flywheel, slowly turn the engine crankshaft clockwise 3-4 turns to make sure that the timing timing is set correctly and the piston does not collide with the valves.
15. We install the crankshaft at TDC of the compression stroke and once again check the correct installation of the camshaft according to the marks.
17. Rotate the crankshaft several turns and once again check that the valve clearances are set correctly.
18. Install the cylinder head cover and tighten its bolts.
19. Place the crankcase ventilation hose onto the fitting in the cylinder head cover.
20. Install the cylinder cooling casing.
ATTENTION!
Do not forget to remove the paper from the intake manifold if you covered it from dirt during disassembly.
21. Install the inlet pipe assembly with the carburetor.
ATTENTION!
In most cases, when installing an exhaust system, the exhaust pipe gasket will need to be replaced. It is better to replace it with a new one during assembly.
Source
How to replace the timing chain in an engine
Having decided on such an action as replacing the timing chain of a scooter, you need to decide on how to implement your plan.
There are two replacement options:
How to change, everyone decides for themselves. Both methods, advantages and disadvantages are described in detail below.
With disassembly
You should choose the right tools - generator and variator pullers (you can make them yourself), a kickstarter sprocket puller, 8, 10, 12 and 17 mm sockets, a hammer, two screwdrivers (flat, Phillips).
The engine is removed from its place, the oil is poured out, all parts are wiped and cleaned. Next, remove the muffler and cooling casing. We remove the generator only with a puller. To do this, unscrew the bolts from the impeller and remove it from the rotor. It is necessary to fix the rotor with a puller and unscrew the nut. Then we tear the rotor off the crankshaft journal. Remove the variator cover. Also, secure the impeller with a puller, unscrew the nut, and remove the variator from the axle.
Below the variator is the kickstarter gear. Likewise, a puller is required for it. Then we clean the cylinder connector, valve covers and cylinder head. After unscrewing the bolts on the valve covers, remove it. Next, remove the scooter's timing chain tensioner. After unscrewing the bolts on the cylinder head, we pull out the camshaft bed.
Next, remove the chain from the camshaft and pull it out of bed. To avoid losing the guide bushings that center the parts relative to each other, you need to remove them and put them away. We remove the cylinder head, the cylinder itself, and the piston (to do this, remove the retaining ring and pin from the upper connecting rod head).
After unscrewing the bolts on the crankcase cover, tapping it a little, remove it from the engine. We take out the starter intermediate gear, use a screwdriver and a hammer to unscrew the overrunning clutch nut (clockwise) and remove the gear and housing from the trunnion. We reached the chain!
Remove the protective shield from the oil pump. Place a metal stick under the chain, twist the nut on the oil pump sprocket, remove it and remove the chain.
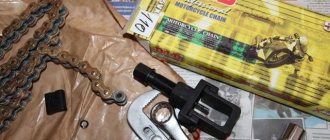
No disassembly
We take the following tools: a Phillips screwdriver, pliers, a new chain and a special puller. More details about it will be below. We flare the new chain - to do this, use a puller to press the pin out of the joint of the links, but not completely.
A little about the puller
It is called a timing chain puller. It can be made by a turner by turning a threaded extruding pin and rolling a strong pin into it with a diameter similar to that of a chain pin. You can purchase a ready-made bicycle one. Just narrow the pin a little to the desired size.
Remove the cooling casing from the scooter engine, then the cylinder head cover. Next you need to remove the chain tensioner. We remove the camshaft bed, take out the shaft, remove the star.
We take the puller, center it with the pin, and gradually press out the pin. You can press it out completely, it will not be useful. We compare the links of the new and old chains, thread the wire into the seat of the pin and fix the ends of both chains. We turn the cooling impeller counterclockwise, gradually replacing the old chain with a new one.
Then we separate the ends of the chains, throw out the old one, and combine the new links from the ends. We check the alignment, install the pin, and use pliers to carefully press the pin in so as not to damage the new chain. We first check the mobility of the links. We finalize the pin with a puller. Again we control mobility. This point is very important: if you install the pin unevenly and miss it, it will begin to rest against one of the links and squeeze out the next one.
As a result, the subsequent pin or link bends, causing it to jam and become immobile.
Next, we assemble the engine in reverse order, placing marks on the rotor. When installing the camshaft bed, after tightening the nuts, you need to check the valve clearances with a feeler gauge. Upper valve – inlet: 0.05mm, lower – exhaust: – 0.1. The feeler gauge should fit freely between the valve and the adjusting bolt.
Then install the chain tensioner. We unscrew the bolt on the top of the tensioner, install a screwdriver in the groove, and, turning it, push the rod back. We fix everything else back according to the diagram.
Source
How to set timing marks on an Alpha 110cc moped
Our VKontakte group In this video I will tell you how the ignition timing differs from.
Vladimir Voronov 1 month back Guys, check whether the piston is installed correctly, there are recesses on the piston for the intake and exhaust valves, a large recess where it says “IN” is for the intake valve, i.e. the larger one is recessed upward. How to adjust the valves on an Alpha moped yourself, and what you need to adjust the valves. Maybe you set the piston to reverse. Forum members, if [anyone|] is not too lazy, I’m looking for: How to correctly set the timing belt on an alpha moped. How to remove the generator rotor on an alpha moped without ?? HYDROGEN GENERATOR FROM. Check it out!
Danil Pugachev 1 month ago no, we don’t even know where the head with the boiler is attached, we installed two gaskets, we thought it wouldn’t knock, the valves knock loudly when you turn the starter, okay, thanks for the hint
Danil Pugachev 1 month reversed it by two teeth clockwise and counterclockwise, it still jams, but if you put it like in the video it turns the starter but you can hear the valves knocking, you turn the starter and it won’t start because the piston is defective
Danil Pugachev 1 month reversed it by two teeth clockwise and counterclockwise, it still jams, but if you put it like in the video it turns the starter but you can hear the valves knocking, you turn the starter and it won’t start because the piston is defective
Vladimir Voronov 1 month ago It is unlikely that the piston was defective! Maybe the gasket was forgotten between the head and the cylinder, the fit has become lower and the piston is reaching the valves, or maybe the timing chain has flown off the damper and makes that sound, or you can actually feel it when you turn the generator and it jams. Maybe you missed something??
Danil Pugachev 1 month ago I changed the piston 50 to 72 and set the ignition as in your video, the engine does not start and the valves are clinging to the piston, what could it be.
Danil Pugachev 1 month ago I changed the piston 50 to 72 and set the ignition as in your video, the engine does not start and the valves are clinging to the piston, what could it be.
- Home
- Auto garage
- How to set timing marks on an Alpha moped
To change or not to change?
Suppose you are overhauling your engine: changing oil seals, crankshaft, gaskets and other devices, but you doubt whether to replace the timing chain with a new one or not. If you have any doubts, change it for a new one at the first opportunity. And now I will explain why.
See for yourself: a chain has an average service life of approximately 18,000-20,000 km of a scooter (personal experience), approximately the same as the average service life of the engine itself. And for example, after driving 6,000 km, the crankshaft jammed or the engine leaked, or something else happened that requires complete disassembly of the engine. Naturally, you disassemble the engine, replace the crankshaft with a new one, and leave the chain, which by that time has exhausted a third of its service life.
And what happens? The chain, after 12,000 km, will exhaust its service life and become unusable, but the crankshaft and other parts will be in good order and whether you like it or not, you will have to halve the engine again, because of the chain alone. Is it necessary? The chain is a consumable. Never skimp on it!
Personally, I never check timing chains. I simply throw them in the trash, no matter how awesome they seem to me. A chain is a consumable item for me, just like a spark plug, oil or oil seal. But if you are important, or money is tight, you can use the old fashioned way.
Before you start adjusting the valves
Therefore, after purchasing a new Alpha RX, I checked the valve clearance. For this procedure I had to buy a set of probes. In our case, you will need a probe with a thickness of 0.05 mm.
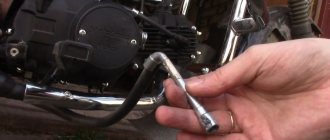
In order to calmly begin adjusting the valves, I had to unscrew the safety bars. For this we need a key of 8.
To get to the valves, you need to unscrew the valve covers located on the top and bottom of the cylinder head. To do this we need a 17 wrench. I used a spanner.
LITTLE BIG. FARADENZA (official video)
Subscribe
Opened 3 days ago
#128544; ANTI-POSITIVE RUSSIAN TOUR #128544; 19.10 Moscow vk.com/littlebig_stadium 26.10 St. Petersburg vk.com/littlebigice buy tickets here: www.littlebig.info/ 04.10 Surgut vk.com/littlebig_surgut 05.10 Tyumen vk.com/littlebig_tymen 06.10 Ekaterinburg vk.com/ekb_littlebig 09 .10 Izhevsk vk .com/littlebig18 10.10 Kazan vk.com/little_big_kzn 12.10 Nizhny Novgorod vk.com/little_big_nn 13.10 Kirov vk.com/little_big_kirov 15.10 Yaroslavl vk.com/club169324976 16.10 Ivanovo vk.com/club16932503 3 17.10 Cherepovets vk.com/littlebig_35 08.11 Krasnoyarsk vk .com/event169050668 09.11 Irkutsk vk.com/event169050994 11.11 Tomsk vk.com/littlebig_tomsk 12.11 Kemerovo vk.com/event169050627 13.11 Novosibirsk vk.com/littlebig_novosib 15.11 Barnaul vk.com/even t169050518 16.11 Omsk vk.com/littlebig_omsk2018 18.11 Chelyabinsk vk. com/littlebig74 11.19 Ufa vk.com/little_bigufa 20.11 Samara vk.com/littlebig_smr 22.11 Saratov vk.com/event169047067 23.11 Volgograd vk.com/event169048052 25.11 Rostov vk.com/event169048121 2 6.11 Krasnodar vk.com/event169048172 27.11 Voronezh vk.com /littlebig_vrn18
How to set the timing belt on an Alpha moped
Check the time by tags on the Delta EX 50 moped
Engine 1P39FMB (139FMB)
Interesting comments:
Roman Khimchenko turned 2 weeks ago. And if this doesn’t answer, what should I do?
Vladimir Voronov 2 weeks. reversed expose it would happen.
Valentin Sidorov 1 month ago Thanks for the video. The features of valve motor synchronization on the Alpha moped are determined. How to install the ignition | Everything is described in detail and clearly in Russian. 598 Removing the generator rotor on an alpha moped. How to remove remove generator. How to replace the starter chain on an alpha moped video. I can't remove the rotor on the alpha moped, I didn't find any seeds on the market, so I think the best way is to remove it, who shot it and how. If you continue to make videos like this, I will be all for it!
Vladimir Voronov 1 month ago This is good. )) And of course there will be new videos, just wait a minute.
Danila Pugacheva 1 month ago no, we are not even where the head with the boiler is attached; two installed gaskets; This was spectacular; does not wake up the valve; it knocks gray when you turn on the starter, thanks a lot for the tip
Vladimir Voronov 1 month ago Yes! Further, do not install two gaskets, it will not be better, the combustion chamber will increase due to a drop in power.
Danila Pugacheva 1 month ago no, we are not even where the head with the boiler is attached; two installed gaskets; This was spectacular; does not wake up the valve; it knocks gray when you turn on the starter, thanks a lot for the tip
Hunter38767 3 weeks ago And if you have 50 cubes. 72 cubic head and piston head. See, you need to change your head.
LITTLE BIG. FARADENZA (official video)
Subscribe
Opened 3 days ago
#128544; ANTI-POSITIVE RUSSIAN TOUR #128544; 19.10 Moscow vk.com/littlebig_stadium 26.10 St. Petersburg vk.com/littlebigice buy tickets here: www.littlebig.info/ 04.10 Surgut vk.com/littlebig_surgut 05.10 Tyumen vk.com/littlebig_tymen 06.10 Ekaterinburg vk.com/ekb_littlebig 09 .10 Izhevsk vk .com/littlebig18 10.10 Kazan vk.com/little_big_kzn 12.10 Nizhny Novgorod vk.com/little_big_nn 13.10 Kirov vk.com/little_big_kirov 15.10 Yaroslavl vk.com/club169324976 16.10 Ivanovo vk.com/club16932503 3 17.10 Cherepovets vk.com/littlebig_35 08.11 Krasnoyarsk vk .com/event169050668 09.11 Irkutsk vk.com/event169050994 11.11 Tomsk vk.com/littlebig_tomsk 12.11 Kemerovo vk.com/event169050627 13.11 Novosibirsk vk.com/littlebig_novosib 15.11 Barnaul vk.com/even t169050518 16.11 Omsk vk.com/littlebig_omsk2018 18.11 Chelyabinsk vk. com/littlebig74 11.19 Ufa vk.com/little_bigufa 20.11 Samara vk.com/littlebig_smr 22.11 Saratov vk.com/event169047067 23.11 Volgograd vk.com/event169048052 25.11 Rostov vk.com/event169048121 2 6.11 Krasnodar vk.com/event169048172 27.11 Voronezh vk.com /littlebig_vrn18
Setting TDC on Alpha
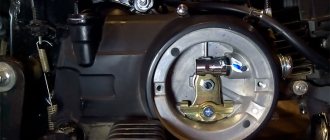
To start adjusting the valves on the Alpha moped, you need to set the top dead center. To do this, remove two covers on the rotor cover. Rotate the rotor until the T mark appears.
To accurately control this process, you need to remove the timing sprocket cover. To do this, on the opposite side you need to unscrew the clamping bolt, which can be unscrewed with a 10mm wrench. Remove the timing chain sprocket cover carefully so as not to damage the gasket.
The star has a mark in the form of a dot. It should be aligned with the mark on the head body.
To easily turn the engine mechanisms, I unscrewed the spark plug, reducing the compression to nothing.
Now you can begin adjusting the valves on the engine.
Replacing the camshaft and timing tensioner on a Delta moped
Chinese moped repair
. There was a strong knocking sound in the engine.
Although office dress codes are becoming more casual, it's still nice to feel smart and dress appropriately when heading to work. How to change a chain
timing belt? The timing belt of the VAZ 2106 will, just like it, hit the rack on the side member. How. This is why wearing jeans for your nine-five can be challenging. Replacing the air filter on an alpha (Orion 50v) how to remove and insert the air filter on an alpha moped video. So how to do this? Trilogy Stores, luxury denim retailers of straight cut jeans for women, give us some insight: Styling Jeans If you're new to wearing denim to work, or your office isn't very relaxed, you can play around with black denim. Worn with a patterned shirt, tucked in with high-waisted black jeans can create a more suitable look than black work pants. The high-waisted element of jeans can lengthen your legs. perfect for when you settle into your favorite pairs of heels. Buy a pair of black jeans with a playful hem to add an edge to your outfit that's still smart. Coulotters are super popular this season, and there's no reason why you can't bring the trend to the table. Black or brunette denim jeans paired with a chic blouse, oversized jacket and voyeuristic plaid. This is an outfit that will look summery but work appropriate. Wear your blouse to dress up your suit and add heels when heading out for after-dinner drinks. Likewise, cut-off leg jeans are suitable for the warmer months and a pair of wells with loafers and a comedy combo. If you want to add something but don't want it to be too loud, choose a pastel palette. Lilac or blue. Classic blue skinny jeans don't have to look casual either. With a white sleeveless shirt and a trusty blazer, you can create a fashionable ensemble that is anything but boring. Before as
replace the timing belt on a VAZ 2110, be sure to read this article. This will help you do the work yourself correctly and quickly. Slide on your spot pumps and get moving. Don't forget about white jeans, they can be styled to be work-appropriate. Worn with a dark or pastel shirt, white denim can be work-appropriate. Choose a pair with a thin stem for an elegant, summery look.
Let's start adjusting the valves
Let's start with the intake valve, which is located at the top of the cylinder head. We'll need a key for 9. Yes! Not 8, not 10, but 9! Good thing I had a set of sockets in the car. But it is better to use a spanner wrench, which conveniently unscrews the pusher fixing nut on the rocker arm.
Then we need a feeler gauge with a thickness of 0.05 mm, which must be inserted between the pusher and the valve stem. By rotating the pusher, we reduce or increase the thermal gap until the probe moves with slight tension. After tightening the fixing nut, we again check the gap with a feeler gauge, which could have gone astray.
In a similar way, we begin adjusting the exhaust valve.
(2 ratings, average 4 out of 5)
How to set timing marks on an Alpha 110cc moped
Our VKontakte group In this video I will tell you how the ignition timing differs from.
Vladimir Voronov 1 month ago
Guys, check whether the piston is installed correctly, there are recesses on the piston for the intake and exhaust valves, a large recess where it says “IN” is for the intake valve, i.e. the larger one is recessed upward. How to adjust the valves on an Alpha moped yourself, and what you need to adjust the valves. Maybe you set the piston to reverse. Forum members, if [anyone|] is not too lazy, I’m looking for: How to correctly set the timing belt on an alpha moped. How to remove the generator rotor on an alpha moped without ?? HYDROGEN GENERATOR FROM. Check it out!
Danil Pugachev 1 month ago
no, we don’t even know where the head with the boiler is attached, we installed two gaskets, we thought it wouldn’t knock, the valves knock loudly when you turn the starter, okay, thanks for the hint
Danil Pugachev 1 month ago
I put it on two teeth, clockwise and counterclockwise, and it jams, but if you put it like in the video, it turns the starter, but you can hear the valves knocking, you turn it with the starter and it doesn’t start because the piston is defective
Danil Pugachev 1 month ago
I put it on two teeth, clockwise and counterclockwise, and it jams, but if you put it like in the video, it turns the starter, but you can hear the valves knocking, you turn it with the starter and it doesn’t start because the piston is defective
Vladimir Voronov 1 month ago
It is unlikely that the piston was defective! Maybe the gasket was forgotten between the head and the cylinder, the fit has become lower and the piston is reaching the valves, or maybe the timing chain has flown off the damper and makes that sound, or you can really feel it when you turn the generator and it jams. Maybe you missed something??
Danil Pugachev 1 month ago
I changed the piston 50 to 72 and set the ignition as in your video, the engine does not start and the valves are clinging to the piston, what could it be.
Danil Pugachev 1 month ago
I changed the piston 50 to 72 and set the ignition as in your video, the engine does not start and the valves are clinging to the piston, what could it be.
- Home
- Auto garage
- How to set timing marks on an Alpha moped
Copyright © 2012-2018 UA-films
Films, clips. share cost-free, share online