Why do you need valve adjustment on an Alpha moped? The engine of the FMB 139 moped is equipped with a gas distribution mechanism with the camshaft located in the cylinder head. The valves are driven by rocker arms. During engine operation, the valves experience thermal expansion, so a small gap is provided between the rocker arm and the valve to compensate for thermal expansion. Insufficient or excessive clearance may cause serious engine damage.
The negative effect of incorrect clearances accumulates gradually and can cause valve burnout, seat destruction, decreased compression, overheating and deformation of important timing components. Adjusting the valves on the Alpha moped should be done several times a season. If the thermal clearances are set incorrectly, a characteristic knocking sound may appear when the engine is running, which is also a reason for adjusting the valves.
Before you start adjusting the valves
Therefore, after purchasing a new Alpha RX, I checked the valve clearance.
For this procedure I had to buy a set of probes. In our case, you will need a probe with a thickness of 0.05 mm. In order to calmly begin adjusting the valves, I had to unscrew the safety bars. For this we need a key of 8.
To get to the valves, you need to unscrew the valve covers located on the top and bottom of the cylinder head. To do this we need a 17 wrench. I used a spanner.
Valve design and grinding in
The valves on the Alpha moped are made according to the same design as for the car. They have a plate and a rod that elongates due to thermal expansion when the engine operates. The normal gap should be 0.05 mm. When the valves warm up, the thermal gap almost completely disappears. The valve plates fit tightly into the seat, and their edges must be perfectly ground to the edges of the seat. Grinding in valves on a moped is no different from a similar operation for car engines and is done using the same paste manually or mechanically using a drill. To remove the valves from the FMB 139 cylinder head, a special tubular puller is used.
Video on the topic
Other videos on the topic:
I want to touch on an interesting topic that everyone has heard about, but not everyone understands its essence - let's talk about valve adjustment.
A little theory.
First, a little theory. Where did the need to adjust the valves come from and why is the thermal gap needed?
- How to adjust the valves of a VAZ-2115 injector 8 valves
Any four-stroke engine has at least two valves: an intake valve, through which the working mixture enters the combustion chamber, and an exhaust valve, through which exhaust gases exit. Part of the valve is constantly located in the combustion chamber and therefore the valve becomes very hot. And as we know from school physics courses, bodies expand when heated. Moreover, the stronger the heating, the greater the expansion.
The valves in the engine are always in a “spring-loaded” state, while the valve plate is pressed very tightly to its seat - the valve seat. This ensures that the valve closes tightly.
To open the valve, you need to press on it. In our case, the valve is pressed by a rocker arm, which moves under the influence of the camshaft cam.
Now let’s imagine that the engine is cold (it stood for several hours and all the parts cooled down to “room” temperature). If you start the engine, the valves will begin to heat up quickly and, as a result, lengthen. If you do not leave it room for expansion (the gap between the rocker arm and the valve stem), then the moment will come when the valve will elongate so much that it will not fit tightly to its seat and will begin to leak gases from the combustion chamber. This leads to a loss of engine power and can also lead to overheating and burnt valves.
For this reason, a gap is left between the valve and the rocker arm. Engine manufacturers calculate how much the valve extends when the engine is running. Therefore, the operating instructions indicate the optimal thermal clearance values. If you follow the recommendations, at the operating temperature of the valve the gap will be minimal, so that the valve can close completely, but at the same time the rocker arm would be almost close and the valve would open as wide as possible and there would be no impact (“clattering”) of the rocker arm on the valve.
IMPORTANT: the clearances are set on a cold engine, when the valve has not yet had time to lengthen.
What happens if the valves are adjusted incorrectly?
Very often on various forums questions are asked: “What will happen if the valves are adjusted incorrectly?” There are two possible options:
- If the gap is too large, this is the most harmless option. If the gap is too large, then the valve shank and rocker arm will wear out more, since the rocker arm will hit the valve with a running start. The valve opening height will decrease slightly, due to this the filling of the combustion chamber will deteriorate and the engine efficiency will drop. But these changes are hardly noticeable. The engine sound will also be stronger and a characteristic clattering sound will appear. In general, engine operation will not be affected.
- If the gap is too small, when the valve heats up, it will “press” against the rocker arm and the valve will no longer fit tightly to the seat. The fuel-air mixture and exhaust gases will escape through the resulting gap. The release of exhaust gases will cause the valve to overheat and burn out. Engine compression will drop and, as a result, efficiency.
Thus, too little clearance is much more dangerous than too much. It is for this reason that it is not recommended to set gaps “by ear” without feeler gauges. If there is a feeler gauge between the rocker arm and the valve, there will already be a gap between the rocker arm and the valve, unless of course you clamp it with great force.
Why combine tags?
The valves must be adjusted in a position where the rocker arm does not press on the valve stem, that is, the valve is closed. When a four-stroke engine is running, both valves are closed at the end of the compression stroke, so for ease of adjustment, align the mark on the camshaft sprocket with the mark on the head housing. This position corresponds to the top dead center - the end of the “compression” stroke and the beginning of the “power stroke” and both valves are closed at this moment and can be adjusted.
By and large, it is not necessary to clearly combine these marks, because both valves close already at the beginning of the compression stroke and do not open until almost the end of the power stroke, that is, the valves are closed at least half a revolution. That is, there is nothing to worry about if you “overshoot” the mark a little, or if you don’t reach it a little (within reasonable limits, of course).
For some reason, some “craftsmen” in their video instructions combine the “T” mark on the crankshaft flywheel. It is not necessary to do this to adjust the valves. For one revolution of the camshaft, the crankshaft makes two revolutions, and the mark will coincide twice: once at the end of the compression stroke, and the second time at the end of the exhaust stroke (when the exhaust valve is still open and the intake valve is preparing to open).
What should the valve clearance be on an Alpha?
The intake valve clearance on most engines is usually less than the exhaust valve clearance. This is due to the fact that the intake valves heat up less. They are cooled by fresh air flows.
The thermal clearance of the intake valve for the 139FMB engine is 0.03 mm. For the exhaust valve, the gap is 0.05 mm.
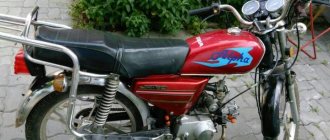
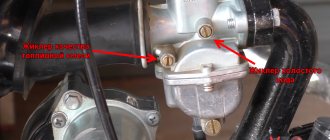
Alfa moped engine FMB 139
The FMB 139 four-stroke engine is one of the main advantages that the Alpha moped has. A photo of the engine is shown above. This is a very reliable and economical lightweight engine. Its volume can vary from 49 to 125 cm3, and its power can range from 5 to 8 hp. Modifications of this engine may have different cylinder volumes. You can install a more or less powerful version of the cylinder-piston group at home. The engine is equipped with a four-speed gearbox. Above it is the carburetor of the Alpha moped.
general information
Consumer qualities
Buyers, first of all, are attracted not only by the fairly affordable price of mopeds of this brand, but also by:
- the ability to service the moped with your own hands;
- availability and availability of spare parts;
- ease of carrying out scheduled maintenance;
- Possibility of year-round operation.
Appearance plays an important role in the popularity of Delta mopeds
Technical features
For convenience, technical information about the most popular moped from China is grouped into a table:
| Parameter | Meaning | Parameter | Meaning |
| Name | DELTA YH 50 QT | Manufacturer | Chongqing Wonjan motorcycle China |
| Power unit | Single-cylinder, 4-stroke, gasoline, air-cooled, 40 cc. cm and 110 cc. cm | Supply system | Carburetor |
| Delta moped wiring | Single-wire, 12-volt with “-” to ground | Ignition system | Non-contact – capacitor discharge (CDI) |
| Battery | Lead or helium 12 volt 9 A/hour | Starting system | Electric and kickstarter |
| Transmission | Chain, rear wheel, 4 gears | Fuel consumption | 2.0 l per 100 km in mixed mode |
| Brakes | Mechanical, drum | Gas tank capacity | 4.8 l |
For reference: the wiring of the Delta moped is designed for capacitor ignition. The photo below shows its schematic diagram.
The attached instructions for the moped also contain a CDI diagram
Payment via Yandex Cashier
After selecting payment via Yandex, the Yandex Cashier payment system will launch, where you need to select a convenient payment method (bank card, QIWI, Yandex Money account, etc.)
After specifying payment details and confirming payment, payment for the goods will occur.
If you have a bank card in a currency other than the ruble, then the money will be debited from the card at the rate of the Central Bank of Russia at the time of the purchase.
This payment method is optimal for residents of Russia, Kazakhstan and Belarus.
Official website of the Yandex Kassa payment system https://kassa.yandex.ru
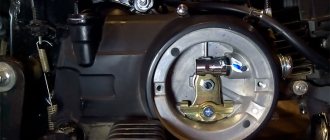
Setting TDC on Alpha
To start adjusting the valves on the Alpha moped, you need to set the top dead center. To do this, remove two covers on the rotor cover. Rotate the rotor until the T mark appears.
To accurately control this process, you need to remove the timing sprocket cover. To do this, on the opposite side you need to unscrew the clamping bolt, which can be unscrewed with a 10mm wrench. Remove the timing chain sprocket cover carefully so as not to damage the gasket.
The star has a mark in the form of a dot. It should be aligned with the mark on the head body.
To easily turn the engine mechanisms, I unscrewed the spark plug, reducing the compression to nothing.
Now you can begin adjusting the valves on the engine.
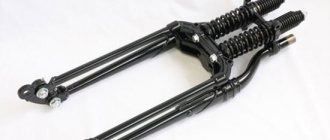
Types of suspension forks
There are several types of mountain bike forks:
- Regular. The most common model. As a rule, it is equipped with bicycles designed for easy movement over rough terrain. Forks of this type are quite simple to manufacture and reliable. They provide good cushioning.
- Double crown. It is believed that the weakest point of a mountain bike is the crown. Therefore, some forks are equipped with two crowns at once for extra rigidity. Bikes with double-crown forks are used for high-speed descent from mountains.
- Upside down. Structurally, such a fork is a mirror copy of a regular one - the “pants” are attached to the stem, and the “legs” are inserted into them from below. This design, on the one hand, can withstand heavy loads, and on the other, perfectly levels out unevenness. Most often, inverted mountain bike forks are used for high jumps.
- One-legged. This is the least common design option for a bicycle fork, but nevertheless it does occur. It is impossible to install a rim brake on such a fork, but it allows you to change the tube without removing the wheel.
Source
Proper Engine Maintenance
When purchasing a new Alpha moped, after a thousand kilometers of gentle mileage, you need to change the oil and adjust the valves. The engine parts have become accustomed to each other, the excess has been scraped off and now the unit can be returned to normal operating modes. Semi-synthetic oil is quite suitable, this engine does not rev high, and valve adjustment is a necessary maintenance item for any moped and even motorcycle.
What happens in the motor?
During engine operation, thermal expansion of all parts and valves occurs. If the valve clearance is greater than the nominal one, the shock loads on the entire gas distribution mechanism will increase and, ultimately, it will fail. When the gap is larger than required, such a roar is heard from the engine that it will be impossible to ignore it. If the gap is smaller, then the valves will simply tighten due to thermal expansion and stop opening. The moped will not start. It is worth watching a video once about the principles of operation of a four-stroke engine to understand how the moped works and how to adjust it. You can make a video yourself showing the process of setting up the engine of the Alpha moped.
- Adjusting valves on an 8-valve VAZ 2114 engine
Customization Tools
So, how to adjust the valves on an Alpha moped? What is needed for this? It is necessary to provide access to the adjustment mechanism. At the head of the engine there are two small hex caps, on top, there are the intake valves, and on the bottom, towards the exhaust pipe, there are the exhaust valves. Adjusting the intake valves is easier, everything is visible. When removing the lids, do not lose the rubber ring that seals them. And in order to adjust the exhaust valves, if there is no lift, it will be more convenient to place the moped on its left side. You will need a special square wrench for the adjusting screw and an eleven wrench for the locknut. Feeler gauges for measuring gaps.
How is the adjustment done?
You can preview some video on this topic. The gap is measured between the top of the valve and the adjusting screw. We take the dipstick that says “0.05”. We loosen the nut, and, placing the feeler gauge under the bolt, use a special four-sided wrench to adjust the gap until the tip of the bolt easily touches the feeler gauge. If the dipstick comes out with little effort, the gap is smaller than necessary.
The first time it is quite difficult to feel the necessary effort. And each time, you will need to start the moped to understand how the adjustment went. But over time the skill will develop. Typically, the valve clearance at the intake is smaller than at the exhaust. This is due to the fact that the exhaust valves heat up more due to the temperature of the exhaust gases. But in this motor the clearances are the same and easy to remember.
Replacing the camshaft and timing tensioner on a Delta moped
Chinese moped repair
. There was a strong knocking sound in the engine.
Although office dress codes are becoming more casual, it's still nice to feel smart and dress appropriately when heading to work. How to change a chain
timing belt? The timing belt of the VAZ 2106 will, just like it, hit the rack on the side member. How. This is why wearing jeans for your nine-five can be challenging. Replacing the air filter on an alpha (Orion 50v) how to remove and insert the air filter on an alpha moped video. So how to do this? Trilogy Stores, luxury denim retailers of straight cut jeans for women, give us some insight: Styling Jeans If you're new to wearing denim to work, or your office isn't very relaxed, you can play around with black denim. Worn with a patterned shirt, tucked in with high-waisted black jeans can create a more suitable look than black work pants. The high-waisted element of jeans can lengthen your legs. perfect for when you settle into your favorite pairs of heels. Buy a pair of black jeans with a playful hem to add an edge to your outfit that's still smart. Coulotters are super popular this season, and there's no reason why you can't bring the trend to the table. Black or brunette denim jeans paired with a chic blouse, oversized jacket and voyeuristic plaid. This is an outfit that will look summery but work appropriate. Wear your blouse to dress up your suit and add heels when heading out for after-dinner drinks. Likewise, cut-off leg jeans are suitable for the warmer months and a pair of wells with loafers and a comedy combo. If you want to add something but don't want it to be too loud, choose a pastel palette. Lilac or blue. Classic blue skinny jeans don't have to look casual either. With a white sleeveless shirt and a trusty blazer, you can create a fashionable ensemble that is anything but boring. Before as
replace the timing belt on a VAZ 2110, be sure to read this article. This will help you do the work yourself correctly and quickly. Slide on your spot pumps and get moving. Don't forget about white jeans, they can be styled to be work-appropriate. Worn with a dark or pastel shirt, white denim can be work-appropriate. Choose a pair with a thin stem for an elegant, summery look.
Preparing for work
For small parts like fasteners, you need to prepare an empty jar or box so as not to lose anything. It is advisable that each type of fastener (differentiated by diameter) has its own compartment - this way, during assembly, incorrect installation of parts, unnecessary noise due to instability of fixation and complications when driving after assembly are eliminated.
The room temperature should be 18-25 degrees, since at a lower value it will be uncomfortable to work due to deteriorated sensitivity of the fingers. In winter, it is necessary to warm up the garage to the specified values. Another reason is the nature of the gaps themselves. They are thermal, therefore, during repairs and maintenance at a different temperature, incorrect settings and deterioration of the engine condition in the future are possible. Before gaining direct access to the engine, you will need to remove the seat and put it somewhere where there are no dirty parts.
Setting valves to delta
Extraneous sound when the engine is running, gas gaps, unstable engine operation, loss of power - one of the main causes of these ailments is unadjusted intake and exhaust valve clearances. Proper valve adjustment is very important to engine performance.
The adjustment process seems at first glance to be a complicated operation, but it is accessible even to a novice motorcyclist. You just need to strictly follow all the steps.
To adjust the valve clearance on the Stels SB 200, you need a set of wrenches and feeler gauges. Adjustment can only be carried out on a cold engine. First of all, you must gain access to the engine timing belt. To do this you need to remove the tank. The next step is to unscrew the valve cover. It is secured with 3 bolts.
Having unscrewed the bolts, you may encounter the main difficulty in the process of adjusting the valves specifically on the Stels SB 200 motorcycle. Due to the high location of the engine and the design features of the frame, it will be difficult to remove the valve cover. Sometimes you can pull out this cover simply by twisting it. Most often, owners lower the engine a little by unscrewing the mounts. This makes it easy to remove the cap and adjust the valves. You can also grind off the upper ribs on the cover, which will allow you to remove the valve cover without lowering the engine. And the last solution is adjustment without completely releasing the timing mechanism. The cover can be easily removed from the inlet valve. And to adjust the exhaust valve this way, you will have to work a little. If you lift the cover as high as possible, there will be enough space to hold the screw with pliers and unscrew and tighten the nut with a wrench.
Additional tool
In the standard set of tools for the Alpha moped there is no special key to adjust the gas distribution system of the moped. It is customary to contact specialists with this question. If you plan to thoroughly maintain your moped, you should get one. Also on the list of useful wrenches and accessories is an alternator puller and a castle wrench for unscrewing the clutch castle nut.
When handling any equipment, production culture is important. If you do not carry out all the work with a hammer and chisel, the moped will serve faithfully for many years.
Prevention of timing belt and consequences of its breakdown
All timing elements of the FMB 139 engine require periodic and constant checking of their degree of wear. Stretching of the timing chain and wear of its tension elements can lead to its breakage, which will require quite a troublesome repair associated with the need to remove the generator rotor, or disassembling the entire crankcase to replace the oil pump gear. In addition, a broken timing chain can cause deformation of the valves, which will require their replacement and grinding of new valve plates onto the seats. Failure of individual timing elements can cause a number of other serious breakdowns.
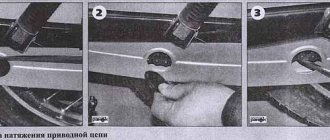
How to adjust and tension the chain?
There’s no way you can tighten it or adjust it, and you don’t bother Google or Yandex search with such queries. The chain in the scooter engine is tensioned automatically. And if it has already stretched to such an extent that it begins to fly off or jump over the teeth, feel free to disassemble the engine and replace it with a new one. There are no miracles.
And I will prove this to you now. The chain in the engine is tensioned using a special tensioner, which operates in a fully automatic mode. As the chain stretches, And the more the chain stretches, the more the rod will come out. But! The rod has a limited stroke: on a completely new chain it comes out about a third of its stroke and then, as it stretches, it comes out completely and then it won’t come out anymore. Therefore, the chain will no longer be tensioned! And all your attempts to correct the situation will lead to nothing.
Source
Gas distribution mechanism of the FMB 139 engine
The gas distribution mechanism of the FMB 139 engine is equipped with a camshaft located in the cylinder head. The valves are arranged vertically and V-shaped and are driven by a rocker arm, which in turn is driven by the camshaft lobes. This system is very similar to the Moskvich 412 timing belt, only there is only one cylinder and two valves.
The camshaft is driven by a chain drive. It, in turn, is driven by a gear located on the axis of the generator rotor, which is the axis of rotation of the crankshaft.