Before you start adjusting the valves
Therefore, after purchasing a new Alpha RX, I checked the valve clearance. For this procedure I had to buy a set of probes. In our case, you will need a probe with a thickness of 0.05 mm.
In order to calmly begin adjusting the valves, I had to unscrew the safety bars. For this we need a key of 8.
To get to the valves, you need to unscrew the valve covers located on the top and bottom of the cylinder head. To do this we need a 17 wrench. I used a spanner.
Setting TDC on Alpha
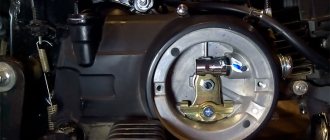
To start adjusting the valves on the Alpha moped, you need to set the top dead center. To do this, remove two covers on the rotor cover. Rotate the rotor until the T mark appears.
To accurately control this process, you need to remove the timing sprocket cover. To do this, on the opposite side you need to unscrew the clamping bolt, which can be unscrewed with a 10mm wrench. Remove the timing chain sprocket cover carefully so as not to damage the gasket.
The star has a mark in the form of a dot. It should be aligned with the mark on the head body.
To easily turn the engine mechanisms, I unscrewed the spark plug, reducing the compression to nothing.
Now you can begin adjusting the valves on the engine.
Let's start adjusting the valves
Let's start with the intake valve, which is located at the top of the cylinder head. We'll need a key for 9. Yes! Not 8, not 10, but 9! Good thing I had a set of sockets in the car. But it is better to use a spanner wrench, which conveniently unscrews the pusher fixing nut on the rocker arm.
Then we need a feeler gauge with a thickness of 0.05 mm, which must be inserted between the pusher and the valve stem. By rotating the pusher, we reduce or increase the thermal gap until the probe moves with slight tension. After tightening the fixing nut, we again check the gap with a feeler gauge, which could have gone astray.
In a similar way, we begin adjusting the exhaust valve.
Valve adjustment on Alpha
I want to touch on an interesting topic that everyone has heard about, but not everyone understands its essence - let's talk about valve adjustment.
A little theory.
First, a little theory. Where did the need to adjust the valves come from and why is the thermal gap needed?
Any four-stroke engine has at least two valves: an intake valve, through which the working mixture enters the combustion chamber, and an exhaust valve, through which exhaust gases exit. Part of the valve is constantly located in the combustion chamber and therefore the valve becomes very hot. And as we know from school physics courses, bodies expand when heated. Moreover, the stronger the heating, the greater the expansion.
The valves in the engine are always in a “spring-loaded” state, while the valve plate is pressed very tightly to its seat - the valve seat. This ensures that the valve closes tightly.
To open the valve, you need to press on it. In our case, the valve is pressed by a rocker arm, which moves under the influence of the camshaft cam.
Now let’s imagine that the engine is cold (it stood for several hours and all the parts cooled down to “room” temperature). If you start the engine, the valves will begin to heat up quickly and, as a result, lengthen. If you do not leave it room for expansion (the gap between the rocker arm and the valve stem), then the moment will come when the valve will elongate so much that it will not fit tightly to its seat and will begin to leak gases from the combustion chamber. This leads to a loss of engine power and can also lead to overheating and burnt valves.
IMPORTANT: the gaps are set on a cold engine , when the valve has not yet had time to lengthen.
What happens if the valves are adjusted incorrectly?
Very often on various forums questions are asked: “What will happen if the valves are adjusted incorrectly?” There are two possible options:
Thus, too little clearance is much more dangerous than too much. It is for this reason that it is not recommended to set gaps “by ear” without feeler gauges. If there is a feeler gauge between the rocker arm and the valve, there will already be a gap between the rocker arm and the valve, unless of course you clamp it with great force.
Why combine tags?
The valves must be adjusted in a position where the rocker arm does not press on the valve stem, that is, the valve is closed. When a four-stroke engine is running, both valves are closed at the end of the compression stroke, so for ease of adjustment, align the mark on the camshaft sprocket with the mark on the head housing. This position corresponds to the top dead center - the end of the “compression” stroke and the beginning of the “power stroke” and both valves are closed at this moment and can be adjusted.
Preparatory work
It is imperative to clean the chain, otherwise tensioning will not work. There is grease on metal surfaces, and dust accumulates on top over time. These contaminants cannot be washed off in ordinary water; you need to use auto chemicals. It is better to choose a product in the form of an aerosol that will not corrode the seals - chain O-rings
If the mechanism is heavily dirty, it is advisable to remove the cover from the drive sprocket. It is important to ensure that the retaining nut is well tightened. The cleaning itself is carried out as follows:
Cleaning the moped chain Now you need to determine the degree of wear of the elements. The chain links should not jam, ideally they move easily. It is also necessary to check the presence and condition of the seals. The sprocket teeth must not be bent, pointed or damaged. Wear on the tooth surfaces may be associated with improper installation of the rear wheel.
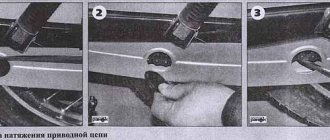
To determine the condition of the chain, you need to check whether there are areas where the tension is too high or, conversely, weak. To do this, you need to manually turn the wheel. If such areas are present, it means that the bushings and pins have worn unevenly. In this case, the distance between the pins increases and the chain becomes longer.
Severely worn chain
Often the cause of the appearance of sections with different tensions are problems with other components of the moped. The sprockets may be installed with an incorrectly centered hole or the wrong diameter. Uneven tension may be due to severe wear on the wheel hub or failure of the sprocket hub bearings. But other damage may also be discovered, so it is important to carry out a thorough inspection.
It is easy to determine the degree of wear by the length of the chain. To do this you need to pull it back. It is important to try to pull the chain off the sprocket at the same time. Replacement is required when, when attempting to remove, most of the sprocket tooth becomes visible. If the chain rollers are bent and squeak when driving, it is better to change the part along with the sprockets.
After cleaning, you need to align the rear wheel. This is an easy task if the axis is marked. But the marks sometimes get confused, so additional checking is necessary. As the rear wheel rotates, you need to shine a flashlight and pay attention to the chain. If it does not move straight, it means the installation was not done correctly.
Valve adjustment on Alpha:
Thank you! I finally found an article where everything was explained in detail about valve adjustment, and I learned a lot of useful things for myself.
The exhaust valve requires different clearances.
Thank you for your comment. I checked the instructions for my moped: yes, indeed the gap is 0.03 mm for the intake valve and 0.05 mm for the exhaust valve. Corrected the article.
the authors made me laugh))))) first write that “By and large, it is not necessary to clearly combine these marks, because both valves close already at the beginning of the compression stroke and do not open until almost the end of the power stroke, that is, at least half a turn the valves are closed.”, and then write the standard instruction “4. By rotating the crankshaft, we align the mark on the head sprocket with the mark on the head body. ..." IMHO it is necessary to set marks in any case to prevent the timing chain from being pulled out
What's so funny? I wrote that there is no point in looking at the mark on the crankshaft; it is enough to align the mark on the head to be sure that the valves are closed. And by half a revolution I mean crankshaft revolutions. I don’t argue that it is sometimes necessary to check whether the crankshaft marks match, especially when there are problems with the engine’s operation. But this has nothing to do with valve adjustment.
Timofey, you are right….that’s what marks exist for, to tune in to them.
These marks are needed to check and correctly install the timing chain. If, when adjusting the valves, you accidentally slightly overshoot the mark, it’s not a big deal. This was exactly the point of the paragraph about marks.
Guys, I encountered the same problem. When assembling there are 4 guides. Two short and two longer. Where to put which ones? Who knows, write thanks
short ones between the engine and the cylinder and long ones between the cylinder head
Timofey, you are right….that’s what marks exist for, to tune in to them.
the author clearly described everything and about the marks, too, the main thing is that both valves are closed and criticism here is not appropriate at all;
“You can't trust anyone. Absolutely no one. But I can"