Peculiarities
There is a wide range of snowmobile skis on the market, but before you buy, you need to study their features and the suspension design of your model. Suspension mechanics and travel, strut and shock height, ski size and other components all affect the stability and handling feel of your snowmobile.
Snowmobile suspensions most often come in three types:
- lever (DSA, ADSA, RAS);
- telescopic (candle);
- spring
Most imported models are equipped with a wishbone front suspension with an A- or V-shaped link, ensuring a smooth ride and maneuverability. The disadvantages are that the dimensions of the levers have a large track width (almost equal to the body), which means that the sled can easily run into hidden obstacles in the form of stumps, sharp boulders, reinforcement, and the like. Skis run the risk of bending even from a small impact, which can be very difficult to avoid in wooded areas.
But “telescopes” are much more difficult to damage, and they are much narrower (not so wide). That is, in fact, the spark plug design travels well in a straight line, easily overcoming small obstacles and bushes - for those who like extreme sports and a lot of steering, it is not suitable.
Important: the levers, unlike the telescopic suspension, are completely repairable even with the use of non-original spare parts and can be adjusted to your own taste. Particularly pleasing is the opportunity to make the necessary part yourself using a simple tool (grinder and welding)
Its second function is to protect the plastic toe from cracks under high loads and collisions with obstacles. The skate is located under the ski and has a particularly strong pobedit soldering for moving on asphalt, ice and other hard surfaces. Its fastening is held on by bolts and is also subject to replacement.
Generally speaking, skis are designed strictly to suit their application. This is where their size and shape come from. Depending on the type of terrain in which you plan to ride, you can choose snowmobiles for sports, mountain, tourism, children's and utilitarian purposes (for sleds and cargo).
According to the type of design, they are divided into single-track with two skis (all imported manufacturers, such as Yamaha, Polaris, Arctic Cat, Ski-Doo and others) or two-track with one (domestic brands “Buran”, “Ermak”, “Eger”, "Freezing"). Thus, formally they all stand on 3 points of support, but the physics of driving has its own characteristic features.
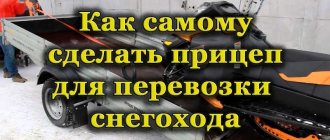
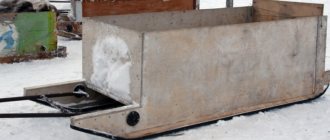
Do-it-yourself sled-drags
With the right approach, homemade drags can be much stronger than factory ones. Despite the fact that the sled is made of durable frost-resistant plastic alloy, it is still not as wear-resistant as metal.
Plastic drags can be rubbed or broken on stone, asphalt and other hard obstacles and surfaces. In addition, the metal hitch fastenings of purchased models are usually of low quality? Bolts often become loose and connections become loose, which can lead to the loss of the sled.
When developing your own homemade drags, you can take all these nuances into account. Recently, a sled made of lightweight metal profiled pipe and plywood has become a very popular model of homemade drag sleds.
Their structure, as befits a skid, is very simple: a metal frame mounted on skids.
In order to make homemade drag sleds, start making a frame. To do this, you will need a welding machine, a grinder, drills and the necessary materials: a profiled pipe for the frame and drawbar, as well as plywood.
Take a lined square profiled pipe, say 20 by 20 mm in size and 2 mm thick (no less). You can make a frame with your own hands measuring 1900 x 300 x 900 mm.
The front needs to be rounded for better cross-country ability of the sled. There you need to weld a steel sheet to give the entire structure more stability.
After the skis and drawbar are ready, the hull is sheathed with thick plywood
It is important that the distance between the crossbars of the body does not exceed 400 mm and the plywood, bending, does not break
To make a drawbar with your own hands? steel coupling between the towing vehicle and the drags? two lightweight steel pipes with a diameter of 20 mm and a total length of 1700 mm are used. To ensure a strong connection, you need to make two crossbars with a cross-section of 20 mm.
To make a drawbar with your own hands, you use a rectangular pipe, but we used a round pipe. In order for the hitch to withstand additional loads and be protected from bending, it is necessary to weld a metal sheet into which a bushing with a diameter of 25–30 mm is cut.
Skis for a homemade sled can be made from sheet metal or using long plastic pipes.
Expert opinion Smirnov Alexander Stanislavovich Wilderness survival instructor. More than 15 years of teaching experience
You can weld metal fasteners for the seat into a metal frame with your own hands, which is not available in purchased sled models. You can make sure that if necessary, for example, to tow a broken motorized dog, the seat can be easily removed.
Depending on your needs, you can make the sides lower or higher, modify the hitch with the towing vehicle and provide mounts for fishing gear, etc.
Well, plus everything, a homemade sled? This is an opportunity to save some money.
So, as we have seen, there is nothing difficult about making a drag sled yourself. You just need to have the necessary materials, tools and desire at hand. In this way, defects and weaknesses of purchased models can be avoided. In addition, homemade drags are much stronger than purchased plastic ones.
Greetings! In continuation of the previous article about a motorized towing vehicle on wooden slides, we will consider creating a homemade drag sled for it. Initially, it was planned to simply buy ready-made plastic drags, but later, after purchasing a sheet of galvanized iron, it turned out that it was just enough for both a motorized towing vehicle and drags.
Therefore, it was decided to buy some additional steel profile and spend several hours building the sled. Now first things first...
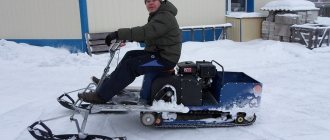
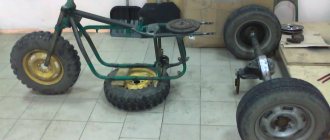
A simple snowmobile in one weekend
Since the engine was going to use 6-10 l / s, and the mass of the snowmobile should be small, I categorically categorically refused a genuine track for snowmobiles. I was going to make a caterpillar myself, about 4 meters long and 50 cm wide, but I was by no means able to purchase a suitable size conveyor belt, I had to make a shorter caterpillar about 2.7 m long. The width of the caterpillar was 47cm. To make the caterpillar, I made a jig, which I used to make holes in the conveyor belt with a feather drill.
In the store I purchased four wheels from a trolley with bearings, two soft stars from BURAN, and two 205 bearings for the drive shaft, a plastic pipe with a diameter of 40 mm. 8 meters long, I found everything else for building a snowmobile in the barn, a 25X25mm square pipe from an old office desk for the frame, trimming corners, water pipes and couplings.
I made drawings for the turner and a week later they made the necessary parts for me. The assembly process is clear from the photographs, everything is very simple, and the principle of operation of the future snowmobile is approximately the same: on a hard surface (rolled tracks) the snowmobile moves on wheels, the ski, which is located inside the track, does not touch the tracks, only its sides prevent the track from moving to the side, thereby There is no additional load and wear on the tracks without lubricating the tracks with snow, and in loose snow the emphasis is on the ski.
During the first day off, I made a caterpillar and a drive shaft, secured it to the frame, since the turner did not have time to make shafts for the wheels.
I made the rotation of the skis very simple; I welded water couplings to the transverse beam of the frame; they screwed into them the brackets with the mount for the skis and steering rod. Therefore, everything is very simple and reliable, no bushings or turning work, only the presence of solid oil and a long service life are ensured, and by turning and screwing in the squeegee, you can adjust the height of the ski stand.
The front wheels are fastened without adjustment, the rear wheels are fastened by moving the axle and the track is tensioned.
The steering rod is solid and not adjustable (this is a temporary option)
Adjusting the chain by moving the engine.
SEE THE PHOTOS (WHEN YOU CLICK ON THE PHOTO THEY ENLARGER)
Calculation and assembly of caterpillars
The caterpillar is a tape, on the outer surface of which tracks are attached. Tracks are rigid lugs installed along the entire length of the tracks. Track options:
- Made from 3mm thick transport tape.
- From a car tire.
- From V-belts.
- Ready-made factory-made tracks.
The conveyor belt must be looped. Its strength is only sufficient for light snowmobiles with engines no more powerful than 10 liters. With. Car tires are stronger than tape and are suitable for powerful engines. Solid tires do not need to be looped, so the likelihood of a rupture is minimal. It is more difficult to choose a tire of the required length than a tape.
Finished tracks are removed from other similar equipment (snowmobiles “Buran”, “Sherkhan”). They are equipped with lugs from the factory. The products are not suitable for use with low-power motors from walk-behind tractors. Homemade snowmobiles made from Buranovsky tracks must have gears from the same “donor”.
The size of the caterpillar is selected according to the required driving characteristics: the larger the width, the lower the handling, but the higher the maneuverability. The minimum area of the contact patch from the snowmobile (skis and tracks) must be such that the pressure from the equipped vehicle does not exceed 0.4 kg/cm2 of surface. Light snowmobiles use a 300 mm wide conveyor belt, cut lengthwise into 2 strips of 150 mm each.
Important Mini roll and bale hay balers
Preparing the Tape
The tracks are attached to homemade tracks with M6 bolts with a wide head. The bolts are fixed with a nut, a washer and a groover are used. Before fastening, leading holes with a diameter of 6 mm are drilled in the tape and tracks. When drilling, use a jig and wood drills with special sharpening.
The conveyor belt is also looped with M6 bolts. To do this, the edges of the tapes are overlapped with an overlap of 3-5 cm, the connection contains 1-2 rows of bolts. For a 150 mm wide track, the following distances are maintained:
- From the edge of the tape 15-20 mm.
- Between bolts on tracks 100-120 mm.
- Between the bolts when banding 25-30 mm.
Homemade lugs
The tracks are made of polyethylene pipe with a diameter of 40 mm with a wall thickness of 5 mm, sawn in half in the longitudinal direction. The entire section of the lug is adjacent to the tape. In light snowmobiles, one track connects the tracked pair. With a track width of 150 mm, the track length is 450-500 mm.
The lugs are cut using a wood circular saw. They use a special machine with two guides (metal and wood), rigidly fixed on a fixed tabletop. The walls of the pipes are sawed one by one.
The distance between the tracks depends on the parameters of the gears on the drive shaft. Typically 5−7 cm. The specified distance is maintained with an error of no more than 3 mm. Otherwise, the operation of the drive is disrupted: the lugs “run” onto the teeth of the drive wheels, the caterpillar begins to slip and fly off the rollers.
Manufacturing of structural elements
Before starting to manufacture structural elements, prepare a drawing, required materials and tools. You can take ready-made drawings based on the Bullfinch or Vepr snowmobiles. Tools you will need:
- welding machine;
- pipe bender or finished frame;
- hammer;
- screwdrivers.
Read also: DIY essential oil at home
Since the design of the mini snowmobile is low, the seat is made of durable waterproof material. The fuel tank is made of metal. Its volume should be from 10 to 15 liters. You can use a motorcycle chain as a drive.
How to make a snowmobile track
A snowmobile track is created from tires or conveyor belt. The work will be difficult and time-consuming if tires are used as the basis. The sides are cut out of them, so the work requires a sharp shoe knife or an electric jigsaw. To facilitate the process, tires are selected with a suitable tread pattern. Making a homemade caterpillar:
- The sides of the tire are cut out with a knife. If the knife blade is periodically moistened in a soapy solution, the cutting process will become easier. When using an electric jigsaw, install a blade with small teeth and moisten it with water.
- If, when cutting, the track turns out to be hard or extra layers have formed on the wrong side, they are also cut off.
- Cutting a new structure is done when there is a mismatch in the tread pattern. The structure made must cling to the soil, so the structure of the pattern must be correct.
A caterpillar made according to this design is quite reliable due to the fact that it has a closed loop. Its disadvantage is its narrow width. To make a larger size, it is doubled. If the caterpillar is made from a conveyor belt, then it is combined into a single ring. This can be done in 2 ways:
- like a piano hinge (with a hinge);
- ribbon stripes.
You need to choose the appropriate thickness of the tape if it is sewn on. Its thickness should be suitable for the engine power. A homemade snowmobile from an IZH motorcycle requires the use of a 10 mm thick tape. To increase the service life of the snowmobile, the edges of the conveyor belt are stitched with fishing line. The seams are made according to the method of overcasting the edges with an interval of 1 cm.
Tackles
A trolley is a movable platform that protects the chassis of equipment from unnecessary mechanical loads. The platform is used when it is necessary to drive a snowmobile into a garage. For its manufacture, a metal pipe of medium diameter (6×6 mm), rollers and a bearing system are used. The wheels are installed with rubber coating and metal discs. Their diameter must correspond to the weight of the equipment.
Snowmobile skis consist of a base, a shock-absorbing part, a rod, a fork and bipod, and a link leg. Skis can be made in different designs from different materials. If plastic linings are used for the base, they are supplemented with expanders. The extensions are mounted with fastenings to the snowmobile chassis. The plastic design is suitable for small equipment. For large and medium-sized snowmobiles, you will need metal skis.
- To give the skis a shape, cut out the base from a cardboard stencil. At the same time, a bend is formed in front. The amount of bending is done at your own discretion. A ski track with a large bend glides poorly and collects snow. And this creates unnecessary braking. Therefore, you should not make it too large. The approximate size of the ski track is 2.5 cm wide and 100 cm long.
- A pipe is welded along the edges of each part. This gives additional rigidity to the product and protects it from stones that come along the way.
- Where the bend passes, the pipe is welded along the contour.
- Shock-absorbing parts are fixed to the skis. Bolts are used as fastening elements.
- The platform and the nose of the skis are connected by a hydraulic pipe. The top part is ready.
- For the lower part, the hydraulic pipe is fixed at 4 points and compressed.
- Then the polyethylene pipe is attached with self-tapping screws, having previously cut it. Instead of a polyethylene pipe, you can use polypropylene.
Finished skis must be painted.
Slimes
Slides are removable guides along which the snowmobile track slides. They prevent the track from sagging between the wheels and protect it from abrasion. Snowmobile slicks can be purchased at a store or made from a water pipe. The thickness of the pipe should be about 10 mm. Strips are made from it and mounted to the runners.
Rollers
Rollers are the supporting elements of the tracked undercarriage system. They create tight contact between the track and the surface of the ground support. Steel sheets are used as supports.
Variable speed drive
A variator is a special mechanism that allows you to smoothly regulate speed in mini snowmobiles. Safari is the most popular CVT. It consists of 2 pulleys: driven and driving, therefore it is capable of adjusting 2 parameters. These are revolutions and movement resistance. The pulley will operate like a clutch if the engine speed reaches 2200 rpm. In this case, the engine and the reverse shaft are disconnected.
Engine
To make a snowmobile powerful, you need to choose a powerful engine. The best engines for assembling a snowmobile are Lifan type engines with a power of 15 hp. With. This model is equipped with a reduction gearbox and has a centrifugal automatic clutch.
Read also What can be mulched with sawdust
Chassis and suspension
The rear and front suspensions are the shock-absorbing system of the snowmobile. The front suspension creates smooth movement for the chassis. At the same time, the driver does not feel any vibrations on uneven roads.
If you choose a suspension based on the principle of operation, then the telescopic one is the most popular.
It consists of a shock absorber and a spring. These parts are located in the rack and eliminate shock loads. Snowmobiles equipped with this suspension are agile in conditions with dense vegetation and trees.
Each snowmobile is equipped with a frame. This part can be borrowed from a moped, scooter or ATV, or welded from pipes. The pipe diameter must be more than 40 mm.
What are they?
In the good old days, metal skis were churned out by the thousands and fitted to virtually every model, and on spring sleds the design of the skis was not particularly important. For many years now, manufacturers have partnered with various snowmobile parts suppliers, who are constantly developing new models of plastic skis with improved performance. The use of high-tech plastic options allows the skis to flex to stay on track.
Some are suitable only for one specific model with the corresponding marking, while others have a more universal device for wide use. Efficient winter driving depends on proper design and provides improved handling in all conditions.
The weight of each plastic ski is about 2 kg, width from 130 mm, length from 1 meter. At the same time, the supporting area is about 1 m2, which makes it possible to demonstrate surprisingly high cross-country ability in powder. The thermoplastic from which they are made has unique properties, great flexibility and the ability to take on most of the load upon impact.
General rules of constructions
Homemade products for driving on snow are varied in appearance, size, layout, power, and even the principle of movement. But in each variety there are components that provide the properties necessary for snowmobiles, namely:
- Don't fall into the snow.
- Move along the surface with minimal friction and in the desired direction.
Obviously, the probability of sinking into the snow and the friction force depend on the weight of the unit, the contact area, and the shape of the surface of contact with the snow. Of course, the condition of the snow has its influence, but this must be taken into account.
To fulfill its main purpose, the following components are always present in the design of a snowmobile:
- supports in the form of runners, wheels or tracks to support the weight of the structure with passengers on the snow surface;
- engine with gearbox, transmission device and fuel tank;
- movers pushing the structure along the snow surface;
- steering device that changes the vector of interaction with snow for turning;
- frame on which all components are mounted.
Making homemade products is simplified by the availability of parts from specialized equipment. Often spare parts are taken from Buran snowmobiles or any tools and vehicles with a motor - scooters, motorcycles, walk-behind tractors. The scope for creativity when creating each node is huge. There are many varied and proven solutions for every detail.
Homemade snowmobile sled made from plastic pipes: 10 steps to your dream
Polymer pipes are a universal material that is perfect for installing water supply, sewerage and heating systems in a house or apartment.
However, in the hands of a home craftsman who has remarkable imagination and an insatiable desire to make something on his own, PVC parts can turn into quite intricate, but no less useful products.
For example, in a snowmobile sled made of plastic pipes, the manufacturing process of which will be discussed below.
You can make a sled from plastic pipes yourself
Volokushi
A very common type of sled. Their design is extremely simple. They are sold in all specialized travel stores and are relatively inexpensive.
Dragging trucks have one big drawback - due to their characteristics, their leading edge and coupling device are often damaged.
But there are also advantages:
- little weight;
- low center of gravity;
- fast loading and unloading of luggage;
- no freezing of the body;
- the ability to transport small cargo by water.
Volokushis are absolutely not intended for transporting people. The entire surface of the body is in contact with snow, and therefore it is not possible to install shock absorbers. In addition, unlike models with skis, these sleds absorb the impacts of stones, snowdrifts and unevenness with the entire body, which undoubtedly affects comfort.
Sleigh-drag
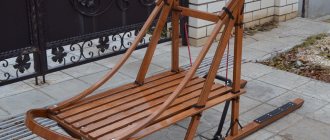
Passenger
They are not very common in our country due to the lack of appropriate infrastructure (equipped snow trails and parking areas). Often such sleds are made independently by winter fishing enthusiasts.
They are a plastic or plywood body mounted on skids. The cabin can be equipped with a heater and lighting fixtures.
The disadvantage is the heavy weight, so for transportation you need to use powerful snowmobiles equipped with a four-stroke power unit.
Passenger sled for snowmobile
Design features of the sled
Before you begin design work, you need to understand what basic elements the sled consists of. The fact is that the manufacturing process includes several stages, at each of which some key part is made.
It is necessary that you have a good understanding of the purpose of each of them:
The main part of any sled is the frame, which is the basic supporting element for the entire structure. It must be as strong as possible, since the following depends on it:
- safety of operation of homemade sleds;
- duration of trouble-free operation;
- reliability of the device as a whole.
Considering that the snowmobile sled will be used in difficult conditions, the frame must be able to withstand negative ambient temperatures, as well as the impacts that the sled is constantly exposed to when driving through forests or bushes.
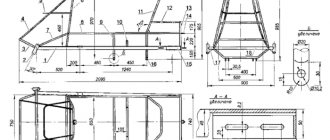
Sleigh design: 1 – frame, 2 – runners, 3 – racks, 4 – soldering point
Otherwise, you will be unpleasantly surprised when the loaded sleigh falls apart while riding and dumps all your belongings on the snow in the middle of a forest clearing.
The second important element is the runners. Strength is also very important here, however, another important detail is ease of control. This determines whether the sled will tip over when cornering or not.
The last point is the dimensions of the structure. This parameter is selected individually based on the tasks that are supposed to be solved with its help.
The sled may be small, but maneuverable and light. Or it will be a durable, reliable structure designed to move significant loads. You decide.
Important What licenses are needed to drive a snowmobile and is vehicle registration required?
Tools and materials
Once you have decided on the sizes, you can start working.
In order to make a snowmobile sled from PVC pipes, you will need the following tools and materials:
- polymer pipes for sleds (they can be purchased at the store, but you can also use old ones left over after repairing or dismantling an old water supply system);
- a hacksaw or special scissors for cutting plastic pipes;
- apparatus for welding pipes and fittings;
- an industrial hair dryer, with which plastic pipes will be heated and bent;
- sharp mechanic's knife;
- sanding paper, file;
- marker for marking parts;
- bolts and nuts for securing parts;
- metal corners that will strengthen the assembly points.
Plastic pipes for making sleds
How to assemble a snowmobile
Having all the necessary spare parts and drawings on hand, you can begin assembling the snowmobile. In general, the work on making a car will take several weeks, so it’s worth starting it long before your first hunting trip. The first stage is planning and searching for suitable spare parts. It is better to order complex components from a professional turner if you do not have the necessary equipment or work experience; Welding the frame - even an amateur can do this, the main thing is to use durable material; Assemble the track block; The frame must be connected to the track unit and the engine; Next, the steering column is assembled and the controls are connected; The body, frame and skis, if they are made of wood, must be covered with enamel. The final result must be tested in a safe area with close to maximum loads. Having successfully completed this stage, you can go hunting.
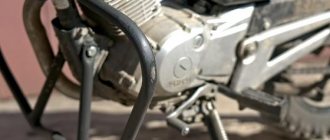
It will make assembly very easy if you have a donor vehicle from which you can remove most of the components for the future snowmobile. An old snowmobile, a motorcycle (in this case, you don’t even have to redo the frame), a walk-behind tractor, a motorized towing vehicle, or even a chainsaw (although the snowmobile will be very low-powered) is most suitable for this role.
Blueprints
Before you start building a trailer, you should carefully consider its purpose. The size of the device largely depends on this. In this case, the parameters of the trailer must match the specific walk-behind tractor to make it convenient to use them together. Based on the power of walk-behind tractors, the following types of trailers are distinguished:
- lungs;
- average;
- heavy.
Motoblocks with power up to 5 liters. With. fits well with trailers on one axle. The body of such devices has a maximum size of 1 by 1.15 meters and is considered lightweight. Medium trailers are suitable for walk-behind tractors with a capacity of 5 to 10 hp. With. The dimensions of such devices can be 1 by 1.5 meters or 1.1 by 1.4 meters. They are designed to transport cargo weighing from 300 to 500 kg.
For cultivators with a power of 10 HP. With. It is best to use a body with two axles. Its dimensions will be approximately 1.2 by 2 meters. In such a trailer it will be possible to transport cargo weighing up to 1 ton. These are the ones that are considered heavy.
A simple trailer consists of the following basic components:
- carrier, consisting of several parts;
- durable frame;
- convenient body with frame;
- wheels of the correct size.
The carrier includes such parts as a housing for the unit responsible for turning, a pipe drawbar, a footrest frame, a pipe stop, ribs for rigidity, and overhead parts in the form of strips. The parts are usually connected using a welding machine. The greatest load falls on the place where the drawbar connects to the swivel unit. It is this that needs to be well reinforced using stiffening ribs.
The frame is most often made of steel, or, more precisely, rods (pipes), the diameter of which is at least 3 cm. Connections on the frame are made using welding, gussets, side members, supports at the corners, and a longitudinal hinge body. Each frame must include a number of features depending on the terrain where it will be used: for example, holes, humps and much more.
The body can be made of both metal and wood. It can be solid or made of twigs.
In order to make a wheel axle, you should use a steel rod. Its diameter should be approximately 3 cm, and its length should be about 1.07 m. These parameters are best suited and do not allow the wheels to protrude beyond the trailer body. As for the wheels, they are suitable for almost any vehicle. The main thing is that they fit the design in size.
When preparing, it is necessary to take into account that the scheme includes a number of subtleties. An important point is the presence of not only main, but also auxiliary units
It is also important to choose in advance the method by which the knots will be fastened
Other creation options
There are other ways to build a snowmobile using skis or a crawler rear. These makeshift snowmobiles and snowbikes use bicycle wheels.
Snowmobile from scooter
One of the simplest homemade options you can create yourself from any scooter or moped. The only differences here are the frames, the sizes of the tracks, and other parts. Such a snowmobile is unlikely to be powerful and will have difficulty moving through snow-covered snowdrifts. Therefore, they use wheels of a smaller diameter and increase the frame. This homemade moped moves well on light snow or crust. In the spring, you can replace the ski or track back with wheels and get a scooter or moped again.
Chainsaw snowmobile
Using a motor from a trimmer, many craftsmen can independently make various devices: cultivators, motorbikes, snowblowers and, of course, snow scooters (or snowmobiles).
Important: Universal all-terrain vehicles Gazelle for off-road conquest
The product is not particularly powerful, but reliable, lightweight and easy to use.
Snowmobile from a motorized dog
It is even easier to get a snowmobile from a motorized towing vehicle or a motorized dog; there is practically no need to reassemble it - just add skis with steering and make minor changes.
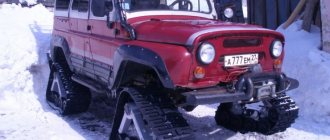
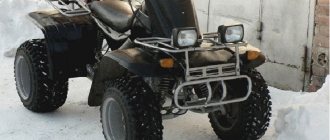
Snowmobile from ATV
The ATV undergoes even less alteration for better maneuverability in winter snowy terrain. Essentially, everything is limited to tuning, which consists of installing tracks, although this process is expensive and time-consuming.
Snowmobile on tubes
About homemade products using cameras or pneumatics has already been noted above. The homemade device consists of a control support ski and a leading support pneumatic.
The advantages include the high cross-country ability of the vehicle, and the disadvantages include low maneuverability.
Transformable snowmobile
A folding snowmobile is called a mini snowmobile or transformer. Its main difference is convenience and ease of use. It easily fits when folded in the trunk or even on the seat of a car.
Snowmobile from a cultivator
And another savvy option for inventive use - a snowmobile made from a cultivator. Usually, every farm has a cultivator and sits idle in the winter. Using the engine according to the assembly diagram, we make an apparatus for winter movement. The power is small, but in reality it is practical and effective.
What else do you need to know?
Some necessary tools can always be replaced with cheaper and disposable ones. You can avoid unnecessary expenses, for example, on a sanding machine just for the sake of one sled. It will be replaced by sandpaper.
It is also not necessary to purchase wooden blocks separately; it is enough to use leftover wood from other buildings or repair work.
Screws can be replaced with nails and a hammer drill. You just need to buy good stainless steel nails.
There are a lot of options for sled designs. They can differ both in design (with a back, with a seat, with carvings, with boards, with additional runners) and in design.
After you can make a sled with your own hands, even for children, winter will become an even more long-awaited and fun time for you. Good luck!
Sources
- https://MachinSpec.com/spec-naznacheniya/snegoxod/sani-svoimi-rukami.html
- https://allremont59.ru/stroeniya/kak-sdelat-sanki.html
- https://SdelaySam-SvoimiRukami.ru/4095-sanki-iz-podruchnyh-materialov.html
- https://rubankom.com/materialy/proizvodnye/fanera/1787-sani-iz-fanery
- https://chudo-lobzik.ru/chertezh-podelki-sani/
- https://stroy-podskazka.ru/snegohody/sani-svoimi-rukami/
- https://o-krohe.ru/pokupki/zimnie-tovary/derevyannye-sanki/
Making a snowmobile using a chainsaw
A chainsaw is a universal tool for working with large wooden beams that are difficult to deform.
With this tool you can make a real snowmobile.
Let's figure out how to make a snowmobile with your own hands from a chainsaw. First of all, pay attention to the 2nd subtitle of the article, which indicates all the necessary materials for construction. So let's get started:
- Based on the dimensions of the future snowmobile, start adjusting the dimensions of the bars with a chainsaw.
- Next, using a chainsaw, we begin to cut out small parts that will be needed to securely fix the lower support.
- Next comes the same sequence of actions as already written earlier.
Preparation
Before we start creating our winter structure, we need to decide what material it should be made of. Wood is perfect as a starting material if you want to make a sled like a sled or entirely made of plastic or metal with plastic parts. There are a lot of homemade models you can assemble. Sleds, thanks to their design solutions, are a very universal item; they can be easily attached to all models of snowmobiles. To optimally select sled models, consider these factors.
- Travel route and terrain features. The factor must be taken into account when using drag-type structures.
- Type of transportation. Taking into account the fact that not only heavy things are transported on sleds, but also people, this factor must be taken seriously.
- Your driving style. This factor must be taken into account, since the service life of all equipment, and not just sled runners, depends on the riding style.
- Amount of snow cover. This factor affects the maneuverability of equipment in difficult natural and weather conditions.
The best option would be to make a sled on a steel frame, as it will be more durable than plastic ones. The main disadvantage of such equipment is considered weight, however, this pays off with a significant margin of safety and a long service life.
Dimensions and drawings
Before preparing your masterpiece, you need to make a design for it, in which you need to constructively decide what size the sled will be. We have prepared a rough drawing of the sled, which we will describe later. As you can see, the dimensions of the structure are a little more than two meters in length, the height of the product is 98.5 cm, the width in the front part is 75 cm, and in the back it narrows to 74 cm. The drawing is very detailed in the height of all parts. Drawings can be found on the Internet, but it is better to come up with your own based on your technical considerations and calculations.
Stripping plywood
We clean our plywood with sandpaper. As you already know, “Medium-grained” and “Fine-grained” sandpaper is used for cleaning plywood when sawing. You've probably seen sandpaper in hardware stores, and that's what we'll need. In your work you will need “Coarse-grained”, “Medium-grained” and “Fine-grained” sandpaper. Each of them has its own property, but a completely different coating, by which it is classified. “Coarse-grained” sandpaper is used for processing rough plywood, i.e. which has many defects, chips, and cracks.
“Medium-grained” sandpaper is used for processing plywood after “Coarse” sandpaper and has a slight coating. “Fine-grained” or otherwise “Nulevka”. This sandpaper serves as the final process for stripping plywood. It gives the plywood smoothness, and therefore the plywood will be pleasant to the touch. Sand the prepared plywood in stages, starting with medium-grain sandpaper and ending with fine sandpaper. Sanding should be done along the layers, not across. A well-polished surface should be flat, completely smooth, glossy in the light and silky to the touch. How best to prepare plywood for sawing and which sandpaper is best to choose Read here. After stripping, check the plywood for burrs and small irregularities. If there are no visible defects, then you can proceed to the process of translating the drawing.
Translation of the drawing
For me, drawing translation has always been the main process in my work. I will tell you a couple of rules, as well as tips for high-quality translation of a drawing. Many people transfer the drawing onto plywood not only using a pencil and copying, but also using “Black Tape”, glue the drawing to the plywood, then wash off the drawing with water and the markings of the drawing remain on the plywood. In general, there are many ways, but I will tell you about the most common method. To transfer the drawing onto prepared plywood, you must use a copy, a ruler, a sharp pencil and a non-writing pen. Fasten the drawing in plywood using buttons or simply hold it with your left hand. Check if the drawing fits the dimensions.
Position the drawing so that you can use a sheet of plywood as economically as possible. Translate the drawing using a non-writing pen and ruler. There is no need to rush, because your future craft depends on the drawing.
Why choose a self-made self-propelled gun?
Factory-made snowmobiles are indispensable for some professions: rescuers, foresters, geologists, surveyors. Wherever the quality of work performed and sometimes the value of human life depend on moving over rough terrain, a snowmobile becomes a vital means of transportation.
Homemade snowmobiles are used in households, when hunting or fishing, at festivals and just for fun, walking, playing with children.
This is a convenient, economical, practical winter means of transportation, which is successfully created by craftsmen in different parts of the country.
How to assemble a homemade snowmobile, see below.
Is it necessary to obtain a license for a homemade snowmobile and register it?
The first question is classified as practically unsolvable. Theoretically, a homemade product can be certified by the Federal Agency for Technical Regulation and Metrology; to do this, it must meet a number of requirements and have all the necessary technical documentation. The snowmobile must pass testing and certification of all major components. In practice, those wishing to obtain a technical passport for a homemade snowmobile encounter a huge number of problems; the procedure will take more than one month, if it brings a positive result at all.
If there is the slightest discrepancy with technical standards, the snowmobile cannot be certified, and if you do not assemble your machine from ready-made parts of serial snowmobiles, but make most of the components yourself, you will have to spend a lot of time and money on certification of the snowmobile - it is cheaper to buy a production model.
You cannot ride such a snowmobile, and it must be transported to a hunting or recreation site on a trailer. But here another problem arises: if you are stopped by a traffic police officer, you will need to confirm ownership of the snowmobile. Any invoice or receipt will do for this. No one should require you to present documents certifying your right to drive a snowmobile until you are stopped while driving the vehicle. Therefore, when designing a snowmobile, keep in mind that you will need a trailer to transport it.
Most homemade models for hunting or recreation fall into the category of vehicles that do not require a license to drive. If the characteristics of the snowmobile require the driver to have a license, this is a category A1 or A license.
It is quite possible to assemble a snowmobile for hunting or recreation, and if you have a motorcycle or moped that can be used as a donor for the main components, then production will cost very little. But it should be borne in mind that it will be extremely difficult to legalize a finished car, so its use will have to be limited to areas that are difficult for traffic police officers to access.