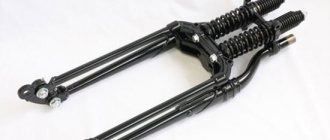
The modern four-stroke engine type FMB 139 of the Alpha moped has two valves through which substances necessary for the normal functioning of the vehicle pass. The hermetically sealed valve ensures reliable operation of the moped, which consists of starting the engine every time the corresponding key is turned. In normal condition, the valve disc is close to the seat, eliminating depressurization.
Since the Alpha moped is outdated, all repair and maintenance work falls on the owner of the vehicle (in an alternative case, on one of the local car services). Even a driver without repair experience can adjust the valve, since significant work on disassembling the moped is not required. If configured correctly, problems with the operation of the motor are practically eliminated during normal operation.
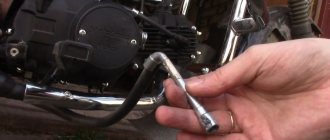
Moped "Alpha"
Timely work makes it possible to increase the service life of the motor without the need to replace individual elements or completely change the engine. It is recommended to carry out the procedure at least every 2 thousand kilometers , as well as after purchase, regardless of condition and year of manufacture.
The FMB 139 gas distribution system has a camshaft in the cylinder head, and the valves are arranged in a V-shape and vertically. They are driven by a rocker arm - it itself begins to move through the camshaft cams. The last element, in turn, starts working thanks to a chain drive.
When to adjust valves on a moped
Maintenance of the Alpha moped engine should be carried out if the following situations arise:
- slow increase in speed during acceleration;
- noticeable noise in the form of a clattering sound;
- the vehicle does not start the first time;
- The motor stops working while driving.
Depending on the wear and tear of the moped, the procedure may be needed more often - even after 1000 km, as metal fatigue and constant temperature changes when starting the engine and when traveling at different times of the year make themselves felt. It is recommended to carry out the procedure regularly to eliminate the following consequences leading to increased costs for correcting transport:
- with a constantly reduced gap, a rattling noise will become noticeable, reminiscent of the sound of a mechanical sewing machine. This configuration is also harmful for the reason that the engine does not provide the required level of traction, increasing gasoline costs and wearing out the mechanics;
- in the case of a reduced gap, compression disappears, preventing the vehicle from moving - the valve gradually collapses, the spark plug becomes unusable;
- the exhaust gases change color and the smell becomes more pungent.
If you follow simple instructions, you will not have to resort to major repairs of the moped, but this procedure will require much greater costs and additional help from specialists.
Gas distribution mechanism of the FMB 139 engine
The gas distribution mechanism of the FMB 139 engine is equipped with a camshaft located in the cylinder head. The valves are arranged vertically and V-shaped and are driven by a rocker arm, which in turn is driven by the camshaft lobes. This system is very similar to the Moskvich 412 timing belt, only there is only one cylinder and two valves.
The camshaft is driven by a chain drive. It, in turn, is driven by a gear located on the axis of the generator rotor, which is the axis of rotation of the crankshaft.
Valve Adjustment Tools
To work with the Alpha moped you will need the following tools:
- pliers - will be useful for holding fasteners in one position while unscrewing other elements;
- a brush for working with metal – it is useful for cleaning the candle from external accumulations;
- 9mm wrench – required to loosen the locknut;
- key 17 - it is necessary to unscrew the valve covers;
- Allen key - you will need it to turn the flywheel. There is a mark on the specified element, thanks to which the “dead” point is adjusted. The mark should coincide with the arrow on the crankcase already during disassembly;
- feeler gauge - it is used to measure gaps. The standard size for the intake and exhaust valves is a 0.05mm feeler gauge, which is the correct setting.
Scooter valve adjustment gauge
Each of these items is included in the toolbox, especially for moped owners. The setup procedure will only take a few minutes with proper skill and following the instructions.
Correct assembly after adjustment
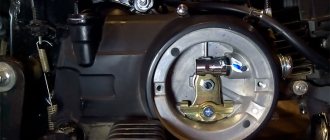
Now let's start assembling. Install the timing chain sprocket cover correctly. Look at the photo below. The timing cover has 2 protrusions - large and small. The small protrusion should fit between two protrusions on the cylinder wall. The large protrusion should face forward and hold the timing sprocket.
We install it in such a way that the timing sprocket cover is fixed. Then tighten the cover with a bolt from the opposite side using a 10mm wrench.
Preparing for work
For small parts like fasteners, you need to prepare an empty jar or box so as not to lose anything. It is desirable that each type of fastener (differentiated by diameter) has its own compartment - this way, during assembly, incorrect installation of parts, unnecessary noise due to instability of fixation and complications when driving after assembly are eliminated.
The room temperature should be 18-25 degrees, since at a lower value it will be uncomfortable to work due to deteriorated sensitivity of the fingers. In winter, it is necessary to warm up the garage to the specified values. Another reason is the nature of the gaps themselves. They are thermal, therefore, during repairs and maintenance at a different temperature, incorrect settings and deterioration of the engine condition in the future are possible. Before gaining direct access to the engine, you will need to remove the seat and put it somewhere where there are no dirty parts.
Proper Engine Maintenance
When purchasing a new Alpha moped, after a thousand kilometers of gentle mileage, you need to change the oil and adjust the valves. The engine parts have become accustomed to each other, the excess has been scraped off and now the unit can be returned to normal operating modes. Semi-synthetic oil is quite suitable, this engine does not rev high, and valve adjustment is a necessary maintenance item for any moped and even motorcycle.
What happens in the motor?
During engine operation, thermal expansion of all parts and valves occurs. If the valve clearance is greater than the nominal one, the shock loads on the entire gas distribution mechanism will increase and, ultimately, it will fail. When the gap is larger than required, such a roar is heard from the engine that it will be impossible to ignore it. If the gap is smaller, then the valves will simply tighten due to thermal expansion and stop opening. The moped will not start. It is worth watching a video once about the principles of operation of a four-stroke engine to understand how the moped works and how to adjust it. You can make a video yourself showing the process of setting up the engine of the Alpha moped.
Customization Tools
So, how to adjust the valves on an Alpha moped? What is needed for this? It is necessary to provide access to the adjustment mechanism. At the head of the engine there are two small hex caps, on top, there are the intake valves, and on the bottom, towards the exhaust pipe, there are the exhaust valves.
Adjusting the intake valves is easier, everything is visible. When removing the lids, do not lose the rubber ring that seals them. And in order to adjust the exhaust valves, if there is no lift, it will be more convenient to place the moped on its left side. You will need a special square wrench for the adjusting screw and an eleven wrench for the locknut. Feeler gauges for measuring gaps.
How is the adjustment done?
You can preview some video on this topic. The gap is measured between the top of the valve and the adjusting screw. We take the dipstick that says “0.05”. We loosen the nut, and, placing the feeler gauge under the bolt, use a special four-sided wrench to adjust the gap until the tip of the bolt easily touches the feeler gauge. If the dipstick comes out with little effort, the gap is smaller than necessary.
The first time it is quite difficult to feel the necessary effort. And each time, you will need to start the moped to understand how the adjustment went. But over time the skill will develop. Typically, the valve clearance at the intake is smaller than at the exhaust. This is due to the fact that the exhaust valves heat up more due to the temperature of the exhaust gases. But in this motor the clearances are the same and easy to remember.
How to adjust valves on an Alpha moped - instructions
Opening the valve will be simple - you just need to press on it. In the case of the Alpha moped design, a rocker arm presses on the element, moving under the influence of the camshaft cam. Next you need to act in strict sequence:
- Complete cooling of the engine to garage temperature. If the moped was used before the procedure, it is better to let it stand for at least two hours to cool down - this way you can avoid burns not only from the elements that are directly affected, but also from neighboring parts;
- turning off the ignition is mandatory so as not to accidentally start the engine;
- placing the moped on a stand for stable holding in an upright position;
- The side cover of the motor head is unscrewed. At this stage, a spare gasket may be required, as wear and careless removal can cause rupture. It is recommended to use a heat-resistant sealant;
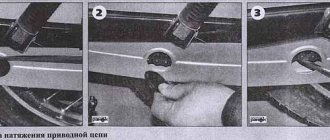
- it is necessary to align the mark that is applied to the head sprocket with the mark that is located on the head body. The crankshaft can be turned using the kickstarter leg: this method is not very convenient due to the arrangement of the elements on opposite sides. It is better to call a person nearby for this stage. For easier rotation of the crankshaft, the spark plug can be unscrewed;
- dismantling the head cover using a 17 key. One element is located at the bottom and the other at the top;
- you need to slightly tighten the locknut of the adjusting screw;
- you need to take a feeler gauge thick 0.05 mm, and then insert it between the valve stems and the screw for adjustment. If the probe passes too freely, you will need to tighten the locknut, and if it does not pass or passes with difficulty, loosen it;
- As stated above, you need to carefully tighten the adjusting screw so that the feeler gauge moves with slight resistance, but is not completely blocked. This indicates that the gap is set correctly. If the probe cannot be inserted, you need to loosen the screw and then gradually tighten the structure. The feeler gauge should not be left in place when adjusting the gap - this may lead to tool breakage. In this case, you need to constantly check the width of the gap - it should not change;
- the same must be done with the other valve;
- Installation of all removed parts occurs in the reverse order.
To check the correct operation, you just need to start the engine after fixing the engine valve. You need to make sure that nothing is leaking or making unnecessary sounds. You can drive a few hundred meters near the garage so that the tools are nearby to fix any problems. It is allowed to increase the gap by hundredths of a millimeter - this does not lead to malfunctions. If everything is done correctly, all the signs of malfunction described above will completely disappear, and the motor itself will serve for years.
A very useful and visual video on how to adjust the valves on a scooter:
You can also see a more general instruction article on the topic “How to adjust valves on a scooter .
Starting concentrator, electrovalve - device, diagnostics
This detail is small, but very important. It is this that helps start a cold scooter engine without difficulty in any weather. Only thanks to it the scooter starts easily with half a turn. Thanks to it, the scooter does not shoot into the muffler like domestic motorcycles, but idles quietly and smoothly. Thank the Japanese for inventing this thing! - I say in all seriousness.
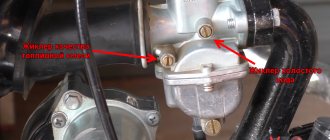
What is this - a starting enrichment agent? This is essentially an additional small carburetor, standing parallel to the main one. It is connected to the main carburetor by three channels - air, emulsion and fuel, drilled in its body. The air is taken in before the throttle valve, the emulsion (mixture) is supplied after it, directly into the carburetor outlet pipe. Gasoline is taken from a common float chamber. Thus, with some stretch, the enrichment can be considered an independent device. It’s a stretch, because it is, nevertheless, structurally inseparable from the carburetor.
Now let's look at the drawing.
The carburetor has a small additional fuel chamber 7, which is connected to the main float chamber 8 through the start jet 9. The tube from chamber 7 leads to the mixing chamber into which air is supplied and from which the air-gasoline mixture goes into the engine. A valve 6 can move in the mixing chamber, similar to a carburetor throttle valve, only much smaller in size. Just like in the throttle valve, there is a spring-loaded needle in the starting valve, which closes the fuel channel when the valve is lowered. When starting a cold engine, the valve is raised (open). At the first engine revolutions, a vacuum is created in the emulsion channel and gasoline located in chamber 7 is sucked into the engine, causing a strong enrichment of the mixture and facilitating the first flashes in the engine.
After the engine has started, but has not yet warmed up, it needs a rich mixture. The enricher works like a parallel carburetor; gasoline enters it through jet 9, mixes with air and enters the engine. When the engine is running, alternating current from its generator is always supplied to the contacts of the ceramic heater 2 of the thermoelectric valve of the starting system. The heater warms up the drive 3. Inside it, obviously, there is a gas or liquid boiling at a low temperature and a piston connected to the rod 4. When the drive is heated, the rod gradually extends by 3-4 mm and through the pusher 5 sets the damper in motion. Valve body 1 is wrapped in thermal insulation (polyethylene foam) and covered with a rubber boot.
Thus, the engine warms up along with the thermoelectric valve and the mixture gradually becomes leaner. After 3-5 minutes, the damper closes completely and the degree of enrichment of the mixture on a hot engine is set only by the carburetor idle system. When the engine stops, heating of the valve stops, the damper drive cools down and under the action of spring 10, pusher 5, rod 4 and damper 6 return to their original position, opening the channels for subsequent start-up. Cooling down and returning to its original position also occurs within a few minutes.
This enricher design is used on almost all modern scooters. Older models may use a design without an electric heater; heat is transferred to the drive through a copper heat-conducting cylinder directly from the engine cylinder. Sometimes, there is also a manual drive of the damper through a cable from the handle on the steering wheel (“Choke”).
Now the “diseases” of the system are 1. The air channel may be clogged with dirt. In this case, the mixture becomes very rich, even after the engine has warmed up. 2. The jet may be clogged with dirt. It is very thin and this happens quite often. In this case, the enricher works in the opposite way - it leans the mixture, making starting difficult. 3. Contact with the heater “tablet” is broken. The valve does not heat up and does not close. The engine runs all the time on an over-enriched mixture and does not develop the required power. The resistance at the valve contacts is easy to measure; it should be in the region of several ohms. 4. The antennae on the pusher 5 are broken, usually due to careless handling when removing the valve, and although the pusher moves, the valve is closed all the time, since it does not rest on it. Symptoms - as in paragraph 3. 5. Drive 3 is out of order. The rod does not extend or almost does not extend when heated. Symptoms - the same as in point 3. Checked by heating the actuator assembled with the valve or separately, for example with boiling water. The drive cannot be repaired.
Recommendations for working with the engine
When purchasing a vehicle secondhand, it is necessary to carry out the above operations, since old owners usually sell the moped “as is,” transferring all responsibility for customization to the new owner and reducing the cost. In addition to adjusting the valve, experts advise changing the oil and cleaning the engine from combustion products and dirt, reducing emissions.
If you need to change the engine completely, then all operations and a set of tools can be applied to the analogue from the Honda Super Cub, since the “Alpha” is in many ways a copy of the specified moped. The set of tools supplied with the vehicle does not contain these elements, so you need to take care of purchasing them in advance - even before purchasing the moped.
Adjusting the gap when the engine is cold is recommended not only to ensure hand safety, but also because of the design properties - the valve lengthens during operation. It is strictly not recommended to adjust the gaps without using feeler gauges, since this method is ineffective due to the fact that the owner is actually counting on a lucky break.
Adjusting valve clearances
When should you check clearances? According to the instructions, for the first time - after the first thousand kilometers, then - every 4000 km.
But if a characteristic clicking sound, similar to a clattering sound, is heard from the cylinder head earlier, you should not wait for scheduled maintenance. In addition, check the valve clearances after disassembling the head or replacing the timing chain.
Many four-stroke owners put off checking, not being confident in their abilities. In fact, this work is not so difficult, and all you need from a special tool is a set of probes.
Where to begin? First of all, the engine should be completely cooled. If the engine has been repaired, it is convenient to make adjustments with the engine removed from the motorcycle.
Most 50 cc engines are equipped with a SOHC timing belt, that is, with a single camshaft in the cylinder head. The clearances in the valve mechanism are adjusted by screws located at the ends of the rocker arms. There are two designs: one is common on engines with a gearbox (for motorcycles, scooters, minibikes and ATVs) (Fig. 1), the other is on scooters with a CVT (Fig. 2). The sequence of operations in all cases is almost the same, except that the sizes of the keys used vary.
Fig 1Fig 2
Note
:
Valve clearances are adjusted on a cold engine (15-30°C).
Note:
To determine the TDC of the compression stroke, just look at the location of the camshaft cams. If the cams are pointing "down", the piston is at TDC on the compression stroke.
Using a feeler gauge, measure the gap between the pusher and the valve stem. For engines with a volume of 50-100 cc. cm, valve clearances are 0.03-0.07 mm. (Exact details can be found in the repair manual for your specific scooter model)
The design of the motors provides special hatches or covers in the cylinder head for access to the adjusting screws.
Unscrew the nuts securing the cover of scooter motors (Fig. 3), and remove the cover (Fig. 3a)
Fig 3 Fig 3a
or a threaded hatch in the cylinder head of engines with gearboxes (Fig. 4).
Prevention of moped engine breakdowns
To increase the service life of not only the valves, but also the entire engine of the Alpha moped as a whole, you must follow these recommendations:
- fill only with high-quality fuel - this eliminates harm to the gas distribution system, and also does not leave unnecessary traces from the inside;
- you need to monitor changes in sensors indicating changes in the condition of the moped;
- It is worth changing the oil completely from time to time;
- Do not allow the engine to overheat, especially in the summer heat. Similarly, it is unacceptable to expose the engine to sudden temperature changes. Therefore, when leaving the street in winter, you should not immediately move away - you need to let the engine warm up. This prevents accelerated wear of the metal used in the vehicle;
- It is mandatory to keep the moped clean - regular cleaning of dirt, at least on the surface, so that it does not accumulate in layers, making further repairs difficult in the future. Vehicles should only be stored indoors on a permanent basis;
- For the winter, the battery will need to be removed if the moped is not in use. This will eliminate the formation of condensation and other problems - before re-installing the element, it is worth recharging it.
You should always keep a toolbox ready specifically for your moped. This is useful not only for repairs, but also for other purposes, such as tightening fasteners, since they can unscrew over time. As a result, not only reliable retention of the engine valve will be ensured, but also overall safety when driving in any conditions.
It is worth considering that the instructions may be useful when correcting defects in other models of mopeds/scooters, where the engine size differs. In this situation, the gap on both sides will be different. Otherwise, you will need to further study the vehicle repair manual to determine the correct parameters. In the garage you will need a small table to place the engine on it when dismantling it and completely cleaning it - this will make the work much more convenient and efficient.
How to adjust valves on an Alpha moped - step-by-step instructions
4.3 (86.67%) 6 votes
Iirbis virago (alpha) 110 – question for readers
pivo_msu Actually, here's the story. On the eve of the New Year, I said goodbye to city life and moved to my house outside the city. Naturally, I work in Moscow, and I go to work at least three days a week. In principle, now such trips do not pose a problem, because it is only an additional 50 minutes of time (plus what it was like when living in Moscow on the way from home to work). However, the summer season is ahead, and I, including myself, need to be at work on Fridays. You understand that I will have to go back home through traffic jams “in the name of all summer residents.” So I had the idea to buy a motorcycle, moped or scooter in order to get through traffic jams with less loss of time. The motorcycle has fallen out of favor as a class, because there is simply no time yet to obtain category “A” licenses and the extra money to purchase them. The scooter is not bad, but the maximum speed of 60 km/h can negate all the advantages of maneuverability in traffic jams. But, as it turned out, there are mopeds with an engine, according to documents, 49.9 cubic meters, but in reality all 110. Accordingly, the documents are like for a moped (you don’t need a license, and even after a beer get-together you can go), and the engine capacity is like a light one motorcycle, and a speed of about 100 km/h will suit me quite well. Further analysis of the situation showed that the Chinese company Irbis does such things. It should be noted here that initially I had an extremely negative attitude towards the Chinese automobile industry, which automatically transferred to their motorcycle industry. On the other hand, there is no alternative (documents from the moped plus a low price). So maybe there is an option to try.
At the moment, the price of the issue does not exceed 30,000. In principle, this is the amount that I can afford to spend, roughly speaking, right now, understanding that the price will rise by the season. In this regard, a question for readers - who will advise what? Tasks: I need a light motorcycle with documents for a moped (real maximum speed under my 85 kg + backpack is at least 90 km/h). Price no more than 30,000. Operating conditions: 70% - trips from home to work (100 km one way), in the summer on Fridays, when the car ride is very long. 30% - fishing trips not far from home, but perhaps with excess weight and on bad roads. Estimated annual mileage is 3000 km. Service life is at least three years. Possibilities for self-repair: Hands grow from where necessary (270,000 miles on domestic cars, in all that time I was in the service only twice, and I did everything myself, including replacing and overhauling the engine). But time and reliability are important.
It is important that the moped can be repaired in a day (maximum two) and that either the parts are available or they can be easily replaced with improvised means. And it is important that the “moped” does not break down on the road, or that a certain number of “weak” parts break down, which you can carry with you and replace on the road in 20 minutes
In this regard, who has experience in operating mopeds, “mopeds” and scooters - is such a concept against traffic jams realistic? Is the option with Irbis suitable, or would you recommend other options? This is the “question for the audience” today. I'm waiting for opinions.
Tags: How to adjust valves on an alpha 110cc moped
Video on the topic
Other videos on the topic:
I want to touch on an interesting topic that everyone has heard about, but not everyone understands its essence - let's talk about valve adjustment.
A little theory.
First, a little theory. Where did the need to adjust the valves come from and why is the thermal gap needed?
- How to adjust the valves of a VAZ-2115 injector 8 valves
Any four-stroke engine has at least two valves: an intake valve, through which the working mixture enters the combustion chamber, and an exhaust valve, through which exhaust gases exit. Part of the valve is constantly located in the combustion chamber and therefore the valve becomes very hot. And as we know from school physics courses, bodies expand when heated. Moreover, the stronger the heating, the greater the expansion.
The valves in the engine are always in a “spring-loaded” state, while the valve plate is pressed very tightly to its seat - the valve seat. This ensures that the valve closes tightly.
To open the valve, you need to press on it. In our case, the valve is pressed by a rocker arm, which moves under the influence of the camshaft cam.
Now let’s imagine that the engine is cold (it stood for several hours and all the parts cooled down to “room” temperature). If you start the engine, the valves will begin to heat up quickly and, as a result, lengthen. If you do not leave it room for expansion (the gap between the rocker arm and the valve stem), then the moment will come when the valve will elongate so much that it will not fit tightly to its seat and will begin to leak gases from the combustion chamber. This leads to a loss of engine power and can also lead to overheating and burnt valves.
For this reason, a gap is left between the valve and the rocker arm. Engine manufacturers calculate how much the valve extends when the engine is running. Therefore, the operating instructions indicate the optimal thermal clearance values. If you follow the recommendations, at the operating temperature of the valve the gap will be minimal, so that the valve can close completely, but at the same time the rocker arm would be almost close and the valve would open as wide as possible and there would be no impact (“clattering”) of the rocker arm on the valve.
IMPORTANT: the clearances are set on a cold engine, when the valve has not yet had time to lengthen.
What happens if the valves are adjusted incorrectly?
Very often on various forums questions are asked: “What will happen if the valves are adjusted incorrectly?” There are two possible options:
- If the gap is too large, this is the most harmless option. If the gap is too large, then the valve shank and rocker arm will wear out more, since the rocker arm will hit the valve with a running start. The valve opening height will decrease slightly, due to this the filling of the combustion chamber will deteriorate and the engine efficiency will drop. But these changes are hardly noticeable. The engine sound will also be stronger and a characteristic clattering sound will appear. In general, engine operation will not be affected.
- If the gap is too small, when the valve heats up, it will “press” against the rocker arm and the valve will no longer fit tightly to the seat. The fuel-air mixture and exhaust gases will escape through the resulting gap. The release of exhaust gases will cause the valve to overheat and burn out. Engine compression will drop and, as a result, efficiency.
Thus, too little clearance is much more dangerous than too much. It is for this reason that it is not recommended to set gaps “by ear” without feeler gauges. If there is a feeler gauge between the rocker arm and the valve, there will already be a gap between the rocker arm and the valve, unless of course you clamp it with great force.
Why combine tags?
The valves must be adjusted in a position where the rocker arm does not press on the valve stem, that is, the valve is closed. When a four-stroke engine is running, both valves are closed at the end of the compression stroke, so for ease of adjustment, align the mark on the camshaft sprocket with the mark on the head housing. This position corresponds to the top dead center - the end of the “compression” stroke and the beginning of the “power stroke” and both valves are closed at this moment and can be adjusted.
By and large, it is not necessary to clearly combine these marks, because both valves close already at the beginning of the compression stroke and do not open until almost the end of the power stroke, that is, the valves are closed at least half a revolution. That is, there is nothing to worry about if you “overshoot” the mark a little, or if you don’t reach it a little (within reasonable limits, of course).
For some reason, some “craftsmen” in their video instructions combine the “T” mark on the crankshaft flywheel. It is not necessary to do this to adjust the valves. For one revolution of the camshaft, the crankshaft makes two revolutions, and the mark will coincide twice: once at the end of the compression stroke, and the second time at the end of the exhaust stroke (when the exhaust valve is still open and the intake valve is preparing to open).
What should the valve clearance be on an Alpha?
The intake valve clearance on most engines is usually less than the exhaust valve clearance. This is due to the fact that the intake valves heat up less. They are cooled by fresh air flows.
The thermal clearance of the intake valve for the 139FMB engine is 0.03 mm. For the exhaust valve, the gap is 0.05 mm.
Signs of improper valve adjustment
If the thermal gaps are too large, this can cause a characteristic knocking or ringing sound that occurs when the engine is running. Loss of compression can also be an indirect consequence of improper valve adjustment. Indirect consequences of incorrect valve settings may be an increase in fuel consumption with a decrease in power due to depressurization of the valves, as well as loss of synchronization of their operation, when the operation of the valves begins to advance or lag behind the piston operation cycles.