All-terrain vehicles are a universal means of transportation that can take you to the right place in catastrophically bad weather conditions.
All-terrain vehicles are most often used in the northern and eastern parts of our large country, where frosts, heavy rains and terrain that cannot be passed by an ordinary car prevail.
It should be noted that all-terrain vehicles move using wheels and tracks. The latter just likes to break down often and cause its owners a lot of problems in repairing or completely replacing this component.
As you might have guessed, we will talk about how to make tracks for an all-terrain vehicle with your own hands.
All-terrain vehicle tracks
As a rule, tracks for homemade all-terrain vehicles are made from high-strength conveyor belt, which lends itself well to various types of deformation while driving. It does not require special care; all you need is to clean it from dirt from time to time.
So, let's now talk more about creating caterpillars. For work you will need the following materials:The tape contains professional pipes with a characteristic cross-section; it is with their help that the all-terrain vehicle can cover distances in the most unfavorable weather.
- Bolts and nuts of various shapes and sizes.
- Profiled pipe with cross-section.
- Massive fittings.
- Conveyer belt.
You should also have the following tools in your arsenal:
- Powerful drill.
- Welding machine.
- Big hammer.
- Universal set of wrenches.
- Track pressing machine.
Based on the size of the track, you need to prepare the appropriate bolts and nuts. Next, take the reinforcement and start shaping it into a rounded shape using a crimping machine. Then, using a welding machine, you need to weld the letter V at the top of the reinforcement.
For a more detailed understanding of the steps, we recommend watching a video on how to make caterpillars with your own hands.
After the work has been done, you will have a homemade track that needs to be attached to another track, etc. The result of the work will be a reliable track for an all-terrain vehicle.
Homemade tracked all-terrain vehicle from an ATV
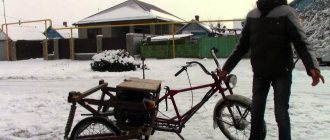
Built a homemade tracked all-terrain vehicle from an ATV. The homemade product can be used as a tractor and for rides. Further photos and description
Once I tried to clear snow using an ATV. The blade worked properly, but the wheel grip on snow and ice was clearly not enough. Despite the fact that studded tires from the car were used. Therefore, I decided to put the ATV on tracks, especially since the ATV had already been in an accident, as a result of which the frame was significantly deformed.
I spent a long time studying the design of industrial mounted tracks installed instead of wheels, but in the end I came to the conclusion that it would be much easier to make a completely new tracked platform.
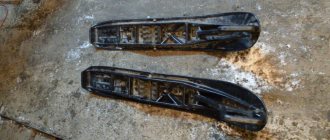
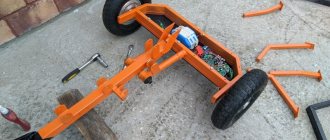
I bought the cheapest caterpillars - from Buran. The so-called bogies, drive and driven shafts are also from him. By chance, I managed to buy a working Oka gearbox complete with drives and brake mechanisms for just 1,000 rubles. All this was later useful for creating a functional all-terrain vehicle. The propulsion frames were welded from rectangular pipes and connected to each other using a frame, since the structure was originally made to be collapsible (photo 1).
The track tensioning mechanism is shown in photo 2.
I cut off the splined part of the drive shafts from Buran and welded to them the splined part of the drive shafts from Oka, and the CV joints also from Oka.
I cut off part of the gearbox casing to ensure free passage of the chain to its drive shaft (photo 7).
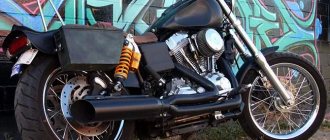
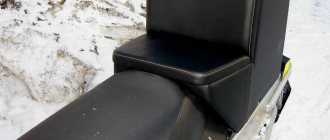
I welded a separate frame for the power plant and seat mounting (photo 9).
Brakes.
As working brake cylinders I used hydraulic cylinders from the VAZ-2101 clutch (photo 11).
I’ll explain why I installed the brakes on the front shafts, and not on the rear drive shafts, which would be more logical. The fact is that the all-terrain vehicle had to have a width of no more than 120 cm - this was due to some features of its operation on our site. But the width of the gearbox and the tracks themselves did not allow the brake mechanisms to be placed on the drive shafts without violating the above conditions. The differential rotation itself is also not the most successful solution from a technical point of view, however, on low-power designs it is quite workable and quite reliable - the strength of the gearbox mechanisms and tracks is even more than enough for this design.
During the installation work, everything was used. For example, from steering bipods from Oka I made levers that, when taxiing, press on the brake cylinder rods (photo 12-15).
Between the engine and the gearbox there is such a spacer, adjustable in length, which helps to remove the load from the fastenings of these units (photo 18).
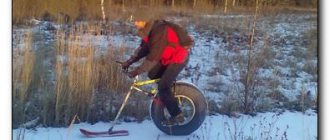
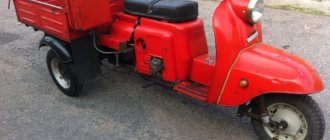
The presence of a gearbox allows you to use the all-terrain vehicle both for household needs and for entertainment. In first or second gear you get a tractor - leisurely, but very high-torque, capable of pushing a blade full of wet snow in front of you.
On the third or fourth there is transport for rides. The controls turned out to be very easy - even a child can handle the maneuvers - and the all-terrain vehicle itself is very passable, because it rests on the tracks of the elongated Buran, being half its weight. Therefore, no snowdrifts, even the fluffiest ones, are scary for him. The only thing that remains to be completed are the fenders and full-length running boards, which my hands just can’t reach.
Now this is a favorite “toy” for children and adults in our company, not only in winter, but also in summer.
Watch the video: rides on a homemade all-terrain vehicle.
Popular homemade products on our website
- Do-it-yourself all-terrain vehicle fracture
- DIY six-wheeled all-terrain vehicle
- Homemade tracked all-terrain vehicle "Iron Scorpion"
- Homemade car lift
- DIY all-terrain vehicle made from a walk-behind tractor
- DIY mini all-terrain vehicle
- Homemade tractor with your own hands
- Homemade tracked all-terrain vehicle: 50 photos with description
- Crawler all-terrain vehicle made from a walk-behind tractor
- Homemade all-terrain vehicle based on UAZ-469 and Toyota Land Cruiser
- Homemade all-terrain snowmobile from a walk-behind tractor
- DIY all-terrain vehicle
Caterpillar for UAZ
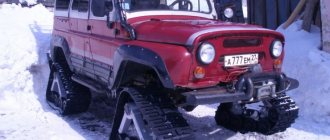
Next we will tell you how to make tracks on an UAZ with your own hands. For this model, a caterpillar made from ordinary car tires is suitable. Select a massive truck tire in advance.
Be sure to pay attention to the characteristic tread pattern. If it has triangular cutouts, then the tire will fit.
To make it, you need to carefully cut out the sides and, most importantly, do not forget to leave space for the treadmill. Then start connecting the resulting tires using car belts.
The result of the work will be a ready-made caterpillar for operation by the UAZ all-terrain vehicle.
The question arises: “How to choose tracks for our ATV?”
Crawler tracks come in the following types:
- winter and all-season. On winter ones there is the designation winter or show, on all-season ones there are 4 seasons
- with regular width
- with spikes
- with wide rear tracks
Let's look at a few examples of market leaders:
Tatou tracks for ATVs
are one of the leaders. Manufactured in Canada by Camoplast. The Tatou ATV track system excels in versatility. The above is explained by the fact that they can be equipped with any machine using an installation kit. The ATV requires four-wheel drive and an engine capacity of at least 300cc. Tatou is also famous for its quality and durability, thanks to which it has gained its leadership and superiority among its competitors.
Installing a homemade snorkel on an ATV
Kimpex tracks for ATVs
- Kimpex tracks for Commander TREX 2.0 ATVs - excellent grip, manufacturing materials have a special composition, making the tracks not so heavy, simple assembly design. The company produces TreK - all-season kits and WTX - winter kits. The width of the front and rear tracks is 292 mm. , each length is 2438 mm. , profile height 31.75 mm. , support area is 1.22 square meters, internal drive, 39 kilograms is the weight of one track, speed loss is 35%, supplied with special installation kits. The support rollers are rubberized and equipped with double bearings with special protective caps. The drive sprocket is reinforced for all-season use. The Kimpex ATV track support is based on a non-slip roller system. The truck has a steel frame for special use in extreme conditions.
STELS tracks for ATVs
— Chinese STELS tracks for ATVs are in demand no worse than their counterparts from Canada. Their quality refutes the belief that Chinese products are reliable. The big plus of Chinese STELS tracks for ATVs is their cost; it is not high compared to other manufacturers. After all, the price of a set of Canadian analogues is equal to the cost of a whole Chinese ATV.
The rear track plays an important role when choosing, and to be more precise, its area directly depends on the passage qualities. It is important to have a turn limiter, which serves as a load reducer on the CV joints and steering wheel. Also take into account the model of the ATV; the hub mounts may not fit, despite the versatility of the tracks.
You can save money on your purchase by purchasing the goosenecks in disassembled form. But in practice, not everyone manages to assemble such a “puzzle,” so it is better to resort to the assembled version.
And so we finally got to the point characterized by:
Making a tractor on tracks
A caterpillar tractor is an integral piece of equipment in a farmer’s work. With its help, you can plow tens of hectares of fertile soil, as well as transport various loads. Now you will learn how to make a tractor on tracks with your own hands.
First you need to make the tracks; read the detailed process of making them above. Next, using a welding machine, begin welding the structure, which will be the basis for the tractor. It can be made from metal plates, beams, slats and other metal elements.
We smoothly approach the cabin. It can also be made by welding metal structures and fixing them with construction bolts for greater strength.As for the engine, the most suitable option would be a diesel engine with at least 14 horsepower.
It is especially important to take care of cooling, because when operating a homemade tractor, there is a high probability of constant overheating of the engine.
Breakdowns and repair possibilities
The main failures of caterpillar tracks, made independently or in artisanal conditions, include breaking of the elastic base or bending of metal linings. To restore the functionality of the structure, it is necessary to disassemble the bolted connections and replace the failed parts. It is recommended to carry out a preventive inspection of the propulsion vehicle after each trip; storing an all-terrain vehicle with a contaminated chassis is not allowed.
If the alignment of the rollers is disrupted, the load on the chassis and belt increases. The cause of the defect is the destruction of the bearings or weak tightening of the bolts holding the axles to the frame of the all-terrain vehicle. Regular preventive inspection of the undercarriage of a homemade snow and swamp-going vehicle allows you to detect and eliminate faults before the caterpillar track is damaged.
Caterpillars for walk-behind tractor
Now it’s time to learn how to make tracks on a walk-behind tractor with your own hands. We say right away that the procedure is very similar to assembling conventional tracks for an all-terrain vehicle.
In the same way, you need to weld together professional pipes with a cross-section and give them the shape of an English letter V.
The only difference will be the fastening on the sides using bushing-roller chain screws.
Finally, measure the length of the caterpillar, and if it is slightly larger than necessary, then simply remove a few extra cm of the corrugated pipe.
Making a caterpillar from belts
The next version of the caterpillar is especially attractive because you don’t have to waste extra effort during the work. Before you begin, you need to prepare belts that have a wedge-shaped profile. They have to be connected into one whole using soil hooks that are fixed with screws; rivets can be used as an alternative solution. The result is a snowmobile track, created with your own hands, which has holes intended for the drive sprocket. In order to create the holes, you will need to leave some space between the straps.