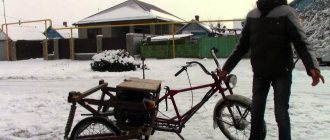
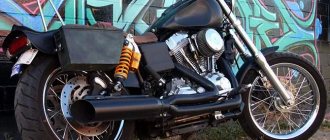
Good afternoon everyone! In this review we will talk about perhaps my most exciting DIY project, which brought such a lot of positive emotions to both children and their parents. We will make a children's tricycle (trike) from an old Chinese mini-Segway/hoverboard and a children's bicycle. As always, in the review I will present in detail the available components and components used, the process of manufacturing and assembling the design of a tricycle with rear suspension, preparing and installing electrical components, setting parameters and firmware of the motor-wheel controller for comfortable riding and control. The review turned out to be quite voluminous, I tried to present all the main points and features of the implementation of the task, so I will have to allocate considerable time to familiarize myself with the material in detail.
I will immediately ask mechanical engineers, electrical engineers and programmers to forgive me for errors in the terminology I use, I am just trying to understand this, please treat it with leniency, as a review from a construction linguist).
DIY scooter trike
Added: 06 Oct 2021, 17:21
Figure 14 shows two rotors, the top one that burned out, the bottom one new. Why do I not recommend rewinding the rotors? If you look closely at the lower rotor, you will see a gray plaque; on the upper one it is simply not visible. The rotor was balanced at the factory; when rewinding, it is not always possible to balance it and the electric drive can quickly fail.
• Shuttlecocks are circles with different inner radii. The width of all shuttlecocks is the same - 10 cm. The circle must be cut in one place along the shared thread. The flounce is sewn onto the inner line of the circle.
Step two
By the way, there is an easy way to check the functionality of the power supply. To do this, it must be disconnected from the motherboard. Simply disconnect the connectors of the wires leading from the block to the plateau. Connectors can be 20 or 24 pins (4 or 6). To check whether the unit is working, you need to short-circuit contacts 14 or 15 with each other (if the connector is twenty-pin) or 16 and 17 (if it is twenty-four pin). That is, green (sometimes gray) and black wires are connected to each other. Then the unit itself is connected to the network through an outlet. If the cooler fan starts working, then everything is in order, it is not the cause. You need to look for other damage. You can also sew a blanket envelope for a newborn. Compared to the previous version, it has a simple and easy to sew pattern. This envelope is very easily transformed into a baby blanket, then, if necessary, reassembled into an envelope. Sewing it will take a small amount of time, but the convenience of this item is undeniable.
Proper installation of door hinges ensures correct functioning of the door. Make a ponytail that was fashionable in the 60s with a backcomb at the crown from an ordinary ponytail.
Each of us remembers the New Year celebration, especially the beautiful Christmas tree with toys, garlands, confetti and candles. In order not to buy a real Christmas tree or make some addition to it, it is possible to create Hand Made decorations for the holiday from what you have on hand. This craft will surely delight your family and friends.
To obtain a polyline, perform the following steps: Hello! I have two LED table lamps. Both burn well and very brightly. But yesterday I needed to transport them from one city to another, and after transporting one of the lamps began to burn very dimly, and then stopped altogether. I tried unplugging it from the socket and plugging it back in and turning it on. The LEDs lit up, but very very faintly, but two LEDs now don’t light up at all. Tell me, please, is it possible to somehow fix the lamp? And what caused this breakdown? Could it be that I hit the case and now it doesn't work? Thank you in advance for your response!
If we continue the topic of choosing gifts for the older generation, then this task is quite difficult. Not every dad, who has long since become a grandfather, can be gifted a parachute jump or quad biking. A photo book would be a good gift for parents for the New Year. As a rule, on the eve of the New Year holidays there is usually a lot of work in photo workshops, so you should start thinking about ordering such a gift as early as possible. To order a photo book, you will need to select the most interesting photos together, come up with text for each page of the book, you can add photos of parents with their grandchildren, brothers and sisters, and friends. Of course, you will have to spend a lot of time, but such a gift will make an indelible impression, becoming one of the most original and unforgettable. As an alternative, you can give a photo frame with pre-uploaded photos as a New Year's gift.
transparent glass container with a lid. There were a variety of doll designs, but they all had one common feature - the absence of a face. This is easy to explain: through facial features, a doll can be exposed to dark forces and bring negative energy into the house.
ASSEMBLY:
We take everything outside and start assembling the tricycle. We connect the frame and subframe:
The bolt for fixing the subframe mounting axis in the spacer sleeve was placed on the thread lock:
I secured the M12 nut of the subframe axle using the old method: I drilled a 3mm through hole through the nut and M12 bolt, inserted a nail and bent it:
We install the shock absorber. For fastening, I use nuts with nylon inserts everywhere so that they do not unscrew while moving:
We attach the driver and passenger footrests:
We assemble the seats and place them on the frame, also fastening them with M8 bolts:
We put new handles on the steering wheel:
To install the power button, battery charging socket, battery disconnect button, I decided to use a black terminal box with rubber membranes for cable input/output:
Placed the power button and charging socket:
To attach the terminal box to the frame, I placed a metal plate on rivets, and secured the box itself to it with bolts and nuts:
I ran a cable from the accelerator handle through the box, it will transit to the subframe, as well as corrugations for laying two lines: a 3x2.5 mm2 power cable for the battery shut-off button (and in the future two batteries), a 3x2x0.5 mm2 control cable for the power button, charging sockets and 2 wires in reserve. Cable 3x2.5 in one corrugation 16mm, cable 3x2x0.5, and cable from the handle - in another corrugation;
For future switching of two batteries, and for emergency shutdown of the battery in case of inappropriate behavior of the tricycle, I purchased a waterproof 30A button and installed it in the terminal box cover:
To enter the corrugations into the “engine compartment” I decided to use brass cable glands. I drilled the holes with a step drill and secured them with the supplied nuts:
The result is a device like this:
Homemade moped: manufacturing features and video instructions
Nowadays, many people have begun to engage in constructive creativity. Fortunately, there is time for this, materials and video instructions that can be easily found. If a homemade bicycle is interesting to some part of our society, then there is nothing to say about a homemade scooter or tricycle, which are easy to make. In city conditions, this is a very useful type of transport, which can be maneuvered quite successfully. You can buy a scooter or a tricycle, but making them yourself means turning all your ideas into reality, a unique opportunity to save money, and much more. You can always make it using a high-quality video guide.
ACCESSORIES:
To manufacture and assemble the tricycle, I purchased the following components and materials:
ST-Link V2 programmer
. We will use it to load new firmware for the STM32/GD32 microcontroller on the Segway/Hoverboard board. Link: ST-Link V2 stlink mini STM8STM32 STLINK simulator download programming With Cover
A set of handles for a bicycle handlebar, with an accelerator handle on a Hall sensor,
with an integrated voltmeter to monitor the battery voltage, and two buttons: a latching button (red) and a non-latching button (green), which we will use as an electronic brake button. Link: Electric Bike Voltage Display 1 Pair Universal LED Voltage Display Twist Throttle for 12-99V Ebike Scooter Durable
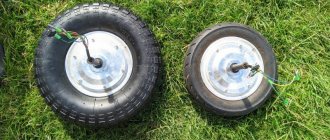
Tires and inner tube for a car, size “6” - 4.00.” Since the original tires of the motor-wheels are low-profile, more suitable for smooth asphalt, and they cannot reach high speeds, it was decided to change them to tires with a larger outer diameter. Buy something special from Kenda, 2-2.5 tr. There was no desire for a tire yet (there was no complete confidence in the success of the ongoing project), so a cheaper option for Delta tires was considered in the online store. Tire link: Delta 400-6 tire for pneumatic wheel Link to tubes: Tube 400-6 for pneumatic wheel
To make a shock-absorbing rear suspension, we purchased the simplest bicycle shock absorber with a declared stiffness of 850 LBS, which in the end turned out to be not enough, although the shock absorber may not correspond to the declared stiffness. Link: Rear frame shock absorber KZ-880B, 165 mm/420030
To make the frame of the tricycle, the following steel profile was purchased:
- Profiled pipe 20x20x2 – 3m;
- Profiled pipe 40x20x2 – 3m;
- Profiled pipe 40x40x3 – 1m (was in stock);
- Plate 40x4 – 1 m (cuts were available);
Also purchased at an auto parts store:
- Medium jet rod 2101-07, link: Jet rod
- Rear shock absorber bushing 2101-07 large metal spacer, link: Shock absorber bushing
A high-strength M12x170 bolt with a short thread (for fastening the subframe) was also purchased from a fastener store.
A used children's bicycle was purchased as the front part of our tricycle. When searching, the priority was the presence of a front hand brake:
Main parts of a moped
First, let's look at the main parts of this technique. In other words, let's take our future scooter apart, so to speak, and find out its main elements so that making a moped is easy.
Main moped components
It is clear that without a good engine you cannot go far on a scooter. In this case, it is usually installed on the D-6 power unit. Recently, chainsaws have also become very popular, from which a homemade moped is made. In the video instructions you can see in detail how to do this. Chainsaws will be discussed in more detail below.
Exhaust system: forward flow
It is necessary to carefully consider a high-quality exhaust system so that the muffler does not have a negative impact on the power unit with which homemade mopeds are equipped, but, on the contrary, helps to quickly get rid of the remaining air-fuel mixture. A direct flow made by yourself will be what you need.
Suspension: pendulum fork
A pendulum fork that looks much better than other versions of this part of the scooter. The fact is that a large number of varieties of forks can be made, but any expert will confidently tell you that nothing is better than a pendulum one, nothing has been invented yet. As you know, this part of the scooter bears the hardest work. It is the fork that takes the brunt of the impact when going over various bumps, and generally uneven sections of the road. This is a kind of suspension on which the driving characteristics depend. Thanks to the pendulum fork, you can achieve stability of the scooter on any road.
Other parts
Finally, the bracket, shock absorbers, frame and steering column define all parts of the moped.
Manufacturing
It is not necessary to study and draw up complex drawings; experienced DIY enthusiasts can make a device based on the general diagram. This shows the outline of the front windows, the cabin, the front end, and the general configuration.
And here the main possible sizes are already shown. The distance between the wheel axles is 1.23 m. Between the extreme steering point and the center of the rear wheel, the distance is 0.98 m.
Making a homemade tricycle with your own hands is possible even practically from scrap metal. One of the possible options is characterized by simplicity of design. The main parts will be:
CVT engine from a scooter and a wheel from the same;
rear wheels from garden wheelbarrows;
steering wheels and seats from any cars;
steering knuckles from GAZ-21;
pipes and other components.
The tricycle frame is assembled from pipes. Only the rear suspension is used, and the front is simply not provided. You can make the steering rack with your own hands.
You can also consider making a tricycle step by step at home based on the old Zaporozhets car. They start by removing the engine and gearbox.
Next they select:
any components related to the operation of the clutch and brake units.
It is better to throw away all other components except those listed or use them in another way. Additionally, you will need various pipes and channels in large quantities. They begin work by preparing the transitional wheel fastening elements. The rear segment of the frame is welded from channels. The front fork parts will need to be carefully polished and coated with a layer of chrome; Maximum attention will have to be paid to the frame, because it is the work on it that is most difficult.
Scooter and tricycle made from a chainsaw
Chainsaws, as mentioned above, are very popular among home craftsmen. They are distinguished by their light weight and dimensions, and in terms of power they are what you need. Today on the Internet you can watch many video tutorials on how to make a tricycle, scooter or moped from a chainsaw . More often mopeds and scooters are made from the Druzhba chainsaw. An old bicycle is also taken, onto which all the parts are installed, including a forward flow muffler.
An example of a homemade tricycle scooter
It is the forward flow muffler that becomes almost the main feature of making a homemade scooter, because you need to know some of the secrets of its installation. The forward flow muffler was originally invented for sports cars. A forward flow muffler in itself already increases the power of a scooter engine.
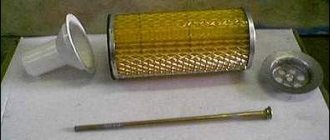
Air filter
An air filter for a homemade moped or tricycle is also made by hand. First of all, the filter must be reliable. It is recommended to use an oil filter from Moskvich, a washbasin siphon, a metal pin, silicone and a self-adhesive micro-pork to make such an element.
- The filter is clamped between the neck of the siphon and the rest of it;
- The whole thing is held together with a metal pin, the length of which is selected on the spot;
- Place the plug on the metal pin;
- We collect everything and treat the cracks with silicone;
- We glue a micropork onto the flange of the siphon neck.
INTRODUCTION.
The idea to implement this project arose when our mini-Segway called “A8,” which is already 4 years old, broke down once again.
The Segway stopped responding to turning the handle, and accordingly the rotation function disappeared. It was necessary to deal with the Hall sensor, but to be honest, I no longer had the desire to do this. The Segway had already begun to show signs of inappropriate behavior: it switched off several times while driving, tilted excessively backwards when accelerating, and it was already becoming dangerous to ride. Therefore, the idea was born to use its motor-wheels and make a tricycle as the simplest design. Having gone online to develop the idea, I suddenly realized that everything had been happening for a long time without me, and my idea had long been worked out by a large number of people). Therefore, before direct implementation, I familiarized myself with the experience of other home-made people, and noted the following main points for myself:
— the tricycle must have a rear suspension, since we live in the private sector, and we do not have smooth asphalt roads near our house (maximum dirt roads rolled with asphalt chips), and driving onto the city roadway is not entirely correct; — the tricycle should be a two-seater, since we have two children, and organized alternate riding, sooner or later, will still lead to loud conflict and complaints; — the tricycle must be assembled on a native controller from a Segway/hoverboard, since many enthusiasts are working on open firmware for boards on STM32/GD32 microcontrollers, which are installed in these Chinese products. It becomes possible to get software fixes, flexible settings, and additional functions, unlike ready-made Chinese controllers for electric vehicles.
The ideological inspiration for my tricycle was the work and videos of the author of the Youtube channel ILYANOV. He developed his own tricycle design, and also made his own alternative firmware for the hoverboard controller for convenient control as a tricycle. It has a free (with maximum speed limitation) and paid firmware version. The amount for paid firmware is more symbolic, but I soon came across other alternative firmware options online, with more flexible configuration and more efficient operation of motor wheels. More on this later. I’ll say right away that I borrowed the idea of the rear suspension from my friend ILYANOV, as a simple and affordable option, but I did not use the frame of the hoverboard itself in my design.
During a short simulation, the following tricycle design was obtained and agreed upon with the children:
Homemade tricycle from IZH Jupiter
A tricycle built on the basis of the Izh Jupiter motorcycle: photo and description of the homemade product, as well as a video review of the trike’s design.
The craftsman assembled a homemade tricycle with his own hands, using Izh Jupiter as a donor. Below are photos and drawings of the trike.
The design of the tricycle is quite simple: a rear axle is installed, torque is transmitted via a chain drive to the driven axle sprocket.
Rear wheels from VAZ.
The figure shows the dimensions of the rear axle of the tricycle.
The rear axle is made of a thick-walled pipe with an outer diameter of 42 mm, machined axle shafts from a VAZ are installed.
A sprocket from an Izh motorcycle is installed on the axle.
We recommend watching the author’s video, where he talks in detail about the construction of his homemade tricycle.
Video: winter drift on a tricycle.
Tools and materials
A good option would be to make a vehicle from an Alpha moped. Instead of standard propellers, it is recommended to use wheels from an Izh motorcycle. But you can get a good device from Dnepr. Even models from very old series are suitable, including those in extremely worn condition.
For the rear part, use car wheels. The ideal donor for wheels and axles will be VAZ cars of any model.
Sometimes a tricycle is also obtained from the Voskhod motorcycle. The basic mechanism has excellent speed characteristics, which increases the significance of this option. The gearbox is taken from any cargo scooter. The body is made by hand. It is advisable to install forced cooling and change the gear ratio.
When they say that a three-wheeled vehicle is made from a chainsaw, they mean that the engine was taken from there. Of course, you can use motors only from the most powerful saws as a basis. The remaining components are:
frame made of ordinary VGP;
wheels and axles removed from garden carts;
a driven sprocket and chain taken from a bicycle;
small leading star with D-6;
handcrafted wings.
If you decide to make a three-wheeler from an “ant,” then additional components are usually taken from Izh motorcycles. The engine and variator can be anything, even made somewhere in Asia in semi-underground conditions. The frame, gearbox, hubs and shock-absorbing unit are removed from the “ant”. The axle shafts are borrowed from VAZ.
Hydraulic components and brakes can be collected from the Minsk motorcycle. But experienced experimenters sometimes even make them themselves.
One original and quite convenient variation is a three-wheeled vehicle made from a pit bike. Despite the “childish” purpose of the original vehicle, it can turn out to be a real all-terrain vehicle that can overcome off-road conditions perfectly. On the ATV, part of the stationary axle is cut out, leaving the factory brake and main sprocket. You can add a differential, but then you will have to deal with scrupulous alignment. FYI: An excellent trimmer tricycle can be created based on the Champion.
It is appropriate to complete the analysis of possible options using the example of three-wheeled transport from OKI. It is rarely used in its pure form; it is much more correct to create “hybrids” with motorcycles such as “Ural”. For the work itself you will need:
welding machine (an inverter is possible, although not necessary);
electrodes of a suitable type;
grinder (for cutting and grinding metal, removing burrs);
other tools and components - at personal discretion.
Homemade moped: manufacturing features and video instructions
Nowadays, many people have begun to engage in constructive creativity. Fortunately, there is time for this, materials and video instructions that can be easily found. If a homemade bicycle is interesting to some part of our society, then there is nothing to say about a homemade scooter or tricycle, which are easy to make. In city conditions, this is a very useful type of transport, which can be maneuvered quite successfully. You can buy a scooter or a tricycle, but making them yourself means turning all your ideas into reality, a unique opportunity to save money, and much more. You can always make it using a high-quality video guide.
PREPARING AND LOADING THE FIRMWARE:
As I wrote earlier, as a software part, I chose the open project of the enthusiast Emanuel Feru on Github: github.com/EmanuelFeru/hoverboard-firmware-hack-FOC
This project proposes to use both sine and vector (FOC) 3-way control principles phase electric motors, with the field weakening function (Field Weakening), as a result we get very soft operation of the motor-wheels, excellent smoothness of speed and torque, as well as a higher speed.
To configure, compile and load the firmware into the microcontroller, we will use what the author of the project himself recommends - PlatformIO IDE, which is installed as an extension in Visual Studio Code from Microsoft. To be honest, I have never had to use these tools before, since I am somewhat far from programming. I did all this under MacOS, but I checked it in a virtual machine on Windows 10, everything installs and runs the same. (The only problem was when installing PlatformIO in Visual Studio Code on Windows 10, there was a cyclical installation process until I installed the Python 3.7 distribution on the system)
We open in PlatformIO (installed in Visual Studio Code) the folder with the project downloaded from Github, and open the platformio.ini file, in which we are given a choice of options for our firmware. There are many implementation and management options, but we are interested in the VARIANT_HOVERCAR option, so let’s uncomment the line:
default_envs = VARIANT_HOVERCAR ; Variant for HOVERCAR build
Then, go to the “Inc” subfolder and open the “config.h” file
In this file we will edit the parameters we need before compilation.
First of all, let's go to the “BATTERY” section, where in the line
#define BAT_CALIB_REAL_VOLTAGE 3970
We need to indicate the actual value of the battery voltage in millivolts. And in the line
#define BAT_CALIB_ADC 1492
The value measured by the controller’s ADC is entered, which we will receive via the serial port a little later.
Let's go to the “MOTOR CONTROL” section
And check the selected motor control mode in the line
#define CTRL_TYP_SEL FOC_CTRL
So that we use FOC mode
In the same section, you can disable one of the wheels if only one motor-wheel is used (otherwise the firmware, after switching on, will complain about the breakage of one of the wheels)
// Enable/Disable Motor #define MOTOR_LEFT_ENA // [-] Enable LEFT motor. Comment-out if this motor is not needed to be operational #define MOTOR_RIGHT_ENA // [-] Enable RIGHT motor. Comment-out if this motor is not needed to be operational
And also enable Field Weakening mode to increase the maximum speed of our vehicle. Speed increases significantly:
// Field Weakening / Phase Advance #define FIELD_WEAK_ENA 0 // [-] Field Weakening / Phase Advance enable flag: 0 = Disabled (default), 1 = Enabled #define FIELD_WEAK_MAX 5 // [A] Maximum Field Weakening D axis current ( only for FOC). Higher current results in higher maximum speed. Up to 10A has been tested using 10″ wheels.
I used a FIELD_WEAK_MAX of 8 because in chair testing, a FIELD_WEAK_MAX of 10 kept my wheels spinning when I released the throttle. True, this was before USART2 was bypassed with capacitors from interference. We need to try the value 10 again:
The “DEBUG SERIAL” section tells us how to obtain data from a USB-SERIAL adapter by connecting to USART3 and how to interpret the received data. We will do this after the initial firmware.
And finally go to the VARIANT_HOVERCAR SETTINGS section
String value:
#define CTRL_MOD_REQ TRQ_MODE
says that Torque Mode is used, which gives smooth acceleration, uniform driving over obstacles and uphill, and most importantly - coasting, inertial movement when the accelerator is released, without engine braking. This greatly increases the run time on the battery, since you can accelerate and coast for a certain time.
#define ADC_PROTECT_ENA
This parameter protects the system from a break in the power or GND wire from the accelerator and brake handle on USART2. The #define ADC_PROTECT_THRESH 300 parameter sets the protection threshold based on minimum and maximum values.
Due to the fact that I just use a button for the brake, which has only two values: 0 and 4095 (min/mac ADC1-value while poti at minimum-position (0 - 4095), I cannot use the protection function. Parameter ADC_PROTECT_THRESH cannot be set to less than 1, and with other values, after turning on the power in the firmware, protection is activated based on the zero value of the brake button (as if a break) and the tricycle beeps with a buzzer and does not go anywhere. Therefore, I commented out the line #define ADC_PROTECT_ENA, disabling the protection, especially that I already have hardware protection, in the form of installed pull-up resistors on USART2;
Strings
#define ADC2_MIN 660 // min ADC2-value while poti at minimum-position (0 - 4095) #define ADC2_MAX 2063 // max ADC2-value while poti at maximum-position (0 - 4095)
and the same for ADC1, you don’t have to touch it, since the author has implemented an automatic calibration mode for the maximum and minimum voltage values from the accelerator and brake handles when you press the power button on the board for more than 5 seconds, which we will do after flashing the firmware.
And here are the lines
#define INVERT_R_DIRECTION // Invert rotation of right motor #define INVERT_L_DIRECTION // Invert rotation of left motor
turned out to be very useful, because when assembling the tricycle, I mixed up the left and right wheels, and they spun in the opposite direction. This parameter for inverting the direction of rotation of the motor-wheels made it possible to correct the direction of rotation without recommutation.
String
#define SIDEBOARD_SERIAL_USART3
must be commented out. The author of the project uses one side board of the hoverboard with his own alternative firmware to indicate the battery charge using a block of LEDs. If the board is not connected, but upon startup the firmware buzzes that there is a problem and refuses to move on.
And here is the line
#define DEBUG_SERIAL_USART3
On the contrary, we need to uncomment it, since this will give us the opportunity to connect to our board using a USB-TTL adapter via USART3 and receive data on the voltage of our battery actually determined by the controller, and make an adjustment.
Line
#define STANDSTILL_HOLD_ENABLE
Helps activate the parking brake function. After a complete stop and an inactive accelerator handle, our vehicle will be impossible to move; the motor wheels will resist, naturally to the detriment of the battery charge. I do not use.
After all the changes have been made, you can proceed to compiling our firmware. Click on the “PlatformIO: Build” button in the lower left corner and compile our firmware according to the selected option and parameters, look at the result of the process in the lower Terminal window:
Once the firmware compilation process is complete, we are ready to upload it to the microcontroller on the board.
To do this, I made a three-wire cable and connected the ST-LINK V2 USB adapter to the board according to the following diagram. I first soldered a comb on the board for connection:
It is recommended not to take +3.3V from the ST-LINK V2 adapter to power the STM32 everywhere, flash only with the main battery connected to the board. Although I tried this too, nothing burned, maybe I was lucky. A colleague of donBaton’s microcontroller still burned out. It's better to avoid problems.
Before flashing the firmware, you may need to remove the write protection of the microcontroller's Flash memory. Two of my boards required this procedure.
I did this using the STLINK Utility program on Windows, but it can also be done on Linux and MacOS using the OpenOCD package. This link explains this in detail: github.com/EmanuelFeru/hoverboard-firmware-hack-FOC/wiki/How- to-Unlock-MCU-flash (How to Unlock MCU Flash)
I will present several screenshots of the MCU Flash unlocking process:
After unlocking, we return to PlatformIO again, connect our cable, hold down the power button and press the “PlatformIO: Upload” button in the program. The buzzer will beep happily and the Terminal window will display information about success:
After the initial firmware, it will be useful to calibrate the battery so that the microcontroller correctly detects the supply voltage. A USB-TTL adapter is used for this. I purchased the simplest adapter for CP2102 from this link: CP2102 USB 2.0 to UART TTL 5PIN Connector Module Serial Converter
For it to work on MacOS (and most likely on Windows), you need to install a special driver: CP210x USB to UART Bridge VCP Drivers
The device was detected in the system and became available at /dev/cu.usbserial-0001
We connect the adapter to the board according to the following diagram:
We launch the virtual serial port reading window with the command in the terminal:
screen /dev/cu.usbserial-0001 38400
The following lines of data appeared in the window:
We are interested in the values in the line under numbers 5 and 6. The value under number 5 is the measured value of the ADC, and under number 6 is the conversion to the supply voltage value. The value under number 5 must be written down.
Then we turn off the tricycle with the on/off button, connect our ST-LINK V2 USB programmer again, open the “config.h” file in PlatformIO again, go to the “BATTERY” section, and in the line
#define BAT_CALIB_REAL_VOLTAGE 3762
We enter the current value of the battery voltage, measured with a multimeter, in millivolts, and in the line
#define BAT_CALIB_ADC 1585
We indicate the measured value of the ADC, which we received under the number “5” step earlier, from the serial port.
We compile our firmware again and again load it into the microcontroller of the board.
Now our firmware correctly determines the voltage of our battery, which can be checked by again connecting the USB-TTL adapter and checking the resulting voltage value under the number “6”.
Now we need to calibrate our accelerator handle and brake button. For this purpose, the author of the firmware has provided an auto-calibration mode. It is necessary to turn off the tricycle board and turn it on again by holding down the power button for 5-8 seconds. The buzzer on the board will emit an additional signal, indicating that we have entered calibration mode. Now we have 20 seconds, during which we need to smoothly turn the accelerator handle a couple of times from minimum to maximum and release. Accordingly, turn on the brake button several times and release. The order doesn't matter. After 20 seconds, the firmware itself will exit the calibration mode and all parameters of our controls (minimum and maximum voltage values on ADC2 and ADC1) will be saved. This must be done after each download of new firmware, if we make changes to it and upload a new one.
By the way, if during the auto-calibration mode we connect to the board with a USB-TTL adapter and output data from the serial port, the screen will notify us about the start of the auto-calibration mode and show the status after completion.
In principle, everything, you can go! On a short stretch of uneven dirt road I accelerated to 32 km/h; on asphalt I think it will go faster. Children have more impressive dynamics.
UPD: Reverse gear is activated by double pressing the brake button when the tricycle comes to a complete stop. The reverse buzzer sounds and you can drive in reverse. Then again, double-press the brake, turn off the reverse mode, and drive forward.
Main parts of a moped
First, let's look at the main parts of this technique. In other words, let's take our future scooter apart, so to speak, and find out its main elements so that making a moped is easy.
Main moped components
It is clear that without a good engine you cannot go far on a scooter. In this case, it is usually installed on the D-6 power unit. Recently, chainsaws have also become very popular, from which a homemade moped is made. In the video instructions you can see in detail how to do this. Chainsaws will be discussed in more detail below.
Exhaust system: forward flow
It is necessary to carefully consider a high-quality exhaust system so that the muffler does not have a negative impact on the power unit with which homemade mopeds are equipped, but, on the contrary, helps to quickly get rid of the remaining air-fuel mixture. A direct flow made by yourself will be what you need.
Suspension: pendulum fork
A pendulum fork that looks much better than other versions of this part of the scooter. The fact is that a large number of varieties of forks can be made, but any expert will confidently tell you that nothing is better than a pendulum one, nothing has been invented yet. As you know, this part of the scooter bears the hardest work. It is the fork that takes the brunt of the impact when going over various bumps, and generally uneven sections of the road. This is a kind of suspension on which the driving characteristics depend. Thanks to the pendulum fork, you can achieve stability of the scooter on any road.
Other parts
Finally, the bracket, shock absorbers, frame and steering column define all parts of the moped.
Project budget and required improvements:
The main points that need to be taken into account when finalizing this tricycle design:
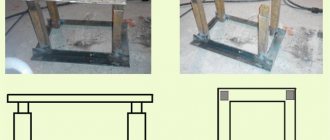
- Lower subframe bump stop.
After assembly and fully loaded with passengers, it turned out that the rear seat profile meets the subframe at a long shock absorber stroke - the shock absorber is too soft. After some thought, I discovered that the shock absorber can be adjusted by twisting the bottom threaded cup upward axially to compress the spring. The rigidity increased, and the seat stopped hitting the subframe cover. At first I had the idea to immediately install a rubber bumper, just in case, from the rear suspension of the Niva. But after checking out local auto parts stores, I couldn’t find one, and I soon forgot about it. I forgot in vain, since on good bumps the children were still able to find the weak points of the structure:
I quickly came up with the following bump stop/travel limiter for the rear subframe, using a bolt, nuts and an old bearing:
It works well, but it's a little annoying, so we need to think about a different implementation.
— Driver and passenger footrests
. After several days of driving the new vehicle, the paint on the running boards began to wear off. Accordingly, it was necessary to correct this. I couldn’t find anything easier and faster than covering them with a double layer of dense heat shrink:
— Battery.
This is, at the moment, the most critical moment in this project, since the original battery is already a little tired and only lasts for 5-7 km, which is quite sad. I disassembled the dead battery from the purchased used hoverboard, took out the BMS board from it, bought new batteries, and assembled a new battery. From the remaining cans of two old standard batteries, I will assemble another battery and put it as a second one in the subframe, with the ability to switch with the previously purchased key:
What else would I like to add to the tricycle:
- headlight and tail lights;
- a small mesh trunk on the back of the rear seat;
- wings for the rear wheels (I don’t know what design and shape yet);
Cargo bikes
8 minutes Author: Mikhail Skvortsov 447
The first cargo bikes appeared more than a hundred years ago. They were widely used to deliver mail, milk, bread and other goods. Such bikes gained particular popularity during World War II, when the fighting European countries experienced an acute shortage of fuel. However, with the end of the war and the advent of relatively inexpensive mass-produced automobile models, the bicycle lost its position, and for a long time, mainly motorized vehicles were used to transport passengers and goods. At the end of the 1980s, there was a surge of interest in an environmentally friendly and inexpensive means of transportation, and the streets of many cities in Europe and America were again flooded with two-wheeled horses. They can be found especially often in the Netherlands and Denmark, which compete with each other for the title of the most cycling country in the world. The cargo bike here is not exotic or a tribute to the fashion for environmental protection, but a full-fledged and ubiquitous participant in the road traffic.
Applications of cargo bikes
Cargo bikes mainly serve the following purposes:
- Selling various goods, such as ice cream, hot dogs or hamburgers, in areas where vehicular traffic is restricted.
- Delivery of small-sized cargo in densely populated urban areas.
- Transportation of goods and tools across factories and factories occupying a large area.
- Luggage transportation at train stations and airports.
- Transportation of goods across warehouses.
- Mail delivery.
- Transportation of children.
- Collection of waste for further disposal.
As you can see, the scope of application of cargo bikes is quite extensive and is not limited only to the above options. And if you install an electric motor on a bike, then the scope of its use becomes almost limitless.
Cargo bikes have a number of undeniable advantages. They do not pollute the air, which is very important in enclosed spaces such as a warehouse or factory. The bikes do not require fuel, are inexpensive to operate and do not make noise. However, such vehicles are not without certain disadvantages. The bicycle is driven by human muscular power, which imposes restrictions on the travel range, as well as on the weight of the cargo transported. The need to maintain balance, the demands on the rider's physical fitness and his vulnerability in city traffic make many people abandon the use of cargo bikes. However, in some situations, a cargo bike is simply irreplaceable, and many of the problems described above can be solved by using a motor.
Types of cargo bikes
The design of such bicycles can be very diverse and largely depends on the conditions in which they are used. The simplest type is a regular city bike, on which strong baskets made of metal rods or special luggage boxes are installed on the front and back, allowing you to transport fairly large loads. This type is most popular in Amsterdam and Copenhagen, and making such a cargo bike with your own hands is quite simple.
Another common type of cargo bike is the bicycle truck (English name - Long John). It usually has a longer wheelbase and a smaller front wheel, allowing for a cargo platform to be placed between it and the steering wheel. The cyclist controls the vehicle using a conventional steering wheel, which is connected to the front wheel by a special structure. The carrying capacity of such bikes, often used by porters at train stations, can exceed 100 kilograms.