How to make a snowmobile from a bicycle
In winter, I often go hunting and fishing along narrow, poorly trodden snow-covered paths and virgin soil.
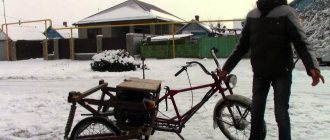
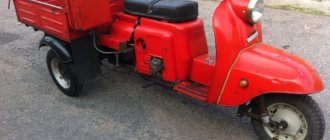
For comfortable movement, I came up with a homemade snowmobile, the Bullfinch. Mono-wheel I created the device as simple, dismountable and adjustable as possible. For the wheel I used a standard rim, expanding it with an aluminum sheet (photo 1)
. Pedal assembly for a snowmobile, turned on a lathe to fit standard bicycle cranks.
I took a wheel tube from the Niva. I sewed a cover for it from tarpaulin using nylon threads. I glued the rubber contact surface to the tire, taped all the seams and covered it with rubber strips.
The camera has the correct shape; it does not inflate like a balloon even with maximum inflation. I did not use wheel lugs.
Adjustable base
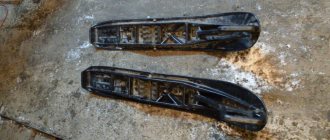
I welded a snowmobile frame weighing 2:5 kg from bicycle spare parts, and made its power part in the form of a spear
(photo2)
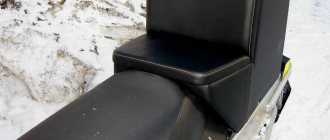
. The seat is attached to a separate “seat bridge”; it is height adjustable. The result was an effective road landing position. The handlebar, which can also be adjusted in height, was chosen so that, with the help of different grips, you can change the fit and shift, loading either the ski (in deep snow) or the wheel (on the crust) with your weight.
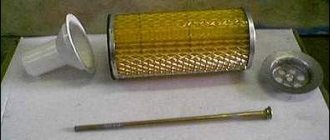
I removed the slide (lower part) and edges from a broken snowboard - the result was a ski weighing 846 g (photo 3)
. For stability, I attached it rigidly to the frame, so that it is not difficult to operate the device.
Where do we start from?
The weight of the Snowmobile snowmobile is 8.7 kg. Estimated cruising speed on packed snow is 8-12 km/h. A snowmobile made with your own hands moves without problems on a ski track, a snowmobile trail, a barely trodden path or noticeable compaction. If the thickness of the loose snow cover is about 30 cm, the wheel begins to slip, falling 10 cm at the start. This can be avoided by starting on a harder surface and then driving on loose snow.
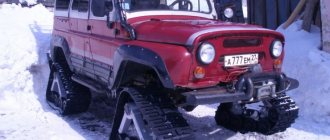
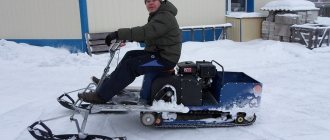
Snowmobile with a walk-behind tractor engine and inner tubes
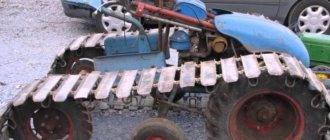
The walk-behind tractor practically does not have to be redone if you upgrade the original wheels. You will need lowered tubes from the truck. Five of them are pulled onto each wheel and secured with chains. The cameras are pumping. Due to the fixation with chains, their shape becomes like a daisy with segments in the form of an ellipse. The new wheels will handle deep snow well.
Another wheeled snowmobile can be built from a walk-behind tractor by putting steel hoops on the inner tubes instead of chains. They are equipped with tracks on the outside. The jumpers are welded from metal plates. The height of the track is about 2-3 cm. After inflating the chambers, the metal hoops will be securely fixed to the wheels.
How to make a snowmobile from a bicycle
Every boy and adult who loves nature and rides on any type of transport, at least once, has dreamed of his own snowmobile, on which any snowdrifts can be overcome and any distance can be overcome in order to drive through the snow for fishing or just for fun, to see to new places where you have never been before.
However, snowmobiles are not a cheap pleasure, and all dreams are shattered by the sad reality of the majority of not very rich people.
What should an ordinary average person do in this situation, when he really needs to be able to go fishing in the snow, etc.?
Puzzled by such a problem, one talented craftsman thought about it and came up with a new means of transportation through the snowdrifts.
Let's move on to practice
The frame, made of pipes or angles, is primarily equipped with a steering mechanism. Having chosen the height and angle of inclination, spot weld the element
Install and secure the motor according to the drawing, taking care not to tilt too much. The snowmobile should not have a long fuel line, so try to position the tank close to the carburetor
The next step is to install the track. Mount the driven axle with the canvas on at the back of the frame (on the fork, suspension, shock absorber, etc., depending on the type of structure), the drive axle - in the middle part of the snowmobile (most often under the driver's seat), in the shortest possible connection with the engine. The gears of both axles are pre-engaged.
Snowmobile idea from a bike
The idea arose to make a snowmobile based on a bicycle frame; the thing, of course, is not very powerful, but for walking in the snow to feel all the joy of freely crossing space, it would be very suitable.
By the way, he had an old and already unusable bicycle in his barn, which became the donor for the implementation of this practical idea.
Consider the design of a snowmobile based on a bicycle frame
Everything is very concise and does not stray too far from the simple concept of the bike itself. The rear wheel acts as a pneumatic wheel or unicycle, and a skateboard ski is tucked into the front fork. The rear fork had to be adjusted to fit the large air tire. Such a simple structure of a snowmobile based on a bicycle with a ski.
Let us now consider what elements and materials are needed for this development: a bicycle, an inner tube from a Niva car, tarpaulin, a sheet of aluminum, a ski from a skateboard, a piece of pipe.
Tools: welding machine, sandpaper, grinder, hammer, wrenches, lathe, glue. For the pre-wheel, the master made a fork, as shown in the photo below.
At the second stage, a metal wheel was made, and an extension was made from an aluminum sheet. Next, the above-mentioned Niva camera was installed on the wheel. The wheel was equipped with a canvas cover.
On the front fork I put a ski from a skateboard that was unnecessary for my direct purposes.
That's the whole laconic structure of a bicycle-snowmobile, which is not so difficult to repeat and can be made, if desired, in an ordinary workshop. The photo below shows a test of the resulting bicycle snowmobile in the field.
Classification of children's snowmobiles
The electric children's snowmobile runs on rechargeable batteries. Such power supplies do not require any maintenance other than periodic recharging. Self-discharge is completely eliminated due to the special design of the batteries.
Some children's vehicles use gasoline engines as their power source. Different types of motors are installed on such vehicles. Children's snowmobiles with two-stroke gasoline engines are lightweight, easy to maintain, warm up quickly, and can run on cheap fuel. Four-stroke engines make less noise during operation. They have lower fuel consumption and a much longer working life.
Some motors have an air cooling system. It must be used correctly to prevent overheating. The hydraulic cooling system uses ordinary snow.
Injection engines have a number of advantages: stable operation, environmental friendliness and efficiency. They are not reliable and are not recommended for use in field conditions. It is advisable to refuel the engines in children's snowmobiles with unleaded gasoline to reduce harmful emissions and increase engine life.
What can you take from your bike?
It would seem that there is nothing to remove from a bicycle to make a snowmobile. However, to make a snowmobile with your own hands you will need almost the entire bike. In particular, for a bike, you will need the entire frame, fork, and seat.
In order to make a snowmobile, it is best to use a mountain version or any other with a reinforced, lightweight frame and a wide range of speeds. It is advisable to use a motorcycle engine as a power unit. It has a small mass, but at the same time produces quite good torque and speed. In particular, you can take the engine from the Minsk motorcycle. or ?Izh?.
Other devices
You can easily and quickly make an angle grinder from a saw that can work autonomously and have high power. For such a transformation, you need to buy the necessary attachments at a building materials store that will help transform one tool into another. To reduce the likelihood of blade breakage, the saw can be equipped with a protective casing, and the number of revolutions can be reduced with a high-speed gearbox.
A good solution is to make a portable generator set from a saw. It will come in handy in a summer cottage where there is no electricity. A power of twelve volts will be enough to provide illumination as from a normal flashlight.
By connecting the inventor, you can convert the energy to 220 volts.
Among the useful homemade products you can add a motor to an inflatable boat, a motorcycle (you will need more than one saw for it), and a light aircraft.
Assembling the front part of the snowmobile
First, remove the front wheel from the bike. Now we attach a piece of channel or a U-shaped bracket to the prepared ski in the center. This can be done using regular bolts. Four M8 or M10 bolts will be enough. After this, cut two identical pieces of pipe. We fix the pipes on the bicycle fork (one pipe for each “horn?”). You can firmly secure the tubes to the fork using U-shaped clamps or clamps. A minimum of two fasteners should be used per fork element.
The pipes are attached symmetrically to each other. To give additional rigidity to the extensions constructed on the fork, we drill through holes in the middle of the length of the tubes and tighten them together with a long bolt or pin. After this, we cut the fixed tubes to length so that they are 20–30 cm longer than the bottom of the bicycle.
Let's return to the ski with the bracket. It is necessary to make holes symmetrically to each other on both sides of the channel/bracket. At the edges of the tubes (near the ground) on the fork we drill holes of the same diameter as in the channel. The holes must be at least 11×13 mm. Now we connect the extended fork to the ski through the holes. To do this, we use a long bolt M10-M12. Thus, the ski is installed on the snowmobile. At the same time, it remains movable in the vertical plane, which allows descent/ascent at different angles. You can control the vehicle by turning the steering wheel, just like on a bicycle.
Calculation and assembly of caterpillars
The caterpillar is a tape, on the outer surface of which tracks are attached. Tracks are rigid lugs installed along the entire length of the tracks. Track options:
- Made from 3mm thick transport tape.
- From a car tire.
- From V-belts.
- Ready-made factory-made tracks.
The conveyor belt must be looped. Its strength is only sufficient for light snowmobiles with engines no more powerful than 10 liters. With. Car tires are stronger than tape and are suitable for powerful engines. Solid tires do not need to be looped, so the likelihood of a rupture is minimal. It is more difficult to choose a tire of the required length than a tape.
Finished tracks are removed from other similar equipment (snowmobiles “Buran”, “Sherkhan”). They are equipped with lugs from the factory. The products are not suitable for use with low-power motors from walk-behind tractors. Homemade snowmobiles made from Buranovsky tracks must have gears from the same “donor”.
The size of the caterpillar is selected according to the required driving characteristics: the larger the width, the lower the handling, but the higher the maneuverability. The minimum area of the contact patch from the snowmobile (skis and tracks) must be such that the pressure from the equipped vehicle does not exceed 0.4 kg/cm2 of surface. Light snowmobiles use a 300 mm wide conveyor belt, cut lengthwise into 2 strips of 150 mm each.
Preparing the Tape
The tracks are attached to homemade tracks with M6 bolts with a wide head. The bolts are fixed with a nut, a washer and a groover are used. Before fastening, leading holes with a diameter of 6 mm are drilled in the tape and tracks. When drilling, use a jig and wood drills with special sharpening.
The conveyor belt is also looped with M6 bolts. To do this, the edges of the tapes are overlapped with an overlap of 3-5 cm, the connection contains 1-2 rows of bolts. For a 150 mm wide track, the following distances are maintained:
- From the edge of the tape 15-20 mm.
- Between bolts on tracks 100-120 mm.
- Between the bolts when banding 25-30 mm.
In total, one track requires 2 bolts, and one belt connection requires 5-10 bolts, depending on the number of rows. When using car tires, only the tread is left, and the sidewalls are removed with a shoe knife.
Homemade lugs
The tracks are made of polyethylene pipe with a diameter of 40 mm with a wall thickness of 5 mm, sawn in half in the longitudinal direction. The entire section of the lug is adjacent to the tape. In light snowmobiles, one track connects the tracked pair. With a track width of 150 mm, the track length is 450-500 mm.
The lugs are cut using a wood circular saw. They use a special machine with two guides (metal and wood), rigidly fixed on a fixed tabletop. The walls of the pipes are sawed one by one.
The distance between the tracks depends on the parameters of the gears on the drive shaft. Typically 5−7 cm. The specified distance is maintained with an error of no more than 3 mm. Otherwise, the operation of the drive is disrupted: the lugs “run” onto the teeth of the drive wheels, the caterpillar begins to slip and fly off the rollers.
Working with the drive part of vehicles
First, remove the rear wheel from the bike.
Instead, a tracked chassis will be installed. If you couldn’t buy ready-made tracks, then we make them from rubber with our own hands. You should cut a strip about 40×50 cm wide. We stuff metal, plastic or wooden strips onto one side of the prepared piece of rubber. These small elements for the snowmobile will serve as snow hooks, so it is best to make them higher. We connect the edges of the rubber to each other to form a closed piece with snow hooks on the surface. We assemble the wheels in pairs on the axle. Taking into account the diameter of the wheels and the length of the assembled track, it is necessary to make a frame that will serve as a common platform for all three pairs of rollers. We mount two pairs of wheels tightly to the frame, and the third outer pair is movable in a horizontal plane. Its mobility will ensure good rubber tension, and as a result, prevent the tracks from slipping. We attach the sprocket from the rear wheel of the motorcycle to the axle of the first pair of wheels.
The assembled frame with track must be installed at the rear of the bicycle. This can be done by welding the drive frame to the bike frame with plates. However, if the frame is large, made of titanium or aluminum, then the drive should be secured with bolts, since at home it is unlikely to be able to weld to non-ferrous metal. The distance from the caterpillar to the frame must be at least 5×10 cm.
Let's start installing the power unit on the snowmobile. The best place for the motor is the horns behind the seat. There the engine will not interfere with your legs and there will be no fear of getting burned on it. However, you can place it in the center of the frame, but only with the top trim. It is worth noting that it is best to place the engine with the shift paw in the middle of the frame, and it is advisable to place the motor with the gear shift on the steering handle at the rear.
The engine is placed on the snowmobile so that its sprocket is above the track drive sprocket. When installing the power unit, additional welding of the plates and channel will be required to fix it on the bicycle frame. You should know how to weld them on site. After this, you need to make a chain of the required length and connect the sprockets. We mount the tank as close to the engine as possible.
Thus, the snowmobile is almost assembled. We install all the power unit controls and the brake bar. For comfort, select a more comfortable seat.
So, it’s not difficult, you can assemble a snowmobile without major investments, which uses a bicycle as a base. You can modify the snowmobile with your own hands at your discretion, but the above diagram will be quite sufficient for driving through snow-covered fields.
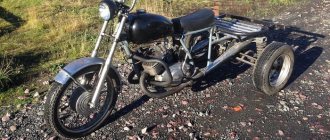
Powerful snowmobile bike
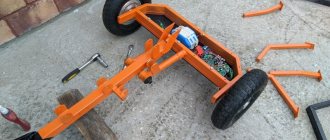
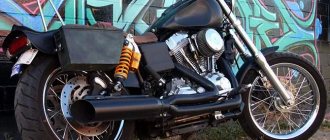
Inspired by the Discovery Channel show “American Chopper” and seeing my neighbors riding around in their snowmobiles, I decided to create a crazy combination of one and a pedal-powered snowmobile. I designed and built this bike in three weeks using parts from three broken bikes, steel tubing and corner extrusion, and a track from an old 1990 Polaris snowmobile.
Step 1: Thinking through the insides
Once you've got the right tools, parts, and as many bikes as possible in one place, start thinking about how you'll assemble your track and bike frame. Children's mountain bikes with 20-inch rims fit perfectly into the snowmobile truck, and the textured tires fit snugly in the gap where the sprocket should be. I have found that the limited space inside the crawler is better suited to a 3 wheel configuration than a 4 wheel configuration.
Start by disassembling two bicycles to assemble the interior of the future snowmobile. Disassemble the bike down to the frame with pedals. trim the frames so that they fit well inside the crawler and do not interfere with rotation. The frames will be located parallel to each other inside the crawler track.
You need to connect the two frames together by welding the chainstays and top stays of the additional frame to the inside of the two-wheel frame. The third wheel should also fit snugly into the gap in the track. When welding frames, you need to remove the paint from the metal surface. *Make sure that the assembled structure of the frames and wheels fits tightly to the track surface, so that when inflating the wheels, the tires adhere well to the track without additional equipment.
Step 2: Making the drive
I originally wanted the pedals to be in front of the crawler. But for convenience and simplicity of design, I decided to use a traditional pedal design, placing it inside the caterpillar track. Of course, the pedals will have to be turned on both sides of the wide track, which can create inconvenience. But in reality it turns out better than it seems: in a vertical position, the pedals extend beyond the top edge of the track, so pedaling is quite comfortable. Since we have two frames, both pairs of pedals must be positioned perfectly evenly in relation to each other, since when the pedals are twisted, one single axis will rotate. Also, the distance from the system to the axle of the drive wheels must be the same so that both wheels rotate the track together.
My two frames didn't fit together perfectly, so I needed to cut new dropouts into one of the frames to properly connect them together. If you, like me, use two different frames, you will have to tinker with the connection. The most convenient way to do this is with dropouts.
When everything is adjusted, you need to remove the two inner pedals and cut off the levers, leaving a small fragment for welding. You can connect two cut internal arms by welding a piece of metal corner. This connection synchronizes the two frames when pedaling. The connection must be secure, so firmly weld the corner to both arms. The gear ratio in both frames must be the same so that both drive wheels rotate synchronously.
Now we have something like a tank unicycle :)
Now we need to construct the final outer frame to attach the seat and handlebars. I simply welded angle steel segments to the frames where the pipes were attached. Steel pipes will extend from them to the seat mounting axis. Then you need to attach the pipe sections to the front and back, as shown in the photo. Cross pipes are needed to attach the seat and steering rails. They are connected by a long transverse pipe. This design allows you to drill holes in the profile and pipes, and find the optimal position for the frame parts. You can bolt it together and adjust the position of the pipes. When everything is debugged, it is enough to simply weld the bolts so that the frame becomes solid.
I left a few of the fasteners unwelded so that the top frame could be unscrewed and stowed away as a separate modular unit in case the track had to be removed for repairs.
The mountings of vertical tubes to bicycle frames must be strong enough not to break under the weight of the rider. They should also not touch the chain or other moving components inside the track. The most convenient way to secure the frame seat tube is at the intersection of the horizontal beam and the long cross tube.
Step 4: Steering Gear
The movement of the bike is complicated by the presence of a heavy track with strong friction on the ground, as well as the combination of the track with a regular front wheel. And if you make it heavier and thereby increase the friction of the wheel on the ground, this will make the bike even more difficult to control. The bike is very heavy, so don't expect any windy rides from it. I decided to use the front frames from disassembled bikes to make the steering gear as lightweight as possible.
I arranged the two head tubes so that the handlebars could be rotated in a traditional way to change direction, but also on a horizontal axis to allow the front wheel to be freely raised and lowered. This steering allows weight to be redirected from the track to the front wheel for better control of the bike. I extended the frame by adding a handlebar mount made from two steel angles (see photo). This moved the front wheel away from the track and the bike was over 2m long.
The addition of long angle bars and Ghost Rider style handlebars allows for better control of the bike from the back of the seat and gives enough leverage to lift the bike (front wheel) while sitting on it. This unconventional way of transferring weight during steering takes some getting used to, especially when cornering, but you can get used to it.
DIY snowmobile from a bicycle
The bike is good, but the problem is that the bike does not ride in the snow in winter . It would be more correct to say that he is moving, but the movement is complicated by obstacles - ice, loose snow, snowfall. With proper preparation, they are not as scary as they seem at first glance. An experienced cyclist continues to ride in the winter without any problems. To move, you will have to choose smooth paths with trampled snow or, in extreme cases, asphalt roads, where dirt and reagents are found in abundance.
When you want to ride around the park, only paths where many people have passed are accessible. If you try to drive on virgin soil, then with a relatively large thickness of snow cover, it will be an unpleasant pleasure. The bike skids, the rear wheel digs in, and pedaling takes a lot of effort. Riding becomes a challenge. It will be difficult to travel even 2-3 km. And is it worth driving like this? After all, riding is meant to be fun. So cyclists have to spend the winter on sidewalks and trampled paths. Even on the ski track (if we ignore the moral side of the issue - the cyclist disfigures the ski track, and the skiers are then very unhappy, which is correct), the bike rides conditionally. Therefore, if you want to ride in a park or through a forest, without choosing general routes, then hunting skis will help.
Step-by-step instruction
Before starting work, calculations are made of all design parameters, draw a diagram of the snowmobile on a sheet of paper, prepare all the parts and tools:
- wide ski up to 80 cm long;
- two small metal pipes with a cross section of 50 mm;
- a small piece of channel;
- a metal plate measuring 25x50 mm, thickness 4-5 mm;
- cameras from a KAMAZ vehicle;
- wrenches of different sizes;
- hammer;
- pliers;
- electric drill;
- welding machine.
Assembling the front part of the snowmobile
It’s best to start by replacing the front wheel with a ski to reduce friction with the snow. Making your own skis is not difficult. To improve the quality of the structure, it is recommended to make skis from duralumin or chipboard.
- To do this, take 4 pieces of plywood with a thickness of 5 mm. Pieces of plywood are glued together and attached to the steering base.
- Then a spring made of high-strength steel is well secured to the structure. Instead of a homemade ski, an old skateboard or out-of-use factory skis are also used.
- The next step is to remove the front wheel of the bicycle. Then fasten the piece of channel in the center to the prepared ski - this is done using four M8 or M10 bolts.
- Then cut two pieces of pipe of the same size, attach them to the bicycle fork - one pipe for each arch of the bicycle. To make the structure strong, it is better to secure the pipes to the bicycle fork using clamps or clamps - use at least two fasteners for each fork arc.
- The pipes must be fastened symmetrically relative to each other. To make the structure durable, rigidity is added. To do this, through holes are drilled in the middle of the tubes, which are tightened together with bolts.
- The tubes attached to the bicycle fork bars are cut to be 20-30 cm longer than the bottom of the bicycle.
- The ski is mounted with a bracket. To do this, symmetrical holes are drilled on both sides of the channel. At the edges of the fork tubes, holes are made the same size as in the channel - no less than 11-13 mm. The structural element is connected with long M10-M12 bolts.
- To strengthen the frame at the joints of the parts, weld a transverse pipe to the bottom of the steering wheel. You need to attach the ski attachment to the transverse pipe using hinges.
- Using a washer, bushing, steel pin, and two nuts, assemble the hinge joint.
Working with the drive part
Work begins with dismantling the rear wheel. Then the wheels, made by yourself, are installed. It is recommended to install wheels with low pressure - they are elastic, have a small mass, and do not put pressure on the ground. Wheels with large chambers have good qualities - increased maneuverability and efficiency. If car inner tubes are filled with polystyrene foam, this will save them from the accumulation of snow, dirt, and ice. The design of the chassis and rear drive is simple and does not cause difficulties in making a vehicle yourself.
Making a snowmobile from a bicycle
Making a snowmobile out of a bicycle is an old idea that has occupied the minds of cyclists for a long time. There were many options, but they were usually not successful.
Homemade snowmobiles are already a whole culture that occupies the minds of lovers of mechanical inventions. There is even a separate article about them.
But in this particular article we will focus on snowmobiles from a bicycle, which you can make with your own hands.
For example, in this video the author made something like a snowmobile , but it didn’t work out.
The front wheel contributes the lion's share to maintaining the cyclist's balance. This article explained why a cyclist is able to maintain balance. Here, the author screwed a shovel to the front wheel. As a result, the wheel, instead of “keeping the route,” became capable of moving in all four directions, similar to a cheesecake sled. An oblong ski should have been used.
But a snowmobile made from a bicycle can be a good one. A relatively successful option for making a snowmobile from a bicycle is the use of special devices . It turns out to be a bicycle on tracks. These units can be used to drive on snowy slopes and even perform stunts.
However, purchasing these accessories will be quite expensive. Therefore, read on.
What to pay attention to
Obviously, the first problem that should be solved when adapting a bicycle to winter is to increase the grip of the drive wheel on the ground and eliminate slippage.
The easiest way is to install the widest possible tires on the wheels that will fit into the frame and fork. Such tires with an aggressive tread will already improve the situation and the cyclist will feel much more confident. But this is not enough.
The tires need to be studded and the bike needs to be modified.
We will plan the following type of device, but instead of a seat we will park a bicycle there so that the rear wheel also digs snow.
Preparing the wheels
Even a wheel with wide tires and an aggressive tread will slip. You may initially consider installing studded tires . But there is a limitation.
Studded bicycle tires are designed specifically for cutting through snow to a hard surface. This does not allow you to ride in deep, loose snow, since the hard part is located there, for example, under 30 cm of a soft blanket.
Therefore, you need to choose the maximum tire width. She fails less. This means that you either need to stud such a tire with your own hands (which usually does not always work out successfully) or simply throw plastic zip ties around the diameter of the wheel. Such improvised spikes act as chains on a car wheel and help the wheel to hold the road much better. It rows better. Well, don’t forget to reduce the tire pressure to the minimum permissible values.
Preparing the skis
A simple way to increase the cross-country ability of a bicycle on snow is to install a ski instead of the front wheel. It is important not to go too far.
The ski should cut into the snow well and have a relatively short length, since the front wheel is also a steering wheel. Should not slide off the road and allow you to maintain your balance. This guy showed an example of successfully installing a ski instead of a front wheel in his video:
Please note that unlike the first example of the video, here the ski holds the road perfectly.
How to attach a ski to the front wheel?
Very simple. It is necessary to make a landing pad from an aluminum corner, which will be tightly attached to the ski. This entire structure can be attached to the bicycle wheel with a woven belt using locks. You will need two or even three belts. A tight fastening is ensured by a relatively soft tire, which is compressed when the belt is tightened and prevents the ski from dangling due to its elasticity.
Please note that the ski is attached to the wheel. This is done not only for ease of fastening, but also to maintain its mobility.
If the ski is attached to the fork in a rigid position, then even on small bumps, the bike will bounce and control will be lost. In addition, the ability to drive even small differences in altitude will be lost. The ski will stick into them at a right angle and break.
Therefore, it must be attached to a wheel that swings on a hub, like a pendulum . You can replace this mount with a specific device that will be installed instead of the bushing. But doing it is much more difficult.
Even installing a front ski will not make moving on snow much easier . Obviously, this will only slightly improve the ride quality of the bike in winter. True, the front axle will dig into the snow less and will allow you to steer.
We make additional equipment
The snowmobile we made moves a little better in the snow, but still sinks in the loose, deep snow cover.
How to improve the situation?
Right! Make sure that the bike does not go under the snow.
How to achieve this?
It can be assumed that it makes sense to install a ski on the rear wheel. There are such examples of homemade snowmobiles and the result is a kind of vehicle on which you can have a good ride down the hill. It's called SNOWBIKE. But driving in the snow on the plain is no longer possible. After all, the rear wheel is isolated by a ski and is no longer capable of transmitting rotation. Accordingly, another solution is needed.
Frame in a winter bike
The cyclist is lucky in this matter, since he can choose the frame according to the material from which it is composed. We will look at all frame options for winter skiing so that you can make the right choice and skate for several seasons without any problems.
Aluminum
This is the most common option, which is also inexpensive. Aluminum frames withstand aggressive influences. A chemical film quickly forms at the site of damage, which serves as protection. Therefore, if small chips of the paintwork occur, you don’t have to worry about the frame; it will withstand such a nuisance.
A winter bicycle requires its user to periodically check the aluminum frame for damage. The most attention should be paid to the right chainstay and dropouts, because these are the places that are most exposed to mechanical stress. To reduce the negative impact and extend the life of the frame, special linings or neoprene covers are put on these places. But first you need to treat and paint over the chipped areas.
Another nuance concerns welds, which also require increased attention. Due to the insufficient ductility of aluminum, fatigue stress can accumulate in the welding area. If in summer a small crack does not cause any particular trouble, then in winter, due to a sharp change in temperature and water ingress in this place, a big problem can arise. Therefore, all cracks will need to be treated before the onset of frost.
Steel
Steel, no matter how high quality it is, can rust. This is not a contraindication, you just need to inspect the frame more carefully and carefully prepare the bike for winter riding. Any chipped paint coating must be thoroughly cleaned, treated with a primer and paint applied.
Dropouts suffer the most from winter driving. It is possible to put them in order, but it is a complex and lengthy process. If before winter it was not possible to properly treat the rear part of the frame, then it must at least be lubricated. Litol, grease, anticorrosive, Movil are suitable for this. The latter option can also be used to process a bicycle frame from the inside.
Magnesium in alloys
A bicycle with such a frame should absolutely not be used for winter riding. Magnesium is a very active element, so it quickly reacts with many elements. If you regularly ride on snowy city streets that are liberally sprinkled with salt, the frame will be completely damaged.
Bicycles with magnesium frames are most often used for racing or at least for high-speed riding, they cost a lot, and it would be a shame to lose such cross-country transport in one winter season.
Titanium
A bicycle with a titanium frame can be considered an ideal option for winter riding. This material is characterized by chemical resistance, which does not change even when exposed to aggressive factors and sudden temperature changes. Titanium does not even need to be painted, since it does not need such protection, and its natural color and texture already look noble.
Even corrosion is not a problem for this material, with the exception of welding areas. In general, working with titanium is very difficult. Welding a high-quality titanium frame can only be done in a professional workshop that has the equipment suitable for this.
Finding a high-quality titanium frame for a bicycle is a great success that smiles only on a few. And a frame with poorly executed welds in Russian winter conditions can collapse even faster than an inexpensive aluminum model. So now think about whether it’s worth tempting fate and hoping that a titanium specimen that was welded by professionals in the proper way will fall into your hands.
Carbon
On the one hand, carbon fiber is not susceptible to the effects of salts, dirt and other aggressive elements. But, on the other hand, at sub-zero temperatures carbon becomes brittle. No one is immune from falling on a bicycle, especially in the winter. The only thing left to add is the high cost of carbon frames.