The fuel supply system to the engine, which is the carburetor, is one of the important components of a vehicle such as a scooter. The functioning of almost all mechanisms depends on the correctness of its operation. Therefore, the carburetor periodically requires maintenance.
Each owner of the vehicles presented must understand the procedure for adjusting this system. Advice from experienced mechanics will help you figure out how to adjust the carburetor on a scooter. They will give several recommendations on how to carry out maintenance efficiently and quickly.
Carburetor value
Before adjusting the carburetor on a scooter, you need to once again study the purpose of this system. This will help assess the importance of periodically carrying out such work.
The carburetor mixes the fuel mixture (gasoline and air) before it is supplied to the engine cylinder. The durability, speed and power of the engine, fuel consumption, and also, importantly, driving safety depend on the correct operation of this system.
The adjustment process should be approached comprehensively. Some owners of this type of vehicle, out of ignorance, underestimate the importance of such carburetor maintenance. At best, an inexperienced driver will only adjust the fuel supply quality screw. This gives results, but only when operating the engine at low or idle speeds.
Correct setting of the scooter carburetor
In the conditions of mass production of internal combustion engines, it is impossible to ensure perfect manufacturing accuracy; as a result, engines coming off the same assembly line may differ from each other within certain limits. The same situation occurs with the production of engine fuel system elements, in our case, carburetors.
The matter is further complicated by the fact that initially the engine manufacturer does not know in what climatic conditions a specific engine model will be operated. As you know, the same engine will operate completely differently in different climatic conditions.
Designers designing engines are well aware of these problems and therefore introduce adjusting elements into the power system (in our case, the carburetor), by influencing which you can significantly improve the efficiency, power and dynamic performance of your scooter’s engine based on specific operating conditions.
First, a little theory.
As you know, a carburetor is a device in which the working mixture (a mixture of air and gasoline) is prepared, without which the operation of the internal combustion engine is impossible. The most optimal ratio of gasoline and air in the working mixture is the value: 1/15, that is, for 15 kilograms of air there is 1 kilogram of gasoline. With such a mixture, the engine will operate without interruptions and detonation. This mixture is usually called optimal.
Unfortunately, at the optimal mixture, the scooter engine in some modes will not be able to operate stably, for example: in cold start mode, for stable operation the engine requires a mixture in which there is slightly less air than in the optimal mixture, the ratio of such a mixture is: 1/13, that is For every 13 kilograms of air there is 1 kilogram of gasoline. This mixture is usually called “rich”.
In order to enrich the mixture at the right time, additional modules (starting enrichers) are introduced into the carburetors, which are essentially mini carburetors; more details about the operation of the starting enricher are written in the article: Automatic starting enricher for a scooter
The most dangerous for engine operation is considered to be a lean mixture (a combination of gasoline and air of approximately 1/17 or lower. When the engine operates on such a mixture, detonation occurs and overall engine overheating, which ultimately leads to burnout of the piston or cylinder head gasket, melting of the internal surface of the cylinder head, such “little things” as burnout of the exhaust valve need not be mentioned at all.
We place the scooter on the central stand, provide free access to the carburetor adjustment elements, and warm up the engine (a prerequisite for high-quality carburetor adjustment).
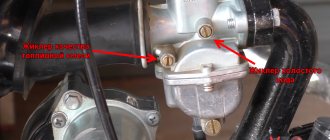
We begin the process of setting up the carburetor by adjusting the idle speed. For this purpose, there is a special bolt on any carburetor (marked with an arrow), by rotating which you can increase or decrease the idle speed. By rotating the idle speed bolt, we achieve minimum, but at the same time stable engine speed.
After adjusting the idle speed, we proceed to adjusting the quality of the mixture. For this purpose, the carburetor has a mixture quality bolt (marked with an arrow), by rotating which you can change the composition of the mixture within certain limits. On different models of carburetors, the “quality” screw works on a different principle: in one case, the “quality” screw closes the air channel of the idle system, thereby reducing or increasing the amount of air in the mixture (enriches or leans it), in another case, the “quality” screw regulates the amount of ready-made mixture (emulsion) entering through a special channel into the engine intake manifold.
In general, there is no particular difference between the two principles of operation of a “quality” bolt, except that in the first case, when tightening the screw, the mixture becomes richer, and in the second, when tightening the “quality” screw, the mixture becomes leaner, keep this point in mind.
We determine the correctness of adjusting the quality of the mixture as follows: after adjusting the quality bolt, we give sharply full “gas” (preferably while driving), the engine should confidently develop speed without jerking delays and detonation, a pronounced “catch” should be felt. If the engine unsteadily picks up speed, detonates or stalls when the throttle is suddenly closed, then you should once again adjust the position of the quality screw until the engine begins to develop speed with a pronounced “catch”.
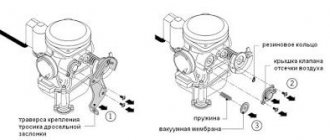
If, after adjusting the quality screw, it is still not possible to achieve normal operation from the engine, then we try to lower or raise the carburetor needle in increments. If the engine picks up speed poorly (rich mixture), lower the needle; if the engine picks up speed unsteadily, detonates and stalls when the throttle is closed abruptly, raise the needle. Try to raise and lower the needle one division at a time and not immediately all the way up or down.
You can read more about the structure and adjustment of the needle in the article: Photo report: Design of the carburetor of a four-stroke scooter (carburetor 4t) or in the article: Photo report: Disassembly and design of the carburetor of a two-stroke scooter (carburetor 2t).
Next, after all that has been done, we drive the scooter for several kilometers as usual, unscrew the spark plug and visually determine by the color of the spark plug insulator what mixture the carburetor is “preparing.”
If the spark plug insulator is black and covered with a layer of soot, then the carburetor is “preparing” a “rich” mixture, in this case the situation can be corrected by lowering the carburetor needle to the desired division.
If the spark plug insulator is snow-white, it means the carburetor is “preparing” a “lean” mixture, in this case the situation can be corrected by raising the carburetor needle to the required division.
If the spark plug insulator is sand or brick-colored, then your carburetor is preparing the optimal mixture and no further adjustment is necessary.
After the final adjustment of the carburetor, you should adjust the free play of the throttle cable; for this purpose, there is a special nut on the cable by tightening or tightening which you can reduce or increase the free play of the cable. The free play of the throttle cable should be: 1-2 mm.
On some models of scooters equipped with 2T engines, after final adjustment of the carburetor, the positions of the oil supply control drive should be adjusted. To do this, just like in the first case, we look for the adjusting nut on the oil supply system drive cable and tighten and release the nut until the marks (marked by arrows) are opposite each other.
Signs of necessary adjustment
There are several main signs that let the driver know that it is time to have their vehicle serviced. They cannot be ignored. Otherwise, repairs will cost much more. In this case, you should learn how to properly adjust the carburetor on a scooter as soon as possible.
First of all, engine power drops. This can also be observed due to wear and tear of the engine systems. The cylinder piston group may require replacement. However, an incorrectly configured carburetor can also affect the power of the engine. If it introduces more air into the mixture than required, the fuel becomes lean. This leads to overheating and reduced power.
If the engine refuses to work at all, this may also be evidence of improper carburetor operation. However, to find the cause of the breakdown, you will need to check several major systems.
If the engine starts but stalls, this may be due to a clog in the carburetor. In any case, the driver must responsibly approach the issue of solving any problem related to his vehicle.
Carburetor structure
It is worth noting that the location of the carburetor is also different in different scooter models. Therefore, before you start adjusting it, you need to thoroughly study all the components and assemblies of your vehicle, their characteristics and location. The structure, in contrast to the location, of the carburetor is approximately the same.
The carburetor includes the following components:
- Venturi tube;
- valve with needle;
- float chamber;
- idle system;
- starting enrichment;
- spool;
- accelerator pump.
Venturi tube
So, the first element of the carburetor, called the Venturi tube, plays the most important role in its operation. This part is characterized by a diameter that varies throughout the entire length of the tube. This is due to the fact that it narrows towards the center, after which expansion follows again. It is the narrowest point of the tube that is intended for the air flow to pass through it.
The characteristic narrowing of the tube contributes to the formation of low air pressure, which is aligned to the point of expansion of the tube. If another smaller tube with gasoline is placed inside this tube, then the gasoline, on its way to the low-pressure zone, will begin to leave the small tube, spraying and evaporating, interacting with the air flow inside the large tube.
Flap with needle
The valve with the needle is installed directly in the center of the Venturi tube described above. It is necessary in order to regulate the amount of mixture that enters the combustion chamber. This adjustment is carried out by pressing the gas. However, the damper cannot operate without a needle. It is this that determines the volume of fuel entering the engine. So, when the pilot presses on the gas, the damper begins to move, thereby raising the needle, due to which the required amount of gasoline is supplied. In a word, the harder you press on the accelerator pedal, the more the damper opens, and, accordingly, the more fuel enters the combustion chamber.
Float chamber
To prevent the engine from stalling, it must be constantly supplied with fuel, a certain amount of which must be in the tube. For this purpose, a float chamber was invented, the operation of which is carried out on the principle of a toilet tank. Those. There is a float inside the chamber that moves to its lower part immediately after the gasoline level in the tube drops. Thus, the displacement of the float ensures the opening of a special valve through which fuel enters. After filling, the float rises, thereby closing the valve. This ensures a continuous and correct supply of fuel.
Idle system
The idle system in the carburetor is responsible for idling. However, its work is carried out not only at idle, but also at low speeds. In the case of idle speed, fuel is supplied through another channel of the carburetor, which is located behind the limiter. The idle system consists of:
Screw system
It is responsible for the volume of air that passes through the entire system, thereby regulating the quality of the mixture entering the combustion chamber. By tightening and unscrewing this screw, the pilot can adjust the amount of air. Accordingly, the less air volume enters the system, the tighter the screw is tightened, and vice versa. It turns out that when there is a lot of air, the fuel is leaner, when there is little, it is richer, since it contains more gasoline than air.
Special channel
The fuel mixture leaves the carburetor through it. This channel is closed by a special valve at the moment when the carburetor throttle valve opens
The valve is an important part because it prevents the system from negatively affecting the operation of the scooter's power unit at high speeds
Jet
Responsible for configuration.
It is worth noting that the carburetor idle system is its most vulnerable part. In this regard, faulty jets with a small cross-section are often the cause of carburetor malfunction. This is due to the fact that they are prone to clogging very quickly.
Thus, knowing the structure and principle of operation of the carburetor, you can begin to adjust it.
Maintenance Procedure
Carburetor failure is the most common problem with a vehicle such as a scooter. Four-stroke (4t) and two-stroke (2t) engines are available for sale. Engines are produced in volumes of 50 and 150 cubic meters. The differences in them are insignificant, so the adjustment in all systems is almost identical.
It is much easier to adjust the carburetor of a Honda Dio scooter. Therefore, many auto mechanics use this technique as an example when training inexperienced drivers. During the setup process, you need to perform a number of manipulations.
First of all, the carburetor is adjusted at idle speed. Next, using a special screw, the ratio of air and gasoline in the fuel mixture is equalized. It is possible to perform this operation by moving the needle. The final stage is to control the fuel level in the float chamber.
Before tuning, the carburetor must be removed and washed. Only after this can the settings be made.
Adjustment
The carburetor of a scooter can be located in different places. It depends, first of all, on the brand of the scooter. For example, on the Honda Dio-35 this element is located on the left side, closer to the rear wheel. A throttle cable and a fuel hose lead to it. Everything is clearly visible and you won’t have to look for the carburetor for long.
Adjusting the scooter carburetor is necessary in the following cases:
- The engine does not start or it takes a long time to start;
- The equipment loses its former dynamics and acceleration;
- With unstable idle;
- When the scooter engine speed is too high;
- With increased fuel consumption;
- When black smoke appears from the muffler.
The adjustment should be made with the engine warm. But before starting it, it is recommended to rinse and thoroughly clean the carburetor. First of all, the idle speed is adjusted, then the mixture quality is adjusted and the fuel level is adjusted.
The idle speed is adjusted using a screw. This adjustment will come in handy if the scooter has been sitting idle for a long time. After it, the carburetor will seem to gain a new life.
- If you need to increase the speed, the screw must be tightened.
- To reduce the speed, unscrew it.
We remind you that the adjustment is carried out after warming up the engine for at least ten minutes!
Adjusting the mixture quality
Adjusting the quality of the mixture is also very important. It is recommended to always adjust it according to the factory proportions. If the mixture is too lean, the scooter will often overheat and lose power and dynamics. On the contrary, if the mixture is too rich, fuel consumption will increase and carbon deposits will accumulate in the chamber more often.
This parameter is adjusted using a special screw or by moving the needle in the throttle valve. Often adjustment is carried out in the second way, since the screw responsible for this parameter may be damaged or simply missing in this model.
- Clockwise ? the mixture becomes richer.
- Counter-clockwise ? depleted.
In the case of a needle:
- Does the needle rise? enriches itself.
- Does the needle go down? depleted.
The most noticeable results can be achieved by combining these two adjustment methods.
Again, before making adjustments, the scooter engine must be warmed up for several minutes, and the carburetor must be clean inside.
The quality of the mixture is correctly adjusted in the following cases:
- The scooter began to accelerate smoothly;
- While driving, there are no failures in engine operation;
- There are no jerks;
How to find out the degree of enrichment of a mixture using a candle
- What if the scooter's spark plug is black and has a lot of carbon on it? mixture is too rich.
- If the spark plug of the scooter is white and looks like it’s brand new? mixture is too lean.
Level setting
The fuel level is adjusted after checking. At the very bottom of the scooter carburetor there is a transparent tube, by which you can determine the level.
- Unscrew the butter screw;
- We lift the handset up;
- Checking the level;
- If the level is just below the carburetor cap curb, everything is fine.
- If not, then adjustments are made: The cover is removed;
- The tendril of the needle, which acts as a locking mechanism, is bent. This type of tuning must be done in very small ranges.
Let us remind you once again that the carburetor must be clean during adjustment. It is necessary to fill only with fuel with the octane number recommended by the manufacturer, and the jets and other parts must be standard, and not homemade or removed from the carburetor of another scooter.
https://youtube.com/watch?v=a0rMb8efxkM
Removal and cleaning
Before adjusting the carburetor on the Honda Dio scooter, taken as a simple example, it is necessary to remove and clean this system. To do this, all plastic elements that impede this process (the seat and the plastic underneath it) are dismantled.
If the engine is 2t, then the fuel and oil hoses will be disconnected (there are no oil outlets on 4t engines). The enrichment contacts are dismantled. Then simply unscrew the carburetor mounting bolts and pull it out. Its external elements are cleaned of dirt.
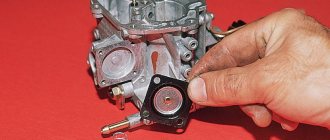
Next, you need to partially disassemble the fuel supply system. The bolts securing the float chamber cover are unscrewed (it is thoroughly washed), and the float is removed. Next, the carburetor is flushed. The system is assembled in the reverse order and installed in place.
Carburetor installation
We install the carburetor on the scooter in the following sequence:
- 1) We fix the carburetor in the place where it is attached to the engine, put on the air pipe and secure it with a clamp.
- 2) We put the drainage hose on the fitting (the lower part of the float chamber)
- 3) Install the throttle cable in a special bracket. We check that the protrusion on the cable fastening screw coincides with the groove on the bracket. Fix the cable with nuts
- 4) We put on the gasoline hose and secure it with a spring clamp.
- 5) Connect the contacts of the starting enrichment.
As you can see, the carburetor connection diagram on a scooter is not that complicated. Next you need to adjust the carburetor.
Carburetor cleaning
Before adjusting the carburetor on a 2t or 4t scooter, you should thoroughly clean the system mechanisms. To do this, you can use one of two methods. In the first case, the carburetor is washed with gasoline and purged with a compressor. The equipment must have a nozzle in the form of a pointed tip.
If you don’t have suitable equipment at hand, you can purchase a special liquid for flushing the carburetor. With its help, all channels, parts and elements can be easily cleaned. The liquid is in a can. Therefore, it is supplied inside under pressure. This principle facilitates thorough purging of even narrow channels.
There is no need to dry internal systems after flushing. They simply reassemble the systems in reverse order. Next you can make settings.
Main problems and malfunctions of the carburetor.
Mesh filter. There are usually only two problems with this element:
- Blockage.
- Breaking.
In order to find out the cause of the breakdown, unscrew the fuel filter cap to remove the strainer. If dirt has simply accumulated on it, then washing it in gasoline or blowing it out will help.
If there is visible damage to the mesh filter, be sure to install a new one. There may also be damage to the fuel supply pipe (during repairs, it is practiced to check this element).
In most cases, the carburetor starter does not function due to blockages. Acetone or the same gasoline should be used for washing.
Blowing clogged carburetor parts with compressed air is an acceptable and convenient repair practice.
The throttle body, carburetor parts, intake or exhaust pipes - all of these parts are subject to depressurization. You can definitely check it in a primitive way - spread soap foam on the problem area.
Idle speed adjustment
When learning how to set up a carburetor on a 4t or 2t scooter, you need to take into account that there are no fundamental differences between these engine types. Some engine models may not have a fuel mixture adjustment screw. It is corrected only by adjusting the needle and float.
Before starting work, it is necessary to warm up the engine for 10-15 minutes. Every scooter has an idle screw. To find its location, you must refer to the manufacturer's instructions. With its help, it is possible to adjust the stability of the idle speed.
If the screw is turned clockwise, the speed increases and vice versa. The adjustment is carried out until the motor operates stably.
How to adjust the carburetor on a scooter yourself
139Qmb manual russian
Its adjustment begins with maintenance:
- the device must be removed, purged and cleaned of contaminants, the channels and jets are recommended to be washed with gasoline, and any remaining contaminants must be removed by blowing with compressed air;
- if the rubber pipe has already “acquired” cracks, then they can be covered with sealant;
- all contamination of the air filter should be removed or replaced with a new one;
- the exhaust system must be inspected and cleaned;
- Assemble the cleaned device and install it in place.
The performance of a scooter engine largely depends on the quality of the fuel mixture. The engine overheats, operates incorrectly and loses power with a lean mixture, while a rich mixture provokes excessive fuel consumption, carbon deposits and fuel overflow. You can check the operation of the carburetor by the color of the removed spark plug - if it is black, this indicates that the fuel mixture used is too rich, and white indicates a lean mixture; their quality will have to be adjusted during tuning. The brown color of the spark plug indicates normal fuel quality; in this case, the mechanism does not need adjustment.
To adjust you need:
- Screw the fuel mixture quality bolt (FMC) first all the way, then unscrew it up to 0.5 turns, while the idle speed is set to the middle position;
- start the scooter - if the equipment does not start or the speed is low or high, then increase it (at low speed) or reduce it (at high speed) by setting the idle speed;
- gradually unscrew the KTS bolt until the engine reaches maximum idle speed and tighten it again by 0.25-0.5 turns;
- start the engine and drive - if there are interruptions and dips when starting to move, then you need to tighten the KTS bolt again by 0.25 turns.
When the bolt is turned clockwise, the mixture becomes richer, and when turned counterclockwise, it becomes leaner. If excessive fuel consumption is detected, the spool needle moves down one notch and the adjustment is carried out from the very beginning. If there is a shortage of fuel, on the contrary, the needle moves up one notch and the adjustment procedure is repeated again.
Correctly configured operation of the engine system of any vehicle should ensure smooth operation, without jerks or dips. A specialist will tell you how to most accurately adjust the carburetor on your scooter, however, we hope that our recommendations will help you cope with this simple job yourself.
Mix quality
When considering how to set up a carburetor on a scooter (150 cc or 50 cc), you need to pay special attention to the quality of the fuel mixture. If the amount of air in it exceeds the permissible concentration, the engine will overheat and its power will decrease. If, on the contrary, there is less air than set by the equipment manufacturer, soot settles on the combustion chamber. Over time, this causes engine failure.
Adjustment should be made using a screw. It is best to find it using the manufacturer's instructions. To adjust the carburetor of a scooter (50 cc, 150 cc), you need to turn the screw. Rotation clockwise will make the fuel richer, and counterclockwise will make it leaner.
If there is no screw, you will have to use the opportunity to adjust the carburetor needle. When it is raised, the mixture becomes rich, and when lowered, it becomes lean.
The principle of operation of a lawn mower carburetor
The throttle valve determines the amount of air supplied, and engine power directly depends on this.
Fuel is sucked into the carburetor system by a pump (its membrane). Then it passes through the fitting in the carburetor. The liquid then moves through the inlet and outlet valves of the pump. Filtered with a mesh. It moves along the needle valve into the membrane chamber.
Step-by-step operation of the device:
- Air supply into a tube with an air baffle (damper). The partition regulates the intensity of the air flow.
- The fuel supply system is necessarily narrowed with a diffuser to increase the flow rate.
- Gasoline through the float chamber and the nozzle tube with a narrowing. A chamber with a float regulates the temporary volume of gasoline. In the float chamber the pressure level is neutral, and in the tube with a narrowing it is already low. Due to the pressure difference, fuel penetrates through the nozzle.
- Accelerating air flow promotes the transfer of fuel (gasoline) and its atomization. As a result, an air-fuel mixture of the required proportion or density is formed.
- The air-fuel mixture enters the engine cylinder through the fuel pipe.
The level of air density in the system depends on the area of the open air damper. The wider the throttle is open, the greater the fuel consumption and power.
Simply put, adjusting the carburetor on a lawn mower is creating an optimal fuel mixture due to the correct air supply.
Mixture control diagram
When considering how to adjust the carburetor on a 4t or 2t scooter, it is necessary to study the sequence of actions for such adjustment. First of all, the engine must be warmed up for 15 minutes. Then it needs to be silenced.
The screw is tightened clockwise until it stops. Next, you need to release it again by 1.5 turns (no more). The engine starts. At this time, the screw is tightened 1/3 of a turn. The motor runs for 2 minutes. If the speed increases, the screw is unscrewed a quarter turn counterclockwise. Again you need to wait 2 minutes. This is done until the revolutions begin to drop.
If the speed drops within 2 minutes, the screw is tightened in the opposite direction, also by a quarter turn.
Adjusting the motorcycle carburetor
What's the first thing you need to do? Let's figure it out together.
The first thing to remember:
- Before making adjustments, it is necessary to completely warm up the power unit. Preparation should be carried out outdoors ONLY. It is prohibited to carry out the preparatory process indoors.
- Before setting up the carburetor, you need to make sure it is working properly. Check to see if it is clogged, look at the fuel level in the float chamber. Fuel must be at acceptable levels. The fuel needle should be at the middle level. Look at the example of Volkswagen Polo price.
Chinese equipment, as a rule, has two adjusting screws installed on the carburetor.
Screw quality.
With its help, the composition of the combustible mixture is regulated. Adjustment is carried out by turning the screw clockwise until it stops. After this, you need to turn the screw in the opposite direction no more than one full turn.
Quantity screw.
With its help, the idle speed of two-wheeled vehicles is adjusted. By turning the screw it is necessary to achieve optimal operation of the power unit at idle. Engine operation must be stable, without interruptions.
The entire process of setting up the carburetor must be repeated several times to achieve the most accurate and efficient operation.
How to determine the quality of a setting?
To do this, you need to sharply open and close the throttle. If at this moment the engine “sneezes” or stalls, the carburetor must be adjusted again. You need to turn the screw responsible for fuel quality ¼ or ½ turn. Then repeat the check again. If the mixture is rich, then everything will be fine.
And further
It is possible to check the operation of the carburetor on a Chinese motorcycle using spark plugs. But this is a separate, long conversation. We'll talk about this topic next time.
Medium and high speed tuning
If there are deviations in the preparation of the fuel mixture at medium speeds, the adjustment screw will not help eliminate the problem. Therefore, in this setting mode it is necessary to resort to the throttle needle. Most often it can be in 5 positions.
When learning how to adjust the carburetor on a Chinese scooter, you cannot ignore adjustments at high engine speeds. This procedure occurs with the throttle valve fully open. The quality of the mixture can only be determined by selecting the size of the main jet.
When the engine needs fuel enrichment, the part provided must be larger and vice versa. The size of the jet itself can be found on the body of the part. Replacement is made only in case of urgent need. Doing this kind of work on your own is quite problematic.
Adjusting a Chinese-made motorcycle carburetor
Especially with the onset of warm days, motorcyclists, exhausted by anticipation, prepare their equipment for travel. They wash, clean, check the operation of the power unit, and adjust the carburetor. But not all the “two-wheeled brethren” know how to adjust the carburetor on a Chinese-made motorcycle. Perhaps the article will help you with this simple question.
It is only at first glance that the carburetor looks like a complex and incomprehensible device. Not at all. A little theory and you will become friends with him!
Signs of deviation in mixture preparation
When studying the technology of how to adjust the carburetor on a 2t, 4t scooter, the driver must know what factors indicate deviations in the process of preparing the fuel mixture. If it is lean, a popping noise will be heard from the system when the vehicle reaches high speed. In this case, the carburetor spark plug will be white. Electrodes may in some cases melt due to operating at too high temperatures. Also, the scooter will react poorly to turning the throttle when reaching the upper limit.
If the mixture is rich, a large excess of fuel will be detected. There will be black carbon deposits on the spark plugs. Black smoke and popping noises will come out of the muffler.
But if configured correctly, such phenomena will not appear. The engine will operate evenly at all speeds. There is no excessive consumption of gasoline. At any speed, the throttle will be informative, and when examining the spark plug, soot and soot will not be detected. Its color is slightly brownish (not white).
Adjusting the fuel level
The final step in considering the topic of how to adjust the carburetor on a scooter is adjusting the fuel in the float chamber. This is a simple but important procedure. You can check the fuel level using a transparent tube. It is located at the bottom of the carburetor.
The drain screw must be unscrewed. The tube rises up. It allows you to estimate the fuel level in the tank. The engine must be running. The tube should be higher than the carburetor. The gasoline level should be detected slightly lower than the cap curb.
If there is little or much fuel, you need to remove the cap and adjust the timing of the needle. In this case, the holder's tendril needs to be bent, but in very small ranges. Such adjustment should be carried out in stages, otherwise the result will be temporary and the adjustment will not have the desired effect.
Having considered the technology of how to adjust the carburetor on a scooter, each owner of such a vehicle can carry out the procedure independently. By following the recommendations of professional auto mechanics, as well as carrying out maintenance on time, you can significantly extend the life of the carburetor and engine. Therefore, due attention must be paid to regulation issues.
Maintenance and repair of a carburetor on a Chinese scooter
The carburetor on a scooter is an important part of the engine's power supply system and is responsible for supplying fuel to the engine cylinders. But due to wear and tear of parts, over time your carburetor may require repairs.
In this article we will tell you how to repair the carburetor of a scooter with a 2-stroke and 4-stroke engine with a volume of 50 and 150 cubic meters, and also explain how to install and adjust a new carburetor on a scooter Contents of the article:
- Removing and cleaning the carburetor,
- Carburetor installation,
- Adjusting (tuning) the carburetor,
- Repair video,
- Our production,