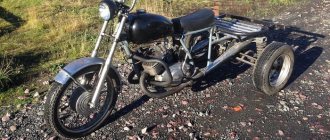
How to make a bobber from the Urals or Dnieper
In the process of developing a bobber project from a domestic motorcycle, it is necessary to carefully think through all the details so that the custom turns out to be harmonious. A motorcycle usually goes through the following stages of modification:
- The old bike is completely disassembled.
- The frame is cut down and takes on a triangular shape.
- All excess parts are trimmed and discarded.
- Wide wheels are selected.
- The front fender is removed, and the rear fender is made shorter.
- The engine is rebuilt and polished.
- The motorcycle parts are painted.
- Other stylistic modifications are being made: seats, mirrors, etc.
The most labor-intensive part is, naturally, altering the frame and installing the wheels. But in general, Russian customizers do all the work during the winter and spend about 60,000 rubles on the whole process. However, the cost may increase if you buy some special tuning elements.
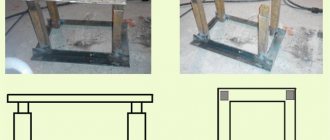
How to remake the Ural: motor mount
The most important part of any motorcycle is its frame. It is the frame that largely determines the silhouette of the motorcycle (not just custom), and therefore its appearance. It depends on the frame what type of motorcycle your “Dnepr” will be after the conversion: chopper, classic, enduro or sportbike. All this is, of course, relative, because, in my opinion, only a chopper can be built from the Dnepr.
So, before you is a cleanly washed frame of the Dnepr. What can be made from it? And you can do a lot, especially if you completely cut it into pipes. But this should be considered as making a new frame, not altering it. Remodeling involves relatively minor intervention in the design.
The most popular frame modifications are:
- Frame extension at the rear (behind the engine). Allows more legroom for the driver. Usually the frame is extended by 5-15 cm with a corresponding extension of the driveshaft. The amount of elongation usually depends on the height of the biker.
- Frame extension at the front (in front of the engine). Allows you to implement the “American landing” with a boxer engine. In this case, the controls for the brake system and gearbox are transferred to a rod located in front of the engine at a height that is individually selected to suit the height and length of the driver’s legs. This is precisely the principle implemented in the Russian Ural-Wolf. I note that the height of the “pedals” on this motorcycle is chosen approximately and on average. As a result, the driver’s legs are unjustifiably “lifted” up.
When extending the frame at the front, a standard length driveshaft is typically used.
- Frame extensions . Used to install a thicker rear wheel. From personal experience, I have verified that it is possible to install a rear wheel no more than 200-210 mm wide. When installing a thicker wheel, you have to use either a broken driveshaft with an intermediate bearing, or a gearbox that allows you to shift the output of the driveshaft to the side.
In fact, a standard Dnieper pendulum can accommodate a wheel no more than 120 mm wide. In this case, there will be approximately 3-5 mm between the tire and the cardan. gap I consider it optimal to slightly widen the frame and pendulum to accommodate a wheel 130-150 mm wide. It is with this wheel width that the conversion will have optimal ride quality.
- Changing the angle of the front fork . A very popular and controversial remake. You need to know that an increase in the fork angle of more than 33 degrees entails a strong deterioration in the handling of the motorcycle (this is due to the general geometry of the motorcycle and is described in textbooks and some popular motorcycle magazines).
Also, increasing the angle of inclination heavily loads the standard Dnieper fork stays and leads to their rapid failure. Also, from personal experience, I have repeatedly observed traverses and upper frame pipes cracked while driving. Therefore, in my designs I try not to increase the angle of the front fork (33 degrees - maximum).
- Tilt of rear shock absorbers . It is used to make them work more efficiently and improve the appearance of the structure (according to many people, vertical Dnieper shock absorbers look unaesthetic).
It should be taken into account that the inclination of the rear shock absorbers must be optimally selected, since with a significant increase in the inclination angle of the standard Dnepr shock absorber, the load capacity of the motorcycle is greatly reduced. This can lead to the fact that even traveling with a compact passenger will be impossible.
- Various smaller improvements:
– Installation of cups under the tapered bearings of the front fork. A very useful modification, but requiring the manufacture of new crossbars.
– Lowering the saddle line. Typically used when extending a frame.
– Raising the frame at the front is done by lengthening the front tubes. Etc.
Now you know what kind of frame you need and you can start cutting the standard Dnieper frame. Here you need to be guided by the principle “measure twice, cut once.”
The Dnepr frame is made of seamless steel pipes with a wall thickness of 3-4 mm. These pipes are perfectly welded by electric welding. But welding frame pipes has its own characteristics.
The main task is the strength of the weld. It has been verified that even in the event of accidents, well-welded pipes never burst at the welding site. Therefore, before you start working with the frame, you need to make sure that you have sufficient ability to work with electric welding. It is advisable to practice on pipes similar to those used in the frame. In fact, it is advisable to take all the pipes for various extensions and additions from another frame.
Making your own scooter air filter
The background to the encroachment is quite prosaic. A friend had a “damn the kitten” problem with the piston, crankshaft, connecting rod, pin, in general, everything that makes the moped move, the engine on the 24 died, and seriously. The recently held first races on a seagull on a scooter inspired heroic deeds.
As a result, a friend buys a 65cc piston (Honda Takt AF24), a new crankshaft, and makes capital investments, since everything still needs to be changed. Well, after driving 300 kilometers, he complains that he doesn’t feel like he has 65 cc. Accordingly, I give him a bunch of links to engine tuning.
In short, after sitting in the evening, drinking beer, we decided to fire up his apparatus. Since I’m still calculating the pipe (I’m checking different calculation options - so that they match, otherwise I don’t want to buy Leovinci or something like that - it’s expensive) - but we’ll do it anyway. In the end, we decided to make the intake easier. Again, I’m reluctant to buy a zero-resistance filter for 250-300 g. So I was drawn to the garage to “go crazy.” About two years ago, I installed a homemade filter for a friend of mine on his Yamaha Jog-Sekogd Edition (an old guy with a vertical motor), since my dear one simply got lost. I was guided by an article from the St. Petersburg site moto.km.ru
In general, the reliability of the filter element has been tested the hard way, over 2 years, without replacing the housing. It was decided, based on experience, to assemble a fan that was more practical to use and reliable to install.
As a result, having come to the market, it was purchased: Oil filter for Moskvich KS-71 (411-412 Muscovites) - 4 g.
Siphon for washbasin - from 5g to 21g. (you need to choose from elastic plastic or with polyethylene impurities - in general, pure polyvinyl chloride will not work - it’s too fragile), although the siphon itself is not needed so much as its upper part - and some at the market sell it separately.
The second aspect when choosing a siphon is that a filter should be inserted into its neck diameter.
An M6 hairpin with a length of 220-250mm is selected experimentally. I purchased a mounting anchor of suitable length, since I didn’t have time to look for a hairpin for a long time. For 2.50 UAH.
Well, and, accordingly, a creative accelerator with a capacity of 1 liter. each. — 3.80 UAH each. :O)
I don’t count the mounting silicone and self-adhesive micropork, because it was available in the garage. Oh, and, of course, two clamps with a diameter of 25-32mm for as much as 1 UAH.
As a result, the idea is as follows:
That is, the filter element, without any modifications, is clamped between the neck of the siphon and its counterpart (a metal round flange with a bunch of holes), the whole thing is pulled together with the same hairpin, the length of which is selected according to the location, you should not leave a very long section of the hairpin, it will go into the air intake pipe and may rest against the carburetor.
Next, we make a plug - a plug for the response hole in the filter element.
The procedure is as follows: We take our throat from the siphon and heat its narrow part (that is, the pipe) with a hairdryer, pull it onto a plastic bottle cap (I pulled it onto a Coca-Cola cap, it has a more or less cylindrical shape). We cut off the resulting plug from the throat of the siphon. It should fit as close as possible into the filter hole. Next, we take our siphon in our hands and from under the clamping nut of the siphon neck we take out the silicone sealing ring, which we put on our plug. As a result, this ring ensures reliable sealing of the hole in the filter element. Everything is clear from the photograph:
We make a hole in the center of the cork and string it onto a pin, starting with the flange (lid) of the siphon neck into which our cork is inserted.
To ensure that the ring does not fall off and the structure has a more civil appearance, we fill the gap between the metal lid and the plug with silicone. To ensure an even tighter seal between the cork and the pin, the cavity in the cork can also be treated with silicone and a series of rubber washers can be put on and secured inside the cap with glue or the same silicone.
Next, simply glue the self-adhesive micropork onto the throat flange. To ensure the same sealing of the filter element.
As a result, we get the following construction:
The hairpin securely tightens the plug and neck, squeezing the filter element into the honey. Please note that the metal neck flange is purely decorative; the element is tightened by wedging the silicone ring on the plug plug on one side and squeezing the micro-pork on the siphon neck flange on the other.
The siphon throat pipe fits the carburetor exactly; if the diameters do not match, you need to make a small insert from a rubber hose and clamp them onto the pipe and on the carburetor with clamps.
In our case, the filter fits quite tightly on the carburetor, after which, unable to bear it, we started the engine. The sound has changed significantly. And while he was muttering there, caressing the ear, we sentenced “creative accelerator” No. 2, since what was next was the biggest “AMBUSH” - to consolidate all this. It was also necessary to come up with a casing that would protect against dirt flying from the wheel.
As a result, we found a suitable oil can so that there was a small gap between it and the filter, and after making a hole, we pulled it over our filter and cut out a hole for the air intake. Next, we glued a rubber hose onto the filter pipe to fix the casing, which provided a layer under the clamping clamp on the plastic pipe that fits onto the carburetor. Next, two brackets were cut in place from a strip of steel.
One wraps around the filter pipe and securely fixes it near the carburetor throat, the other secures the far end of the filter housing.
That's all, actually.
And, of course, reconfiguring the carburetor. For now, just raising the needle for the modes in which he now drives is quite enough. Since the commutator has not been changed, there is no talk of replacing the jets yet, fortunately the carburetor on Hondas is less capricious than on Yamahas. In the future, when replacing the pipe and commutator, we will certainly select jets.
As a result, about 20 UAH were spent. and received a lot of pleasure, moral and aesthetic satisfaction. I apologize for the poor quality pictures, they were taken with a phone. And then - after almost everything was done.
Special thanks to EWA
- for the provided scooter. And to Negative - for the provided garage.
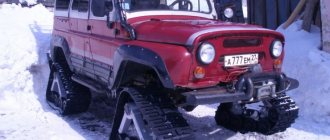
Chopper from the Urals - how to turn a dream into reality, and what you need for this
Custom motorcycles always looked more impressive and gave their owner much more positive emotions than a regular factory model. The idea of modifying and reincarnating motorcycles appeared back in the 50s. American bikers began to actively remodel their motorcycles, not only painting them in the original color, but also modernizing power units. Some created completely unique models, installing a new exhaust system, beautiful wheels on their motorcycles, modifying the optics, and even such elements as a tank or wings. But what if you try to modify a Soviet motorcycle, for example, Ural or IZH. After thinking a little, we decided to tell you about how to make a chopper from the Urals.
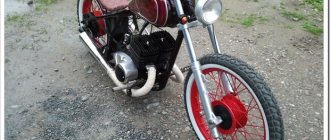
What is a chopper?
First of all, you should understand what motorcycles of this class are. The first choppers appeared in the USA around the 50s. This class became very popular due to the fact that it had a very comfortable seating position, which made traveling on a motorcycle a pleasure. The thing is that the chopper has a high steering wheel, with a clearly inclined front fork. The front wheel of this class of motorcycle is narrow, and the rear wheel is much wider.
Choppers are also distinguished by a small tank and a large engine. And what is important, the very first choppers were made by the same American bikers who created a chopper from an ordinary production motorcycle. Most often these were bikes from the Harley Davidson company, until engineers began producing serial models of Harley choppers.
Choppers are not only a cool and unusual appearance, but also a comfortable ride. The upright riding position allows you to ride a bike like this for quite a long distance before you get tired, which is not the case with sports bikes, for example. But creating a custom chopper with your own hands allows you not only to have a lot of imagination, but also to create a motorcycle just for yourself, which is good news.
Hand and handlebar protection for enduro
This type of protection is called differently, some call it hand protection, others talk about protecting the steering wheel or levers. In their own way, everyone is right, since this type of protection can perform several protective functions.
Enduro motorcycles, as a rule, are not equipped from the factory with any additional protection on the handlebars. Although manufacturers know in what style hard enduro will be used. The question of whether to install protection remains with the owner.
The exception is those installed on the steering wheel to protect hands from flying stones, branches and wind. For example, on Husqvarna or KTM. Let's imagine that you are participating in competitions or just riding through the forest. Being distracted by branches that hit your hands is not the most pleasant thing, sometimes it hurts. It is much more effective if the motorcycle takes on the attack of the “forest warriors”, and your hands do not feel parasitic sensations. All that remains is to concentrate on skating and do what you love.
David Leonov, as a factory team rider, rides with standard protection.
And in cool weather, these plastic wings allow you to open them without the risk of freezing your hands. The incoming air will be pushed to the sides without affecting the handle on the steering wheel. This is where the positive qualities end and they are not able to protect the rider’s hands from any serious physical impact. They are also useless for protecting the steering wheel and everything mounted on it. They themselves are also quite fragile and break easily in case of serious falls, forcing riders to turn to dealers for new ones. But if you are not a top hard enduro rider and falls are not uncommon, you should consider buying more serious protection.
What is it?
The very minimum that protection for hands and steering wheel can be is a metal bracket, which is attached with one side to the edge of the steering wheel, and the other to a bracket attached to the steering wheel, closer to its middle. Already in this Spartan form it will perform the main functionality. Most often, in addition to the base of the bracket, it is combined with plastic mugs, which were mentioned just above. The burdocks are either attached to a metal bracket from the outside, or have a more complex shape and cover the entire surface of the part. This way you get double protection for both hands and steering wheel with a good appearance.
Let's look at the protection functionality in more detail.
Lever protection.
Everything is simple here. When riding an enduro motorcycle, falling and breaking the brake or clutch levers is common. Many people already know this life hack: it is advisable to tighten the fastening of the clutch and brake bracket with a little force, slightly shortening the bolts. In such a way that with physical impact on the lever it is possible to rotate the clutch or brake machine around the steering wheel. This will reduce the likelihood of the lever itself breaking. When you fall again, after lifting the motorcycle, it will be enough to apply a little force by hand and return the bracket to its usual position.
First we wash the grips and handlebars, then we install the protection. Do not do it this way.
But this doesn't always help. In case of serious falls or flights, the motorcycle will not ask where and in what place it is better to rest. A broken clutch lever away from home is not a myth; many have experienced this. Fortunately, modern levers have an edge, which sometimes helps. If you're lucky, the lever breaks not at the base, but at a previously weakened place and simply becomes a little shorter.
Handlebar protection is useful in hard enduro
In the case of installed protection, in this case it would take all the energy upon itself and the levers would not contact anything, remaining intact.
Hand protection.
Here it is obvious that the protection takes care of everything that your hands might encounter while riding. Sometimes you drive in the forest between the trees and the edge of the steering wheel touches a tree. Without protection, it can be painful and even cause injury.
Steering wheel protection.
The most important and necessary function is to protect the steering wheel as a whole, along with all installed attachments. In the case of soft ground, when a motorcycle falls without protection, the steering wheel readily “sticks” into it. If before this the motorcycle performed another “curve” and both wheels went flying, then the probability of deeply recessing the edge of the steering wheel is high. In this case, the steering wheel willingly sticks into the ground and goes away along with the lever. There are several unpleasant moments here. To lift the motorcycle you will have to try, since the levers now rest against the ground and anchor, making it difficult to reach the motorcycle. After picking up the motorcycle, the controls will be dirty if it was dirt. Driving such a motorcycle is unpleasant. The water will evaporate in any case, but the sand remains. If sand gets between the throttle bushing and the steering wheel, the gas may jam, and this is no longer safe.
The protection is dirty, the steering wheel is clean.
In the case of hard soils, rocks or stones, the steering wheel with controls most likely will not get dirty. But he will have to take on more impact energy. Even the densest and highest quality grips are instantly rubbed off the edges or simply torn off in pieces. After which the metal of the steering wheel begins to wear off, nothing protects it anymore. As the impact becomes more targeted, the chances of bending the handlebars increase.
New steering wheel protection after the Cretaceous Park race. We sacrifice protection for the sake of steering.
If protection is installed, most of the risks are removed. In case of soft ground, the protection works like a ski and prevents the steering wheel from going into the ground. The controls remain clean and intact and the bike can be easily lifted by the rider. When falling on rocks or hard ground, the protection takes the blow. Accordingly, the protective surface is sacrificed, the steering wheel remains intact. The load ceases to be a point load and is distributed over the entire bracket. High-quality steering wheel protection absorbs the impact energy like a bumper and fenders with a hood on a car. In the event of serious falls, the protection “sacrifices” itself and becomes deformed for the sake of the integrity of the steering wheel. In this case, returning the protection geometry is much easier than trying to bend the steering wheel back to its original position. And if the deformation of the protection is too strong and interferes with control, you can quickly remove it and move on.
Where can I buy?
The question of where to buy hand protection for enduro depends on your financial capabilities. The cost of good protection will start from 5 thousand rubles for metal brackets and will approach 10-12 thousand rubles for a complete set with plastic mugs. Good factory protections include Cycra, Acerbis, Zeta Racing, Enduro Engineering, Moose Racing.
You can save a lot of money by purchasing hand protection in China. The price will be no more than 2000 rubles. In general, it will also fulfill its role; many skate with such protection and respond positively. Using this link you can see what is offered on Aliexpress and choose what you need.
An example of steering wheel protection. When you click on the picture, you will be taken to the product.
Be sure to look at the reviews, do not buy without good ratings and reviews. If you purchase without reviews, you may end up with silumin protection; this protection will break even if the motorcycle simply falls on the spot (we’ve encountered it personally).
Should I install hand protection?
Disputes continue over the meaning of installing hand protection; it is all due to the risk of injury in the event of an unsuccessful fall. Judging by the reviews of “experienced” endurists, this has happened in world practice, albeit rarely. For example, an emergency situation occurs, control is lost, the motorcycle stops abruptly, and the rider, by inertia, continues to move and flies forward and somehow his hand gets caught between the steering wheel and the guard; there is no point in describing further. Usually, by inertia, a person flies forward, while he either releases the steering wheel in advance, preparing for landing, or holds on to the steering wheel until the last moment. Most likely, a dangerous situation can arise during some kind of unsuccessful landing, when the inertia will throw you forward and down.
Honda, with Chinese hand protection against the backdrop of Elbrus. She is lowered down, the mugs are useless, but her arms are intact.
When assessing the risks, it becomes clear that motorcycles fall very often. And the likelihood of injuring yourself or the motorcycle is much higher than a traumatic situation, the likelihood of which is quite low. That is why meeting a hard enduro motorcycle at competitions without hand protection is rather an exception; most people ride with it.
To minimize possible risks, you can simply lower the protection bars as far down as possible, this will reduce the likelihood of your hands catching on them. They will still perform their role, except that the plastic mugs will point down and become useless.
Chopper from the Urals - start of work
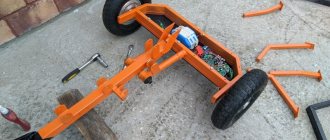
Having selected a decent motorcycle and checked its engine for performance, you can begin to create a motorcycle - the Ural Chopper. All we need to do to create a chopper is to lengthen the front of the bike and work on the rear wheel and suspension. Let's try to break down the construction process step by step.
Drawing
The process will go much faster if you make a drawing or approximate picture of what the resulting motorcycle will look like. There are quite a lot of drawings of chopper frames on the Internet, so choosing the right one will not be so difficult. If you are confident in your abilities, then you can do without it.
Perhaps the only difficult stage that you will have to face is the alteration and welding of the frame. The whole secret is to place the steering rack at the right angle, which will ultimately change the angle of inclination, allowing you to set the front fork at the required degree. It is worth saying that a lot of attention needs to be paid to welding this place, since this area will receive quite heavy loads.
Having finished with the front fork, you need to work on the rear part of the future motorcycle - Ural Chopper. As a rule, bikes of this class are quite long due to the large rear wheel. That is why we need to weld the frame so that we can install a wide wheel on the axle. Naturally, this part of the frame should also be given a lot of attention. In general, if you have not done welding before, then it is better to entrust this task to specialists, because safety comes first.
Required materials and tools
For this procedure you need:
- spotter, screwdriver or bolt;
- compressor (it is only suitable for working with small dents);
- hammer;
- bar;
- putty;
- developing powder.
Some craftsmen pull out dents by welding. They weld a small metal object (such as a bolt) to the dent so that they can then pull it out. Sometimes it works. Putty is used when other methods do not help.
Latest improvements
If you manage to weld a high-quality frame, then you can assume that most of the work has already been done. The only thing I wanted to add was the angle of the front fork. We do not recommend tilting it more than thirty-three degrees. This value is the most optimal for choppers, because the greater the angle of inclination of the front fork, the worse the motorcycle will handle. In our opinion, 28-30 degrees will be more than enough to make the motorcycle look like a real chopper from the Urals, and at the same time handle well.
The last stage is the final assembly of the motorcycle. The engine and other main mechanisms are installed on the frame. The front wheel and handlebars are finally in place and we can see for the first time what our bike looks like after the rework. But in general, the frame is not the only thing that can be done with a Ural motorcycle.
True motorcycle enthusiasts can put all their soul and money into their custom motorcycle, and end up with a Ural Chopper that will delight them for a long time. Installing and reworking the exhaust system, upgrading the fenders, seats, lighting fixtures are just a small part of what can be changed. When modernizing the appearance, you can fully express your imagination or borrow ideas from ready-made choppers.