Every snowmobile requires periodic maintenance. This includes general inspection, checking track tension, alignment, lubrication, and tightening of threaded connections. This must be done first of all in order to see the wear of the chassis and all its parts in order to avoid breakdowns. This can be done in a workshop or on your own. Stretching the tracks of the Buran snowmobile must be carried out regularly, and the one who does it must understand it perfectly.
What kind of motorcycles can I use?
Back in Soviet times, motorcycles were created that are prototypes of modern technology. You can very easily make a snowmobile out of them. Let's remember some of them.
"Ant"
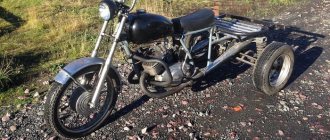
It was used as a cargo vehicle, had a body and three wheels. This model had wheels located as follows: one in front (drive), and two more at the edges of the body. The snowmobile from this motorcycle was the most popular among the residents of Russia. This is where it all started. One of the villagers dismantled his old motorcycle, installed a motor on a ski and tracks that were made from an ordinary fence. The product had its drawbacks, but people quickly figured out how to fix them.
"Dnieper"
It had various modifications: MT-9, 10, 11, 16. These models were equipped with engines from 27 to 32 horsepower. It was distinguished by a cradle for the third passenger. Almost all motorcycle parts are used for a snowmobile, however, in case of repair, it will be difficult and expensive to buy spare parts.
"Ural"
This motorcycle was usually equipped with military equipment during the Great Patriotic War. The power is very pleasing, it reaches 40 horsepower. In this regard, the motorcycle is one of the best for creating a snowmobile based on its engine. The model is three-wheeled and has additional space for a passenger.
"Sunrise"
It became the next model after the Kovrovets (K-175), which was produced from 1957 to 1965. The engine is two-stroke with one cylinder, volume 175 cc. cm, power - 20 horsepower. Good characteristics, thanks to which it will be very easy and cheap to remake the motorcycle.
"IZH Planet"
Years of production: 1962-1967, 20 horsepower. Many people still have this model; it can also be used to create new equipment.
"Minsk"
A two-wheeled motorcycle, which began to be produced in 1951. And even then, many people had a desire to convert this motorcycle into a snowmobile, but things didn’t go further than ideas.
Motorized towing vehicle price
The cost of a motorized dog is 39,500 rubles with 2 carts (without the middle one) or 41,000 rubles with 3 carts. At the same time, its cost was about 33,000 rubles. Let me remind you that the construction of our previous towing vehicle, which was built on wooden slides, cost us 25,000 rubles.
The higher cost of a new motorized dog is due to the use of a roller suspension; a more powerful, reliable and, accordingly, expensive engine, i.e. Lifan instead of Forza and, of course, a general increase in prices for all components.
How to make: instructions
First, the frame is welded. Obviously, the larger the frame, the heavier the device will be and the slower it will move. The optimal frame length is 2 m plus/minus.
The following are sequentially fixed on the frame:
- drive shaft with receiving star;
- power plant with a transmission star and gas tank;
- front wheel axle (fixed fastening to the frame by welding or bolts);
- rear wheel axle (fixed with a movable guide element);
- front suspension with steering structure and guide ski(s);
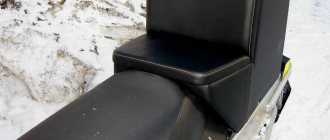
- seat(s) and body.
Caterpillars are made of drive V-belts or conveyor belts. The optimal track width is from 40 to 50 cm. With a smaller width (40), the snowmobile will be more maneuverable and better controllable. With a higher value (50+), the patency of the device improves.
The function of lugs is performed by PVC pipes of the diameter indicated above, sawn in half lengthwise. They are attached to the rubber base using bolts and nuts. V-belts of insufficient width can be fastened to each other with metal grousers.
In order to be able to adjust the tension of the track, the rear wheel axle is attached using a movable guide element, which allows you to fix the position of the axle in a certain position.
Additional notes:
- The center of gravity should be approximately the center of the structure. Since the power plant is mounted at the front, the driver's seat should be centered over the front axle or slightly offset to the rear.
- The distance between the drive shaft and the power unit should be minimal to minimize losses of energy transmitted to the shaft.
- If you install a shock absorber under the seat, then the front seat support is rigidly mounted on a profile arch, and the rear seat rests on the shock absorber.
- If you are making a snowmobile with a heavy load in mind, then to remove some of the weight from the tracks, it is advisable to install an additional ski in the middle of the base (between two tracks). This ski, 50-70 cm long, is attached directly to the frame. However, this design requires a more accurate preliminary calculation with subsequent leveling of the height of the “leg”, which complicates the manufacture of the snowmobile.
- It is advisable to maintain low pressure in snowmobile tires to avoid rapid wear of parts and high fuel consumption.
- The considered version of the snowmobile is the simplest in design. If you have the tools and a welding machine, it can be assembled in the garage without any problems.
- As soon as winter begins in our country, given the climate, two-wheeled vehicles are put away in the garage until spring. It may be impossible to use a car for transportation due to heavy snow. And here, a snowmobile on tracks, which you can make from a walk-behind tractor with your own hands, comes to the aid of all motorists who want to move along a snowy road.
- Not everyone has the opportunity to buy an additional vehicle, but everyone can independently construct a homemade tracked snowmobile from a walk-behind tractor.
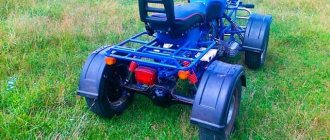
Steering
Assembling an ATV with your own hands is not an easy task. And, perhaps, the most difficult thing is to make the steering. To do this, first weld the frame of the front part of the ATV. Then you will need steering knuckles from a car, for example from a Niva, but any others will do. After which you need to build suspension arms
Pay special attention to the design of the mounting of the levers, since when they are connected to the frame, large loads arise, so additional stiffening ribs will not be superfluous. Levers are usually bolted through silent blocks
This is a rubber-metal joint that is an essential link in the suspension. It dampens wheel vibrations, preventing vibration from being transmitted to the frame. Levers can be made according to these drawings.
Go ahead. What is the front suspension without shock absorbers? Here you can use 4 motorcycle shock absorbers, one for each arm in the front, and two for the swingarm to dampen the rear axle. Rear shock absorbers from Izh will do, but if you are willing to shell out for gas-oil shock absorbers with pumping, this will give you the opportunity to adjust the suspension to suit road conditions, which is very useful for equipment such as an ATV!
Telescopic suspension
Perhaps this is one of the most common and simplest types of suspension based on the principle of operation. Most often, this suspension is used on snowmobiles of the “utilitarian” class. The design of the telescopic fork consists of a spring and shock absorber, which are located directly in the strut. Thus, the telescopic stand is able to smooth out shock-type loads. It is worth noting that the stroke of this type of suspension is limited according to the stroke of the shock absorber itself.
As a rule, snowmobiles with such suspension have incredible maneuverability in dense forest conditions, since the ski base is small.
Also, one of the simplest and most common suspensions is the spring system. This engineering solution was used on the legendary domestic car "Buran". This model has one ski track, as a result of which the equipment does not have the necessary maneuverability. It is generally extremely difficult to enter the required turn at speed. But in general. The suspension performance itself is quite acceptable.
Manufacturing
Snowmobiles of various types are created on the basis of old motorcycles, adding one or two skis. A chain or wheel suspension system can be mounted to the rear of the snowmobile. It all depends on how difficult the snow cover you have to overcome.
You can make a snowmobile at home (garage). It can be used for hunting, fishing, or just driving through the forest in winter.
To make a snowmobile, and we are considering a budget option, we will need any of the above models of old brands of motorcycles and various parts.
What will we get as a result?
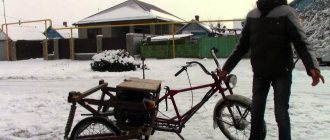
Simply put, there is a ski with steering in front, a frame with a motor and a seat, and a caterpillar track at the bottom or rear. The frame will be suitable from IZH Planet or Voskhod, but additional fasteners will need to be reconstructed. The engine can be taken from the Voskhod motorcycle (20 horsepower) and put on caterpillar tracks.
A snowmobile with such an engine can reach speeds of up to 70 kilometers per hour. For household use this is quite enough.
You can use a ready-made frame or make it according to drawings from scraps of pipes with a small diameter. It is also important to strengthen the frame using welding. In some cases, temporary fastenings are used. If necessary, instead of the tracks and skis, you can return the wheels. The assembled structure must be strong and reliable. The chain drive is used from the main propeller shaft (you can use IZH Planeta or Ural) to the drive shaft of the tracked structure.
To make a caterpillar engine, you can use a part from the caterpillar belt of another unit (for example, Buran) or purchase it separately in a factory variation. However, this is not always possible. In this case, you can assemble it yourself.
To create a caterpillar with your own hands, you need slats (plastic or tin), a conveyor belt and tin slats, fasteners and drawings. When making slats for lugs, you need to make parts (plastic or tin) of pipes with bends of the same length and width, and then attach them to the transport belt at the same distance. Three pairs of wheels, different in size, will serve as the drive shaft in the tracked structure.
- For the drive shaft you can take larger wheels, for the other two - smaller ones (they will serve as rollers). The rollers need to be “shod” in rubber to have a better connection with the caterpillar track. It should be borne in mind that all home-made structures are not very durable, so you should not subject such a snowmobile to high speed loads.
- The shock absorbing system on the rear suspension can be left over from the original motorcycle (its basic design). On the front, you can use springs from a car or a motorcycle. Shock absorption is very important during turning movements; the stability of the entire structure depends on it.
- The fuel tank with a volume of 15 to 20 liters can be placed in a more convenient place, according to the drawings you choose, but basically it remains in its original place in the motorcycle version.
- There is also an option for making two tracks based on the Ant motorcycle. Since the side rear bases are made for wheels, they can be used for two track structures. The fuel tank may also remain under the bar, but may be moved to the rear, depending on the design chosen and the conditions in which the sled will be used.
- You can also consider the option of a snowmobile based on the Minsk motorcycle. For the front part with one ski, use the option discussed above. The back is more difficult. We will replace the driven gear of the bridge with a rear sprocket from the IZH Planet motorcycle. The intermediate shaft serves as a drive to the axle, remaining a chain shaft. If you don’t have the parts you need for the job, you can purchase them from the aftermarket.
- Some people like to modernize modern motorcycles for different types of units, for example, instead of a caterpillar mover, install large tire frames covered with a chain, which prevents slipping on snow. In this version, the snowmobile looks like 3 or 4 huge wheels and a small part of the engine, frame and seat. You can also replace parts of the ski-tire. There are options where instead of a ski there is one wheel in front.
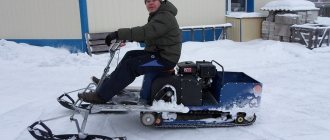
What is a motorized towing vehicle - description and purpose
A motorized dog is understood to mean a mini snowmobile (mini-all-terrain vehicle) with an engine. This vehicle is a coupling of a caterpillar towing vehicle with a sleigh or drag sleigh. The driver of the motorized dog sits in the sleigh, and any cargo is placed there. Some dog models have a special cargo area on the tractor. Engine power is usually from 6 liters. With. up to 13 l. s., speed is 30-40 km/h. The motorized dog does not have a brake, which the driver must always remember.
Motorized towing vehicles are popular among fishermen and hunters. They can also be used in agriculture and forestry for transporting small loads. Unlike wheeled vehicles, skis on a motorized dog sled allow you to move even on loose snow and winter off-road conditions, which makes the vehicle resemble a snowmobile. The only difference is the driver’s position: he sits outside the platform with the motor, which reduces the weight of the motorized dog and increases cross-country ability. Also advantages in comparison with a snowmobile are the simplicity of the design and lower price.
You can use motorized dogs to move along the frozen surface of a body of water - a lake, a river. They are ideal for ice fishing enthusiasts and have been designed specifically for them. The machine can be easily transported in a car using a cover, unloaded on shore, and then used for its intended purpose. On a motorized dog it is possible to transport cargo over rough terrain, replete with descents and ascents. They use the equipment for traveling in summer, spring, and autumn along swampy meadows and forest paths.
Why is it worth making a motorized dog - reasons
Both purchased equipment and homemade equipment are unpretentious, compact, and do not require much space for transportation and storage. But some hunters prefer to make motorized dogs themselves, using improvised means. The main reason is cost-effectiveness: a homemade version will cost an order of magnitude cheaper. For no more than the cost of the simplest towing vehicle from China, you can also build a reliable, durable pusher towing vehicle.
Many models of motorized dogs, especially those made in China, have a lot of design flaws. For example, the caterpillar can often become clogged with snow, which is associated with mistakes by the developers. Other possible problems are the motorized dog rearing up, burying itself in too deep snow, throwing snow into the sled. All these troubles can be avoided if you build the vehicle yourself.
With a front-mounted motorized dog engine, which is almost always planned in home-made models, the operation of the machine will be much more efficient. Here are the obvious advantages:
- fuel savings and overall reduction in design costs;
- higher driving speed;
- the ability to make additional compartments for gear.
Recommendations
When working on a snowmobile, it is important to follow the main manufacturing rules - evaluate engine power, stability, balance, wear resistance and replaceability of parts and the structure as a whole. It is better to use a motor with a volume of 125 cubic centimeters, with one or two cylinders, two-stroke. The desired power is from 15 horsepower. The speed of the snowmobile you assembled can reach up to 80 km/h.
Based on the parts, capabilities and desires you have, you can create the basis of a snowmobile at home. And then they usually work on modeling, improving the seats, you can even attach a cabin - for protection from precipitation or a trailer part during the transportation of goods.
When creating a snowmobile with your own hands, the most important part is the motor. It must be tested before installation on the structure prior to assembly.
When using a homemade snowmobile, you must follow safety rules - have a protective helmet, appropriate clothing and gloves (gaiters). First of all, you should conduct a test drive and make sure that there are no problems with the chassis and engine parts.
Basic elements of a motorized dog
The most important piece of equipment is the engine. Typically, a single-cylinder carburetor gasoline engine is used to create motorized dogs. An equally important part is the rubber-metal track - the propulsion unit with suspension. With the help of a caterpillar, you can drive on snow, ice, and soft ground in warm weather. It is worth taking a closer look at all the components of a motorized dog.
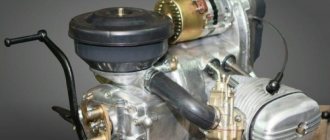
Car engine
Most often, motorized dogs use engines from Honda, Yamaha (expensive) or Chinese brands (MTR, Lifan and other budget ones). These power units vary greatly in price, although their power is usually equivalent. Lifan engines with a centrifugal (dry) clutch have proven themselves to be excellent. Some people use a motor from a walk-behind tractor to create motorized dogs; they remove the engine from a Ural chainsaw or a Druzhba saw.
The motor from the Sh-58 moped, designed for manual gearbox shifting, is considered popular. Scooter engines can also be used. The main thing is that the product has good traction characteristics, a power of at least 6 hp. With. This is enough to transport one person and a load of 30-50 kg on a motorized dog. For a trip of two people and a load of 150-200 kg, it is better to choose an engine with a power of more than 9 liters. With. A chain tensioner is often used as an engine tuning element.
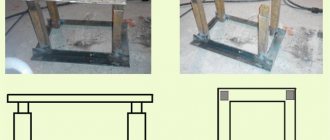
Motorized dog support frame
The frame must be of excellent quality, because on the road it experiences high loads, especially when driving off-road. This design is made entirely with your own hands, welded from rectangular metal pipes. Usually a pipe thickness of 3 millimeters is enough; thinner metal is not suitable, it quickly deforms.
You can see how to make a frame with your own hands in the photo and video. Take two pipes with a cross-section of 20*20 mm, add two more sizes of 20*40 mm, and form a frame. Two 40 mm corners are welded into it, and a protective frame for the engine is welded on top, which will prevent it from being damaged when the equipment rolls over. It is also advisable to attach a galvanized sheet to the frame with rivets to cover the track.
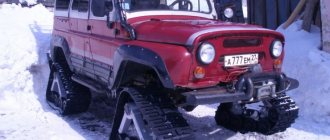
Features of creating a snowmobile from a Ural motorcycle
In order to make equipment based on the Ural, you can use the circuit from any Buran model. The caterpillar system is designed in the form of rollers. You can make them yourself. The power transmission is transmitted through a chain. At the front of the snowmobile there will be several racks for attaching skis. They are equipped with springs from the shock absorbers of the Ural motorcycle.
- Snowmobiles based on the Ural motorcycle are in most cases used with tracks installed. This is due to the fact that the structure itself is very heavy. In addition, there is a cardan drive at the rear, which makes the installation of a conventional track unit with a chain drive mandatory.
- It is worth considering that when creating this tool with your own hands based on the Ural model, the modular design will be noticeably more complicated due to the organization of the drive through a gearbox. That is why some changes must be included in the frame, because the height of the Ural hull may increase, which will entail an overestimation of the center of gravity and a decrease in stability parameters.
The Ural engine has a fuel consumption of no more than 6 liters per 100 km of route. The maximum speed of such homemade equipment can reach up to 60 km/h. This model is capable of towing up to 1 ton of cargo.
What is the effect of a loose track?
Weak tension will also not have a very good effect on the operation of the vehicle. Failures will mainly occur in the chassis system, but they will harm the entire snowmobile.
A loose gooseneck will result in:
- slipping of drive shaft sprockets under load or during strong acceleration;
- the caterpillar moves and often rotates outside of the treadmills;
- rubber is wiped with slimes;
- perforation breaks;
- spokes break;
- The wear of the side edges increases, the cord simply climbs;
- the road wheels turn over.
The most dangerous thing is that with a side load the caterpillar can simply fly off.
Features of creating a snowmobile from Izha
You can make a snowmobile from Izh with your own hands in several ways. The first is a wheeled ski option. At its core, the design does not change, only the wheels are removed. Instead of the front one, a ski made from a pipe is installed. It is attached to the axle shaft to the front fork.
- For the rear of the future snowmobile based on the Izha, a tracked module is being manufactured, which will be attached in place of the wheel. In addition to the frame, it will include a rear axle from a UAZ vehicle, the driven gear of which must be replaced with a rear sprocket.
- A snowmobile from Izh must have a chain intermediate shaft. The wheeled version uses cameras from PTS-2-4. Discs are made by welding rods and attaching wheels using belts. A snowmobile, which you can make yourself using the Izha base, is capable of reaching speeds of up to 60 km/h.
If your hands are golden
You can assemble a motorized dog from scrap and not so expensive materials with your own hands. How to make such a transport? This will be discussed further.
This will certainly require certain skills, materials, tools and time. You can choose from the available options, but you can create your own drawing of a motorized dog with your own hands. Then pack your transport and get pleasure, convenience and additional time for relaxation by reducing the time it takes to travel through snow-covered fields and roads.
Manufacturing of caterpillar propulsion
- In the first case, a track-type mover for snowmobiles can be made on the basis of a classic roller-bushing chain and transport belt. When making a caterpillar, no special tools are required. To extend the service life of the tape, you need to stitch its edges with fishing line. The rings are connected by connecting the ends of the element.
The thickness of the tape is selected based on the power of the motor. When using domestic motorcycle engines, a tape up to 10 mm thick, which is used in agricultural conveyors, is ideal. This type of track can be easily repaired if it breaks.
- The second option is to connect V-belts to lugs that are attached with screws or rivets. The result is a caterpillar track with holes for the drive sprocket. There is a small gap left between the belts.
t0shkan › Blog › My BSZ in Tula
There is no need to convince anyone that contactless ignition is a really necessary thing. Every owner of a motor vehicle puts it on literally everything that moves, even on hunchbacked Cossacks. But if you google about installing BSZ on Ant, then complete trash comes up. Someone came up with the idea of screwing a round curtain directly onto the shaft, which of course is logical. But there is not enough space for the sensor itself, as a result the casing is subjected to wild grinding, and all this hell sticks out outside the motor. It looks very ugly, and while in “Ant” there may be nothing, then in Tula it definitely looks like a collective farm. This solution requires the manufacture of an axis for attaching the curtain, and it is proposed to manufacture the curtain itself as follows: All videos on YouTube are dedicated to this particular implementation. I was able to find only one video where a motor with a BSZ is briefly shown, with nothing sticking out of the casing, but exactly how the author did it is left behind the scenes.
By purchasing the figure eight ignition components and playing with them, anyone can see that the dimensions and angles in the curtain drawing above are complete nonsense. They are absolutely unnecessary; a spark jumps out even if you rustle the sensor slot with the tip of a slotted screwdriver. In fact, when installing the BSZ you need to know only 2 things: 1) A spark jumps when the curtain halfway opens the sensor. 2) For the Ant motor, this moment should occur 3 mm before TDC. That's it, this information is enough to install the BSZ. After removing the impeller casing and examining possible mounting locations, it became clear that the sensor needed to be mounted from above. It won't interfere with air flow, and there's just enough room to mount the sensor to the crankcase, while the shutter can be attached to the flywheel. There are two options here: either attach the sensor without an adapter directly to the crankcase, in which case the curtain will have to be made in a Z-shape, or attach the sensor through an adapter, then the curtain will be a simple corner. I chose the first option. I drilled a couple of holes here:
And screwed the sensor into the standard holes
The curtain was made from an old mount for a three-inch drive. You can use an old case from any desktop, there is a good tin of just the right thickness, and there are ready-made neat grooves for adjusting the position of the curtain, if necessary. For mounting, I drilled a couple of holes in the flywheel and cut an M4 thread there (drill carefully so as not to drill through and damage the dynostarter winding). The depth of the hole is 7 millimeters. A long crank is convenient for cutting threads; in the photo there is a tin from which the curtain is cut.
How it all spins is clear from the video
Final view - the central hole of the casing is closed with a standard rubber band, everything is beautiful
Source
Review of factory products and homemade products for snowbike
- The Canadian company Timbersled offers several versions of its own systems for Japanese-made motorcycles. At first glance, the design is quite reliable, but the price of the product is not affordable for everyone. Manufacturers are asking $5,500 excluding delivery for the most inexpensive kit in the line. The weight of the products is slightly more than 60 kilograms.
- The Russian brand VORTEX offers kits, which they claim have no analogues in the world, for enduro and cross motorcycles with power from 250 to 750 cm3, which enable motorcyclists to engage in sports in winter. What’s important is that the kit comes with a set of bushings, with which the track and ski, according to the manufacturers, will exactly fit your motorcycle.
- The Tyumen company “Alpha Drive” is a manufacturer of Snowrider kits. The line includes three models differing mainly in the length of the tracked chassis. The weight of the set ranges from 60.5 to 64 kilograms.
“The adapter kits produced allow the track kit to be installed on almost any modern lightweight enduro or motocross motorcycle with a left-hand chain, with an engine capacity of 250 cubic centimeters or more.” -indicated on their website.
The price of product sets is from 318,000 to 342,000 rubles, delivery will be at your expense. The set of adapters is not included in the price, but is sold separately, the cost of the set is 10,000 rubles.
Let's go down the price range closer to the people.
- “Price without canister and case.
- The 101″ track kit is ideal for groomed trails as it does not require snow to lubricate the track. The set is suitable for riding in fields and forests.
- Suitable for any motocross or enduro motorcycle
- KTM. Yamaha. Husqvarna. Kawasaki. Honda. Suzuki. Kayo. BSE. Avantis. GR7. 125. 140. 150. 160. 190. 230. 250. 350. 400. 450.
- Caterpillar for a motorcycle. Snowbike. Snowbike. Snowmoto.fun. SMF. “
- Track kit SMF CROSS 101″ from 136,000 rub.
- Track kit SMF 129″ from 185,000 rub.
- Track kit SMF PRO 127″ from 250,000 rub.
- The Samara company SNOWBIKE LLC offers a set with adapters that are included in the price of the set. The issue price is 76,600 rubles. + delivery by transport company.
- For motorcycles with a volume of 110-250 m3, the company offers potential buyers a kit costing 62,500 rubles. which is suitable for motorcycles from Japanese, Chinese and European manufacturers.
- And from the same company, an offer and, in my opinion, not a budget offer.
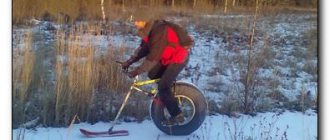
- Electric Crawler Fat Bike Conversion Kit.
“Although the fatbike itself is quite a passable device due to the wide tires, its passability ends in loose snow. At speed, it will still be able to travel some distance in the snow, but if you drove into a snowdrift 30 degrees or deeper, then its cross-country ability will not be enough. In addition, on snowy climbs, of course, any tires, even the widest and studded ones, will slip. Therefore, we are developing a kit to increase cross-country ability. In effect, you get an ultra-light single-seat all-terrain vehicle.”
- -Assembled weight: 15 kg
- -Speed: up to 45 km/h
- -Distance on one charge: up to 70 km
- - Load capacity: 140 kg
- -Motor power: 2.2 kW
- -Battery capacity: 26 Ah.
- -Tracks width: 15-22 cm
They are asking 80,000 rubles for this device.
This is not a complete list of devices that will turn your motorcycle into a maneuverable, smaller, but more unstable and injury-prone version of a snowmobile.
For people with a technical mindset, skillful hands and a desire to create their own creation, on the vastness of the World Wide Web there are enough technical developments for the production of such kits. Good luck!
Connecting the electrical wiring
Okay, you figured out the transmission, you shoveled a lot of snowstorms before, okay. What do you need? You need wiring to make the engine breathe, work, and all the units work together. You bought a bunch of wires at the electric store, you soldered something. You've done everything, you've got yourself a high-quality wiring harness.
Second question. This is not a car engine, it is a Chinese engine. It may have twenty wires, but only four work. You see, if you bought an engine with a powerful light coil, it has 2 wires, but if it has a weak one, it has one wire. You look, he should have a plus - a minus in theory, but he only has a plus sticking out. Of course, I’m saying everything exaggeratedly, but it’s a fact.
It's a hassle with connecting, but oh well, we've all been through that. Can you imagine what kind of motorized towing vehicle it turns out to be? I've seen a bunch of do-it-yourself motorized towing vehicles. Yes, a great man, he spent six months of his life in a garage, did not see his family, his children. And so he went out for a test drive, since the season and the first snow had arrived. He dug himself out of the garage, drove out, and something broke. It happens anyway...
BSZ Ant
You need to remove the fan grille and the metal ring that secures the fan impeller.
The next step is to secure the modulator shutter with M4*6 mm screws in place of the eccentric.
The next step is to install the rubber washer from the kit. The washer is installed under the metal ring for fixing the fan impeller.
The next step is to install the fan grille in place.
Next, we attach the optical sensor to the fan grille with M4*10 mm screws from the kit.
Center the optical sensor.
Next, we connect the wiring according to the attached diagram from the kit.
For normal operation of the BSZ it is recommended:
Use only a high-voltage wire from a car (since the ends of motorcycle wires have a built-in resistance of 10-15 KOM, which is not suitable for BSZ).
The switch can be used from a VAZ 2108-09-99 car. Check the voltage in the network. It should not exceed 15 Volts, otherwise the switch will fail or the ignition will work unstably.
Electrical circuit diagram of the Ant scooter
Hai! This wiring diagram of the Ant equipment will be useful to those who restore old Soviet scooters. On our website All about motorcycles, such biker mechanics will find many useful images, as well as texts with tips on tuning iron horses, etc.
This resource also provides news from the world of biker sporting events.
The famous domestic scooter has become a rarity these days. Only occasionally is he encountered on the endless roads of his great homeland. You can buy it for relatively little money. On this motorcycle site you can study the technical characteristics of this utility vehicle.
Explanations for the Ant Moto wiring diagram:
1) Direction indicators with bulbs.2) Battery (battery).3) Scooter speedometer.4) Speedometer dial backlight bulb.5) Motorcycle ignition system spark plug.6) Ignition system coil.7) Ignition system capacitor.8) Switching mechanism/ turning off the high beam and the sound signal. 9) Front parking light bulb. 10) Main lighting bulb (low/high beam). 11) Turn signal switch.
12) Sound signal playback device.
13) Scooter turn signal relay. 14) Switch. 15) Night light switch. 16) Generator operation identification indicator light. 17) Neutral transmission identification indicator indicator. 18) Identification mechanism for engaging neutral gear in the gearbox.19) Motorcycle clutch.20) Bike dynastarter.21) Interrupter for the ignition system of a Soviet scooter.22) Ignition system lock.23) Ignition system fuse.24) Stop switch/switch signal.25) Moto Ant relay-regulator.26) Switch block.27) Brake light bulb.
28) Rear marker lamp.
Contactless ignition Ant, Tula (FULL set of BSZ Muravey 2.5)
Topic of the section Homemade electronics, computer programs in the General Questions category; Hello everyone, I have an idea to install a spark ignition on my engine, I don’t have money to buy a specialized ignition, I want to make Forum Rules. Rules Advanced search. Forum General questions Homemade electronics, computer programs Electronic ignition circuit. Dear readers! Our articles talk about typical ways to resolve legal issues, but each case is unique. If you want to find out how to solve your particular problem, please use the online consultant form on the right or call the numbers provided on the website.
Source
Ignition From Trimmer On Motor Scooter Ant
The ignition on the scooter is responsible for igniting the mixture, which is ignited by the spark plug at the right time. For the correct flow of voltage, the current goes through several stages of transformation. From the moment of flow until the appearance of a powerful spark, interesting processes occur. The spark must occur at certain times when the piston almost reaches the desired position. Efficiency and efficiency depend on proper ignition settings.
A high-voltage special wire is supplied to the spark plug the moment the switch is installed. As a result, the spark moves from the insulated to the grounded electrode located on the side. The mixture must be ignited efficiently, so the spark must have some strength. As a rule, the ignition on a scooter must be of a certain brand
It is also important to install the correct spark plug for the engine type. Today, models are available with cold and hot spark plugs, which must be installed on a specific scooter, which you can find in the instructions or in the understanding of professionals
When selecting and installing the ignition on a scooter, the role of the coil and switch should be taken into account. A high voltage current is generated in the coil; it works on the simple principle of induction. Its design is simple, just two windings that are wound around a core. The difference between one and the other windings is that the primary has several hundred turns, and the secondary has thousands. Passing through the primary current, it forms a field, then is interrupted and disappears, while a fairly high voltage is formed in the secondary winding. The voltage generated at the right time, which is set by the switch, is supplied to the spark plug. Its electrode is immersed in the combustion chamber.
Ignition from a chainsaw on Tula
On older models, the ignition on the scooter included a magnet. The contactless system is installed on any modern scooter that does not use switch contacts, as they quickly failed and often needed adjustment. The fill switch consists of a thermistor and other electronics. The principle of operation of such a system on a scooter is simple, it is autonomous and you almost never need to interfere with its operation, but in life there is everything, and sometimes you need to fix it.
READ How to Load Line into a Trimmer Reel Video
In a scooter ignition system, the generator is responsible for generating the required voltage amplitude at certain engine speeds. To form an arc with a breakdown force of one millimeter of air mass, the voltage must be at least three thousand volts. In order for the mixture to ignite completely, the spark must not disappear for a certain time. The ignition coil or ignition coil generates this voltage. It receives only 100 or 400 volts and produces 6 or 20 thousand volts, but at such times the current decreases. A hole rarely needs repair; it truly lasts forever.
If the commutator does its job, it transmits a pulse in time, which must have a strictly defined amplitude as well as duration. Many scooters are equipped with thyristors, called capacitor systems. A capacitor was installed inside the commutator, at some point it emits a current, it is transmitted to the coil, namely to its primary winding. This process is controlled by a thyristor. The Honda 18E Engine Switch does just that according to this principle and gets the job done. They are installed on many models of Chinese mopeds. Some ignition systems install a special pulse converter. Its purpose is to convert current from 12 volts to 300. This ignition on a scooter is a very successful development. At any engine speed, the spark will always be the same, eliminating problems when starting or idling.
Contactless ignition at Tula TMZ. Easily!
Any lover of domestic motorcycles knows that the original cam ignition is a rare slag and needs to be changed. What to change to is a rhetorical question. Of course, for normal operation you need to install contactless optical ignition.
You can come up with something with a Hall sensor, it will work. But this is already the last century. The most modern and technologically advanced solution is optical ignition based on LEDs.
I found a seller on a well-known domestic social network and signed up. The reviews are good, it doesn't look like a scam.
The trading approach is my favorite. These people clearly know how to sell a product.
The main product is the optical ignition elements themselves. If you want, you can buy only them, and buy the rest yourself.
I’m not sure about the straightness of my hands - buy the extended set, there are more details, you don’t have to do anything yourself. But for some spare parts you will have to run to the Zhiguli store.
If you don’t want to run anywhere, buy the richest set, it has everything. This is definitely enough, you don’t need to look for anything except electrical tape.
Of course, I didn’t frown at the overpayment of 200 rubles, I value my time more, and ordered everything at once, including a handful of candles, some repair kits and spare rubber bands. Everything that was available in Tula.
We carefully study the instructions. Let's go! Nothing complicated. Even the right ATV tires were more difficult to buy and install.
We dismantle the grille and unscrew the standard cam ignition. Goodbye source of unstable idle, we won't see you again.
Here, in fact, is the most important detail in contactless ignition - the optical sensor. In the center lies a beautiful one. For motors, scooter “Ant”, “Tulitsa” and “Tourist”) - it looks like this. For IZH motorcycles and sidecars, SZD is almost the same, very similar.
We also throw out the standard coil (ignition coil in a smart way) and the capacitor. There is no place for them in the new system.
First of all, we mount a tricky-shaped curtain made of an equally tricky material onto the flywheel. Two screws and it's in place.
Then we screw on the sealing rubber. Again two screws, again everything is simple and clear.
We install the grille, and then screw on the heart of the contactless ignition - an optical sensor with an LED.
It's time to think about where to put the switch. It is advisable to install it on some kind of massive piece of hardware so that there is good heat dissipation. The most massive piece of iron in Tula is the frame.
We drop the tank and see that there is a lot of space under it, there is even a hole very suitable for a threaded rivet (comrade engineers, forgive me, of course, a hole). We drill another hole and install two threaded rivets.
Great! There's simply no better place for a switch. The perfect place.
We put the wires in a special “snake skin” type insulation and connect them according to the instructions. Again, everything is simple, if you distinguish colors, connect it.
Don’t forget to install a Zhiguli bobbin instead of the standard bobbin. They say it will be much better. There is no reason not to believe.
We adjust the ignition at top dead center. Again, everything is according to the instructions. You know what top dead center is, right? If you know, there shouldn't be any problems. If you don’t know, go play on the computer; oil-fired motorcycles are not for you.
How to install a magneto on an Ant scooter. How to set magneto ignition on ant
History of models. Who's online? You are an Anonymous user. You can register by clicking here. Soviet scooters: Forum. Previous topic :: Next topic. Matroskin Interested Registered: Dec 16, Messages: Explain how to do this on your fingers, the instructions say about some kind of meter, etc.
To come back to the beginning. First, you need to write on what engine. Everything written below concerns Tula ones. If I'm not mistaken, the opening of the contacts should begin 2. If the ignition is normal: we hook a 12V light bulb with one end to ground, the other to the terminal of the coil to which the wire from the contacts goes, take an iron rod about 6 mm, about 10 cm long, unscrew the spark plug, stick the rod into hole, lightly resting on the piston, rotate the rotor counterclockwise until TDC, set TDC, put a notch on the rod with a needle file, pull out the rod, and put a second mark at a distance of 2.
Now we turn on the ignition, stick the rod back with the same side, and turn the rotor counterclockwise, when the SECOND risk mark that you made the 2nd time appears, it is at THIS moment that the light bulb that you connected to the coil should light up, if it lights up earlier or later, then loosen the screws and turn the ignition to the correct position. Well, it seems to be something like this on the fingers. Labuh wrote:. Now turn on the ignition, stick the rod back with the same side, and turn the rotor counterclockwise, when the SECOND mark appears, it is at THIS moment that the light bulb that you connected to the coil should light up, if it lights up earlier or later, then loosen the screws and turn the ignition , choosing the correct position.
Damn, how intricate! It’s all true, but in practice it practically doesn’t work! PLAY is inherent in this ignition. I usually adjust it while moving, achieving the best traction. In general, we have known about electronic ignition for a long time. We have written and rewritten a lot about this. Or do you mean a breaker? Matroskin wrote:. Andrey wrote:. Guys, I keep turning and turning the impeller, but the lamp is still on.
I closed the breaker with a screwdriver and it still lights up. Taxes in order. How should it stand, with the armor wire socket closer to the frame or vice versa? Or from the coil directly to the breaker? Do not swear! A person turns on the ignition for the first time, and even an experienced one sometimes grabs his head. Matroskin, if you take a photo of the ignition unit installed on your scooter, the eccentric, the breaker and its contacts, the wire going to the coil, the coil and its terminals, then it will be more convenient for us to show everything in the pictures.
And so again point by point: 1. Secure the breaker eccentric to the dyno starter housing. Install the fan grille and secure it with 4 M6 screws. The slot for the wire coming from the breaker contacts should face up.
Install the breaker contacts into the recess of the fan grille. Secure them with screws. The contacts should look down and be located to the left of the eccentric.
Connect the wire coming from the contacts to the minus terminal of the ignition coil. Attach the capacitor wiring to the same terminal, and secure the capacitor itself to the fan volute housing. Connect the positive wire coming from the ignition switch to the coil to the “plus” terminal. If there are no markings on the coil terminals, it means it doesn’t care where its plus and minus are. Connect the temporary light bulb with one wire to the negative terminal of the coil, and the other to ground. Turn on the ignition.
Loosen the screws securing the base of the breaker and turning it counterclockwise or clockwise, find the moment when the “temporary” lamp lights up, this is the moment of ignition, the moment of the spark.
If everything works out, carefully secure the base of the breaker and start it. It happens that the lamp is constantly on or does not light up at all. The reason for this may be: a large gap on the breaker contacts, a short circuit of the contacts to ground, misalignment, or the fan grille is not installed correctly.
If for some reason you cannot install the ignition, start reading everything from the beginning. Non-motorized flea market Motorized flea market – Archive What-where-how much Swamp Closed forum Comments on the operation of the site and forum.
Ignition installation
Installing the ignition on an Ant scooter, as on any motorcycle with a single-cylinder engine and a battery ignition system, does not require special knowledge or effort. All you need is very thin paper, a narrow rod and a set of keys. So, how to set the ignition on an Ant scooter:
- Remove the spark plug and set the piston to top dead center (hereinafter referred to as TDC).
- Insert a rod through the hole from which the spark plug was removed and press it against the piston head. Make a notch at a length of 4.5-5 mm
- Close the breaker contacts when the piston is at TDC. Place paper between them and pinch.
- Turn the crankshaft counterclockwise as slowly as possible and pull the piece of paper at the same time.
- When the paper is released when the piston is lowered to the depth of the mark made, the ignition will be set correctly.