I’m working further and this is an essay and probably a reminder for me and for those who will also disassemble everything... In short, if you want to put the motorcycle in complete order with your own hands (in my case it’s still the engine and gearbox, I just haven’t gotten around to the rest)
To begin with (if you are a city person and you have the opportunity to spend 50+ thousand wooden ones on a hobby, then we go to the market if you don’t have a tool) You will need a 36 socket (long and better impact) and a wrench (I bought one for trucks with inch square and transition to 1/2 inch for torque wrenches)
You will need pullers (especially 2-arm and 3-arm pullers (large for 2-arm gears and flywheel removal)
You will also need WITHOUT OPTIONS BUY OR FIND THIS SCREWDRIVER (otherwise the work will stop until you get this gadget) Impact rotary screwdriver (any manufacturer) 2 pry bars (medium) 2 pry bars (small) 1-2 blunt chisels of different sizes and also this puller (you need will be in order to then press out the bearing race
In principle, let's start work and I'll tell you where to start
THE MOST IMPORTANT THING CONCERNES SAFETY AND FIRE SAFETY
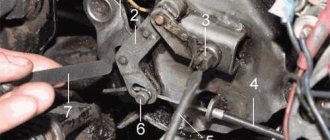
On the Dnieper, 2 halves of the tank are connected by a hose that runs under the frame and when lifting the tank from its place, this damn hose is removed and fuel begins to flow, I almost had a big boom with a shish kebab from me as it doused me significantly. So be very careful. 1. Drain the oil from the engine and gearbox. 2. We hang up the rear wheel or the pendulum to remove it (I’ll answer the stupid question of what it is... it can’t be removed right away) the brake cable goes to the rear wheel and if you look at it, there is a rod that is held on by a cotter pin that you just need to remove (saw off, saw off, bite off in general, get rid of it) 3. Having unscrewed and removed the cardan, remove the generator and disconnect all the wires from the engine and gearbox
Here comes the moment of understanding how much strength you have and whether anyone can help you, if not and you are ready to scratch the motorcycle frame, then move on, if not, then read the same thing, but at the moment of jacking the engine is held by a couple of people
The engine hangs on 2 studs that pass through the engine from below, depending on the wear, I recommend cleaning it, lubricating it with water and heating it to 150-300 degrees. Then the nuts will come off with a bang; we knock out the studs from the side of the stroller if necessary)))
Before dismantling the studs, walk around in a circle and make sure that everything has been removed!!!
4. If you 1 then unscrew 3 NUTS and ONE BOLT WHICH IS SCREWED ON THE SIDE OF THE CYLINDER AND ON THE SIDE WHERE THE 3 NUTS ARE LOCATED, you can see that the stud is broken!!! keep this in mind!!!
Basically, we just remove the engine.
Stages of working with a removed engine!!!
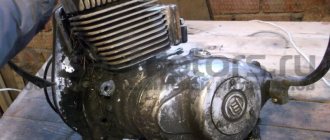
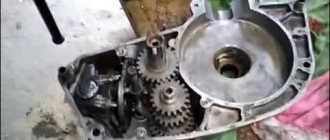
1. Unscrew the pan and get ready to see a bunch of goon that will either flow as jellied meat!!!
2. Remove the front part of the engine carefully. 3. Remove the gear using a puller and remove the centrifuge and oil pump!!! otherwise you won’t be able to remove the guitar later. 4. The next step is to remove all the gears and look for the presence of the mark!!! in order to then set the timing gears, the mark is something that looks like hitting two gears with a chisel in one place (you can’t make a mistake, but if not, do it yourself) and for one gear you will need a 2-armed puller and for the other a 3-armed puller and another one thing is VERY VERY IMPORTANT , the center of the puller should rest against anything but not the shafts (you can screw bolts onto the shafts and then if you don’t do this, the shafts will flare!!! and may burst!!!
5. You’re probably already itching to try the impact a screwdriver, but early now it’s time to take a rubber hammer, a flat regular impact screwdriver and two small prybars))) and by tapping on the fastening with a rubber hammer, we turn it so that we can slip a prybar under the ledge on one side and the other, and by pressing on the ends of the prybars we try to pull it out camshaft (usually it’s easy for everyone, for some it’s simply removed with your fingers, which is even worse) 6. Let’s move on, now we need to remove the guitar (remove the keys in advance!!! I hope you’ve already done this)
Now, using the pry bars, we remove the guitar!!! Very carefully, it is fragile but can come off like this for me and this is not uncommon as I understand it
Removing the bearing is very easy; in the photo below you can see two factory holes that are needed for these purposes; old valves are ideal for knocking out; only the tip of the valve needs to be reduced; it is better to use a sharpener (reduce the diameter to the narrowest part, as for crackers, and to a depth of 2-2.5 cm) then it will be enough to knock out the bearing. By lightly tapping the valve, we knock out the bearing, changing the pressing points, one then the other.
Next, a smoke break, since you’ve been pretty tired of having to take a smoke break and drink a glass, especially since you’ll need it later)))
Flywheel
To remove this thing you will need an impact head and a handle for the possible use of a pipe + a person holding the engine 1 piece. We take Kuzkin’s mother’s impact screwdriver and disassemble the clutch, removing everything, we see a 36 bolt and a lock washer.
Down with the washer, the bolt has a normal thread; if you look at it, unscrew it to the LEFT SIDE .
After unscrewing, remove the flywheel and see the oil seal with a retaining ring!!! Now you will need the puller that was in the beginning. After removing the retaining ring, we heat the seat with a hair dryer and slowly knock out the bearing race. Since all the bearings I install are Japanese, I will install them like this.
That's all for now, next there will be a part of the report on engine assembly and a report on the box, I confess I haven't started yet, I don't have time.
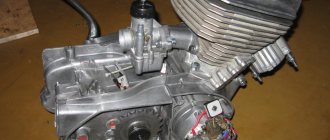
Power unit. Engine disassembly.
Instructions for the installation, maintenance and repair of motorcycles Ural, Dnepr.
>> Power unit. Engine disassembly. K.P.Bykov P.V.Grischenko
Let's look at engine disassembly using the example of the Ural M67-36 motorcycle engine. Disassembling the engine is carried out in the following order: - remove the gearbox, to do this, unscrew the stud nuts and the bolt securing the gearbox to the engine crankcase; — disconnect the suction pipe and remove the carburetor with the gasket; — dismantle the cylinder head and its gasket, having previously placed a container under the connector to drain the oil; — set the piston of the cylinder being disassembled to top dead center so that both valves are closed, turning the crankshaft; — having unscrewed the nuts securing the brackets, remove the rocker arms with the axle brackets, remove the pusher rods; - Separate the head from the cylinder with light blows of a hammer through a wooden block; you must ensure that the gasket separates along with one of the parts and does not tear. When removing both heads, you need to mark the parts being removed so as not to confuse them during assembly; — unscrew the fastening nuts and remove the cylinder by rocking from side to side; — remove the piston using the tools shown in Fig. 2.55. In this case, first remove the piston pin retaining rings, then put the device on the piston and install it on the cylinder mounting studs and press out the piston pin; — remove the pushers with guides, having first unscrewed the locking screws, remove the pushers, mark them; — remove the front cover by unscrewing the screws securing it; — disconnect the wires from the ignition coil terminals; — remove the breaker cover, remove the high voltage wires along with the rubber bushings; — remove the ignition timing device together with the breaker cams; — remove the cover, remove the breather.
If it is necessary to inspect and disassemble the lubrication bypass valve, it should be borne in mind that it is strictly calibrated for a pressure in the lubrication line of 70 - 90 kPa. Before removing the camshaft, it is necessary to measure the engagement gap and the end runout of the timing gears. To do this, unscrew the fastening nuts, remove the generator, and, installing a device on the upper right threaded hole, measure the lateral clearance in the gear mesh, which should not exceed 0.3 mm (Fig. 2.56). If the gap is too high, replace the gears. Then, having secured the device (Fig. 2.57) into the right threaded hole, measure the end runout of the gears, which should not exceed 0.04 mm.
To remove the camshaft, it is necessary to unscrew the screws securing the flange through the holes of the driven distribution gear; the shaft is dismantled using a puller, which is inserted into the hole of the removed guide sleeve of the intake valve of the left cylinder (Fig. 2.58). Place the mandrel under the cam and push out the camshaft by turning the mandrel counterclockwise.
Rice. 2.55. Device for pressing out and pressing the piston pin into the upper head of the connecting rod: a - using a tape device: b, c - using a mandrel and a hammer: d - using a screw: 1 - wooden stops; 2 — piston pin; 3 — mandrel: 4 — connecting rod: 5 — piston; 6 — mandrel; 7 - drift
Rice. 2.56. Measuring the bale gap in the meshing of distribution gears
To remove the flywheel, you need to bend the lock washer of the flywheel bolt, install a 19x22 key in the spacer between the hole for the spring in the flywheel and the boss under the engine crankcase mounting stud, unscrew the flywheel mounting bolt, remove the lock washer and remove the key. Then fix the device (Fig. 19, a) on the flywheel and screw in the central screw of the device, remove the flywheel from the crankshaft cone.
To remove the crankshaft from the crankcase, you must first remove the drive gear (Fig. 19, b), remove the key, unscrew the bolts securing the front bearing housing, remove the washers and cover, then undo the cotter pin, etc. After unscrewing the bolts securing the rear bearing housing, remove the washers and rear bearing housing. Then press the crankshaft out of the front bearing using a puller (Fig. 2.59, a). After this, turn the crankshaft in the engine with your left hand until it stops, lifting it up, and with your right hand move the connecting rod towards the left hole of the crankcase, remove the crankshaft from the crankcase. If inspection and replacement of parts is not required, then there is no need to remove the front bearing housing.
Rice. 2.57. Measuring the axial runout of distribution gears
Rice. 2.58. Pressing out the camshaft: a - using a mandrel; b - using a drift and hammer
The bearing is removed from the crankshaft rear journal journal using a puller. If necessary, press the front housing together with the bearing out of the crankcase, and then remove the bearing from the front housing using a hand press.
After disassembling, the parts must be washed in kerosene, cleaned of deposits and carbon deposits, and inspected. Replace worn parts with new ones or repair them
Rice. 2.59. Pressing out the crank mechanism or crankshaft using a universal puller: a - pressing out the crank mechanism; b — pressing out the rear bearing housing: 1 — engine crankcase; 2 - bearing housing; 3 - ball bearing: 4 - crank mechanism
Next >>
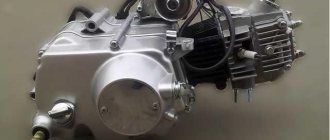
Assembly and repair of Dnepr motorcycle engine
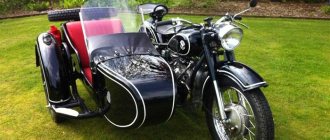
“Dnepr” has been produced at the Kiev motorcycle plant since the mid-twentieth century. In Soviet times, it was popular along with Ural technology and was its direct competitor. Now the Irbit plant has stopped producing its motorcycles, but the Kiev plant still produces new models, such as Solo and KM38 .
They have earned popularity due to their reliability and power. Repairing the Dnepr engine is quite simple, which allows it to be done even while traveling. All bikes from the Kyiv plant have good dynamics and a pleasant sound, which is often compared to Harley. It was possible to attach a stroller to the main part, however, due to production cuts, models without additional seats or equipment for agriculture are currently being produced.
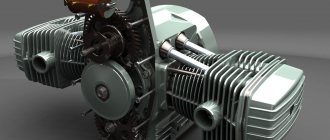
The most popular model is the Dnepr 11; engine tuning is presented in the 11M model, slightly modified with higher performance. Engine type: four-stroke carburetor, overhead valve with air cooling system. The two-cylinder Dnepr, whose engine capacity is 649 cm3, produces quite good power of 32 horsepower. The speed is 105 km/h according to the passport, but in reality it is about 120.
The gearbox of the Soviet bike has a dry, double-disc clutch and four stages. Assembling the Dnepr 11 engine with such a gearbox is not a problem. Moreover, it is very reliable and rarely causes problems.
If your motor makes excessive noise during operation, it means there is a problem with it that needs to be corrected immediately. Everyone has encountered problems in the engine itself and has already faced more than once what a Dnepr engine assembly is. However, few people encounter problems with the box. Therefore, let's talk about what issues may arise during the operation of the checkpoint and how to solve them.
At the first symptoms of self-shutdown, excessive gear noise, or when the next gear is not engaged, the motorcycle jerks or jolts. It is impossible to carry out repairs where necessary. Parts must be kept clean, since dirt and dust have a very negative effect on engine performance.
Dnepr motorcycle engine repair is directly related to the gearbox . However, unlike many motorcycles, it is not necessary to remove both units. The box is removed separately. To do this, the wheel, driveshaft with rear axle, separate the clutch cable and neutral wire. Then disconnect the air filter and drain the oil. After this, you can disconnect the unit from the motor.