Homemade all-terrain vehicles are designed and manufactured by mechanics who know and love their job. Some craftsmen develop equipment from scratch, creating a frame from scrap elements, adapting spare parts from different cars and motorcycles to it. Before putting an idea into practice, all stages of work must be thought through and recreated in drawings.
DIY all-terrain vehicle: assembly photo
A homemade all-terrain vehicle made with your own hands from a Lifan engine: photo of the assembly with a description, as well as a video of testing a homemade all-terrain vehicle.
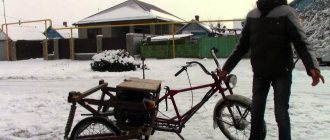
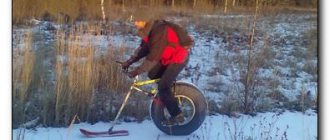
A two-wheeled all-terrain vehicle is an off-road motorcycle with wide, low-pressure tires. The craftsman decided to build himself such a vehicle for entertainment and off-road driving.
To build the homemade product you needed the following materials:
- Lifan engine 6.5 hp (with gearbox and automatic clutch).
- Wheels for a light ATV (made in China).
- Profile pipes.
- Disc brakes and other scooter parts.
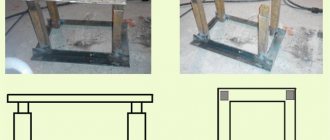
In order to assemble the frame with the correct geometry, it was decided to first make a slipway for welding the frame.
The frame of the all-terrain vehicle is assembled from profile pipes.
Then the author made the wheel hubs.
During the assembly process, the author decided to replace the standard Chinese gearbox with a Togliatti one with better gear ratios and, most importantly, a lower gear. Now with a lower gear you will get a real all-terrain vehicle.
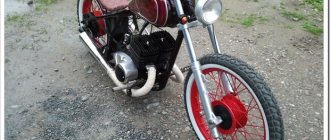
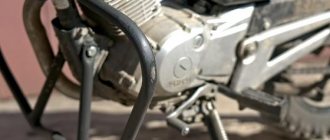
Assembly process, on the frame there is an engine with a replaced gearbox.
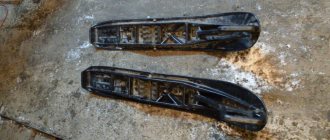
Disc brakes from a regular scooter are installed.
Sprockets from a motorcycle, for a 520 chain.
Immediately after the first tests, the star had to be replaced with a larger one with 52 teeth.
In the photo the nova is on the left side.
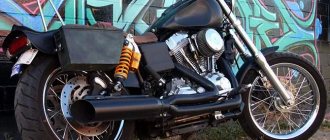
The steering fork has been installed.
First tests.
After testing, design flaws were identified - the frame made of a profile pipe is too heavy and wide, it is not very comfortable to sit on such a frame, so the author assembled a new frame, this time from a round pipe with a diameter of 30 mm.
The process of replacing the frame has not yet been completed; the photo shows the first version of the frame made from a profile pipe.
The author made a video showing the capabilities of a self-made all-terrain vehicle.
1 General information about the self-made mini tractor fracture 4×4
The Perelomka mini tractor is a means of small-scale mechanization. This mechanical device looks like a standard small-sized tractor built on a walk-behind tractor. There are 3 types of tractors: factory, homemade, converted using factory tools.
Minitractor frame - fractures
In terms of technical characteristics, homemade products cannot be compared with models produced in factories. However, a number of advantages make it appropriate to operate a homemade 4x4 tractor in small areas:
- an alternative option in some cases gives a head start to more powerful devices in terms of functionality, while the cost is less than for a factory product;
- wide scope of application. The use of a homemade tractor is possible in orchards and vegetable gardens, for cultivating crop areas, harvesting work and transporting small-sized cargo;
- The cost of the machine will pay off in one season. Mechanisms and the breaking unit for a mini tractor are usually removed from broken equipment. You should not get rid of devices that often fail. A monoblock that breaks repeatedly can still serve you by becoming a storehouse of working elements for creating a mini-tractor with your own hands. Some farmers convert other equipment into a mini tractor. Then its production is greatly simplified.
Important What categories of rights are needed to manage different modifications of GAZelle Next
There are also disadvantages. It may be difficult to find certain parts. In addition, it is not easy to find an equivalent replacement when one or another mechanism has served its purpose. This is due to the fact that borrowed components and mechanisms are taken from machines that have long gone out of production.
1.1 Technologies for assembling a mini tractor
To make a device with a breakable frame with your own hands, you need to be focused, patient and diligent. An important stage in creating a homemade product is preparing drawings. If you do not have technical skills, enlist the help of someone who specializes in this matter. He will have to calculate the thrust force of the engine. As a last resort, the necessary information and drawings can be found on the Internet.
Homemade tractors with a breakable frame are very popular among farmers. This is an articulated model with 4-wheel drive. Among the variety of assembly options, a suitable design for beginners is as follows:
Mini tractor drawing - fractures
Then they begin to prepare the frame, engine, transmission, and steering. Let's look at the frame design first. The frame has parts:
- traverse;
- spars.
The traverse at the front is made from a twelfth-size channel, and at the rear - a sixteenth. The spars have a structure of three stages. When making fractures based on an all-metal frame, the front steps are made from metal channels of the tenth size, the latter is made from a square-shaped steel pipe (with sides 8x8 cm). The structure of the material is quite strong in bending.
A metal beam is used as a cross beam.
Another option involves using channel No. 9 or 5. First, 2 half-frames are welded, which will be connected by a hinge joint. Drive shafts from trucks are used for this.
The minitractor with a tipping frame is susceptible to any 4-cylinder engine with adequate power. Professionals recommend equipping homemade equipment with a power plant with a power of 40 hp; for home use this is quite enough. The following engines are usually used: M-67, MT-9, UD-4, UD-2; engines are borrowed from Moskvich or Zhiguli passenger cars.
When choosing an M-67 engine, you will have to increase the transmission gear ratio and make sure that the equipment includes an additional cooling system. If you ignore this condition, the self-made tractor will not be able to move due to insufficient power of the unit.
All-wheel drive all-terrain vehicle drawings
Dear visitors to the “ Samodelkin Friend ” website, we present to your attention drawings of the all-wheel drive all-terrain vehicle “Mopets” as well as step-by-step photos of the assembly of a homemade two-wheeled all-terrain vehicle. The Mopets was assembled in St. Petersburg by one of the local Kulibins, American samples of all-wheel drive all-wheel drive vehicles of the “Rokon” type were taken as a basis. A drawing was previously developed and drawn up (see below) and its own all-terrain vehicle was assembled on its basis.
The homemade frame is welded from a square section profile, a 6.5 l/s gasoline internal combustion engine from a walk-behind tractor, all-wheel drive on the front and rear wheels, torque transmission is carried out through a chain drive. The suspension is rigid without shock absorption, ATV wheels are 25 inches.
The all-terrain vehicle is designed to overcome off-road, rough terrain, as well as wetlands and forest areas. Mainly actively used by fishermen and hunters.
And so, let's carefully look at the presented drawings, as well as step-by-step photos of assembling the all-terrain vehicle based on them.
Materials
- engine from walk-behind tractor 6.5 l/s
- professional square pipe
- 25 inch quad bike wheels
- chain
- leading and trailing stars
- primer and paint
- steering wheel
- cardan
- support bearings
Tools
- welding inverter
- Angle grinder (grinder)
- drill
- set of wrenches
- plumbing and measuring tools
Drawings of an all-terrain vehicle and step-by-step photos of assembly with your own hands. Assembling an all-terrain vehicle according to the drawings.
Adjusting the angle of the front fork and the fracture unit.
Frame
Slave stars
Fracture node
An all-terrain vehicle sneaks through the swamp)
We also invite you to familiarize yourself with a similar all-terrain vehicle of the VASYUGAN type and there is also a more interesting design with the transmission of torque to the front wheel through a cardan drive, you can find it HERE Stay tuned for many more interesting things to come;)
Device and design
The all-wheel drive snow and swamp-going vehicle has large pneumatic wheels with a special tire tread that helps the vehicle float on water due to the rotation of the wheels. The body of the equipment is waterproof, the bottom is like that of a boat. Thanks to this, the all-terrain vehicle is able to float on the water even with flat tires.
The front and rear of the Sherpa are equipped with airtight doors. At the bottom there is a box for tools and other necessary things. The bottom is made of Swedish armored steel. The design has a flat plane, allowing the all-terrain vehicle to crawl on its belly over logs, stones and other protruding elements.
On new models, the upper part of the body is made of aluminum steel. There are strong bumpers with brackets installed at the back and front, which can be used to hook a winch if necessary.
The cabin is designed without a hood, which improves visibility. The interior package includes 2 folding chairs and 2 comfortable beds. The front and rear windows are equipped with wipers; if necessary, the windows can be raised and exited from the cab. There are emergency hatches at the front and rear.
Do-it-yourself homemade ATV: how to make a decent device
An ATV is a vehicle equipped with four wheels. The main manufacturers of mini cars are: Yamaha, Polaris, BRP, CF Moto. Utilitarian quadrics are used as all-terrain vehicles, and stunt models are used for fast driving. The categories differ from each other in technical characteristics, which is taken into account when you need to assemble an ATV with your own hands.
Description of the vehicle
A modern ATV is equipped with four or six small wheels, but with increased maneuverability. The main technical characteristics include: light weight, all-wheel drive and low gear. Due to the unique configuration, the vehicle can easily travel on country roads. It can be used in summer and winter.
To make a homemade ATV, it is recommended to decide on its type:
- Utilitarian. The model has a lot of weight and good maneuverability. The vehicle easily carries several people and accelerates to 90 km/h.
- Stunt. Equipped with a narrow platform and radiator. The car weighs little and can accelerate to 137 km/h.
Vehicle assembly is carried out taking into account technical characteristics, equipment, and operating conditions. To perform independent work, you will need to have skills in working with a welding machine and a lathe. To build a car, you will need a spacious garage. Taking into account suitable parameters, a do-it-yourself drawing of an ATV is prepared.
Preparatory stage
When assembling the structure yourself, the power of the motor, the type of suspension, and the need to install a trunk are taken into account. To perform the upcoming work you will need: a welding machine, drill, grinder, keys, hammer, pliers, jack. As a basis you can take:
- Motorcycle Ural.
- Motorcycle Izh.
- Scooter.
- Oka or Niva car.
If necessary, transport is assembled from motorcycle and car parts. If the frame is made independently, special equipment will be required to deform the pipes. In this case, it is recommended to separately make drawings of the frame for the ATV with your own hands. This will simplify the process of assembling components:
Selection of systems
The brake system uses new parts or with minimal mileage. It is dangerous to install old brakes. The muffler is removed from the old car or made independently from a pipe. If a frame from another machine is used, it must be securely bolted to the bottom of the motor. The power unit is installed at the rear or front. Experts advise securely attaching the drive and transmission to the frame.
If the frame requires reconstruction, the component elements are dismantled. The front part needs to be extended onto the frame. At the next stage, the components of the frame are welded. When reconstructing the frame of a motorcycle, the seatposts are moved back by 40-45 cm. Racks are cut out of metal and welded, which are then fixed to the frame. The resulting homemade quad part can be painted with any paint.
To make your own frame, use a regular pipe with a wall thickness of up to 3 mm. It is better to make the spars from a pipe with a diameter of 25 mm, and the struts from a 20 mm pipe. The elements are fixed by spot and then solid welding. In a similar way, the ears from the levers and shock absorbers are welded to the frame. It is recommended to fix the brackets when installing other components and assemblies.
Power unit
The motor is removed from a sports or regular motorcycle, scooter, or car. Auto mechanics advise using a four-stroke engine with a power of more than 15 hp. With. The power units of scooters differ from other analogues in their low fuel consumption. An ATV based on a scooter weighs little, so it can be pulled out quickly if it gets stuck in sand or mud.
To transport cargo or drive off-road, a stronger motor is installed:
- from Izh-1, Izh-2 or Izh Jupiter with a power of 24 hp. With.;
- from the Urals 32 or 36 l. With.;
- from Oka two-cylinder engine 35 liters. With.
To transport heavy loads, a three-cylinder engine is installed. To drive in hot weather, a motor with a cooling system is used. It is not available on older motorcycles. In such units, the cooling system will need to be modified.
Front and rear suspension
Homemade ATVs are equipped with front or rear suspension. It is easier to mount a ready-made front suspension from an old motorcycle. You can use other options:
- Rear axle from the car. It must be shortened to fit the parameters of the quadric. The advantage of this method is the presence of a differential. The disadvantage of the bridge is its large mass.
- Cardan + gearbox on the rear axle. An independent suspension with high ground clearance is suitable for an all-terrain vehicle. In this case, the suspension arms are fixed to the frame using bolts.
To prevent the ATV from turning over while driving, it is recommended to tilt the front suspension strut. The shock absorbers are from Izha. If you have the financial opportunity, it is better to install gas-oil shock absorbers with pumping. They provide suspension adjustment based on the road surface.
The steering system of an ATV is similar to that of a car. A steering wheel or motorcycle handlebar is installed . Some experts advise combining 2 types:
- motorcycle handlebars, shaft and lever at the top;
- parts of the steering system from the car are below.
You can make the steering shaft with your own hands. For this, a pipe with a diameter of 20 mm and a wall thickness of 3 mm is used. You will need to install a travel stop at the bottom of the part.
Gearbox and brakes
If the quad is assembled on the basis of a car, the chain drive is replaced. This greatly simplifies vehicle maintenance. A manual transmission is installed, as it improves maneuverability. The input shafts are directed to the front and rear axles. Wheels can be removed from small cars: Oka, Niva.
How to make an ATV from a Dnepr motorcycle
Today, Soviet-era motorcycles are not very popular and are increasingly being scrapped. This depends on the fact that it is difficult to get spare parts for repairs, and old equipment tends to break down often and constant repairs are not something any motorcycle enthusiast can withstand.
As a result, such rare units either rust in the yard or are used for spare parts. But some craftsmen have adapted to converting old motorcycles into ATVs. One of the most suitable for these purposes was the Dnepr.
- Assembly steps
- The entire conversion process consists of four stages: • frame improvement; • installation of engine and gearbox; • suspension modernization;
- • installation of body kits, painting.
- Necessary materials
To convert the Dnepr motorcycle into an all-terrain vehicle, you need to acquire some spare parts, without which it is impossible to create an ATV: • steering; • two bridges; • brake system;- • suspension.
The main tools include a grinder and a welding machine. Without them there is no point in starting construction.
Control
Before you start creating an ATV, you should decide on its control. For this purpose, a car or motorcycle can be used. In order not to complicate the design of the all-terrain vehicle, it is recommended to use the existing steering system from the Dnepr. Otherwise, you will have to buy the necessary spare parts.
Not a single project of future technology can be completed without a drawing, on which it is necessary to mark the location of all the main elements of the ATV. This will simplify assembly and make it possible to present the final result. In the end, you may end up with a powerful unit capable of driving on any road.
ATV frame
The first step is to slightly change the existing frame, which will serve as the basis of the ATV. To do this, you need to move the vertical tubes of the struts under the saddle back by 40 mm. Next you need to cut off the rear fork and weld the rear axle to the swingarm. Then you need to assemble the struts from the pipes and install them near the suspension bushings.
The front bumper and trunk can be made from a pipe with thin walls with a diameter of 30 mm. You just need to set the welding machine to minimum so as not to burn through the metal.
Suspension
Initially, you need to pay attention to the back. To modernize it, you can use several options. You can install a universal joint and gearbox from a motorcycle, which will greatly simplify the assembly process, but installing a car axle requires the presence of a differential.
For this reason, many prefer the second option and use bridges from passenger cars. Oka is an excellent donor for these purposes. Its bridge does not have very large weights, which in turn will have a good effect on the driving performance of the ATV. But even that will have to be shortened a little. This will take a lot of time and effort, but the presence of a differential will more than pay for this work on the track.
All-terrain vehicles with such axles perform much better on the road. To bring it to the required size, you need to remove the support cups and spring mounts. After this, you should take out the end flange, cut the bridge and insert it back. We connect the resulting contraction by welding. Axle shafts from Oka can be converted into a driveshaft.
The front suspension gives more design options. It makes no sense to install suspension arms from a car, since the weight of the ATV is not large enough. In this case, you can try to build the front suspension with your own hands.
This makes it possible to choose the required size and slightly reduce the weight of the all-terrain vehicle. In most cases, it is made from a metal pipe with a cross-section of 25 mm. Ball bearings from Zhiguli are used as supports.
Homemade ATV based on Oka and VAZ units
We present the ATV of our regular author S. Pletnev from the city of Ocher, Perm Territory. The next machine he built testifies to the increased design level and professional skills of its creator. However, judge for yourself.
A year of work of 3-4 hours after work and on weekends - and the new car was ready for testing, only minor (and I would say pleasant) modifications remained: connecting lighting equipment, installing an ignition switch, rear-view mirrors and other little things.
DIY Oka ATV
The power unit for my homemade ATV was the engine from the Oka car - 32-horsepower, two-cylinder, four-stroke, liquid cooled. And if its power was often not enough for a car, then for an ATV it should have been more than enough.
The machine frame is spatial, welded. Its main elements (two pairs of side members: upper and lower) are made of round pipes of the VGP-25 type (water and gas pipes with a diameter of 25 mm and a wall thickness of 3.2 mm), auxiliary (struts, cross members, etc.) - from VGT-20. The spars are bent: the lower ones are in the horizontal plane, the upper ones are in the vertical plane. I bent the pipes on a pipe bender, “cold”. Eyes (pairs of ears) for attaching suspension arms and shock absorbers were welded to the frame immediately, and various brackets were welded as components and assemblies were installed (in “place”).
The transmission of the all-terrain vehicle is unique. Although the car is all-wheel drive, it does not have a transfer case. As you know, in the Oka the engine is located transversely, while on an ATV it is installed lengthwise. This made it possible to direct the output shafts from the gearbox (Gearbox) not to the right and left wheels (as in a car), but to the front and rear axles. It’s just that the power unit itself, interlocked with the clutch “basket” and gearbox, had to be shifted slightly to the left relative to the longitudinal plane of symmetry in order to reduce the horizontal angle of the longitudinal articulated shafts of the transmission. Well, their vertical angles turned out to be insignificant.
The transmission is assembled from units of various domestic cars, mainly VAZ models. But ready-made industrial units also had to be modified. For example, from the gearbox (from Oka), to ensure optimal (reduced) speed and increase torque, I removed the main gear pair and replaced it with a chain drive. The gearshift rod was also made different - elongated, with outlets on both sides of the gearbox. The rod can be locked in three positions: to engage 1st and 2nd gears, 3rd and 4th and reverse. The lever for selecting these positions is on the right side, and the gear shift lever is on the left.
The inter-wheel gearboxes are from the rear axles of the VAZ “classics”, only their axle shafts along with the “stockings” were removed and replaced with shafts with CV joints from front-wheel drive models. CV joints are also used as hinges in the remaining intermediate shafts of the transmission.
There are no low gears or differential locks.
The steering is motorcycle type (lever and shaft) at the top and automobile type (with tie rods) at the bottom, only simplified, without a steering mechanism, with one bipod. At first I used the steering wheel from a Minsk motorcycle, with a pipe diameter of 22 mm, but it turned out to be a little thin. Later I found and installed it from a Ural motorcycle. The steering shaft is made of a pipe with a diameter of 20 mm and a wall thickness of 2.8 mm. It has a travel stop at the lower end. At the bottom, the shaft rests on a thrust bearing, and in the middle part it rotates in a detachable nylon bracket-sleeve.
The bipod is made of 8 mm thick steel sheet in a shape resembling the letter “T”. At the edge of the “rack” there is a hole with a diameter of 20 mm - the steering shaft is inserted and welded into it, and in the ears there are conical holes for the ball ends of the tie rods. These holes are reinforced with suitable welded washers. The bipod ears are bent down slightly so that they are almost parallel to the rods.
The wheels of the ATV are 15-inch, from a Chevrolet Niva car. Tires with the appropriate landing diameter dimensions 205/70 (width/height as a percentage of the width) with an off-road tread pattern. The wheel running diameter is about 660 mm.
The wheel suspensions are independent, on two triangular wishbones each (upper and lower) with shock absorbers from the Oka car (front). The levers are welded from round pipes of the VGP-20 type. Elastic elements (springs) and shock absorbers are from the Oka
"(rear). Wheel hubs and steering knuckles are welded into the wheel ends of the front arms - from a VAZ-2109 car. Both had to be modified. I installed studs for Niva wheels in the hubs, and homemade swing arms in the front knuckles.
The muffler is homemade, two-section. To protect the body kit from temperature warping, I covered it with a remote cover, and insulated the inlet pipe with asbestos.
DIY ATV body kit
Do-it-yourself ATV body kit - fiberglass. I glued it in for the first time, and therefore first studied the recommendations for performing the relevant work. But as it turned out, this process is painstaking, although the result is worth it.
First, I made the required contours of the body kit from a square steel pipe with a cross-section of 10x10x1 mm. Fortunately, this pipe bends easily even with your hands over your knee. The contour was welded to the frame using jumpers from the same pipe, in places where later (after gluing the body kit) the “tacks” could be easily cut off. Then I bent “wings” from hardboard (fibreboard) and fixed them with self-tapping screws to the contour and jumpers. Where the bend turned out to be steep, I attached separate strips of the same hardboard. The front end was made with polystyrene foam purchased at a hardware store. It was possible to use polystyrene foam or the same polystyrene foam, but polystyrene foam turned out to be a more suitable material - it cuts well with a sharp thin knife. I glued individual elements from it into the overall structure on polyurethane foam.
DIY ATV frame drawings
The false tank has a complex shape. It was not possible to bend it out of hardboard. Therefore, having wrapped the engine with plastic film, I began to fill the space intended for it with layers of polyurethane foam. After each layer, drying is mandatory, otherwise the thick volume of foam may not dry out inside. Filled until the layers went beyond the contour. Finally, after the foam had completely dried, I began to draw out the desired shape with a knife. The edges were smoothed with coarse sandpaper.
Necessary tools and consumables
To do the job efficiently, you need to prepare the following tools:
- Bulgarian.
- Drill.
- Ruler - triangle.
- Roulette.
- Marker.
- Adjustable wrench.
- Equipment for bending pipes.
- Hammer.
- Welding machine.
Consumables:
- Circles for turbine.
- Electrodes.
- Drill.
- Sandpaper.
- Dye.
- Tassels
- Solvent and primer.
Do-it-yourself ATV - we sort out all the difficulties when creating an all-terrain vehicle
Unfortunately, not every person has the opportunity to purchase an ATV in a store. All more or less interesting models are now quite expensive, and buying a used ATV is always a certain risk. In this regard, many motorcyclists advise making a four-wheeled all-terrain vehicle with their own hands, using an engine and spare parts from some old Soviet motorcycle. Earlier, we already told you about how to make an ATV from a Ural motorcycle. In today's article, we will talk about other donors that can be used if you decide to assemble an ATV with your own hands.
Why is it worth assembling an ATV with your own hands?
Assembling a four-wheeled all-terrain vehicle by yourself definitely helps solve several problems. The first reason why people decide to make a homemade ATV is, of course, a small budget. If you analyze the market prices for ATVs, you can understand that such vehicles can be considered almost a luxury. Prices for the simplest and lowest-power models start from 150 thousand rubles, for example, Yamaha Blaster YFS200. In principle, such a single-seat “quad” will be enough, but the power will always be in short supply.
But ATV models with engines with a volume of 500-800 cm 3 will cost much more, approximately 500 thousand rubles. You can also consider Chinese models, such as the Russian manufacturer Stels, but you will have to carefully monitor them. New all-terrain vehicles of this brand will cost approximately 300-400 thousand rubles, but the engines are much more interesting - 45-70 hp.
Nuances when operating a homemade “quad”
If you definitely decide to make an ATV with your own hands, then you should know about the intricacies of its operation. In principle, if you need an all-terrain vehicle for driving in impassable places where patrol cars have never been, then there’s probably nothing to worry about. You will have to face problems if you plan to drive even through small settlements, which are sometimes visited by patrol cars. If they catch you without documents for this vehicle, then with a 99% probability they will take it away from you. The whole difficulty lies in registering a homemade ATV, because the traffic police will most likely refuse you. In a good way, it is possible to register a homemade product, but it is extremely difficult to do. Therefore, assembling a homemade ATV only makes sense if you operate it in some wilderness.
Making a choice
So, how to make an ATV with your own hands? When creating a homemade ATV, we need to decide on the donor, that is, the motorcycle that will form the basis of our project. Old Soviet motorcycles are perfect for a four-wheeled all-terrain vehicle. From them we can borrow an engine with a gearbox, a frame, a steering wheel and, if desired, such parts as a tank, a seat and other elements. Since we already had an article about a homemade ATV from a Ural motorcycle, in this review we will talk about how to make an ATV based on an IZH motorcycle.
For our purpose, almost all models of motorcycles from the Izhevsk plant are suitable for us. The only thing that is important to understand is the engine power. Still, the end result will be a rather heavy structure, so the best solution would be to use the latest models - IZH Jupiter 5 or IZH Planet 5. There is no point in considering more interesting models, like IZH Planet Sport, because it is quite difficult to find them, and even if it is possible , then it’s better to restore them, because the motorcycle is quite rare and interesting. Let's move on to the main thing, how to make an ATV and what you need for this.
Instructions for creating an all-terrain vehicle
The front suspension of an ATV based on the Ural motorcycle is installed on double transverse A-arms made of a square profile.
The brakes are borrowed from the VAZ-2101 (without power steering and handbrake).
The cylinder drive is connected to the motorcycle pedal. A fan from a Zhiguli stove is used as an engine cooler. The rear wheels are “shod” with tires with a pronounced tread, and road tires are installed on the front.
The steering of the homemade vehicle is hybrid. The lever is borrowed from the Urals, cams, rods, bipod - from VAZ. The pendulum rear suspension will be harsh, with a large torsional load on the unit. The trunks are welded from steel rods and equipped with sheet aluminum fenders and mud flaps for protection.
The characteristics of the all-terrain vehicle are similar to those of the Ural. The maximum speed will be lower, but the torque will increase. Due to automobile shock absorbers, it is more comfortable to move on an all-terrain vehicle than on a bike.
Features of a homemade all-terrain vehicle made from a walk-behind tractor
Many farmers cannot do without walk-behind tractors. A distinctive feature of this technique is the ability to transform the unit and transform it into a caravan, an ATV or an all-terrain vehicle. In this way, you can expand the functionality of the device without spending much money and without the help of specialists.
Features of a homemade all-terrain vehicle made from a walk-behind tractor
An all-terrain vehicle in the classical sense is a vehicle designed for off-road and on-road travel, regardless of their surface. The all-terrain vehicle made from a walk-behind tractor is small in size and lightweight.
Before you start making a mini all-terrain vehicle with your own hands, you should perform the following steps:
- Prepare a running gasoline or diesel engine with a traction potential sufficient to move the unit and transport the driver;
- Determine the chassis - tracked or wheeled type. Mini all-terrain vehicles on wheels are less passable, but making them with your own hands is much easier than tracked models.
You need to purchase or make your own key structural components:
- Frame for fastening all parts;
- Rear axle for rear wheels;
- The driver's seat, which must be protected from water and dirt flying from under the wheels;
- Lighting for mobility at night.
Technical characteristics of the finished all-terrain vehicle:
- Load capacity – 200 kilograms;
- Engine with power from 10 hp. With.;
- Average speed – 10 km/h.
How to make an all-terrain vehicle from a walk-behind tractor?
An all-terrain vehicle with an engine from a walk-behind tractor is manufactured following a certain scheme:
- The base of the device is created. Ready-made frames are most suitable. You can take them from old Ural and Izh vehicles. Such frames are durable and maneuverable;
- Rear axle. Includes rear and front suspensions, which are assembled from a strut, strut and steering bushing;
- Wheelbase of the unit. You can use an old spare tire from trucks. The walk-behind tractor with low-pressure chambers is easy to operate and quite maneuverable;
- A prefabricated motor structure is installed to allow the all-terrain vehicle to perform its functions;
- If the installation of the motor system is completed, the transmission, exhaust elements and brakes are installed. The latter can be taken from an old car or motorcycle.
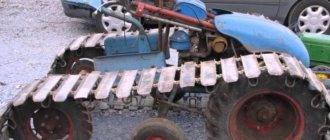
Homemade karakat based on a walk-behind tractor
Karakat performs the same functions as the all-terrain vehicle, but there are distinctive features:
- Oversized wheelbase with belt clutch;
- Large unit size;
- Wide application conditions. Pneumatic vehicles can reach speeds of up to 70 km/h.
This modification most of all concerns tires, the creation of which requires special emphasis.
It is necessary to highlight the key nuances:
- Lightweight design. Two metal disks are aggregated onto the sleeve. On top of the chambers, which are secured by a conveyor belt. The device is stable and durable;
- The disc is fixed to the sleeve. Jumpers with rings are also welded;
- A central disk with an additional spoke, for the manufacture of which a metal blank or pipe is suitable;
- You can use rims from an old scooter; they will be mounted on a hub.
Karakat from a walk-behind tractor has the following design features:
- A frame made of a metal profile or pipe is welded;
- Rear and front drives are installed. Differential and solid elements are suitable;
- Front axle and steering, parts can be taken from the chassis of the car;
- “Native” motor and gearbox, which can be replaced by a multi-speed gearbox for easy speed control;
- At the final stage, the ramps are installed and the caracat is tested.
Homemade ATV based on a walk-behind tractor
The ATV has good maneuverability, maneuverability and a high level of safety. It resembles a four-wheeled motorcycle.
Often, an ATV is created on the basis of the Neva walk-behind tractor.
Step-by-step manufacturing scheme:
- Wheels are modified. In the unit, the wheels are set at the same distance from the body using factory adapters;
- The frame is being redesigned and strengthened. It is better to use a ready-made motorcycle base, which is strong enough and will not cause problems in the future;
- Disks are mounted. You can use low profile disks. It is possible to smooth out the friction between the rubber and the rim with special fabric pads;
- The tires are put on. Cameras from trucks are suitable. You can take wheels with low pressure. There is no need to install shock absorbers on the unit.
After simple steps, the finished ATV from a walk-behind tractor is tested on a country road.
How to make low-pressure wheels with your own hands?
Regardless of the type of equipment being manufactured, driving on wet and unstable soils requires lugs that provide high traction. Low pressure wheels are most suitable. A walk-behind tractor with pneumatic wheels has minimal impact on the soil.
On the rear axle, homemade special wheels are used, which can be installed on a swamp vehicle, motor sleigh (air sleigh), snowmobile or motorized towing vehicle from a walk-behind tractor. You can purchase ready-made elements or buy parts separately (tires, tubes, wheels).
Wheel assembly diagram:
- Conventional disks and mounting plates are welded together with metal tubes. This creates larger cameras with improved fixation;
- A camera is placed on the finished expanded disk. It can be purchased or used from trucks;
- An air valve is inserted into the hole of the disk;
- Inflate the wheel with air;
- Install the finished tires on the pneumatic track from the walk-behind tractor.
The cross-country ability of a conventional wheel is increased by an additional tread. To secure the cameras, chains, conveyor belts, and homemade tracks are used.
To make all-terrain vehicles/caracats on a pneumatic track, you need to prepare the necessary materials and tools in advance. The described action diagrams and video instructions will help you understand the process.
Similar all-terrain vehicles
The Sherpa all-terrain vehicle is not the only domestic SUV. Among its competitors are self-propelled vehicles Trekol, Viking, Litvina, Shatun, Khunta and Arkos.
Trekol 39041
This model is made in an all-metal body, with wide fenders and comfortable running boards. Swims at a speed of 3 km/h. When installing an outboard motor, the speed can increase to 10 km/h. Trekol has the following performance characteristics:
- length - 439 cm;
- width - 255 cm;
- height - 251 cm;
- ground clearance - 49 cm.
Equipped with two power units: ZMZ - 40905.10 with a volume of 2.7 liters and a power of 128 hp. or a turbocharged diesel engine with a volume of 2.5 liters and a power of 83 hp. ICEs work with 4- and 5-speed manual transmissions.
Viking 29031
This 7-seater all-terrain vehicle can reach speeds of up to 80 km/h and can swim up to 12 km/h. It has low fuel consumption - about 13 l/100 km. It has high cross-country ability and is able to overcome slopes at an angle of 35°.
It is equipped with 2 options of diesel power units - 2.5 and 2 liters, with a power of 110 and 140 hp, which work with manual or automatic transmissions.
Litvina 3903
The snowmobile is designed to transport people and cargo in any climatic conditions: from +45 to -45°C. It has a double plastic insulated body that protects passengers from the cold. The speed of movement on land is 50 km/h, on water - 3 km/h.
The all-terrain vehicle is equipped with 2 types of diesel engines - 2 and 2.2 liters, 83 and 48 hp, operating with a 4-speed manual transmission.
Connecting rod Neo
This is one of the best all-terrain vehicles that overcomes any water obstacles and barriers up to 1 m high. This 7-seater all-terrain vehicle reaches speeds of up to 40 km on land and up to 6 km in water. Weight is about 1800 kg, load capacity is 1000 kg.
The all-terrain vehicle is equipped with a 1.5 liter diesel engine with a power of 44 hp, working with a 5-speed manual transmission.
Junta
A snowmobile can overcome snow drifts, sand, swamps and water obstacles. It floats due to the movement of the wheels and an additional propeller rotated by a motor. Swimming speed is up to 8 km/h, on land – up to 70 km/h. The body is made of fiberglass.
The car is equipped with a 1.7 liter gasoline engine with a power of 95 hp. or a 1.9 liter diesel engine with a power of 120 hp. Combines with a 5-speed manual transmission.
Arcos 800
This all-terrain vehicle with improved cross-country ability on low-pressure tires floats well and can transport loads of up to 350 kg through water. The car has a fiberglass aluminum body and axles installed from a Volga car.
Engine 1.5 liters and 103 hp. works with automatic transmission. The machine is easy to repair and maintain.