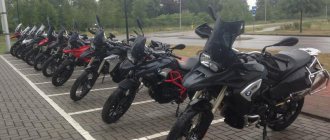
Choosing a used BMW R1200GS
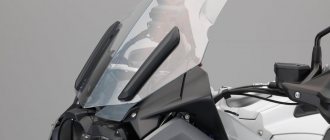
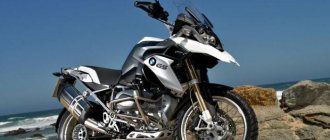
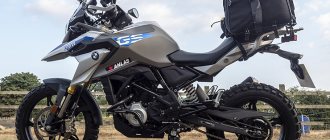
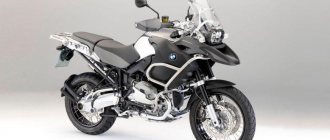
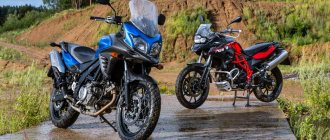
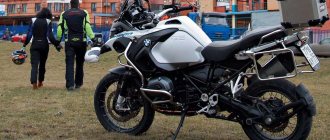
SWAN GEESE. Having appeared in 2004, the current generation of GSs changed a little only in 2010: they received an updated overhead motor (+5 hp), but otherwise the “goose” remained the same. Today there are more than 980 thousand species of birds in nature. As for the “geese,” only four species have been described recently: the junior F650GS, the mid-size F800GS, the senior R1200GS and its Adventure modification. We will talk about the “kids” another time, but now we will talk about the older opposite “geese”. “Adventure” differs from the usual one in the gas tank increased from 20 to 33 liters (which ensures a non-stop flight of up to 500 km), spoked rather than cast wheels, the presence of a tubular “cage” around the engine, as well as more developed wind protection. Other options (such as “electric” ESA suspensions, tire pressure sensors, heating, ABS and a great variety of external gadgets) are available on both models. So, after all, what should you look for when choosing, so that the external gloss and abundance of tuning do not mask the overall shabbiness of the car, or vice versa, so that the lack of “minced meat” does not deceive a “living” motorcycle in a new state?
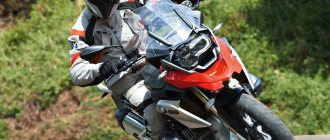
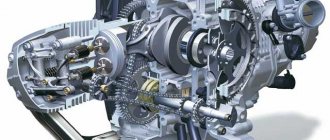
BIRD'S HEART. In principle, the engine is indestructible: if it is not overheated and the oil is changed on time, it can easily survive two hundred thousand kilometers. However, even the pillars of reliability have weak points, and in this case, one is due to the layout - needless to say, the opposed engine is more afraid of falls than other motors hidden in the depths of the frame. There is no frame as such, and the cylinders stick out defiantly to the sides. Therefore, the first thing you should pay attention to when inspecting the engine is the virginity of the edges of the bolts, the absence of oil stains at the joints between the crankcase, cylinders and heads, and the external “knots” on the “pots”. When you listen to the engine, do not forget that even though it is noisy and “ventilated,” rhythmic metallic knocks equally hint at a diagnosis for any engine, regardless of the type of cooling.
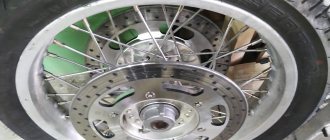
As for the transmission, there are two weak points: the clutch and the rear tip. The clutch here is single-plate dry - like on cars, and it is just as easy to burn it - just a few “racing” starts from traffic lights at high speeds, and the characteristic smell of a scorched disk will not take long to appear. And if the clutch can somehow be diagnosed (it should not slip when the gas is sharply opened in higher gears), then the rear gearbox is unrealistic. The problem is that motorcycles manufactured before July 2006 suffer from the fact that in some cases the rear wheel hub bearing separator and, accordingly, the driven gear of the final drive suddenly fall apart. As a rule, the gears are chewed even before the owner notices something is wrong. This usually happens after a mileage of 20–30 thousand kilometers. For reference, the cost of rebuilding the “bridge” is about 15 kilo rubles, the assembled gearbox costs about a “ton” of euros. Someone will probably suggest shaking the rear wheel when it is hanging, but you will hardly be able to notice the play - the bearing dies instantly, without any symptoms. So it’s better to look for a newer car, or take a “goose” with an already replaced “bridge”.
HOW'S FEET. This is not a cake. This is the chassis. Everything here is as simple as it is atypical. Firstly, the main load-bearing element of a motorcycle is the motor. And the whole “hanging” is attached to it on tubular stretchers. Their integrity and straightness can be checked both by eye, placing the motorcycle on the center stand, and on the move, releasing the steering wheel on level asphalt: the motorcycle should stand and ride perfectly straight, it should not be led to the side, but the “tail” and the rear wheel should not be displaced relative to each other. In “adventure” vehicles, it is also worth inspecting the steel protective frame that encircles the engine for dents. In my memory, there was one “goose” whose engine was torn from the box after the frame hit a pine tree.
As for the suspensions, in addition to the integrity of the chrome on the fork stays and monoshock rods and the absence of oil stains on them, be sure to check the operation of the ESA system, if there is one - following the graphical display of the state of the shock absorbers, the suspensions should switch modes quickly, their change is noticeable by the change in the nature of behavior motorcycle. But there is hardly any need to be afraid of the current telelever feather seals - they are no more difficult to move than a classic fork design. It would be a good idea to check the ball joint of the lower yoke for play by hanging the front wheel and tugging the lower ends of the stays back and forth.
SUMMARY. Here, in fact, are all the nuances of choosing, perhaps, the most convenient enduro for travel. And in order for the “goose” to serve faithfully for a long time, you should monitor the cleanliness of the oil cooler, adjust the valve clearances in a timely manner, do not increase the interval for replacing consumables such as oil, filters, spark plugs, do not feed it with 76 gasoline and do not play traffic light races with sport bikers. And as for tuning, the “Golda” will be jealous of the abundance of all kinds of gadgets.
Tightening torque bmw r1200gs
in general, subj speaks for itself. While the goose stood with the rear axle untwisted waiting for the ordered parts to arrive, I decided to service everything else:
1) bleed the clutch. The clutch on the goose is the easiest to pump, you just need a special fluid 21520392546 (vitamol\hyspin V10) the essence of the work is to attach the tube to the fitting, unscrew it a little, slowly work the clutch lever, constantly adding fluid to the reservoir so as not to suck in air. We do this until a new “blue” liquid flows out of the tube. this will take about a third of the jar
2) replaced the rear pads. nothing complicated, carefully unscrew the rear caliper, knock out the pin, install the pads, hammer in the pin, screw on the caliper. installed FERODO FDB2039ST.
3) I decided to change the oil in the box, unscrewed the filler plug, dipped my finger - it was as clean as a child’s tear. left it as is.
4) the engine oil also seems to have been changed recently, but since the can and filter had already been purchased, I drained everything and replaced it. I filled it with Motul 7100 20w-50, filter MAHLE OC306 mileage 22261, so as not to forget.
5) ordered and installed a headlight protection kit. number 63127695770. It’s expensive, now I doubt whether it was necessary to do this. it takes 5 minutes, nothing interesting
7) replaced the fluid in the front brake circuit. This turned out to be a hemorrhagic issue for BMW, I recommend thoroughly studying the articles on replacing fluid in the RSD help system before starting. I started without studying it, and ended up stuck with 4 hours of work instead of 1. In short, first you need to remove the tank. then, connecting to the fittings of the ABS block, strictly according to the manual, pump the circuit from the lever to the ABS, and then from the ABS to the pads. The usual classical method of bleeding “from the lever to the pads” does not work, because BMW...
and now the slides! It stayed like this for a week while I was waiting for spare parts for the rear flange:
headlight protection kit:
rear pads are different
oil cooler BEFORE and AFTER
clutch and its blue liquid, it was previously called VITAMOL V10, now Hyspin V10
Bmw r1200gs 2006 manual
The BMW R1200GS and R1200GS Adventure are motorcycles manufactured in Berlin, Germany by BMW Motorrad, a member of the BMW group. This is one of the BMW GS family of dual-sport motorcycles. Both motorcycles have 1170 cc. cm (71 cu in), two-cylinder boxer engine with 4 valves per cylinder. The Adventure has a larger fuel tank and longer travel suspension. As of 2012, BMW R1200GS bicycles are their best-selling models.
Content
At its launch in 2004, the R1200GS was 30 kg (66 lb) lighter than the R1150GS. Which he replaced [5]. and produced 100 liters. With. (75 kW). An increase of 19%. BMW continued to produce the R1150GS Adventure. By releasing a special edition model [6]. before the launch of the R1200GS Adventure in late 2005. For 2006 model year. [7]
Modernization for the 2008 model year included an increase in power to 78 kW (105 hp). Release of a new integrated
anti-lock braking system ABS II without servo assistance and adding new options. Including Electronic Suspension Adjustment (ESA) and Automatic Stability Control (ASC). [8] [9]
For the 2010 model year, both models featured a revised DOHC cylinder head. Increased redline limit to 8500 rpm and exhaust flap. To give the exhaust a different tone. Power is increased to 82 kW (110 hp) at 7,750 rpm. [10]
At the 2012 Intermot show, BMW announced that the 2013 model will have
water-cooled, produce an additional 11 kW (15 hp) and weigh approximately 9.1 kg (20 lb) more. Than the outgoing model. [eleven]
Although the 2013 model has since proven itself. She had a somewhat shaky start. In the UK the R1200GS was subject to various DVSA vehicle recalls covering front brakes, anti-lock braking system, throttle cable. Fuel pump, clutch. Final drive unit. Brake pipes and gearbox; [12] [ minor source required
] and similar reviews were issued in other countries.
early journalistic reports described the motorcycle as having front-end speed fluctuations, [13] [14] and deliveries of the motorcycle were stopped. While BMW has revised the front end geometry. [15] [16]
There were annual incremental updates during the 2014 to 2021 model years. Including adjustments to road handling and the addition of such options. Like LED headlights. Keyless ignition. Quick gear shift. Anti-theft system and another lower seat option. New ABS mode available as a software update. Allows you to brake more safely when cornering.
For the 2021 model year, the bike has been restyled with technical changes to comply with European EU4 regulations. Side reflectors and an on-board diagnostic display (OBD) in the cockpit were added. Indicating a malfunction. So is the R1200GS Adventure. All liquid-cooled Boxer models were equipped with a damper on the transmission output shaft. The selector drum drive, transmission shafts and transmission shaft bearing have been revised. The GS also received a new crash bar option, allowing the installation of protective cylinder covers. As was standard on Adventure.
As of 2007, the R1200GS was BMW's best-selling motorcycle. Exceeding 100,000 units. [17] In 2006, the R1200GS was the best-selling motorcycle in the United Kingdom. With cumulative sales of 2,227 units. The next most popular motorcycle, the Honda Fireblade, sold 2,067 units. [18]
Almost a third of the 100,000 units sold by BMW Motorrad worldwide in 2006 were R1200GS. [18]
In 2008, the R1200GS again became BMW's best-selling motorcycle. Delivering 22,845 standard models and 12,460 adventure models. [19]
In 2012 Cycle World
named the R1200GS in the adventure touring category. [20]
As of December 2021, 145,032 motorcycles and maxi-scooters have been sold. Sales of BMW Motorrad vehicles increased by approximately 50% compared to the 98,047 vehicles sold in 2010. The R series represented more than half (53.6%) of all BMW motorcycles sold in 2021. Around 17% of BMW Motorrad bikes sold in 2021 were BMW R1200GS, up 7% compared to 2015.
The R1200GS Adventure sold 21,391 units (up 18.8%). And R1200RT-9 648 units. [21]
In popular culture
R1200GS appeared in several episodes
Renowned motorcyclist journalist Kevin Ash died from his injuries. Injured in an accident while test riding the R1200GS during its press launch in 2013. The investigation determined that death was the result of an accident. But the British coroner could not give full reasons [13] [25]
BMW R1200GS Service
Without a doubt, the BMW GS is the forerunner of all off-road touring motorcycles. The legendary bike was created in the late 70s as a prototype with the R80 index. Later, the company gave the family the name G/S, which means Gelande/Strasse, that is, Off-Road/Road (literally, Earth/Street). Never before has a motorcycle been so appropriately named, and never before has another model pioneered a whole new genre. (details about the GS family in this blog - Frank)
When sales began in 1980, G/S set a new bar in the motorcycle industry. It was the lightest 800, the fastest off-road bike, and it took the rear wheel off in record time. Its popularity grew like a meteor; in the first year, sales accounted for 20% of sales of the entire BMW motorcycle division.
The further history of the model is described as a consistent series of improvements and innovations. Until the mid-80s, the GS's calling card was a rear console swingarm with a cardan inside. The R80G/S-PD “Paris-Dakar” modification, in the colors of the legendary winners of the legendary race, is still considered a style icon.
In 1987, the evolution of the model gradually began to shift in the direction that we now all know very well. Monolever was replaced by Paralever, which eliminates the unloading of the rear shock absorber during acceleration and adds strength to the entire structure. The line was expanded with the R100 model with a 980 cc engine, and the name was changed to GS, that is, Gelande/Sport. Then, until 1994, the company focused on the engine.
And in 1994, the conventional front fork was replaced with a Telelever, which provides handling and responsiveness that is still unsurpassed for a production motorcycle. The indestructible engine received four-valve heads, power increased from 60 to 80 hp, and excellent handling combined with off-road capabilities made the BMW R1100GS an excellent choice for off-road travel.
Subsequently, GS was improved almost every year. A super-efficient engine management system, a CAN bus, and an ADV variant with a 30-liter tank, improved wind protection, an off-road body kit and the ability to change the injection map for low-octane gasoline have appeared. The brake booster appeared in 2002, although the company has now abandoned it.
The current GS, like all its predecessors, provides long and comfortable travel on all types of surfaces, and its boxer engine produces an impressive 110 hp. and 120 Nm of torque. This is a true legend among modern motorcycles. (the book was written before the advent of the water GSa - Frank) OIL CHANGE
Oil flows out better from a warm engine. Place the bike's center stand on a horizontal surface and make sure it is stable.
Remove the crankcase protection.
Unscrew the bolt covering the drain hole and allow the oil to drain into the pan.
3. Remove the old oil filter, drain the remaining oil from it into a drain pan.
Wipe the filter mounting area, install a new filter, not forgetting to lubricate the O-ring with oil.
5. Screw in the filter to the correct torque.
Tighten the drain bolt to the correct torque, using a new sealing washer if possible. Fill the engine with the correct amount of recommended oil.
Start the engine and let it run for a few minutes to distribute the oil. Stop the engine and after a few minutes check the oil level in the inspection window. Top up if necessary.
REPLACING THE AIR FILTER
A clogged air filter reduces engine performance and increases fuel consumption. Fortunately, it is easy to change.
Remove the driver's seat and right tank cap.
Open the clips holding the filter housing cover.
Pull the duct out of the way and note the mounting eye at the rear of the duct.
Remove the old filter, clean it or replace it with a new one.
5. Place the clean filter in place, being careful not to damage it. Make sure it fits properly.
Replace the duct, making sure that the mounting eye is in the correct place. Close the clamps.
Replace the tank cap, then the driver's seat.
OIL CHANGE IN THE MAIN GEAR (04-07)
Place the bike's center stand on a horizontal surface and make sure it is stable.
Remove the wheel and mudguard. Support the pendulum with a stand or piece of wood.
2. Unscrew the rear bracket and hang it on something to the rear subframe. Don't leave it dangling from the brake hose!
Unscrew the speed sensor and also hang it on the subframe. Don't lose the O-ring!
4. Loosen, but do not remove, the drain bolt.
Loosen the rear Paralever bolt.
6. While supporting the final drive housing, remove the Paralever bolt, then carefully tilt the housing until the drain hole is at the bottom. Note that the final drive splines will come out of the driveshaft.
Completely unscrew the drain bolt and allow the oil to drain into a substitute container. When the oil has drained, replace the gearbox housing by engaging the main gear and cardan. (Just put the box in neutral first, otherwise nothing will work out for you - Frank). Replace the Paralever bolt and tighten it to the correct torque using thread locker. (Low strength, of course - Frank)
8. Replace the rubber boot.
Fill with the required amount of recommended oil. This can be done either through the speed sensor hole or through the drain hole. Screw in the drain plug and speed sensor, using a new sealing washer and ring if necessary. Reinstall the remaining parts in reverse order. OIL CHANGE IN THE MAIN GEAR (from 07)
Place the bike's center stand on a horizontal surface and make sure it is stable.
Unscrew the drain plug located in the rear of the gearbox housing. Use a cardboard or other suitable object to direct the draining oil into a waste container. When all the oil has drained out, tighten the plug to the correct torque.
Unscrew the filler plug. For better access, you can remove the rear wheel. Fill in the required amount of recommended oil and tighten the plug to the correct torque.
CHANGING THE OIL IN THE TRANSMISSION
The design of BMW boxers differs from most other motorcycle engines in that the gearbox is separate from the engine and has its own lubrication system. The oil in it needs to be changed every 40,000 km (that is, every 4th engine oil change) or once every 2 years.
Place the bike's center stand on a horizontal surface and make sure it is stable.
2. Unscrew the filler cap
Unscrew the drain plug and drain the old oil, using a cardboard or other suitable object to direct the draining oil into a waste container.
4. Screw the plug back in using a new washer and tighten it to the correct torque.
Fill the box with the recommended oil until the level reaches the bottom edge of the filler hole. Tighten the plug to the correct torque using a new sealing washer. REPLACING FRONT PADS
Place the bike's center stand on a horizontal surface and make sure it is stable.
Pull out the wire retainer.
2. Unscrew the finger.
Pull out the spring.
4. Remove the old pads.
Use your hands to press the pistons into the bracket. Apply a small amount of special copper-containing brake lubricant to the back (non-friction!) side of the pads. Install the new pads, making sure they fit into place.
6. Put the spring back.
Wipe the pin and lightly lubricate it with brake lube. Slide it through both pads and tighten to the correct torque. (on some models the finger is simply threaded through as shown in the photo).
8. Secure the finger with a wire retainer.
Press the brake lever firmly several times until the pads seat on the discs. REPLACING REAR PADS
Place the bike's center stand on a horizontal surface and make sure it is stable.
Remove the mudguard and pull out the wire retainer.
Use a suitable tool to push out the finger.
3. Remove the old pads through the back of the bracket.
Check the condition of the pads and, if necessary, replace them with new ones. If they are not very worn, clean them with a clean (not oil!) wire brush and a special brake cleaner.
5. Carefully press the pistons into the bracket before installing the pads. Lightly coat the back of the pads with brake lube to prevent them from squealing. Make sure the pads are in place before installing the wiped and lubricated pin.
Secure the pin with the wire retainer and press the pedal several times until the pads are pressed against the disc. Install the splash guard.
kot_3axap
One day I wanted to have a motorcycle with a round headlight and splayed cylinders. After scouring the local market, I found three units for sale.
Two are in moderate condition and running (and therefore quite expensive), one is in an almost abandoned state and therefore cheaper. Well, after the auction he grabbed it.
Photos from the first meeting
Upon closer look, numerous schools began to emerge
04 Rust everywhere
05 The spokes are all rusty
08 Oil where it shouldn't be
09 Motsyk stood for a long time, but no puddles of oil appeared under him
11 The worst problem is the paint coming off everywhere. The photo shows the gearbox, the engine is even worse
12 There are traces of corrosion under the paint on the rear fork. The brake hose cover was missing and corrosion had started to spread from the mounting studs.
13 Condition of paint on the engine
14 Oil leaks from under the cylinder?
15 The insulation of the cable harnesses is crumbling
17 The tires looked almost new, but they were as old as the motorcycle itself
18 Rear fork corrosion
Also the rear fender is cracked on both sides.
Of course, upon inspection, starting it was not an option - the battery was dead. Therefore, having bargained even lower based on the results of the inspection, I took this trash. After transporting the unit home, I changed the oil and battery and took the risk of starting it up. It started, as they say, with half a turn. I drove about 100 miles (went to registration, talked to the mechanics, just drove around). It turned out that the left cylinder had some problems with chain tension (as I later discovered, this is a common problem with the model, for which the manufacturer produced a modified tensioner), and the compression on one cylinder was quite low, although within normal limits. It also did not work controls on the left console - turn signal, horn, high beam. After the rides I started disassembling.
This is my first motorcycle that I have taken apart. Well, breaking is not building, but I also wanted to put it back together later.
The main goal is to paint the engine. But the problem with this creation of the gloomy German genius is that the engine cannot simply be taken and removed from the frame, because that is what it is. Those. In order to “take out” the engine, you need to disassemble the bike completely, literally. Well, since such a disassembly, then immediately everything else that comes to hand will be painted.
I gave it to a local customizer for sandblasting and “painting” with powder; I ordered consumables and other spare parts from Germany.
I scoured the American forum dedicated to this model. I picked up all sorts of useful information there. I printed out the service manual. I came up with a plug with electrical diagrams - I couldn’t find it online, apparently they are highly classified. I had to order.
19 The fuel tank has been removed. This model does not have ABS; in its place is an alarm box.
20 Workbench for disassembly. There is no central footrest. The motorcycle was lifted with an electric winch suspended from a beam and left there so that it would not fall over during disassembly. I took off the wheels.
21 Brake pedal condition
22 The battery box is rusty.
23 The cable harness under the battery compartment looks terrible. The outer insulation was crumbling, but all the wiring, fortunately, was in good condition and did not require replacement.
24 Somehow, the photo turned out to be mirrored. Probably, I clicked in the wrong place when converting.
25 Contents of an electrical box with all sorts of relays and connectors
26 The front suspension (telever or whatever it is called) has a strange aluminum plug on the left side, ground into a hexagon. As you can see from the photo, the hexagon turned out to be stronger. Without removing the cover, you cannot remove the axle.
27 A drill is a young mechanic’s best friend. The cover is drilled to the best of its ability (a new one has been ordered instead).
28 Injection lines - the rubber parts are all cracked; for the rides, before disassembling they had to be wrapped with electrical tape to isolate air leaks.
29 The fork has been disassembled, oil seals and boots have been ordered.
30 Dirt in the fork (the plastic tube is part of the design).
32 The front frame has been removed. The lumber in the background is pieces for another project completed at the same time (and much faster) - re-roofing a house
34 What a mess
35 Attaching the battery negative to ground
36 The location is very inconvenient. The pain naturally refused to come out and had to be drilled out.
37 The sensor connection looks completely unreliable, but I couldn’t find any information about whether the wire slipped off or someone’s thread
It's time to disassemble the engine.
38 First you need to dismantle the generator hanging on the front cover.
39 Box and clutch removed
40 Disassembling the box was not included in the plans, so I agreed to paint it not with powder, but with regular car paint - it cannot be left in this form.
41 Dry clutch, single disc
42 The engine is “removed” from the remains of the motorcycle
43 The chain on the left cylinder is sagging (not quite noticeable in the photo). A new tensioner with a modified design has been ordered.
44 Dismantling the cylinders.
45 Work is in full swing. Pay attention to the pin inserted into the hole in the flywheel on the left - it is necessary to hold the pistons at TDC. At the same time, I ordered a special device for this purpose, which fixes the flywheel through the teeth.
46 To prevent the piston from hitting the body, before removing the cylinder, I tied the pistons to the studs
47 I used electrical tape to mark how far the studs were screwed into the body, and then unscrewed them using two nuts
48 Synchronizer chain before dismantling
49 The TDC mark is tiny, but still noticeable.
50 Oil pump
51 Flywheel removed.
52 The pin for the side step spring broke off when trying to unscrew it. I cut a new one out of the bolt.
53 Bolt securing the protective frame around the cylinders. Some craftsman put it on glue. Moreover, as far as I understand, the hole initially has no thread. He tore off the head quite quickly, the sledgehammer did not help either when it was cold or when heated with a gas burner (he heated it carefully, without fanaticism, so that the body did not lead). In general, I had to drill it out, otherwise the crankcase would not be halved.
54 Drilling took two evenings (fiddling with the motor after work) and several broken drills.
55 Everything inside is clean, no defects were found. Disassembly of the crankshaft was not planned.
56 There are two large oil seals on the shaft.
57 The rest of the bolt had to be drilled out and knocked out
58 Disassembling the oil system.
60 Intake valve condition
61 I also planned to paint the exhaust pipe. However, I couldn’t unscrew the oxygen sensor. I warmed it up, and sprayed all sorts of garbage, and gnawed with a gas wrench - nothing. I left it like that for now, and had to try to polish the exhaust somehow.
62 oxygen sensor after trying to unscrew it
63 The wheels are painted (sandblasting, then powder), new tires are installed.
64 Front frame painted and assembled - refrigerators installed
65 I cleaned the piston of deposits. I measured the rings - within limits. I ordered a set of new rings.
66 Valves cleaned. After painting the heads, I gave them for grinding, so as not to mess around with them myself.
Hello everyone! Believe me, there is no need to be afraid that BMW is difficult or difficult to maintain!
The main thing is Time!
All those liquids are different for everyone, below is just my example.
For THAT we need a good set of torexes (stars),
large ratchet with medium extension,
Oil MOTUL 7100 5W40 4L
Gearbox oil MOTUL GEAR 300W 75W90 180ml,
I used Liqui Moly to lubricate the splines on the cardan (I’ve been using it for a long time and it’s fine)
Oil filter Hyflo or champion just like in vozduchan!
Candles for information NGK 93444 catalog number.
Well?
Let's begin my curious friend!
All the photos are in order of how to unscrew them, but I will describe everything exactly how to do it for you, and there will be photos below!
1. Unscrew the 3 bolts holding the rear fender.
1.1 Unscrew the wheel! if there is forward flow, then it’s easier to pull out the caliper, because if Akrapovic is installed, it is a little fatter than the stock one, and without removing the caliper, you can scratch the paint on the disk by tearing out the wheel.
2. Unscrew the caliper.
3. Unscrew the abs sensor from the rear gearbox, it can be found on the hub side between the brake disc, carefully pull it out and wipe it, together with the caliper you can fold it to the side,
4. Unscrew the two plugs on the rear axle (gearbox), bottom drain, top fill!
5. We drain everything from the bridge and do not forget to clean the magnet itself from chips in the bottom plug with the magnet! And believe me, there will be quite a lot of it in BMW)) and this does not prevent it from driving for a long time with a decent resource and proper care for it!
6. After draining the oil, tighten the bottom drain plug.
7. Unscrew the Bolt on the rod that holds the rod and the rear gearbox, there is no need to rush anywhere, IT WILL BE HARD, it is equipped with lactate (thread locker) from the factory, so don’t be alarmed! We take out the bolt, carefully remove the abs sensor wire with the piece of iron and put it aside along with the caliper; it will not interfere. Then we gently lower the gearbox and press with a screwdriver or a finger on the protective boot of the gearbox-cardan, there are 3 grooves, it may be a little difficult the first time, but it seems like I did maintenance on 3 motors and it never broke. After removing the casing, the gearbox falls sharply down, but you obviously hold it in your hands; it is not itself! What do we see? Dry slots motherfucker! Hey BMW! We take lubricant for KardanidzE and apply it, but not with a reserve, but it’s ok.
8. And here’s the trick! In order for the grooves of the crosspiece splines to fall back onto the gearbox splines, you need to bend it almost like the letter L by placing it on a long screwdriver, so you can quickly and easily get Dad into Mom, so to speak)) Once everything is in the grooves, we stick the bolt with the piece of iron back into the axle rod - gearbox And calmly put everything back together in reverse order!
Gearbox oil 180 ml (I added a little more but this is my decision)
9. Put everything back together in reverse order and move on to the motor!
10. Unscrew the 5 bolts on the belly protection.
11. Unscrew the oil filler cap on the right Cylinder (it is unscrewed with part of a standard collapsible screwdriver, under the seat)
12. Unscrew the drain plug on the engine crankcase, there is only one there and it’s big, I think it’s hard not to notice it!
13. Drain the old oil while unscrewing the oil filter under the left cylinder, do not forget to wipe everything well.
14. After draining the oil, tighten the plug, screw on a new oil filter (you can put a little oil into the filter (well, this habit won’t get any worse), screw on the belly protection.
15. Boldly fill in 4 liters of oil, well, just boldly without even thinking! Fill and tighten the plug in the cylinder.
Let's go to the air filter.
16. Remove the driver's seat.
We take a standard screwdriver with Torex and turn two bolts where the driver’s seat is,
and 3 bolts where the steering wheel is, the central bolt holding the plastic is longer and thicker than the others, you can’t confuse it, and two more in the mini-case that is at the neck of the tank, this is the Adventure, a regular Goose doesn’t have 2 bolts.
17. Having unscrewed the bolts, pull the plastic toward the seat until it clicks and lift up the latches just below the neck, hold the plastic and pull it pointwise. Having removed the plastic, we see 4 Torex bolts. To remove the unscrewed window in the air vent, you need to slightly pull the plastic in different directions and take out the first part that is closer to the neck of the tank.
17.2. For a regular goose, the cassette with the filter is removed from the side.
18. We take out the air filter in a plastic crate. Just don’t shake it, dry flies, bees and other evil spirits may fly!
19. Put everything in reverse order.
More info on replacing the spark plugs, you need to remove the arcs from the Adventure, but alas, it won’t work to be cunning.
but for an ordinary goose everything is easy and simple.
20. If we change the spark plugs, then unscrew 1 bolt on the plastic cylinder cover, remove it, remove the chip from the coil, remove the coil, some have a special puller, and some have ingenuity =)
21. Take the long thin spark plug head and unscrew the spark plug.
22. Assembly in the same order.
By the way, the dirty spendthrift is not mine)) I’m just doing something (for friends and not only).
There is one problem with this post, I couldn’t overcome the rotation of the photo, stretch your neck))
I hope, my young friend, I helped you in some way or added new information!