- What are homemade motorcycles?
- Steps on how to make a motorcycle yourself
In the modern world there are a considerable number of creative people who are able to turn even the oldest things into something original and interesting.
Many people who are not indifferent to motorcycles do not have the opportunity to buy a motorcycle for some reason. There is a way out for them - to assemble the bike with their own hands. Not every person can assemble a motorcycle on their own. This requires a lot of time and patience. You need to use all your love for bikes as inspiration. Thanks to this, it will be possible to assemble a very good vehicle at home, which in any case will be unique.
You need to be prepared that when creating a motorcycle with your own hands, a large number of difficulties may arise. It’s not uncommon for designers to make non-standard decisions. For beginners building their own motorcycles, it is best to start by assembling the simplest models.
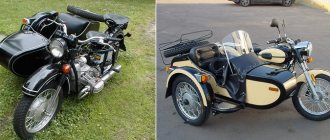
Homemade motorcycle Ural
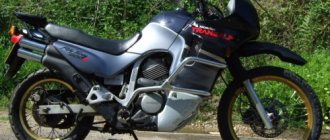
DIY motocross motorcycle
Despite the highest technical indicators of this type of motorcycle, such as a cross-country motorcycle, it is quite possible to assemble it yourself. Of course, nothing prevents you from simply buying a ready-made model, but not always factory samples are able to satisfy all the desires of a particular motorbike enthusiast, besides, such a purchase will certainly not be cheap, and a homemade motorcycle will save a significant amount of financial resources. However, here it is necessary to strictly comply with all installation requirements, otherwise the end result may be very disappointing.
Possible list of materials for creating a motorcycle from a bicycle
So, turning a bicycle into a homemade motorcycle, the most common option for a set of parts is the following:
- engine;
- pulleys;
- drive belt and tension roller;
- fasteners.
One way or another, making a motorcycle from a bicycle is far from a cheap pleasure, so sometimes it’s better to think about whether it would be advisable to do this or whether it’s better to buy a new moped or at least a ready-made bicycle motor.
Steps on how to make a motorcycle yourself
There are several stages in creating a motorcycle with your own hands:
Choosing a homemade motorcycle model
Before starting work, everyone who is going to assemble any thing should have an idea in their head. It is fundamental to creating a really good thing. It is very important to imagine the design and all the technical features of your future creation.
Read also: How to relieve pain during childbirth and contractions
Drawing of a future motorcycle
Any master does not necessarily need to have the skills of an artist in order to draw his future creation. It is very important to indicate on a piece of paper those features of your motorcycle that are worth paying attention to.
Important: It is necessary that everyone who makes a motorcycle with their own hands has a visual image of the future masterpiece.
Purchasing parts to create your own motorcycle
At this stage you will have to spend a little of your money. To create a motorcycle with your own hands, you need to purchase a large number of elements, including an engine, wheels, frame, and various metal pipes.
At the final stage, it is necessary to assemble all the parts together to obtain a homemade vehicle. To do this, it is very important to have knowledge of how all the components and systems of motorcycle equipment work.
Read also: How and where to advertise your book
Homemade motorcycles
In the modern world there are a considerable number of creative people who are able to turn even the oldest things into something original and interesting. Many people who are not indifferent to motorcycles do not have the opportunity to buy a motorcycle for some reason. There is a way out for them - to assemble the bike with their own hands.
Not every person can assemble a motorcycle on their own. This requires a lot of time and patience. You need to use all your love for bikes as inspiration. Thanks to this, it will be possible to assemble a very good vehicle at home, which in any case will be unique.
You need to be prepared that when creating a motorcycle with your own hands, a large number of difficulties may arise. It’s not uncommon for designers to make non-standard decisions. For beginners building their own motorcycles, it is best to start by assembling the simplest models.
Homemade motorcycle Ural
Selection and preparation
As a basis for a cross-country motorcycle, you can choose a used small-class bike - it is best to choose models with an engine capacity in the range of 125–350 cubic centimeters. The best option would be a road-going Japanese car aged 12–15 years with a well-preserved engine and an intact frame. In addition, you can even choose a Soviet motorcycle - for example, “Voskhod” or “Minsk”. It won't catch the stars from the sky at sporting events, but it will allow you to get a lot of fun from off-road adventures.
The motorcycle will have to be disassembled - you must remove all the components from it, leaving only the frame. It is better to go through the motor, transmission and drive components, diagnosing possible faults and eliminating them before starting assembly. The frame and tank of the future motocross motorcycle should be cleaned of paint, then covered with putty and a new coating applied according to your wishes. After such preparation, you can begin selecting components and gradual assembly.
Instructions for assembling a bicycle from scratch
For big work you will need special tools:
- carriage remover;
- whip and puller (for cassette);
- wire cutters;
- positive and negative screwdrivers;
- pedal tightening wrenches;
- lubricant;
- horn key;
- clean dry rags.
So, you have assembled the “backbone” of the bike - it is currently represented by separate elements, but very soon all the details will fall into place and the future custom will begin to acquire recognizable features.
Assembling a bicycle consists of several stages:
- Installation of the carriage assembly, front sprockets and connecting rods.
- Installing a cassette on the rear wheel.
- Installation of the steering wheel and fork into the front glass of the frame.
- Mounting the handlebars into the fork body, seatpost and saddle.
- Installation of tubes and tires on wheels.
- Rear wheel, chain and derailleur assembly.
- Mounting the rear wheel to the fork.
- Installation of brakes.
Now let's look at each stage in more detail. The axle and bearings of the carriage are installed in the lower glass of the frame, after which the connecting rods are mounted using a special tool. A little force is required to install the carriage assembly. This point also applies to mounting the rear cassette to the rear wheel hub.
You can install the fork yourself if you have the appropriate experience, but it is better to seek help from a bicycle workshop. Because this process involves precision pressing of the body into the glass. The bearings are installed in such a way that the fork can rotate freely around the axis when the steering wheel is turned. Here, too, it is advisable to contact a professional mechanic, but if you wish, you can try it yourself. To do this you need:
- Insert the steering column into the glass, pressing the upper and lower elements in sequence.
- Carefully insert the fork rod into the steering column.
- Tighten the locknut until it stops.
Pay attention to the position of the column in the glass - it must be strictly vertical. Otherwise, the wear of the tube and fork will not take long to occur.
The next stage of assembling a bicycle from scratch is installing the handlebars and seatpost. Here it is necessary to determine in advance the height at which the saddle will be located relative to the steering wheel. If you are assembling a regular bike, then the handlebars and saddle are approximately at the same level. If it is a mountain model, the saddle is located slightly above the handlebars. If you have a road bike, the saddle should be even higher than that of a mountain model. Additionally, when building a road bike, it is necessary to install a longer stem.
How to make a motorcycle with a walk-behind tractor engine with your own hands
The most logical and natural solution to install an engine from a walk-behind tractor on a motorcycle, as a rule, comes to owners of broken down scooters or bicycles who have a power plant from a walk-behind tractor or motor-cultivator on their farm (for example, if it was equipped with a different motor, but the old one remains). On the Internet you can find examples of the Ural motorcycle with an engine from a walk-behind tractor, which successfully fulfills its function as an “iron horse”. The only drawback of such a vehicle is the ban on its use for travel on public roads.
But covering long distances in nearby areas, driving to a field, to a river or to a store are tasks that a homemade moped with a walk-behind tractor engine can handle perfectly. A standard engine from a walk-behind tractor with a power of 5-6 hp. quite enough to accelerate to 60 kilometers per hour. But if an adult rides such a motorcycle, the new vehicle should be equipped with reinforced wheels that can handle a weight load of up to 100 kilograms.
In this video you will learn how to make a bike from a walk-behind tractor:
For assembly, you will need the same tools that are needed in the manufacture of most other homemade products for a walk-behind tractor and are usually available in any farm that owns small agricultural machinery. The list of tools is as follows:
- welding machine;
- grinder with metal discs;
- drill with metal drills;
- set of wrenches;
- screwdriver;
- pliers;
- level;
- hammer;
- anti-corrosion agent, metal paint and a brush (or other device for applying it).
Bicycle classification
For example, for short trips, a clumsy and bulky road bike is suitable. Walking or city - more maneuverable, on shock absorbers, and has several speed modes - very convenient for commuting to work and walking along paths in the park.
A mountain bike is considered a universal type; it is suitable for both rural areas and cities. If you are a fan of fast driving, you should opt for a road model. A touring model is ideal for bicycle trips; you can attach a trunk and a backpack to it. For those who prefer paired riding, there are tandems.
Benefits of a bicycle
The bicycle is the most popular transport on Earth. There are about 1.4 billion bicycles in the world, and approximately 400 million cars.
This happens because a bicycle has a number of advantages: it saves a lot of time, since you don’t have to stand in traffic jams; helps you get rid of extra pounds without running to the gym and grueling workouts; saves money - no need for gasoline.
We paid attention to the main models, but they are constantly being improved and added with all sorts of features. Thus, bicycle choppers, a hybrid of bicycles and motorcycles, are becoming increasingly popular.
The main differences between choppers and bicycles
A characteristic feature of choppers is ease of movement, an elongated frame, a wide handlebar, a special fork, wide tires, an interesting appearance and an original design. Almost any bike can be equipped with any equipment you wish, and you will become the owner of a unique and exclusive bike.
Bicycle culture began in the 1950s in Mexico. Inventor Harry Silva, founder of the workshop of the same name, created the world's first chopper - a large bicycle with a cross-shaped frame and high handlebars. It turned out to be very beautiful, but also quite comfortable. Outwardly, it strongly resembled a motorcycle. Do you need a motor in a bicycle?
Chopper can be used not only as an electric motorcycle, but also as a regular bicycle. Or you can move like this: spin the pedals and help with the motor.
You can cover many kilometers and quite long distances. The battery is charged from a regular household network. And if it runs out, then the pedals will help you out.
Does not require large expenses compared to motorcycles and cars. Allows you to safely bypass traffic jams.
The difference between a bicycle chopper and a regular motorcycle
It’s also worth mentioning separately the advantages of a bicycle chopper over a motorcycle: you can put it at home, it’s not heavy at all and doesn’t stink, and it works silently. The cost of one battery charge is very small, you can quickly and easily get to work without harming the environment.
As a rule, they are bought by people who love everything non-standard, including bikes. We present the most interesting models of non-standard bicycles.
Source: https://AktSport.ru/velosiped/izgotovlenie-velosipeda-svoimi-rukami.html
How to make an all-terrain vehicle from a motorcycle?
Recently, all-terrain vehicle designs that are made from ordinary motorcycles have become widely popular. In addition to the entertainment functions that such a device carries, it is also a very reliable means of transportation.
So, homemade all-terrain vehicles made from motorcycles can be divided into several categories, the main of which are, naturally, ATVs. These transport models amazingly combine the mobility of a motorcycle and the stability inherent in cars. Due to the fact that each of the ATV wheels has its own suspension, the device is able to overcome almost any, even the steepest, road irregularities.
Harmonious combination of new and used spare parts
Before you become a regular at bike showdowns, you need to understand what to look for and what condition the parts should be in. As we have already said, spare parts do not always have to be new - in some places you can save money by buying a used mechanism. So, we list the main components that will be needed for assembly:
- frame;
- fork;
- wheels (rims, spokes, tubes, tires, cassette with stars);
- steering wheel with stem;
- saddle and seatpost;
- connecting rods with carriage and front sprockets;
- transmission (speed switches, cables, cassette, chain);
- brakes
These are the main mechanisms and components of any bike. Here it is important to clearly see the end result - it will be a city bike or a road bike, a mountain bike or a hybrid. Now let's figure out what from this list should be new, and what can be bought in used condition - let's look at the example of a road bike.
So, let's start with the frame. You can buy it secondhand, but provided that it is 100% quality, without a single dent, crack or other defect. If this point is in doubt, then it is wiser to purchase a new part from a trusted manufacturer.
Next on the search list are wheels. You can, of course, spend time and try to find a decent option among the numerous offers of used spare parts. But it is better to buy new rims and tires. The fact is that used wheels may have defects that cannot be seen immediately, for example, symptoms of metal fatigue. Tires can be taken by hand, but you should pay attention to the tread pattern and the quality of the rubber.
The supported saddle with seatpost, fork, handlebars and other body kits will harmoniously fit into the self-assembled design. Particular attention should be paid to suspension forks - often among used spare parts there are low quality products. A seatpost is a simple metal tube that connects the saddle to the bicycle frame. You need to pay attention to the length of the seatpost and the integrity of the tube. As for additional canopies, they must match the model being assembled.
Where to start assembling a motorcycle with your own hands?
Having ready-made motorcycle project diagrams at hand, as well as materials for their practical implementation, you can safely move on to the direct processing of pipes and metal sheets in the process of creating a frame. Each part of the chassis can be chromed or painted to give it a more aesthetic appearance. This is also done to prevent corrosion of the chassis.
You can also create wheel rims with your own hands. Still, why “reinvent the wheel” if many compatriots know from practice how to make a motorcycle from the Urals or Dnieper MT. using the frame, engine and electronics of the latter. By adding other unique nodes to them, you will clearly get an iron horse that is unlike any other.
Having installed an extended fork (preferably adapted for a front disc brake), homemade traverses (created using a steel sheet with a thickness of several tens of millimeters), the bike’s handlebars are mounted using brackets. The brackets are also used to mount the rear shock absorbers. They are considered a secure base for holding the seat back. Here you can fix various panniers and the trunk of the bike.
How to assemble a complete homemade motorcycle
It is better to choose/create a two-level saddle for a two-wheeled custom. Before creating it, you need to find a thick sheet of steel (about 2 mm). The latter will bend along the contour from the future tank to the rear panel. To make the edges of the saddle more rigid, you need to bead its sides 1 cm down. The soft part of the seat can be made of ordinary thick foam rubber. Leather is best suited for all this as upholstery. When installing the seat, it is necessary to install rubber gaskets on the frame directly under it.
Also make sure that in the future your homemade bike can be placed on a leg as easily as possible when parked. For these purposes, it is better to choose a side knife, which is mounted on the left side member of the frame and has the ability to easily recline in the presence of a spring.
The steering wheel should be attached not only to rear-view mirrors, levers, cables, but also to various electrical appliances, which can be purchased together with the body in many places. The devices that look most beautiful are those placed in chrome-plated boxes/cylinders.
You need to know how to make a motorcycle with your own hands as correctly as possible even before installing the throttle handle on the steering wheel. The latter should be made with small turned rubber rings.
Don’t forget about installing turn indicators on your homemade bike. Their absence on a motorcycle can lead to various dangers on the road. You can supplement the classic set of lighting devices (headlight, stop, turn signals) by installing small flashlights near the front headlight. Additional safety will be provided by installing safety arches on a homemade iron horse.
It is important to remember: when making a motorcycle with your own hands, make sure that in the future you will be able to register it with the road control authorities. Any major changes in the design of the bike must be registered with the traffic police/traffic police.
Repair of motorcycles of different models
Any motorcyclist, whether a beginner or one with sufficient experience, knows that motorcycles, despite their reliability, require periodic inspection and repair.
In order to eliminate minor faults in advance, it is best to carry out a technical inspection of your iron friend once every six to seven months. And then you will be insured against serious problems. To do this, many use the services of motorcycle services using diagnostic equipment. It is special equipment that will provide the necessary guarantee of high-quality inspection. But there are bikers who know absolutely everything about their motorcycle, and do all the necessary work themselves.
Heavy motorcycles of domestic production enjoy a good reputation among bikers. They are reliable, passable, and have high engine power. But heavy motorcycles will still have to be repaired, since various types of malfunctions also arise during their operation.
Motorcycle repair is necessary when malfunctions occur in the chassis, when wheel spokes break off, or rear suspension bushings wear out. It is best to replace them with new ones. Faulty brakes on heavy motorcycles may have scuffed brake drums or oily brake pads.
If the engine malfunctions, you need to check the gaskets in the cylinder head, as they most often burn out. Do not reduce the gap that forms between the pusher and the valve, this may lead to engine overheating.
In case of malfunctions in electrical equipment, it is best to contact specialists, since this work requires certain knowledge and skills. For more detailed information on repairing heavy motorcycles, you can refer to specialized literature, which provides detailed instructions for troubleshooting a particular problem.
Repairing motorcycles used in motorcycle racing also requires special knowledge. Repairing motocross motorcycles is not difficult for those who know this matter. However, such bikes rarely break down. Their main parts are made of very strong alloys and very light. The essence of this technique is aimed at the speed and power of the engine. Repairing them simply requires completely different parts. And the tools are the same as for repairing other motorcycles. But motocross motorcycles require frequent maintenance to avoid major breakdowns and the risk of an accident.
And if you have purchased a Japanese motorcycle, you need to know that it will serve you reliably and for a long time only if you take care of it constantly and carefully. A new motorcycle will require a mandatory break-in so that all parts are ground in. Do not drive the first thousand kilometers, change the operating mode of your engine more often. And if you give your engine a chance to rest every thirty to forty minutes, repairs of Japanese motorcycles will become less frequent.
For DIY repair work, be sure to purchase a set of sockets. You will also need a spark plug wrench. But if you don’t have time to do this, or you don’t feel like a mechanic and are not ready for such work, then it is better to choose a specialized service center so that real specialists can carry out all the necessary work efficiently and professionally.