Dear customers, you can leave feedback about good work using the following links Flamp, Yandex
Parcels are stored for no more than 7 days, please be careful. We thank you in advance for the parcels being picked up on time
Original and analog spare parts for the following brands
MAKITA SPARE PARTS | BOSCH SPARE PARTS | MTD SPARE PARTS |
| HITACHI SPARE PARTS | SPARE PARTS INTERSKOL | FUBAG SPARE PARTS |
| HUSQVARNA SPARE PARTS | STIHL PARTS | PARTNER SPARE PARTS |
| SUNGARDEN SPARE PARTS | HUTER SPARE PARTS | TEXAS PARTS |
| CHAMPION SPARE PARTS | ECHO SPARE PARTS | OLEO-MAC SPARE PARTS |
CARVER TOOLS AND SPARE PARTS | TOOLS AND SPARE PARTS PARMA | SPARE PARTS CALIBER |
| HONDA PARTS | BRIGGS & STRATTON STOCK | ROBIN SUBARU PARTS |
| STURM SPARE PARTS | HAMMER PARTS | STERN SPARE PARTS |
| ABAC SPARE PARTS | LIFAN SPARE PARTS | EFCO SPARE PARTS |
| REBIR SPARE PARTS | METABO SPARE PARTS | DEWALT PARTS |
| SPARE PARTS FOR PETROL SCROWERS, TRIMERS, MOTOR DRILLS | SPARE PARTS FOR CHAINSAWS, ELECTRIC SAWS | SPARE PARTS FOR CULTIVATORS, MOTOR-BLOCKS |
| SPARE PARTS FOR DIESEL HEAT GUNS | SPARE PARTS FOR SNOW BLOWERS | SPARE PARTS FOR ELECTRIC AND GAS GUNS |
| SPARE PARTS FOR PETROL GENERATORS, POWER PLANTS | SPARE PARTS FOR DIESEL GENERATORS, DIESEL ENGINES | SPARE FOR VIBRATING PLATES, VIBRATING FOOT, VIBRATING RAMMERS |
| COMPRESSOR SPARE PARTS | SPARE PARTS FOR CONCRETE MIXERS | SPARE PARTS FOR MOTOR PUMPS, PUMPS |
| SPARE PARTS FOR BATTERY SCREWDRIVERS | SPARE PARTS FOR WELDING MACHINES, WELDING | CONSUMABLES |
Spare parts for tools and household appliances
is one of the largest suppliers of spare parts and consumables for electric and gas-powered tools in Russia. Having a huge network of dealers throughout the country, it has established itself as a reliable and competent company. Today it is the official supplier of original and analog parts of such brands as: Hammer, Sial, Fubag, Abac, Interskol, Echo, Partner, Rebir, Sturm, Fiolent, Lepse, Kipor, Lifan, Loncin, Grost, Forza, Stiga, Profi, Piran , spare parts Caliber and others. A staff of qualified specialists will be happy to help you with your choice and answer all your questions. Our store also sells spare parts for household and garden equipment.
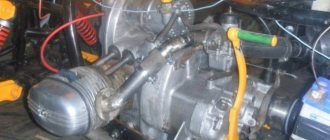
Cleaning the carburetor of a walk-behind tractor
Frequent malfunctions in the operation of the power unit of a walk-behind tractor indicate the accumulation of blockages inside its carburetor. This fuel unit constantly interacts with engine oil, gasoline and air. They contain solid fractions, tar and small debris, which can be deposited on the walls of the carburetor chambers and inside the fuel channels. In this regard, the carburetor needs regular cleaning, especially if low-quality fuel is used to refuel the agricultural unit.
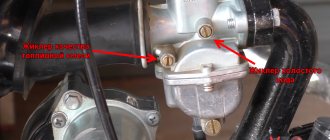
Before directly flushing the carburetor of the walk-behind tractor you are using, you need to remove the standard air filter and rinse it thoroughly in clean gasoline. After this, the part will need to be dried. The operator should also inspect and clean the spark plug. If a thick layer of carbon deposits has formed on its cap, this indicates oil leakage.
The further procedure should be as follows:
- First, you need to carefully remove the inoperative carburetor from the factory device and completely drain the remaining fuel from the standard metal float chamber;
- Next, you will need to inspect the built-in fuel fitting. If air does not pass through it, then the fitting must be blown out with compressed air from a purchased cylinder;
- Next, the operator must examine the condition of the float metal chamber and the “tongue” necessary to adjust the position of the float. The operator must check the level of the amount of refueling fuel that enters the chamber - its level must initially be no lower than 3.5 cm;
- After this, you will need to remove the needles responsible for setting low and full gas - this is necessary to completely flush the nozzle;
- Next, you need to unscrew the bolts and disconnect the standard upper part of the factory carburetor from the lower one. After this, the operator will be able to thoroughly rinse the built-in fuel supply valve;
- Then you need to blow out the nozzle with air from the cylinder. This and other carburetor elements should not be wiped with a lint-lined rag. Otherwise, the risk of damage to the chrome coating of the walls of the fuel unit will increase;
- After all the parts of the standard carburetor are completely dry, it can be assembled.
Immediately after installing the fuel unit, the operator must configure it and smoothly start the walk-behind tractor engine. Next, the user will need to check the operation of the node. If the built-in engine operates as stably as possible and does not make any extraneous sounds, it means that the standard carburetor was cleaned and adjusted correctly.
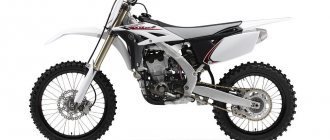
Everything about Pitbike!!
mikuni vm22
The easiest way to check whether a pit bike's carburetor is set correctly is by the color of the spark plug. We unscrew the candle and look at the color:
- Brick color - the mixture is correct
- White – poor mixture
- Black smoked – rich mixture
In addition, you can determine the quality of the mixture by the sound and reaction to opening the trigger. When you release the gas, you hear shooting sounds - the mixture is lean . When the gas is sharply opened, the engine seems to choke and there is no proper pickup - the mixture is too rich . In addition, when the mixture is lean, the engine overheats and the exhaust pipe becomes red hot . Having determined the quality of our mixture, we begin to turn the carburetor. In reality, it looks something like this: first we try to achieve the desired mixture by raising or lowering the needle one or two notches, we try to ride it, if the difference is felt immediately, we continue to conjure until the desired result is achieved. Don't forget about the suction. The carburetor must be adjusted with the engine warm and the choke closed . If the difference is not immediately visible, we ride longer, then evaluate the results of the adjustment by the color of the spark plug. If you can’t adjust the needle, then return the locking ring on the needle to the middle position (default) and select the jets. The carburetor must be supplied with a set of jets of different sizes. The nozzle has two sizes: the first is the thread diameter (m5, m6, etc.), the second is the throughput of the nozzle in cm3/min (the numbers are stamped on the nozzle itself). You can change the jet or check its size by removing the carburetor from the pit bike, draining all the gasoline from it and opening the float chamber. The jet looks like a flathead screwdriver bolt with a through hole in the middle. Accordingly, if the mixture is poor (the spark plug is white, the pipe is red, the motor is overheating), we raise the needle; if that doesn’t help, we increase the jet (the numbers are larger). If the mixture is rich (the spark plug is black, there are dips when the gas is opened sharply), we lower the needle; if that doesn’t help, we reduce the jet (the numbers are smaller). After you have adjusted the mixture on the carb, there is also a bolt with a spring that is responsible for idle speed . If the pit bike stalls when the gas is released, the engine speed is too low - turn the screw clockwise (tighten it). If, on the contrary, the pit roars while standing on a stand, unscrew the screw counterclockwise. Do everything with the engine warm and running to immediately determine whether we have turned it up enough or not. It happens that no adjustment helps; alternatively, this may be due to dirt getting into the carburetor. Flushing and blowing all the channels in the carburetor will help here.
Jet
Next, based on the color of the candle, we change the jet.
- If it gets rich , we reduce the jet by two orders of magnitude.
- If it becomes lean , we increase the jet by two orders of magnitude.
- If we are close to the target, we change the jet in the range ± 1.
After each replacement, we roll back and forth at full throttle, then look at the spark plug. We turn off without releasing the gas. The process is quite long and tedious. Having received the desired color (coffee with milk), we proceed to adjusting the quality of the mixture at idle speed. A correctly selected jet can also be determined by the following symptoms.
- If, when you sharply apply the gas and release the throttle, the speed seems to hover at the top point for a few seconds , and then reluctantly drops, this indicates a lean mixture.
- If, when you sharply apply the gas and release the throttle, the revolutions drop and sag almost until the engine stalls , and then rise and level out to idle, this indicates a rich mixture.
With a normally adjusted mixture, after releasing the throttle, the engine speed should drop to the idle level within a second and operate stably at it.
Screw quality
We dose the fuel with the quality screw.
- By twisting , we lean the mixture.
- By unscrewing it , we enrich it.
- So we tighten the quantity screw, listen to the motor and count the number of revolutions. As soon as the speed starts to drop, we stop. We remember the position and twist it until it stops, counting the revolutions. So we know one limit value (for example, at 1.5 turns of the quality screw from the stop, the engine speed began to fall).
- Now we begin to twist in the other direction (unscrew), listen to the engine and count the revolutions of the screwdriver. The engine speed should first begin to rise, because we are enriching the mixture, and then begin to fall, because the mixture has become too rich. We record the number of revolutions of the quantity screw when the engine speed began to fall. Now we know the second limit value (for example, at 4 turns of the quality screw from the stop, the engine speed began to fall).
We need to set the midpoint between the two boundary points. If you plan to ride around the city, in the heat, with frequent stops, it makes sense to shift the adjustment to a richer side. If you are too lazy to twist and count. We tighten the quantity screw until the motor is still running stably, but is about to stall. And gradually we begin to unscrew the screw. The turnover will gradually begin to increase. As soon as unscrewing the screw stops affecting the engine speed, stop rotating. All. We adjusted the amount of mixture at idle.
Needle
Let's move on to adjusting the needle position. We get on the pit bike and start riding, watching its behavior. Then we raise the needle by two divisions (we put the latch in the lower groove), enrich the mixture. We ride and look at the behavior of the pit bike. Then lower the needle to the very bottom (put the latch in the upper groove), lean the mixture. Let's ride. We select the position of the needle individually according to how you feel. There should be no dips during acceleration. If, after adjustment, the needle is in its extreme positions , it means that we selected the main jet incorrectly. A short course on setting up the carburetor on a pit bike.
- Removing the carburetor and filter
- We disassemble the carburetor down to the screws, wash everything in gasoline, and blow out all the holes with a compressor.
- Reassemble the carburetor in reverse order, keeping it surgically clean. We unscrew the quality screw two turns, and tighten the idle screw almost all the way. The needle is in the middle position.
- I wash the filter with a special product, or Fairy, if it is just foam rubber (from a filter box), and rinse it in gasoline.
- We dry the filter and thoroughly saturate it with special oil, let it soak, and squeeze out the remainder, without enthusiasm.
- We put everything back together and install it on the pit bike.
- We put a new clean candle.
- Next, we look at the gas hose and gas filter (if installed). Kinks in the hose are not allowed. The filter should be blown freely without creating resistance.
- We check the presence of gasoline in the tank (at least 500 g.)
- After all the manipulations, we look for a deserted, flat road. Let's start a pit bike. Warming up. Using the XX screw, we lower the idle to stable. Then we go all the way in a straight line and ride at an active pace for about 5-10 minutes.
- We unscrew the spark plug and look at the insulator
- If it is ashen white , the mixture is too lean.
- If it is pale with a brownish tint , the mixture is too poor.
- If it is the color of coffee with milk, or a brick tint , the mixture is what you need!
- If it is darker (coffee with a small amount of milk), the mixture is slightly richer.
- If it is dark brown or black , the mixture is too rich.
If nothing is clear from the candle, we ride at full speed for another 5-10 minutes.
Here's a video on setting up the carb!
Successfully tune your carb.
- Design and procedure for adjusting UAZ K126G carburetors
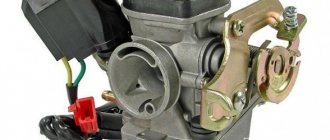
In this article we will talk about the Mikuni carburetor, its design and adjustment, and to be precise about its common modification VM.
These are the most popular and high-performance carburetor models for regular and sports motorcycles.
The brand belongs to the Japanese company Mikuni Corporation, founded on October 1, 1923. Over the years of its existence, the company managed not only to conquer the market of its native country, but also became famous for its high-quality products all over the world. By the way, this manufacturer has gained popularity not only among owners of “two-wheeled” vehicles.
Design and operation
It is important to note that according to the manufacturer's manual, the installation angle and tilt angle of the Mikuni carburetor should not exceed 20 degrees from the horizontal.
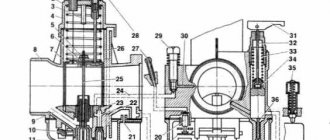
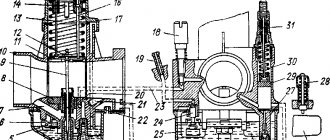
First, let's look at what parts the Mikuni carburetor consists of:
Mikuni carburetor parts
The vehicle engine is operated in different operating modes: from idling with the throttle valve almost fully closed (1), to full load with the throttle valve fully open. To meet the requirements for the required ratio of air and fuel in the mixture, Mikuni VM-type carburetors are equipped with a low-speed fuel system (pilot system - in foreign literature, or the idle system more familiar to us) and a main fuel system (main metering system).
- Design and adjustment of the DAAZ 4178 1107010 carburetor for UAZ
Idle system (pilot system)
On Mikuni VM-type carburetors, the idle system and the main system are of independent design.
When the engine is idling (fig. left), or when the engine is running at low speeds without load, the throttle valve is almost lowered, the air flow rate through the main system needle valve is low. Consequently, the pressure is high enough to cause fuel to flow from the main system atomizer. The fuel mixture is supplied during idling through the outlet hole (3), and when the throttle is further opened, also through the transition hole (4). The fuel, entering through the idle fuel nozzle (5), is mixed in the required proportion with air, the amount of which can be adjusted using the screw (6), and enters the engine in the form of an emulsion.
Operation of the Mikuni Carburetor Idle System
The fuel entering through the idle nozzle is also mixed with the air entering through the transition hole, and through the idle nozzle enters the outlet (7), and then into the engine.
When the throttle valve is opened, the air flow increases and the fuel supply from the idle air system (pilot) nozzle becomes insufficient. This drawback is compensated by a transition hole, from which it is no longer air that begins to flow, but additional fuel (Fig. on the right)
The mixture ratio is adjusted at this stage using the idle jet and the propeller.
Main system
- Do-it-yourself carburetor adjustment for VAZ 2107
Mikuni Carburetor Basic System
When the throttle valve (1) is opened 1/4 or more, the speed of air flow past the metering needle area increases and the pressure drops to the point where fuel can be drawn from the main system. The throttle valve and metering needle move simultaneously. Since the metering needle (11) has a different cross-section along its length, its position determines the amount of fuel supplied from the main system to form a combustible mixture. This gives the required ratio of fuel and air.
Fuel entering through the main jet (9) into the mixing tube (10) is mixed with air entering through the air hole (12), and through the sprayer it enters the diffuser (2).
There is a cutout in the throttle valve, which is used to create optimal pressure in the area of the main system sprayer. When the throttle is more than a quarter open, fuel is primarily metered by the main system, but the idle system and transfer port are also involved in this process.
Float mechanism
Mikuni carburetor float system
The float system serves to maintain a constant fuel level in the carburetor. Fuel (15) enters between the valve needle (13) and the valve seat (14) and enters the float chamber. As a result of filling the chamber, the float (16) moves up to a predetermined level, gradually closing the needle valve until the fuel supply is completely stopped. It is important to note that the fuel level in the float chamber determines the amount of fuel in the fuel mixture. A level that is too high allows more fuel than necessary to leave the nozzle, richening the mixture. Conversely, too low a fuel level will lean the mixture. Therefore, you cannot arbitrarily change the fuel level in the float chamber.
Cold start system
Starting device
To start a cold engine, Mikuni carburetors have a special system. The device includes independent air and fuel channels, which are opened by a plunger (22) when the trigger lever is lowered. The fuel enters the mixing tube (18) through the starter nozzle (17), where it is mixed with air. Next, through a special channel, the mixture enters the plunger area (19). Here the emulsion is additionally mixed with air coming from the inlet (20) of the starting system, and then supplied to the engine through the nozzle (21) of the starting device.
Since the operation of the starting device is based on pressure difference, it is important that the throttle valve is closed when starting the engine.
At temperatures around 20 degrees Celsius (68 degrees Fahrenheit) and above, the trigger may not be activated.
Adjusting the Mikuni carburetor
The composition of the fuel mixture may vary depending on external weather conditions: pressure, air temperature, humidity. The table below shows how the composition of the fuel mixture changes.
Dependence of mixture composition on weather
It is necessary to adjust the carburetor on a warm engine using spark plugs recommended by the manufacturer (they may differ in heat rating) through test drives.
Adjustment screws
As you know, the fuel mixture consists of fuel and air; by increasing the amount of air in the mixture, we make it leaner, and vice versa, by decreasing it, we make it richer. Our task is to achieve the optimal ratio in all operating modes; for this, you can adjust the air screw and idle screw on the carburetor, select the main jet and idle jet, and change the position of the metering needle.
At load modes, when the throttle valve is open from 3/8 to 4/4 (full opening), the composition of the mixture can be adjusted by replacing the main jet. The higher the number, the richer the mixture. Depending on the characteristics of the motorcycle, it is necessary to achieve maximum speed.
Throttle valve 4/4 open
In modes when the throttle valve is open from 1/4 to 3/4, we adjust the composition of the mixture using a metering needle. There are E-rings on the needle; by moving it to a lower ring (raising the needle), we enrich the mixture, and vice versa.
- If the moped does not accelerate smoothly, you need to make the mixture richer.
- If the engine is running hard and black smoke is coming out of the chimney, we make the mixture leaner.
In idle mode, the throttle valve is lowered (we do not touch the throttle), the composition of the mixture is adjusted using an air screw by changing the amount of air in the mixture.
- turning the screw to the right (tighten) – enrich the mixture
- turning the screw to the left - we lean.
First, fully tighten the propeller and unscrew it 1.5 turns. After rotating it a quarter or half a turn to the left or right, we achieve the maximum rotation speed.
Next, by loosening the idle screw, which acts on the throttle valve, we achieve stable speeds. And again we turn the propeller, obtaining the highest speed.
Also, in idle mode, the idle jet may need to be replaced.
- if the propeller is unscrewed more than three turns, change the idle jet to a smaller one.
- If the propeller is fully tightened, change the idle jet to a larger one.
With the correct choice of jet, the engine should accelerate smoothly from idle when driving at low speed.
By the following signs you can determine whether the idle jet is selected correctly:
- the engine rotates jerkily - the jet is small;
- black smoke from the chimney, hard work - the jet is large;
Don't forget to adjust the propeller again after replacing the idle jet.
The easiest way to check whether a pit bike's carburetor is set correctly is by the color of the spark plug. We unscrew the candle and look at the color:
- Brick color - the mixture is correct
- Whitish - poor mixture
- Black smoked – rich mixture
In addition, you can determine the quality of the mixture by the sound and reaction to opening the trigger. When you release the gas, you hear shooting sounds - the mixture is lean . When the gas is sharply opened, the engine seems to choke and there is no proper pickup - the mixture is too rich . In addition, when the mixture is lean, the engine overheats and the exhaust pipe becomes red hot .
Having determined the quality of our mixture, we begin to turn the carburetor.
In reality, it looks something like this: first we try to achieve the desired mixture by raising or lowering the needle one or two notches, we try to ride it, if the difference is felt immediately, we continue to conjure until the desired result is achieved. Don't forget about the suction. The carburetor must be adjusted with the engine warm and the choke closed . If the difference is not immediately visible, we ride longer, then evaluate the results of the adjustment by the color of the spark plug. If you can’t adjust the needle, then return the locking ring on the needle to the middle position (default) and select the jets. The carburetor must be supplied with a set of jets of different sizes. The nozzle has two sizes: the first is the thread diameter (m5, m6, etc.), the second is the throughput of the nozzle in cm3/min (the numbers are stamped on the nozzle itself). You can change the jet or check its size by removing the carburetor from the pit bike, draining all the gasoline from it and opening the float chamber by unscrewing two bolts. The jet looks like a flathead screwdriver bolt with a through hole in the middle. Accordingly, if the mixture is poor (the spark plug is white, the pipe is red, the motor is overheating), we raise the needle; if that doesn’t help, we increase the jet (the numbers are larger). If the mixture is rich (the spark plug is black, there are dips when the gas is opened sharply), we lower the needle; if that doesn’t help, we reduce the jet (the numbers are smaller). After you have adjusted the mixture, there will also be a bolt with a spring on the carber that is responsible for idle speed . If the pit bike stalls when the gas is released, the engine speed is too low - turn the screw clockwise (tighten it). If, on the contrary, the pit roars while standing on a stand, unscrew the screw counterclockwise. Ideally, do everything with the engine warm and running, so that you can immediately determine whether we have cranked up enough or whether we need more. It happens that no adjustment helps, or this may be due to dirt and sand getting into the carburetor. Flushing and blowing all the channels in the carburetor will help here. In general, this is how everything is set up, the main thing here is to stock up on time and patience, in this matter, of course, some professionalism is required, which will allow you to quickly identify the problem of a bad mixture and adjust the carburetor on a pit bike, but even without experience you can cope with this task. Although in particularly advanced cases it is better to call a professional . Mikuni carburetor rebuild for pit bikes
SUPER ESSENTIAL UPDATE
An ultra-intensive course on setting up carbers on a pit bike.
- Removing the carburetor and filter
- We disassemble the carburetor down to the screws, wash everything in gasoline, and blow out all the holes with a compressor.
- Reassemble the carburetor in reverse order, keeping it surgically clean. We unscrew the quality screw two turns, and tighten the idle screw almost all the way. The needle is in the middle position.
- We wash the filter either with a special product, or with Fairy, or, if it’s just a foam cartridge (from a filter box), we soak it in gasoline.
- We dry the filter and thoroughly saturate it with special oil, let it soak, and squeeze out the remainder without enthusiasm.
- We put everything back on the pit bike.
- We put a new clean candle.
- Next, we look at the gas hose and gas filter (if installed). Kinks and pinching of the hose are not allowed. The filter should be blown freely without creating resistance.
- We check the presence of gasoline in the tank.
- After all the manipulations, we are looking for a deserted, flat, straight road. Let's start a pit bike. Warming up. Using the XX screw, we lower the idle to stable. Then we go all the way in a straight line and ride at an active pace for about 5-10 minutes. Turn off the engine with full throttle.
- We unscrew the spark plug and look at the insulator
- If it is ashen white , the mixture is too lean.
- If it is pale with a brownish tint , the mixture is too poor.
- If it is the color of coffee with milk, or a brick tint , the mixture is what you need!
- If it is darker (coffee with a small amount of milk