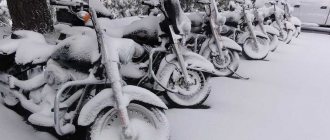
High-quality Korean wheel bearings for Ural Dnepr. Replacement and adjustment of wheel bearings.
High-quality spare parts for Soviet boxer cars are a real headache for every owner in modern realities.
My solution is to use suitable parts from modern cars as much as possible. They are often cheaper than their motorcycle counterparts due to mass production and are of better quality if you choose the right manufacturer. Everything is on video, and if anyone forgot how to assemble and adjust the wheels, I also filmed that. Regarding the manufacturer - I used Parts-mall PSC-009 bearings and as the owner of a Korean car, I assure you that these are excellent analogues, which are the supplier of the Daewoo-GM conveyor. The same cannot be said about “Korean-type” AMD bearings, which they can offer you as an analogue. they are two or three times cheaper when purchased, and this is weak Chinese, be careful!
Attached videos:
- I like I like 2
Other entries in this logbook
How to install an oil pressure indicator on a Dnepr motorcycle.
A detailed description of such a simple but very important modification to my Dnepr motorcycle, installation of a mechanical pressure gauge. Usually everything is on the Internet. Read more
Blog named after DobryiD_Sw → A trip to the Black Knives bike festival in the ancient Urals with a stroller.
We have been coming here for a long time, the first time we were in Aramil at the second Rally as schoolchildren, at Izhaki, without a license, and today the fifteenth is already taking place (. Read more
How to check the boxer crankshaft without disassembling the engine.
You've probably already started to worry why there are no new videos. The bottom line is that the more work I do on the motorcycle, the less output I have. Read more
Comments
Only authorized users can leave comments
Replacing bearings in a motorcycle steering column
?
Anton Zhukov (tohazhukov) wrote, 2012-07-25 09:49:00 Anton Zhukov tohazhukov 2012-07-25 09:49:00 The steering column is one of the most important and at the same time the most loaded components in the chassis of a motorcycle. The condition of the steering bearings directly affects the handling and safety of the motorcycle. Old, worn-out bearings can lead to play in the entire front suspension, which will naturally affect the quality of its operation and, accordingly, the grip of the wheel on the road. The motorcycle may even stop going straight. In the worst case scenario, the old bearings will simply seize.
To understand whether it’s time to change the bearings in the steering column, you need to hang the front wheel completely (rolling it under the yoke will not work). Then, with both hands, grab the fork from below and move it along the axis of the motorcycle. The play will appear as a knocking sound in the area of the steering column. To eliminate play, sometimes it is enough to tighten the adjusting nut (move it down). If the adjustment did not help, or you do not know when and how the steering bearings were changed on your motorcycle, replacing them would be a good solution. This is a relatively simple task, although it requires a little skill. Everything can be done in any garage with improvised tools. Most motorcycles are equipped with inexpensive ball bearings. They wear out faster and withstand less load than tapered roller ones. In addition to the bearings themselves, we will need a new boot for the lower bearing.
So, to start working on the motorcycle, you need to remove everything unnecessary: the front wheel, fender, damper, head fairing, fork and clip-ons (or handlebars, if you have the wrong motorcycle :-).
Unscrew the axle nut securing the upper crossmember. We remove the traverse. (You may have to tap it from the bottom.) Now we need a key for the round spline nuts. For example, a key for adjusting the shock absorber spring preload. A bicycle “family bike” is also suitable. A makeshift extension cord wouldn't hurt either. In front of us are two spline nuts. Carefully bend the upper petals of the locking ring and unscrew the fixing nut, remove the ring and unscrew the adjusting (lower) nut. Holding the lower traverse with your hands, remove the upper boot and bearing. Now we take out the traverse with the steering axle and the bearing on it. As you can see in the photo, during a previous bearing replacement, an old damaged boot was left on my motorcycle, which allowed dirt and moisture to get inside. Now comes the hard part. The inner ring of the lower bearing and the old boot remained on the axle. It's not that easy to remove. On the Internet, it is generally recommended to cut the ring with a grinder (or rather, an angle grinder). The Honda manual insists on using a chisel (or small chisel) and a hammer. I preferred the official method. Before you start working with a chisel, you need to screw the nut securing the upper yoke onto the axle. This will protect the threads from damage. After half an hour of dancing with a hammer and chisel, the axle is finally free. Minor damage is inevitable, no big deal. Now you can install a new bearing. We put the boot on the axle, then the new bearing and put the inner ring of the old bearing on top with the opposite side. Now, with confident blows of a hammer through an extension (or a pipe of suitable diameter) and the old ring, we push the new bearing onto the seat. We knock until the boot stops hanging around. To facilitate the process of seating a new bearing, we will use knowledge about the thermal expansion of materials. Let's put the axle in the freezer for a couple of hours, and heat the new bearing. The process will be easier. The main thing is to do everything quickly, until the temperature of the parts is equalized. Don't forget the boot! Let's put the traverse aside and move on to the frame. There are cages left in it from old bearings that need to be replaced with new ones. We'll use a socket extension and a hammer. The extension cord is placed in special grooves inside the frame and rests against the edge of the holder. The clip is knocked out with light and uniform blows around the entire perimeter. Now you can lubricate the seats and install new clips. Their old brothers will help us with this. The new clip is placed in its seat, the corresponding old clip is placed on top with the reverse side, and evenly struck with a hammer. The rings are driven in all the way.
The bearings must be lubricated before installation. I use a grease that contains molybdenum disulfide. It is important to lubricate both bearings and their races well. You literally need to rub the grease into the bearing. The adjusting nut that closes the steering column must be lubricated with engine oil. This is necessary for the next step.
We assemble the entire structure. We place the lower yoke and the axle with the bearing installed on it in the steering column. We put a bearing and boot on top of the axle. Tighten the adjusting nut with an initial torque of about 30 Nm. Then, with both hands, we turn the traverse several times from side to side - from lock to lock - to seat the bearings. Tighten the nut again, now to a torque of about 50 Nm. Again, we make sure that the traverse moves smoothly, with little effort, without any play or knocking. We put on the locking ring and tighten the fixing nut with our fingers. Now use the wrench to make another quarter turn so that the petals of the ring fit into the slots of the fixing nut. Carefully bend the petals upward. Now you can install the upper yoke and attach the nut securing it. After installing the fork, the nut can be tightened (103 Nm). The rest of the assembly is carried out in reverse order.
After a run of 100–200 km, it is recommended to repeat the adjustment.
Tags: cbr600rr, logbook, motorcycle, then
tohazhukov.livejournal.com
Messages [13]
1↑ Topic from Dimka-Oppositchik 02/23/2012 14:21:34
- Dimka-Oppositchik
- Assistant
- Inactive
- Registered: 14-01-2012
- Messages: 155
- Reputation: 1
Topic: Wheel hub disassembly
In short, hello everyone) the problem is current! in the middle it became very heavy, but I tightened the wheel more, it seems like the steering wasn’t so bad! AND NOW I HAVE REMOVED THE REAR WHEEL, I LOOK AND THERE THE BUSHING IS BROKEN, where the bushing on which the wheel is centered is inserted))) so it was broken, namely the bearing (I want to remove it, but I only removed one nut from the outside, and then you need a special puller! How to remove it without puller? And is it possible to buy these bearings in a regular store?
2↑ Reply from mexanik62 02/23/2012 19:19:19
- mexanik62
- Mechanic from the 30s.
- Inactive
- Name: Uncle Vitya
- From: Evpatoria
- Registered: 03-08-2011
- Messages: 10 831
- Reputation: 1 138
- Motorcycle: 12-volt K-750, ZAZ Sens Hatchback
Re: Wheel hub disassembly
Bearing 7204 In addition to our wheels, the outer bearing of the front wheel is used. Zaparya I don’t quite understand, but you need to unscrew the adjusting nut so that the first bearing is visible, then put the hub on a wooden support and use a pipe of size 1" to knock out the bearings from the side of the ring gear
Added: 02/23/2012 17:13:26
Added: 02/23/2012 17:19:19
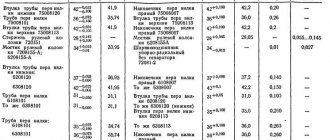
Here is a drawing Explain from the drawing what is hurting you 1 left spacer sleeve (short) 2 Lock nut 3 adjusting nut 4 oil seal 5 7 bearing 7204 or 6-7204 6 middle spacer sleeve 8 boot washer 9 right spacer sleeve (long) Here is one of options for knocking out bearings
Edited by mexanik62 (11-04-2019 08:00:28)
+1
3↑ Reply from Dimka-Oppositchik 02/24/2012 12:28:24
- Dimka-Oppositchik
- Assistant
- Inactive
- Registered: 14-01-2012
- Messages: 155
- Reputation: 1
Re: Wheel hub disassembly
I have a broken bearing and I want to replace it, describe the process to me, I unscrewed one nut that was not large, but I can’t do the other! tell me what and how!
4↑ Reply from mexanik62 02/24/2012 19:18:17
- mexanik62
- Mechanic from the 30s.
- Inactive
- Name: Uncle Vitya
- From: Evpatoria
- Registered: 03-08-2011
- Messages: 10 831
- Reputation: 1 138
- Motorcycle: 12-volt K-750, ZAZ Sens Hatchback
Re: Wheel hub disassembly
As I understand it, you unscrewed nut 2 (see picture) Now you need to unscrew nut 3. It requires a “native” key, like for an angle grinder, but first pick out the dirt from the holes for the key. Well, of course, you can use a punch in this hole and a hammer, but it is not advisable Right-hand thread i.e. unscrew counterclockwise Then knock out the bearings with a pipe as shown in the figure. Be careful not to damage the threads! Assemble in the order shown in the picture. Lubricate the bearings thickly.
5↑ Reply from Dimka-Oppositchik 02/25/2012 06:27:48
- Dimka-Oppositchik
- Assistant
- Inactive
- Registered: 14-01-2012
- Messages: 155
- Reputation: 1
Replacing wheel bearings
Home → Operation, maintenance and repair of the Ural motorcycle → Wheels →
Wheel hub bearings must be replaced if the wheel has lateral play on the axle, when rotating, extraneous noises and knocks are heard from the hub, or the wheel sticks. The lubricant embedded in the bearing during installation does not require periodic replacement and lasts for the entire service life of the bearings. The required service life of the lubricant is ensured by its quality and the reliability of the bearing seals. 1. Having rested the drift against the hub bushing, press out one of the wheel hub bearings with light blows of a hammer.
After removing one of the bearings, we clean the inner surface of the hub from the remains of old grease and dirt. 2. Using special pliers, remove the hub retaining ring.
Do not squeeze the retaining ring too tightly with pliers to avoid permanent deformation.
3. Remove the spacer sleeve. 4. Similarly to step 1, press out the second wheel bearing using a mandrel of the appropriate size. On motorcycle models with a side trailer, the wheel hubs are unified and slightly different from those used on single models. The disassembly process is also slightly different. 1. Using a radius wrench, unscrew the hub nut.
2. Using a special wrench included in the tool kit supplied with the motorcycle, unscrew the nut with the oil seal. We inspect the oil seal. If tears, cracks or severe wear are visible on it, replace the oil seal. Even a slightly damaged seal will not provide reliable bearing protection. 3. Remove the spacer bushing. 4. Remove the rubber boot that covers the hub splines from dirt. 5. Having rested the drift against the spacer sleeve of the hub, we press out the tapered bearing of the hub. 6. Remove the bearing from the hub housing. 7. Remove the hub spacer sleeve. 8. Similarly to steps 5-6, press out the second hub bearing using a mandrel or tool attachment of a suitable size.
After disassembly, we wash all parts with kerosene or solvent, removing old grease. Before assembly, lubricate all parts and the inner surface of the wheel hub with grease. We perform assembly in reverse order.
www.smug.ru
Rear axle of a Ural motorcycle. We change the main pair.
Riding with an 8-wheel drive in the rear axle of a motorcycle did not bring satisfaction, especially since the rear wheel had a 16” rim. The engine roars at maximum speed, and the speed barely reaches 90 km/h. It was decided to change the main pair in the rear axle of my Dnepr motorcycle.
I had a stroller pair (8/37 with a ratio of 4.63), and at the market I bought an accelerated pair (10/35 with a ratio of 3.5). I expected the speed increase to be about 32%.
I started by draining the oil from the bridge by unscrewing the bottom plug. I took off the rear wheel, disconnected the brake rod, unscrewed the four nuts securing the bridge to the pendulum, pulled it slightly towards myself, and now I have the bridge in my hands. The brake pads were removed and put aside.
I unscrewed the protective cover (cap) of the hinge; note that it has a left-hand thread. Next, I unscrewed the nut and carefully, so as not to spoil the thread, knocked out the wedge bolt securing the hinge. Lightly tapping the body of the hinge mechanism with a hammer, he removed it from the drive gear shaft.
Unscrewed the six nuts securing the crankcase cover. Some nuts came off along with the studs. By quietly tapping the crankcase cover with a hammer, he disconnected the cover and the crankcase. When I pulled out the cover, needles from the needle bearing fell into the crankcase. I carefully counted them all (45 pieces) and collected them in one place.
To remove the large gear from the crankcase cover, I had to screw in two long bolts in place of the studs securing the crankcase to the pendulum and slowly use them to squeeze out the hub with the driven gear.
I immediately cleaned the threads in the crankcase cover with a sword. Removed the thrust bushing from the driven gear hub.
Next, I unscrewed the aluminum shank nut. It also turned out to have a left-hand thread.
Pulling the shaft, shaking it a little from side to side, he pulled it out of the crankcase. The needle bearing remains in the housing. I removed all the needles from the bearing cage, there were 28 of them.
Removed the collar seal from the crankcase cover.
I knocked out the support bearing (207) through the holes in the hub and loosened the 8 bolts securing the driven gear to the hub. The bolts were loosened and unscrewed almost by hand. Removed the driven gear.
I washed the crankcase body and cover in gasoline.
I started installing the new driven gear on the hub. It turned out that the old mounting bolts did not fit on the new gear. Different thread pitch. I had to look for eight suitable bolts.
Motorcycle steering column bearing.
The steering column bearing of a motorcycle, scooter, ATV and even a snowmobile (more precisely, bearings, since there are two of them) are very important parts that affect handling and, accordingly, affect traffic safety. This article, more aimed at beginners, will describe what the bearings in the steering column of the above listed vehicles are, which are better and which are worse, how to replace worn bearings with new ones, and other nuances.
The service life of motorcycle steering column bearings (and other motor vehicles) of course depends on operating conditions. And of course, the bearings will last longer on those motorcycles that are ridden on roads with high-quality surfaces, and not on potholes. But the service life of the steering column bearing depends even more on the design and quality of the bearing itself.
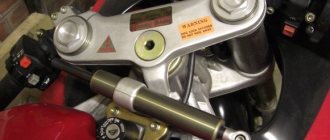
Steering column bearing standard ball and lower roller
On some serial imported motorcycles, and on almost all domestic bikes, in order to save money, simple open bicycle-type ball bearings are installed, for example, indicated by the yellow arrow in the photo on the left. The service life of such bearings is very short, especially on our domestic heavy motorcycles Ural, Dnepr, K-750 and other similar boxers, which in stock form (without hitch and sidecar) weigh at least 220 kg.
And of course, they fail much faster than tapered roller bearings, one of which is indicated by a red arrow in the same photo.
Below in this article I will describe in detail the procedure for replacing worn steering column bearings on a motorcycle with new ones, but first you should still write how to improve your motorcycle by installing better and more reliable tapered roller bearings. After all, this site is not only about banal repairs, but also about vehicle tuning.
And as mentioned above, many production motorcycles have cheap ball bearings, which quickly wear out and the handling of the motorcycle deteriorates significantly (those interested can read how to restore normal handling of the bike here).
And of course, it will be much better not to simply replace worn bearings with the same new conventional ball bearings, but to replace them with normal tapered angular contact bearings, which will last much longer and significantly improve the handling of your bike.
You will need to select and buy tapered bearings in the store (read how to choose a bearing and their markings here) and then you will need to perform a simple modification to the steering column of your bike, which will be described below.
First, you will need to remove the front fork from your motorcycle, and how to do this will be described below in the section on replacing bearings. And in this section, only the steps to modify the steering column will be described in order to then be able to replace the ball bearings in it with tapered roller bearings.
Refinement of seats for replacing ball bearings of the steering column with tapered roller bearings.
After removing the fork, you will see that the height of the seats (the so-called cups) in which standard ball bearings were installed from the factory is small enough to properly press in the higher outer race of a more powerful tapered bearing.
In addition, the diameter of the cups (or the diameter of the steering column itself) on many motorcycles is usually small in order to install in them the outer race of even those small outer diameter tapered bearings that are used in standard wheel hubs of domestic heavy motorcycles (their marking is 6-7204A) .
These wheel bearings are suitable for installation in modified steering columns of small-sized motorcycles and scooters. And for heavier motorcycles, including the modified steering column of our domestic Urals and Dnieper, it is better to use tapered bearings with a number larger than the wheel bearings described above, it is much more reliable, which is what I did on my Dnieper.
I already wrote about the modification of the steering column (and in general about the modification of the frame) of our domestic boxer cars in this article. There is also a photo of the modified steering column of my Dnepr. But this post will describe everything in more detail.
So, there are two ways to modify a standard motorcycle steering column, which will be described below, and the choice of method depends on the availability of equipment. First, you need to cut off the standard cups for the factory ball bearings from the steering column.
You should try to cut it so that the cut is strictly at a right angle to the axis of the steering column. But if the cut turns out to be slightly crooked, we grind off the excess with a grinding wheel and at the same time control the cutting angle of 90º by applying a bench square and checking in the light where the excess needs to be ground off.
However, if someone refines the steering column using the first method, which involves using boring equipment, then the cups can simply be ground off with a milling cutter strictly at a right angle (aligning the steering column so that the axis of the cutter coincides with the axis of the steering column) using a milling or coordinate boring machine machine.
And then, having cut off the standard cups, you will need to bore the steering column pipe as shown in Figure 1. All dimensions in this figure (in the place indicated by the red arrow) and in other places, too, are purely conditional and depend on the outer diameter and height of the outer race of the tapered roller bearings that you purchased and which you are going to install instead of standard ball bearings.
It should be noted that this method in most cases requires a fairly large milling or boring machine, which will allow you to mount the motorcycle frame on the machine table and be able to bore the steering column to the desired diameter. And of course, many do not have such machines, and even if they have a familiar boring machine or milling machine operator, in most cases it will not be possible to “teleport” a motorcycle frame to the factory territory.
Therefore, you can simply make a new steering column of the required dimensions on a lathe and then cut the standard steering column from the motorcycle frame and weld a new one. However, here, too, everything is not so simple and you will need a motorcycle slipway, and only with the help of it can you accurately align and weld the new steering column.
But not everyone has a slipway (as well as a boring or milling machine, lathe) and therefore the simplest second option for modifying the steering column for new tapered roller bearings will be described below.
The second option, which is shown in the figure on the left, will not require removal of the standard steering column from the frame, but only its modification.
You will again need to cut off the standard cups designed for conventional ball bearings at a right angle (90º relative to the axis of the steering column) and press the new cups tightly into the steering column, which must be ordered from a turner.
The drawing of the new cups is shown in the figure below and, of course, all the dimensions in the drawing are conditional and depend on the sizes of the new tapered bearings that you are going to install instead of the standard ones. When making new cups, you should ensure that they are subsequently pressed very tightly into the steering column, then even if you cut off the old cups unevenly, install the new ones without distortion (strictly at 90º relative to the axis of the steering column).
Drawing of cups for conical bearings (sectional view): the inner diameter A is equal to the outer diameter of the outer race of the bearing, the outer diameter B is equal to the inner diameter of the steering column, and height B is approximately 1 mm less than the height of the outer race of the bearing, which will be pressed into the cup.
After tightly hammering the new cups into the steering column of your bike until they stop, they should then be welded in a circle using a semi-automatic machine and after cleaning the seams, you can paint your frame (or just tint the modified steering column). By the way, it is also advisable to cut out anthers from a thin sheet of felt and place them under each bearing during assembly. This will prevent dust from entering later and will increase the longevity of the bearings.
And one more thing - you will need to machine a new, longer rod and press it into the lower traverse, instead of the short and narrower standard rod. After all, the distance between the new bearings has increased slightly, since the cups themselves are taller and so are the new bearings.
Measuring the distance is easy if you insert both tapered bearings into the new steering column cups and, using a tape measure inserted instead of the rod, then measure the distance between the inner races of the tapered bearings. Well, then add the width of the adjusting nut, which tightens the bearings, plus the width of both cross members and plus the width of the outer nut, which is screwed over the lower cross member of the fork.
And according to the nuts, you will see how much to lengthen the rod and how much to cut the thread on the new rod. By the way, the new rod will be wider than the standard one, because the diameter of the internal races of the new tapered bearings is larger and, of course, the outer diameter of the new rod is sharpened according to the internal diameter of the internal races of the tapered roller bearings (the traverse nuts should also be machined new, according to the diameter of the external thread of the new rod).
And in order to be able to press a thicker new rod into a smaller diameter hole in the lower traverse (so as not to drill a standard hole in the lower traverse), the rod in the lower part (in the part where it is pressed into the lower traverse) is simply machined smaller in diameter than in the rest of the top.
The diameter of the rod, in the place where it will be pressed into the hole in the lower crossmember, should be machined 0.04 mm thicker than the diameter of the hole in the lower crossmember, in order to subsequently be able to press the rod into the lower crossmember with interference. Before pressing the rod, it should be placed in the freezer of the refrigerator for a couple of hours, and the traverse itself should be slightly heated on a gas stove before pressing the rod into it (we heat it until drops of water hit the traverse quickly evaporate).
After all the work, we press the outer races of the tapered bearings into the new cups of the modified steering column. Then we press the new rod into the hole of the lower yoke (as described above), then we press the lower tapered bearing onto the new rod (at the same time we press with a long sleeve only on the inner race of the bearing) and from below we insert the lower yoke with the bearing pressed onto its rod into the hole of the steering column until the lower bearing rests with the rollers against its outer race, pressed into the lower cup of the steering column.
After this, we press the inner race of the upper tapered bearing onto the rod protruding from the upper cup of the steering column and then press it further using the adjusting nut. When tightening the adjusting nut, we ensure that there is no play in the bearings, but at the same time the lower yoke rotates freely around the axis of the steering column. Then we put on the upper crossbar and tighten it with the outer nut. More information about assembling the steering column will be described below, in the section replacing steering column bearings.
Replacement (installation) of new steering column bearings.
Before starting work, you should suspend the front part of the motorcycle using a small lift or motorcycle stand, several options of which are described here, or using a hoist, or simply using a rope thrown over the beam of your garage (the rope can be tied, for example, to the tank pipe of the frame ). If you have a center stand on your motorcycle, you can use it.
But at the same time, you should load the rear part of the motorcycle with some kind of weight so that when you remove the front fork, your motorcycle does not hit the floor of the garage with its front end (more precisely, the bottom part of the frame hits the floor). If there is nothing at all from the above, then you can raise the front part of your bike by placing some kind of strong box under the lower frame pipes.
Having suspended the front of the motorcycle (lifting the front wheel off the floor), you next need to decide whether to remove the front wheel and other parts of the front part or not. Experienced mechanics can completely replace the steering column bearings without removing the front wheel and fender, but only by removing the upper crossbar and removing the fork from the steering column along with the wheel and fender.
But this will require helpers, and you will also need to hang the front of the motorcycle significantly higher than if you had to remove the fork from the frame without the front wheel. In addition, then you will need to somehow secure the fork with the wheel so that it is convenient to remove the lower bearing race from the lower yoke rod, but more on this below.
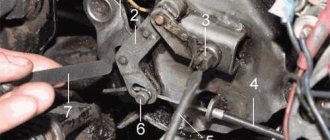
And one more thing - on some choppers the headlight is mounted on the lower crossbeam, which means you will need to dismantle the headlight. However, on other motorcycles, with the usual fastening of the headlight to the ears of the fork housings, you will also need to remove the headlight for further ease of operation. Next, unscrew the fastenings of the steering columns and remove the steering wheel - this will make it much more convenient to work and it will be easier to get to the top nut of the rod.
In other matters, it is quite possible to remove the upper yoke along with the handlebar mounts and the handlebars of the motorcycle (even without removing the gas, brake and clutch control cables), but here it all depends on the design of the motorcycle and the availability of a convenient wrench for unscrewing the upper rod nut. Having unscrewed the top nut of the rod, then unscrew the plugs of the fork legs and remove the upper crossbar, moving it to the side and hanging it (if the steering wheel is in place and the control cables are not removed).
Now you have access to the second nut (shown in the bottom photo, where the special key is shown), which holds the rod and lower crossbar in the steering column of the motorcycle frame. Many motorcycles have a retaining ring that has a tendril on it (shown in the bottom photo) that must be bent (out of the nut slots) to release the nut and be able to unscrew it. On many motorcycles, the locking ring even has two tendrils bent on opposite sides, which must be bent with a sharp screwdriver to release the nut.
Next, using a special wrench (the wrench is shown in the bottom photo), unscrew the second rod nut. This can be done using a steel rod and a hammer, but it is still better to use a special wrench so as not to damage the nut splines. After unscrewing the nut, we can now lightly hit the rod with a copper or plastic hammer to knock the rod out of the inner race of the upper bearing, while holding the lower yoke with our hand so that it does not fall to the floor.
In this case, it is useful to not unscrew the nut completely, and to strike not at the rod, but at the nut screwed onto the upper turns of the thread. And then, firstly, you can be sure that the thread of the rod is safe, and secondly, we will be sure that the lower traverse will not fall to the floor and will not need to be held by hand. Well, at the end, we completely unscrew the nut from the rod and, holding the lower yoke with our hand, finally knock it out and remove it together with the rod and the inner race of the lower bearing from the steering column of the motorcycle.
Now all that remains is to remove the inner race of the upper bearing from the upper cup of the steering column, which can be easily removed by hand. But it’s not so easy to pull the inner race of the lower bearing off the rod, since the race is pressed onto the rod close to the lower yoke and boot and won’t be able to catch on with the puller.
You can try driving sharply sharpened screwdrivers between the clip and the traverse (from two opposite sides) and slightly lifting the clip above the traverse, then use a puller with long and finely sharpened legs.
But if the clip is placed very tightly on the rod, then sometimes this does not help and then all that remains is to simply grind off the clip on one side using a grinder (see photo), and then it will be easy to pull it off the rod using screwdrivers. When working, you should act carefully so as not to damage the seat on the rod.
When grinding, it is better to leave about half a millimeter of the body of the clip at the very end and then use a thin chisel to cut the clip. And since bearing steel is quite hard, but brittle, the race easily bursts in the thin ground part.
Having removed the inner race of the lower bearing from the rod of the lower yoke, you should now put a new boot on the rod (if you don’t have one, you can make it from sheet felt) and then you need to press in the inner race of the new tapered roller bearing. When pressing the inner race onto the rod, the main thing is to choose a tube of a diameter and length that will be slightly longer than the rod in length and slightly larger in internal diameter than the outer diameter of the rod.
When pressing, the tube should only put pressure on the inner race, and not on the separator - this is important and I hope even beginners understand this. This is the only way the new bearing will not be damaged when pressed in and will last its intended life.
Having pressed the inner race of the lower bearing onto the shock until it rests against the boot and the lower yoke, then you should put aside the lower yoke with the rod (or the fork with the lower yoke, if the yoke was not removed from the fork stays) and remove the outer races of the upper and lower bearings from seats (from cups) in the steering column of your motorcycle (moped, or other motor vehicle).
To do this, you will need a thin and strong steel rod, which is slightly longer than the height of the steering column of your motorcycle and which is sharpened on one side. We rest this steel bar with its sharpened part against the edge of the outer race (first the lower bearing, which is easier to remove) and then apply gentle blows with a hammer to the other end of the bar. At the same time, we rearrange the rod in a circle after each blow and the outer clips are gradually knocked out of their seats.
However, on some motorcycles, the outer races of the bearings are smaller in diameter than the thrust step of the seat in the steering column (in its cup) and the outer races do not protrude, which means there is nowhere to rest the steel rod to knock out the old races.
In this case, a reverse hammer will help, the pin of which is electric welded directly to the holder itself (it is better to weld a kind of forked wire fork in two opposite places of the holder) and knock it out of the steering column using a reverse hammer.
After removing the old clips from the steering column, all that remains is to press in the new clips, which were carefully placed in the freezer of your refrigerator in advance. After all, as you know, metal shrinks a little at sub-zero temperatures and pressing in cooled clips will be much easier.
Now all that remains is to assemble everything and, first, insert the lower yoke into the steering column from below (or the fork with the lower yoke if the yoke was not removed from the fork stays) until the rollers of the inner race stop against the cone of the outer race of the lower bearing.
Next, holding the lower yoke with your hand, ask an assistant to put the inner race of the new upper bearing on the rod protruding from the steering column, then lightly hit the tube resting on the inner race, press it onto the rod and then press the inner race of the new upper bearing with the second nut.
Then we remove the nut, put on a new boot, a locking ring and return the nut to its place and tighten it, achieving slight rotation of the lower yoke in the steering column, but there should be no play. If there is no play, but the lower yoke turns with some effort, then you should slightly loosen the adjusting nut, but again there should be no play. Next, we lock the nut using a locking ring, bending the antennae into the slots of the nut.
steering column bearing - nuts, retaining ring and special wrench
Some motorcycles do not have a locking ring, but have a locknut (and some have both a locking ring and a locknut - as in the photo on the left) that is tightened against the first nut (the locknut should be tightened with a torque wrench to 25 Nm). After fixing the adjusting nut using a locking ring (or using a lock nut - or using both - as in the photo), all that remains is to put on the upper crossbar and screw on its outer nut on top (and tighten it with a force of 103 Nm), which will press the crossbar to the lower one nut.
If the fork stays were not removed from the lower yoke, then we then put the upper yoke simultaneously on the stem and the fork stays and tighten both the outer nut of the stem and the stay plug and thus fix the fork on the frame. If the fork stays were removed from the lower crossmember during disassembly, then by installing the lower crossmember into the steering column and pressing in the new steering column bearings (as described above), all that remains is to insert both fork legs into the lower crossmember.
Then all that remains is to install the upper yoke, clamp it with the outer nut and screw in and tighten the plugs of the fork legs, and after that we clamp the yokes in the lower yoke with special bolts (the bolts clamp the clamps of the lower yoke on the fork legs).
Before screwing in and tightening the stay plugs, remember the last time you changed the oil in your fork. And if you have driven about 10,000 km since the last replacement, then it is high time to change it (read more about changing the oil in a motorcycle fork here) and only after that we screw in the plugs of the stays and tighten them.
All that remains is to return the headlight, steering columns and the steering wheel itself (if you removed it) and the replacement of the steering column bearings can be considered complete, good luck to everyone.
suvorov-custom.ru