Gearbox adjustment
Are you having trouble shifting gears?
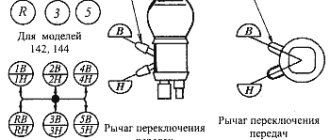
This may be due to a breakdown of the gearbox gears. If you are confident that the gearbox is in good working order, then you need to adjust the gearbox using the screws located on the box, near the base of the lever. Do not rush to immediately twist the screws, but check the condition of the balls and holes Are there any visible damages, is the shift sector working properly? If this is all in order, then proceed to the adjustment: Put the motorcycle on the stand. Set the hand lever to the left in 2nd gear, press the pedal with your heel to engage 3rd gear. If the ball coincides with the hole, then you don’t need to touch the bottom screw. If the hole in the 3rd gear does not align with the balls, it doesn’t engage (when the manual shift lever is pushed forward, it aligns with the ball), you need to unscrew the bottom screw a little. And if the hole jumps over the ball, it switches (the lever needs to be pushed back )screw in the lower screw. With the 3rd leg, switch to 2nd. If the hole of the 2nd gear does not reach the ball (the lever must be moved back), unscrew the upper adjusting screw. If the hole jumps over the ball (when the manual shift lever is moved forward, the speed is turned on ) tighten the top screw. 1amoto.ru
All motorcycle speeds and its maximum speed
The maximum speed of a motorcycle depends on the power of the bike and the drive gear ratios. Motorcycles of different sizes can reach speeds from one hundred and forty kilometers to three hundred and forty kilometers per hour.
You don't need to make your bike's top speed an end in itself. Much more important is how dynamic your motorcycle is at all possible speeds. Gear ratios can be increased or decreased to improve the motorcycle's performance. For example, for city streets the maximum speed is not higher than 220 km/h. In this case, the gear ratios are selected so that at this speed the sixth gear is turned into the cutoff. The motorcycle will gain such important dynamics for it.
For track racing, the gear ratios are chosen slightly differently so that all six gears are used until a top speed of 280 kilometers per hour is achieved.
Replacing gear ratios is considered the cheapest tuning and does not affect the wear of the motorcycle.
Good afternoon, gentlemen of the opposition, perhaps I’m asking a very stupid question, but nevertheless, how to change gears in the Urals, describe the process itself. I only rode a scooter, but on Thursday my friend and I are going to buy a MOTORCYCLE and will need to ride home on it.
Thanks in advance.
We made it. There are already questions about gear shifting.
It's better to find someone experienced.
You'll be fucking killed without driving experience.
The first is down, the rest are up.
You forgot to add that you must shift with your hand and always on the left side - otherwise I won’t bother!
I add hell for example!
Open a book - this is also such a carrier of information.
I'm crazy!
I already opened it, but it’s only about repairs and installation.
in this case it is better not to buy.
From a scooter straight to the Urals, you’re desperate. My advice is to take with you someone who at least understands a little about them and has ridden them of course. In principle, there is nothing complicated, but there are some nuances, it’s better not to risk your life. Do you have a license? If not (most likely, otherwise I don’t think there would be such questions), it’s better not to go on public roads. Practice somewhere in the village, in garages, etc.
Where does a 16 year old pioneer get his license? ))
I also switched from a scooter to the Dnieper, however, then it almost didn’t go)
the first all the way down, then up in order neutral, second, third, and fourth. Down, respectively, you press not the front shoulder of the pedal up to the rear.
This is good advice, thank you very much!
My pleasure. It’s better not to risk it yourself, let someone who knows how and with a license overtake it. Then you yourself will master driving in a large open area; the difference between a Ural and a scooter is big.
Congratulations on your decision to buy a Urals! A lot of new and wonderful things await you) in addition to everything said above, yes, it’s better to ask someone who knows how to drive to drive. you'll learn on your own later. When I bought my first IZH (I still didn’t have a license), I had to drive more than 100 km, and miraculously I didn’t fly under a car at the first intersection. but the miracle might not have happened. but he was a friend with rights)
CLUTCH. Don't forget to squeeze the clutch (lever on the left of the steering wheel) when changing gears)))
Yes, I know that, I just didn’t understand where to switch the foot (and without a clutch it would have been funny)))
The best way to change gears is with your foot.
and press the clutch by hand...
and most importantly, think with your head.
Find the instructions for the Ural 67-36 motorcycle and everything will be indicated there in detail - which gear corresponds to which speed. If you don’t find it, remind me, I’ll tell you then. I'm at work right now and don't have the instructions at hand.
Thank you, I already understood everything in principle.
So you can’t really tell a newbie what he’s asking for, he’ll take it and crash into you. There’ll be no one to blame. It’s my own fault for not prompting him in time. You need to be more attentive to newcomers.
Before you try to ride (if it's a solo ride), put the bike on the ground and try to lift it off the ground. Otherwise, God forbid, you fall and then you won’t pick him up
And with a stroller, even more so, you need to be more experienced in driving, since a single driver and a stroller are slightly different in control and behavior on the road.
hmm. driving license as I remember on cat. A can be opened from the age of 16.
FIRE is simple.
No comments.
Don't forget to take with you a supply of motor oil, spare spark plugs, some tools, a helmet and a motorcycle license. And as much money as possible.
Congratulations, you are about to have an adventure - searching for neutral in the Urals. That's another activity.
What's the problem ?
Kherivoznait, but for the first time in a wheelchair for me it was hellish torment. It was somehow easier on the Wolf the first time.
By the way, what are you going to do with the motorcycle later?
Maybe I’ll repair it and go to the dacha.
No, I was just hoping for a chopper.
Night Rider - do you think there are no 16-year-old pioneers with a license? I'm 16, I'm already studying, I'll get my license in June. Birthday in November.
Zlo_na_kolesaX - open yes, but you can study for category A from 14.
O my young friend. Just because you're studying doesn't mean you already have them. So, first get a license, then say what you have. And it’s not a fact that you’ll get it.
Z.Y. In general, you don’t have a license yet, and you definitely won’t for two years)))
Remind me about the clutch.
Finding neutral is very simple, you put it in first, and if there is a reverse gear, turn it on and off, that's all)))
you think he knows how to do it. )))
This ritual can only be mastered by an elf of level 80
The whole risk is not in the checkpoint, but in the STROLLER. Ask someone to move it. I once let a scooter driver steer my Dnieper-wheelchair, and we “drove” off the road into nettles—very cruelly. He said that his steering wheel turned towards the stroller, he got scared, let off the gas, but forgot to press the brake and switch to a lower gear. Learn to operate a heavy motorcycle not on a public road. It's not easier on your own! Since the high center of mass.
ahaha)) nettle) and when I was moving the strollers, the same thing happened. I took a right turn, but turned the corner faster than I did. hit the curb with both “left” wheels and flew off onto the grass) but the Ural remained in place, drove on in second and idle)
He also flew into a ditch - he was afraid to turn the steering wheel on the stroller.
You should not be afraid, but be aware of the danger. Yes, the Urals are a difficult and capricious thing. That's why we love it????
On topic: the lever on the left of the steering wheel is the clutch. Separates the engine and gearbox. The scooter has a brake in this place. In the Urals, the brake is a lever on the right. This is the front one. Rear - with the right foot. Under the left foot there is a gear selection and neutral pedal. Switch it a couple of times and you’ll understand what’s what. Start only in neutral and do not touch the clutch. Shift gears only with the left lever fully pressed. The first gear is with the toe down firmly and all the way. Release the clutch smoothly! Gas to a third of the handle. As soon as you feel traction, hold the clutch and release it only when it starts moving normally. Something like this ????
What if the clutch of the motorcycle he buys is not adjusted?
For example, he leads.
then the main thing is not to put it in the cold, otherwise it will freeze)))))))) (sorry, I couldn’t resist)
Adjusting the foot shift mechanism. Signs of lack of uniformity may include:
When switching with a foot from a low gear to a higher one, the manual lever easily moves slightly forward and only after that the position of the foot pedal is fixed.
When you engage a top gear with a foot shift while driving, this gear automatically disengages, while engaging the same gear with a manual shift prevents spontaneous disengagement. To eliminate this malfunction, you need to loosen the lock nut and unscrew the lower gearbox adjustment screw by 1-1.5 turns.
When switching from a low gear to a higher gear, the gear shift sector moves excessively, and the locking hole of the sector passes the lock ball. This malfunction can be corrected by screwing in the lower gearbox adjustment screw.
When moving from a higher gear to a lower gear, the gear shift sector does not move enough and the gear does not lock. In this case, you need to loosen the lock nut and unscrew the upper adjustment screw for adjusting the foot shift mechanism.
When moving from a higher gear to a lower one, the sector moves excessively, and the locking hole passes the locking ball. To eliminate this malfunction, you need to screw in the upper adjusting screw and ensure timely fixation of the sector on motorcycles.
Technical characteristics of modern models [edit | edit code]
Tourist, Tourist 2WD, Gear-UP, Troika Lux
| Tourist | Tourist-2WD | Gear-UP | Troika Lux | |
| Model: | IMZ-8.1037 Tourist | IMZ-8.1037 Tourist-2WD | IMZ-8.1037 Gear-UP | IMZ-8.1037 Troika Lux |
| Dimensions L×W×H, mm: | 2580×1700×1100 | 2580×1700×780 | 2580×1700×1100 | |
| Ground clearance, mm: | 125 | |||
| Dry weight, kg: | 350 | |||
| Total weight, kg: | up | |||
| Fuel tank, l: | 19 | |||
| Maximum speed, km/h: | 105 | |||
| Fuel consumption in the city, l/100 km: | 6-7 | |||
| Fuel consumption on the highway, l/100 km: | 4-5 | |||
| Engine: | 745 cm³, 42 l. p., 4-stroke, 2 cylinders, opposed OHV | |||
| Launch: | electric starter and kickstarter | |||
| Electrical system: | 12 V, generator 500 W | |||
| Ignition system: | contact | |||
| Checkpoint: | 4-speed, with reverse | |||
| Main gear: | gimbal | |||
| Gear ratios: | I - 3.6; II - 2.62; III - 1.61; IV - 1.3; Rear: 4.2 | |||
| Main gear ratio: | 4,62 | |||
| Tires: | 4.00x - 19″ | |||
| Wheels: | knitted, painted, 19″ | spoked, chrome-plated, 19″ | knitted, painted, 19″ | spoked, chrome-plated, 19″ |
| Brakes: | front - hydraulic, disc; rear - drums | |||
| Suspension: | front - lever with spring-hydraulic shock absorbers; rear - pendulum with spring-hydraulic shock absorbers, adjustable for load | front - telescopic; rear - pendulum with spring-hydraulic shock absorbers, adjustable for load | ||
| Seat: | separate, double adjustable | solid | separate, double adjustable | solid |
| The package includes additional equipment: | Painted stroller wheel rack, driver's mudguards, passenger handles, parking brake | Chrome-plated rack for the stroller wheel, searchlight, driver's mudguards, stroller glass, shovel, canister, chrome-plated driver's protective bar, chrome-plated stroller protective bar | Stroller wheel rack, searchlight, shovel, canister, driver's mudguards, passenger handles, parking brake, driver's protective bar, stroller's protective bar | Chrome-plated luggage rack on the stroller wheel, chrome-plated passenger handles, velor upholstery of the stroller, leather passenger seat in the stroller, stroller glass, parking brake, driver's roll bar |
Retro, Retro-Solo, Wolf, Solo-sT
| Retro | Retro Solo | Wolf | Solo-sT | |
| Model: | RETRO | RETRO SOLO | WOLF | Solo-sT |
| Dimensions L×W×H, mm: | 2224×1630×1020 | 2224×840×1060 | 2530×850×1300 | n/a |
| Ground clearance, mm: | 140 | 115 | 125 | |
| Dry weight, kg: | 343 | 220 | 260 | 198 |
| Total weight, kg: | 610 | 400 | 430 | n/a |
| Fuel tank, l: | 19 | |||
| Maximum speed, km/h: | 120 | 150 | ||
| Fuel consumption in the city, l/100 km: | 6-7 | 5-6 | ||
| Fuel consumption on the highway, l/100 km: | 4-5 | |||
| Engine: | 745 cm³, 42 l. p., 4-stroke, 2 cylinders, opposed OHV | |||
| Launch: | electric starter and kickstarter | |||
| Electrical system: | 12 V, generator 500 W | |||
| Ignition system: | microprocessor | |||
| Checkpoint: | 4-speed, with reverse | |||
| Main gear: | gimbal | |||
| Gear ratios: | I - 3.6; II - 2.28; III - 1.56; IV - 1.19; Rear: 4.36 | |||
| Main gear ratio: | 4,62 | 3,89 | ||
| Tires: | 110/90-18″ | front 90/90-18″ rear 130/90-16″ | front 3.50-18″ rear 4.00-18″ | |
| Wheels: | spoked, chrome-plated, 18″ | spoked, chrome-plated, 18″ | spoked, chrome plated | spoked, chrome-plated, 18″ |
| Brakes: | front - hydraulic, disc; rear - drums | front - hydraulic, disc; rear - hydraulic, disc | front - hydraulic, disc; rear - hydraulic, disc | |
| Suspension: | front - telescopic; rear - pendulum with spring-hydraulic shock absorbers, adjustable for load | front - telescopic; rear - pendulum with spring-hydraulic shock absorbers, adjustable for load | ||
| Seat: | separate, double adjustable | separate, double adjustable | separate | separate |
| The package includes additional equipment: | Velor upholstery of the stroller, leather passenger seat in the stroller, stroller glass, parking brake, driver's roll bar | Driver safety bars |
How to change gears without a clutch
If you have a manual transmission car (manual gearbox) and you are moving in third gear, then in order to switch to the higher “fourth” gear, you must first engage neutral. To do this, you need to release the gas and move the gear shift lever to the neutral position. Then shift the lever to the desired gear position. After the engine speed of the gearbox gears coincides, torque transmission will occur. In the same way, you can shift to higher gears without almost squeezing the clutch in all brands of cars that are “equipped” with mechanics.
For beginners who are just learning to drive, the main problem is the manual gearbox. Problems with shifting arise especially in understanding, and at first by touch, which gear is quite difficult. This confusion, in turn, can cause serious transmission breakdowns, or worse, create an emergency situation.
We recommend reading: Will a notary certify a copy of a work book without the original?
Adjusting the clutch of a Ural motorcycle
The quality of the clutch's functioning is important for a motorcycle. This will require proper adjustment of the drive mechanism.
When the drive cable is tensioned sufficiently, slippage of the clutch will be observed; if it is the other way around, then the clutch is moving.
When the starting device fails to function, usually due to a break in the starting spring or its release from the bushing. In this situation, the Ural motorcycle clutch lever will not automatically return to its initial position, but you can easily resort to a mechanical method of lifting the latter up.
If the starting pawl breaks, the lever itself will slide freely and go down without rotating the engine crankshaft. A similar situation occurs if the pawl spring breaks or due to an increase in oil thickness.
During operation, noise may also occur, the main reasons for which are the wear of the working surfaces of the gear teeth. With no load adjustment of the clutch on the motorcycle, the noise simply disappears. This type of noise is not dangerous, but one cannot help but note its unpleasantness. Removing it will require removing and replacing the gear. Otherwise, the expected result will not be heard...
A worn out and failed bearing can also be a source of interference. The reasons for self-switching gears include wear of the splined connection of the coupling responsible for shifting gears. All of the above problems can be eliminated with your own efforts without additional costs, the main thing is to find the cause in time.
How to adjust the clutch on the Dnepr? Clutch adjustment in the Urals
Gearbox adjustment in the Urals
Adjusting valves on a Ural motorcycle
Spark plugs are the basis of engine operation
comments powered by HyperComments
Ural motorcycles use a double-disc dry clutch. The name indicates the number of driven discs, as well as the operating conditions of the unit - the clutch operates without lubricating the discs. The design of the clutch of Ural motorcycles is quite simple and reliable, requires virtually no maintenance and, if used correctly, can last longer than the engine.
Clutch diagram: 1 — flywheel bolt; 2 — lock washer; 3 — clutch spring; 4 - flywheel; 5 - screw for fastening the thrust disk; 6 — thrust disk; 7 — intermediate drive disk; 8 — driven disks; 9 — clutch release rod; 10 — rod tip; 11 — release bearing; 12 — slider; 13 — pressure drive disk; 14 - crankshaft shank In the landing flange of the flywheel 2 there are six threaded holes for the screws securing the thrust disk 3. Six springs 14 are installed in special sockets, also located in a circle. Grooves are cut along the inner radius of the landing flange, and which include the protrusions of the leading clutch discs 4, 6. The drive pressure plate 4 is installed on the springs, followed by the driven disc 5, then the intermediate drive 4, again the driven 5 and then the thrust drive disc 3. The pressure and intermediate drive discs are secured from moving in the radial direction relative to the flywheel by protrusions , which fit into the grooves of the flywheel. Thus, the driven disks rotate with the flywheel, but they can freely move along the splines along the axis of the flywheel, so the force that the springs exert on the pressure disk is transmitted to all other disks, ensuring the transmission of torque. The thrust drive disk is rigidly attached with screws to the flywheel flange, limiting the freedom of movement of all other disks and acting as a stop. The driven discs have toothed hubs, with which they are mounted on the shank of the gearbox input shaft. That is, the driven disks always rotate with the input shaft.
Ural gearbox switching diagram. Ural 4320 gearbox shift diagram
Depending on the car model, the control scheme and location of transmission gears on the new KamAZ may differ. Domestic trucks can be equipped with two types of gearboxes.
The difference is that some transmissions have five shift stages, while others have ten. These models are called 14 and 15. Five-speed transmissions are usually installed in cars that are used as personal vehicles.
Ten-speed gearboxes are usually equipped with trucks classified as road trains.
If you are driving downhill, you do not need to turn off the engine. When the engine is turned off, the steering wheel will lock. And this will lead to an emergency on the road.
When driving downhill, do not turn off the auxiliary braking, and also depress the clutch pedal all the way.
Newer versions of trucks use improved transmissions, which has allowed engineers to reduce the load on the main gearbox parts. Therefore, when driving in critical conditions and on descents, the car’s engine will not wear out.
How to change gears on a Ural motorcycle
This is the peculiarity of driving a KamAZ vehicle. A gearbox, the shift pattern of which is well studied and executed in this form, is distinguished by directional stability.
The main point of dividing it into 2 modes is to facilitate engine operation when driving a car with different weights.
Starting off on a loaded KamAZ (or with a trailer) is carried out in high gear with a crankshaft speed of 2600 rpm.
Please note => Documents Necessary for Registration of Ownership of an Apartment
Purpose, design and operation of the gear divider
The gear shift mechanism of the divider is designed to ensure that the required gear is engaged while the vehicle is moving and consists of a fork 14 (see Fig. 17) with nuts 15, a roller 13 of the fork 14, at the end of which a lever 16 is installed, and a pneumatic cylinder with a gear shift mechanism housing.
We recommend reading: Deed of gift with the right of lifelong residence
1 - spring housing; 2 — intake valve spring; 3 - gasket; 4 — inlet valve; 5 — intake valve stem; 6 — body; 7 — union nut; 8 - membrane; 9 — washer; 10 — housing cover; 11 — balancing spring; 12 – plug
Transfer case Ural 4320, design and operation
Today we will talk about the transfer case of the Ural 5557 and 4320, and also discuss their design.
The transfer case is a unit that is responsible for distributing torque from the engine to certain drive mechanisms, and they most often increase the number of gears in the transmission.
The Ural transfer case distributes torque between the axles and increases the torque of the drive wheels, which guarantees stability while the Ural vehicle is moving.
The Ural transfer case significantly affects the cost of the fuel mixture and the traction and speed parameters of the vehicle.
Because of this, the cost of transporting various cargo directly depends on the correct choice of parameters owned by the transfer case itself.
Ural 5557
In this article you can easily find answers to the most common questions:
- Transfer case of the Ural 5557, 4320 and its device;
- Functioning of the part as a transfer case of the Ural 5557, 4320;
- Common malfunctions of the transfer case of the Ural 4320, 5557;
- Adjusting the transfer case of the Ural 5557 and 4320.
Basic information about the transfer case of the Ural 5557 and 4320
The Ural 4230 and 5557 vehicles use a two-stage transfer case equipped with an asymmetrical cylindrical center locking differential with a power drive. The transfer case is mounted on the car frame using four rubber pads. The design of the transfer case of the Ural 5557 and 4320 is absolutely the same as that of the KamAZ 4310.
In the middle of the crankcase the following are located on bearings:
- Intermediate roller with gears of the lowest high gear;
- Rear drive shaft with middle axle. An asymmetrical cylindrical center differential is installed on these rollers;
- Front axle drive shaft;
- The primary roller has high and low gears, and a clutch is installed between them to change gears.
In order to maintain atmospheric pressure in the crankcase cavity, a fitting with a tube is installed on the bearing cover, connecting the crankcase to the atmosphere through a sealing system. The outlet tip of the tube is brought to a level above the maximum fordability to prevent water from being sucked into the crankcase while overcoming water obstacles.
The crankcase is made of cast iron, there is a hatch on top, the crankcase itself is one-piece, closed with a lid with an oil guide tray.
Oil is poured into the crankcase through the top hatch with the cover removed or through the hole under the control plug, which is located on the rear wall of the crankcase. The oil is drained through the bottom hole, which is closed with a plug with a magnet.
The crankcase is ventilated using a fitting, and its tube is included in the general sealing system of the units.
List of models [edit | edit code]
Road motorcycles
- IMZ M-72 (1940-1961) - the first motorcycle of the Irbit plant, a copy of the BMW R71, was modernized throughout its production, the latest model even received a short-lever fork and aluminum wheel hubs;
- IMZ M-52 (single) (1950-1957) - a model with the chassis of the M-72 and a 500 cm³ engine. Only a limited edition of 678 motorcycles was produced;
- IMZ M-61 (1957-1963) - a transitional model with the chassis from the M-72 and a new engine (650 cm³), the travel of the front fork and rear suspension has been increased. The front fork has been changed. The crew section has been lightened;
- “Ural” M-62 (1961-1965) - new gearbox, increased suspension travel, automatic ignition timing introduced, camshaft cam profile changed to reduce wear. The steering has been changed (chain throttle and duralumin clutch and brake levers);
- “Ural-2” M-63 (1963-1971) - a frame with a pendulum suspension of the rear wheel on spring-hydraulic shock absorbers (later a similar suspension was introduced on the sidecar wheel), ground clearance was significantly increased due to the introduction of a new exhaust system.
- “Ural-3” M-66 (1971-1975) - the engine was significantly modernized, the power increased to 32 hp. With. Engine durability has been increased due to full-flow oil purification and the use of a new crankshaft design. The motorcycle has direction indicators and new lights;
- "Ural" M-67 (1973-1976) - twelve-volt electrical equipment was used. The design of the motorcycle frame has been changed;
- “Ural” M-67-36 (1976-1984) - due to changes in the design of the cylinder heads, the use of K-301G carburetors with an increased diffuser diameter and an increase in the diameter of the exhaust system, the engine power was increased from 23.5 to 26.5 kW. (36 hp). The right turn signal on the motorcycle itself has been removed.
- “Ural” IMZ-8.103-30 (1985-1986 [ source not specified 2336 days
]) - the frame and rear suspension, optics, electrical equipment were modernized, a brake was installed on the sidecar wheel, instead of two mufflers, one was installed on the right side; - “Ural” IMZ-8.103-10 (1987-1994) - differed from the previous model by the presence of reverse gear, slightly lighter weight, noise and fuel consumption;
- “Ural” IMZ-8.103-40 Tourist - equipped with a lever front fork;
- “Ural” IMZ-8.123 Solo - a single unit based on the IMZ-8.103-10, engine power 40 hp. pp., 18-inch wheels;
- "Ural" IMZ-8.1037 GEAR-UP;
- "Ural" IMZ-8.1243 Voyage;
- "Ural" IMZ-8.1024 Cobra;
- "Ural" IMZ-8.1238 Wolf (1999-2011) - a motorcycle in the chopper style;
- "Ural" IMZ-8.1036 Retro
Sports motorcycles
- M-35;
- M-52S for road racing;
- M-52K for cross-country competitions;
- M-61K for cross-country competitions;
- M-62K for cross-country competitions;
- M-75M;
- M-76;
- M-77 for road racing.
- M-80;
- K-1000 for cross-country competitions;
- “Cross” IMZ-8-201 for cross-country competitions.
Special equipment
- "Ural" IMZ-8.1233 Solo-DPS - patrol motorcycle;
- "Ural" IMZ-8.1037 Gear-UP - a military motorcycle equipped with a 7.62 mm PKMB machine gun on a standard turret;
- "Ural" IMZ-8.1037 Gear-UP-ATGM - a military motorcycle, carrier of the Konkurs-M ATGM. The launcher with a thermal imaging sight is mounted on a motorcycle sidecar on a special turret. An ammunition load of two ATGMs is transported in the ammo rack of the stroller. In the stowed position, the launcher and thermal imaging sight are placed in the trunk of the stroller. The weight of the container with a guided missile (without launcher and thermal imaging sight) is 26.5 kg; the firing range of the complex is 4000 m during the day and 3500 m at night; armor penetration - 200-250 mm (solid steel).
Limited editions
It has become a tradition to make limited editions of Urals. Among them:
- Gzhel Sugar (2009) - painted like Gzhel. Released in a single copy.
- Yamal (2012) - theme of the icebreaker "Yamal" with an oar. 50 copies were produced.
- Gaucho Rambler LE (2013) - cowboy theme with warm materials and tea set.
- World (2014) - Shuttle Theme. Powered by solar battery. 20 copies were released.
- Dark Force (2015) - Star Wars theme with lightsaber. 25 copies were produced.
- Ambassador (2017) - presented in honor of the 75th anniversary of the plant. With a standard bottle of vodka and sardines. 20 copies were released.
Ural motorcycle gearbox with reverse speed
Over its long life, the gearbox of the Ural motorcycle has undergone several modifications, including the addition of a reverse gear. The use of a secondary shaft in the gearbox made it possible to increase productivity and significantly reduce the size of the box, which is very important for a motorcycle. Repairing and assembling the gearbox of a Ural motorcycle is not very difficult, and this work can be done independently.
How does a Ural motorcycle gearbox work with reverse gear?
The two-shaft gearbox of the Ural motorcycle uses fewer gears when transmitting torque, which is the main reason for the increased efficiency. The input shaft of the gearbox has three initial speed gears, which are integral with the shaft. The purpose of the secondary shaft is to select the required gear, and the gears on it are not rigidly fixed. The gearbox of the Ural motorcycle with reverse speed has manual and foot shift methods, which makes it very convenient to use.
On later modifications of the gearbox, a removable rear cover appeared in the aluminum crankcase, allowing the gearbox to be repaired without removing it from the engine.
Among other motorcycles, it is precisely the ease of maintenance that distinguishes the Ural motorcycle - a major overhaul of the gearbox can be easily completed within a day, if the appropriate spare parts are available. It must be remembered that some parts from various modifications of the gearbox are interchangeable. This is one of the main advantages that makes it quite easy to assemble a working box from several faulty ones.
Removal and repair of Ural motorcycle gearbox
To remove the gearbox without unscrewing the motor, you need to do the following:
- Remove the rear wheel from the motorcycle.
- Remove the cardan drive.
- Remove 1 bolt and 3 nuts securing the gearbox to the engine.
- Then the gearbox can be pulled out of the motorcycle frame and you can begin to inspect it.
Repair of the Ural motorcycle gearbox consists of replacing worn gears, followed by adjusting the gear shift mechanism
You should also pay attention to the seals - their wear will cause oil leakage, as a result of which the Ural motorcycle gearbox will operate in conditions of insufficient lubrication
Dismantling and assembling the gearbox of a Ural motorcycle
To disassemble the gearbox, proceed as follows:
- dismantle the clutch mechanism along with the bearing;
- remove the starter lever, then the rubber coupling located on the secondary shaft;
- remove the gear shift housing cover;
- Unscrew the lid of the box and carefully remove it from the shafts.
Complete disassembly of the clutch mechanism, gear selection mechanism and kickstarter is allowed only when repairing them - otherwise there is no need to disassemble them.
The Ural motorcycle gearbox is assembled with reverse gear in reverse order. After assembly, the gear shift mechanism must be adjusted, otherwise problems may arise when choosing them.
The gearbox of a Ural motorcycle with reverse speed begins to be adjusted by placing the motorcycle on the stand. Then the 2nd speed is turned on and the pedal is pressed to the 3rd gear. If the ball coincides with the well, adjustment of the lower adjustment screw is not required. After moving from 3rd speed, you need to return to the second and check the alignment of the ball, tighten the upper screw if it does not match. This completes the gear selection adjustment.
The Ural motorcycle allows you to repair the gearbox with minimal effort, thanks to the simplicity of its design, which distinguishes this model from other two-wheeled vehicles.
Ural car gearbox shift diagram
Ural gear shift scheme can be different depending on the model of the Ural car. If we look at a Ural 4320 or Ural 5557 car with their modifications, we will see that a YaMZ 236U gearbox is installed there. It is three-way and has five forward and one reverse gears.
and is shown nearby. The gear drive installed in the box switches first gear and reverse gear. The remaining gears, namely second, third, fourth and fifth, are synchronized. It would be useful to see what the transfer case looks like. It has high and low gears, and you can also lock or unlock the differential.
If you have Ural 6563 or Ural 6470 cars, then the shift pattern on such Urals will be completely different, since they have a completely different gearbox installed. (see below). YaMZ 239 is mechanical, with a multiplexer, with nine stages, which have synchronizers. There is only one reverse gear and without synchronizers.
Gearboxes of Ural vehicles, regardless of the switching scheme, have proven themselves to be very positive. They are reliable and ensure that all necessary tasks are performed when driving, both empty and loaded, in any conditions, whether on the highway or off-road.
However, in order for such gearboxes to serve faithfully for many years, they must be properly maintained. Monitor the oil level; there is an indicator for this, which is located in the plug.
Change it in time; for this there are two drain holes on the bottom and side. And fill it correctly according to the lubrication chart.
If such a need arises, replace worn parts with new or repaired ones.
If it is necessary to tow a Ural car, then it is necessary to tow it correctly. If the distance exceeds 150 km and the engine is turned off, then it is necessary to remove the intermediate “cardan”. If you do not want to remove the intermediate driveshaft, the towing speed should not exceed 40 km/h.
Source of the article: https://awtosowet.ru/ural-sxema-pereklyucheniya-peredach/
Control mechanism and devices URAL-4320-10, URAL-4320-31
The Ural 4320 is a popular truck that is excellent for use on rough terrain and in forestry. This is facilitated by high ground clearance and a powerful engine. This machine is equipped with YaMZ diesel engines.
Power can exceed 300 horsepower. The gear shift scheme is competently designed by the manufacturer of this equipment. Approximately 30 liters of fuel are consumed per 100 km.
If this indicator has increased, it is necessary to carry out premature diagnostics of the automotive system.
The winch for the Ural-4320 is necessary for self-pulling vehicles or pulling out other vehicles. Maintenance of the winch consists of directly checking and tightening all fasteners.
Transmission system components
Ural vehicles are valued for their high power characteristics, excellent load capacity, and driving dynamics. The performance indicators of this vehicle are largely influenced by the installed gearbox. This device affects power gain.
The Ural-4320 is equipped with a five-speed gearbox. It has a long service life and can withstand the loads placed on it well. The Ural gearbox housing is attached to the clutch housing. The manual transmission on the Ural car has fixed shaft axles. The upper crankcase cover is equipped with a gear shift mechanism.
Gearbox diagram
The transmission system includes lockable cross-wheel and center differentials. On the truck there is a dependent power take-off box or KZOM.
It should be noted that there is a transfer case on the Ural 4320. It is 2-stage and affects the fuel consumption for each kilometer traveled. This box is securely fixed to the frame with several special rubber pads.
Power take-off
The Ural transfer case is an additional gearbox. It ensures stable movement of the machine at low speed. The installed Ural power take-off is single-stage. It is necessary to drive auxiliary units.
Transmission Power Line
Gear shift mechanism
Operating principle and troubleshooting of the Ural gearbox
The Ural gearbox is a device in the vehicle system that is responsible for transmitting power.
How does the checkpoint work?
The KPP-141 device, installed on some Ural models, includes the following elements:
- Coupling mechanism. It helps temporarily separate the engine and transmission. This allows you to change gears without reducing the speed of the power unit.
- Driven gears and shafts. The drive, intermediate and secondary shafts are installed here.
- Synchronizer. It ensures silent operation of the mechanism and equalization of gear speeds.
The gears rotate freely when the neutral mode is engaged, at which time all clutches and synchronizers are in the open position.
When the driver begins to squeeze the clutch mechanism and shifts the handle to some other gear, a special fork device begins to move the clutch into the engagement position with the corresponding pair at the end of the gear.
The gear mechanism is rigidly fixed to the shaft and stops spinning on it. The clutch in this position facilitates the transmission of rotational motion and traction force.
While the vehicle is moving, the gearbox is activated by the gear shift knob. It moves sliders equipped with forks, which begin to move the synchronizers at the required speed. A color diagram of gear shifting is in the Ural user manual.
How to change gears on a Ural car
Gear shifting is carried out by a lever located in the cabin using a mechanical remote drive, the need for which is caused by the forward displacement of the cabin located above the engine. In a bracket fixed to the boss of the gearbox housing cover, a gear shift roller is mounted on two supports. A switch lever is attached to the inner end of the roller, the end of which fits into the grooves of the heads mounted on the switch rods. In the middle position, the lever is installed by an upper clamp with a pin and a spring and a lower reverse lock with two pins and a spring. The outer pin is installed in the swing arm for shifting first gear and reverse gear. The leash is pivotally mounted on a pin fixed in the boss of the gearbox cover.
The input shaft with gear is installed in the crankcase on a ball bearing. The intermediate shaft is also installed in the crankcase: in front - on a cylindrical roller bearing, and in the rear - on a ball bearing. The rear bearing housing is covered with a cast iron cover.
Lubrication of M72 box parts
The gearbox parts are lubricated with oil poured through a hole located on the left side of the gearbox housing.
To lubricate the bronze bushings of the secondary shaft gears, there is an oil pocket in the secondary shaft bearing cover, and a blind hole is drilled along the axis of the secondary shaft. The oil that accumulates in the pocket enters the shaft hole and flows through radial drillings under the influence of centrifugal forces. To the inner surfaces of bronze bushings.
Oil leakage from the gearbox is prevented by washers and seals. All these parts must be inspected in a timely manner and replaced if there is significant wear.
Return to contents — ↑
DIY clutch repair
Repair after disassembly - inspect its parts and replace if necessary. Clutch springs should not differ from each other in height by more than 2.5 mm. If the friction linings of the driven discs are severely worn or damaged, they should be replaced (re-riveting the linings). Riveting can be done using fixture 2 or mandrels 3 (picture) in the following order:
- knock out the rivets with a beard and remove previously installed unusable linings; — place new linings 1 on the disk so that the countersink holes of both linings are on the outside; — insert hollow rivets 4 one by one into the holes and spread their ends apart with a core 5, hitting it with a hammer 6, while the heads of the rivets should be buried in the countersinks by at least 1-1.5 mm.
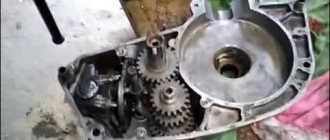
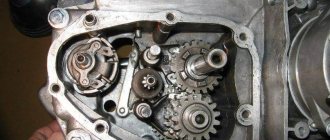
Photo report: Assembly of the gearbox (box) of the Ural motorcycle
In the article: Step-by-step disassembly of the gearbox (box) of the Ural motorcycle, it has already been said that we are faced with the task of assembling at least one working copy of the gearbox from three control units of unknown condition.
All three available gearboxes were disassembled, the internal parts of each of them were subjected to thorough diagnostics, both visually and with special measuring tools. As a result, two gearbox housings did not pass the inspection because they were seriously damaged. In two gearboxes, parts of the reverse gear engagement mechanism were either completely or partially missing; one gearbox was an old model and, moreover, had a “dead” foot start mechanism. In general, we somehow managed to scrape together more or less serviceable parts, only for one gearbox.
Before final assembly of the gearbox, we thoroughly wash the housing, and while the bearings are not yet installed in the mounting holes, we adjust the gear shift mechanism. Adjustment of the gearshift mechanism is done as follows: Place a standard gasket on the body of our gearbox, put a cover with a pre-assembled gearbox on the body, tighten a couple of bolts on the gearbox cover.
We take a flashlight, shine it through the holes into the gearbox housing and, in accordance with the factory instructions, adjust the thrust bolts (marked with arrows) of the gear shift mechanism. It is best to adjust this mechanism before the bearings are installed, otherwise when you look inside, where did the locking ball get into? That's it, no way...
We place the gearbox cover on some blocks and insert the foot start mechanism into it, then we take the secondary shaft in our hand and put the first gear gear and one splined clutch on it.
We put the clutch for engaging the first and second gears on the shaft, with a groove (marked by an arrow) to the first gear gear.
We put the second and third gear gears on the shaft; there should be a washer between the gears.
We put a splined coupling on the shaft, then put on the clutch for engaging the third and fourth gears and put on the fourth gear gear.
We place an oil deflector washer on the secondary shaft bearing.
We connect the secondary and primary shafts and, holding the shafts with our hands, insert them into the gearbox cover.
We install the forks of the gear shift mechanism into place.
We install the rod of the forks and gear shift mechanism into the cover until it stops.
We insert the pin into the bracket for the reverse gear engagement mechanism.
We insert the pin into the reference groove of the plate of the reverse gear engagement mechanism, correctly orient the reverse gear and insert the bracket rod all the way.
After the final assembly of the gearbox, we must check that the gears are engaged correctly and the clutches are engaged correctly. Gear clutches must mesh with the gear splines for the entire length of the splines - without exception. It is also worth noting that the forks of the gear shift mechanism, with any gear engaged, should have a slight free play, that is, not be clamped, as if “floating”.
We put an adjusting washer on the secondary shaft, which ensures the axial play of the secondary shaft in the range: 0.4-0.6 mm.
Install the pin into the gearshift ratchet.
We degrease the connector surfaces, place a new gasket on the sealant, and insert guide pins into the holes (marked with arrows).
We take our gearbox housing with a pre-installed secondary shaft bearing, check the functionality of the retainer ball (marked with an arrow), the ball must have the correct shape and move freely back and forth, apply sealant to the connector and install it on the cover, when installing the housing, do not forget to install the ratchet pin gear shift mechanism into the groove of the fork, gear shift foot shaft.
We twist all seven bolts on the gearbox cover crosswise, unfold it, take the thrust flange of the foot start mechanism, lightly put it on the shaft, turn it so that the return spring tendril goes into the hole, pull the return spring to the desired force, tighten the standard bolts and core their hats.
Oh yes. Don't forget to fill the gearbox with oil. And then there were cases... However, this is a topic for a completely different article...
Source
How to change gears on a motorcycle correctly
When changing gears, change one speed at a time. It is not advisable to jump.
To understand how to change gears on a motorcycle, you need to carefully study the controls. There are motorcycles with manual transmission and semi-automatic.
Method one
Motorcycles with manual transmission. All actions in this case occur in the following sequence. Pick up speed. Take off the gas. Engage the clutch. Press the gear shift pedal. Release the clutch, then the shift pedal and add gas.
To start the motorcycle, place it in neutral. After this, remove the gas and squeeze the clutch, at the same time turning on first gear. Taking your foot off the gear pedal, apply gas and release the clutch. Now add gas.
To downshift, you need to remove the gas and engage the clutch. After this, sharply add gas, and when the speed begins to drop, press the gearshift pedal. Release the clutch and shift pedal and add gas. Once the motorcycle has stopped, be sure to put it in neutral.
Driving a motorcycle Ural M67-36When starting to move, engage only 1st gear. To do this, press the clutch control lever all the way, and then engage 1st gear by pressing the front shoulder of the foot shift pedal with your foot. By turning the carburetor throttle control handle towards you, increase the engine speed, at the same time smoothly release the clutch control lever and the motorcycle will slowly move away.
The engine should not be allowed to develop high speed when the clutch is disengaged. The rotation speed must be such that the engine does not stall when the clutch is engaged.
Do not suddenly release the clutch control lever, as the engine may stall or the motorcycle may suddenly move forward. You should also not engage 1st gear by forcefully pressing or tapping your foot on the front shoulder of the foot shift pedal.
Having accelerated the motorcycle to a speed of 10-15 km/h, engage 2nd gear. To do this, squeeze the control lever while simultaneously reducing the engine speed by turning the throttle control handle, quickly press the rear arm of the foot shift pedal and smoothly release the clutch control lever while simultaneously increasing the engine speed.
When the speed reaches 20-30 km/h, engage III gear in the same way, and at a speed of 40-45 km/h - IV. After this, the speed of the motorcycle is adjusted by the position of the carburetor throttles using the throttle control handle.
Riding a motorcycle at speeds lower than recommended with 3rd and 4th gears engaged is unacceptable. At low speeds, you need to use III and even II gears, adhering to the speeds indicated above. At the same time, you should not move for a long time while turning on
1st or 2nd gear, unless road conditions require it, since the engine develops a high rotation speed, is poorly cooled and wears out quickly. In addition, when driving in lower gears, significant excess fuel consumption occurs.
Use the clutch control lever when starting, changing gears, stopping and braking. You cannot change the speed by slipping the clutch.
To switch from a higher gear to a lower one, you need to reduce the engine speed (“let off the gas”). When the speed of the motorcycle decreases, engage the clutch (squeeze the clutch control lever). Then, by pressing the front shoulder of the foot pedal, engage the lower gear, engage the clutch and increase the engine speed (“turn up the gas”).
To quickly reduce speed, the motorcycle must be braked. There are three ways of braking: 1) brakes, 2) motors, 3) motor and brakes at the same time.
The first method can be used when stopping the motorcycle quickly, provided that the wheels have good grip on the road. To do this, you need to disengage the clutch, simultaneously reduce the engine speed (“relieve the gas”) and smoothly press the foot brake pedal and the hand brake lever. By using two brakes at the same time, the stability of the motorcycle improves. You can brake with one of two brakes.
To brake the motorcycle with the engine (second method), you need to reduce its speed without disengaging the clutch. When reaching a speed of 10-15 km/h, turn off the clutch so that the engine does not stop, and, if necessary, stop the motorcycle with the brakes. They brake the motorcycle with the engine, as a rule, on long, gentle slopes or on straight sections of roads, when it is necessary to reduce the speed on slippery ground.
To brake simultaneously with the engine and brakes (third method), you need to reduce the supply of the combustible mixture (“lower the gas”) and, without engaging the clutch, smoothly press the foot pedal and the hand brake lever. At
In this case, you cannot completely brake the drive wheel, as the engine may stop and even break down parts of the power transmission. Simultaneous braking of the motorcycle by the engine and brakes is used on steep descents and when driving on slippery ground to avoid skidding. You must brake carefully, as the possibility of the motorcycle skidding and overturning during sudden braking is high. Sharp braking is especially dangerous in winter and on wet roads.
As the climb approaches, you should calculate your actions and the speed of the machine so as to avoid a forced stop. If the climb is gentle and long, then accelerate the motorcycle in such a way as to cover the entire climb or most of it with the top gear engaged. If the speed begins to drop noticeably when climbing, then switch to a lower gear. Do not press the clutch in order to overcome an incline, increasing the engine speed due to clutch slipping. This technique leads to rapid wear of clutch parts.
If the motorcycle, approaching a steep climb, does not have sufficient speed, it is necessary to engage 2nd or 1st gear and do not change it until the end of the climb. If the engine stalls on an incline, then, while holding the motorcycle with the handbrake, start the engine, engage 1st gear and simultaneously release the brake and clutch control lever.
It is recommended to drive through areas of dry sand or loose powdery snow with 2nd or 1st gear engaged at high speed, maintaining a constant engine speed and straight-line movement. When driving into sand, you should not turn the steering wheel sharply, disengage the clutch, change gears or sharply increase the engine speed. All this can cause the rear wheel to slip and stop the motorcycle. When overcoming areas with thick sticky mud, you must move in the same way as on loose sand. If a lot of dirt has accumulated under the guards, you need to stop the motorcycle and remove it with a tire remover or a stick.
It should be borne in mind that a certain maximum permissible steering angle corresponds to a certain motorcycle speed. As the driving speed increases, the permissible turning angle decreases. The motorcycle steering wheel must be turned smoothly, without jerking, especially when turning to the right.
When operating a motorcycle in summer, you must carefully monitor the thermal operating conditions of the engine, power transmission units and chassis mechanisms. Under normal temperature conditions of engine operation, the temperature of the cylinder heads does not exceed 180-220° C.
A sign of normal engine operation is good obedience of the throttle control handle, absence of knocking in the crank mechanism*. A sign that the engine is warming up is working on the glow ignition, loss of power, as a result of which the motorcycle slowly picks up speed; a sharp metallic knock in the crank mechanism.
When assessing engine knocking, you should distinguish between knocking noise caused by overheating or pre-ignition settings. When installing the ignition, a knock appears simultaneously in both cylinders. A knock caused by engine overheating appears first in the left cylinder. This is explained by the fact that the temperature of the left cylinder (when operating a motorcycle with a sidecar) is always 20–30° C higher than the temperature of the right one. The normal oil temperature in the engine crankcase should be 80–100° C.
Prolonged driving at temperatures above 100° C is not allowed. To avoid overheating, the driver must choose the smoothest sections of the road that allow driving without overloading the engine.
To cool an overheated engine, stop driving, stop the engine and allow it to cool. You cannot cool the engine with water; as this can lead to failure of the cylinders or their heads.
to the place of the most intense air movement, reduce the engine speed to a minimum and, without turning on the ignition, completely close the air corrector damper. The engine will stop without knocking or kickback. After this, turn off the ignition.
It is not recommended to stop an overheated engine by turning off the ignition.
Operating the engine at low speeds with overload, when it runs jerkily, is harmful to it and to the motorcycle transmission. You should not allow the engine to rotate at high speeds when the power plant is turned off. The rotation speed must be such that the engine does not stall when the clutch is engaged smoothly. When stopping the engine, the fuel tap must be closed.
When operating a motorcycle, do not allow water to enter the gasoline tank, engine crankcase, as well as the gearbox and final drive housing, and dirt to enter the breather channel; you need to monitor the cleanliness of motorcycle components, especially electrical equipment and cooling fins of the engine cylinders. When operating a motorcycle in summer, special attention should be paid to the condition of the tires. Maintain tire pressure within the limits specified in the instructions. Low pressure leads to excessive heating of the tires and their premature failure.
The motorcycle must be thoroughly cleaned after each ride. It is best to clean the engine and gearbox with a hair brush dipped in kerosene; chrome parts should be washed with water using a soft rag and sponge, then wiped with cotton ends and rags or suede. To add shine, chrome parts are polished with suede after drying.
Once the engine has cooled down, wash it with a hose, while avoiding high water pressure and not directing the stream at the generator, relay regulator, headlight, air filter and carburetors. Moisture that has penetrated into individual components can cause corrosion and lead to permanent machine defects. Close the air filter damper. It is forbidden to drive into water to wash a motorcycle and stop the engine when fording if the water level is higher than the exhaust pipes and openings in the mufflers.