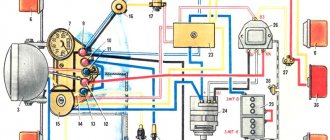
Generator circuit G 1 - cover; 2 — oil seal; 3 - rotor; 4 - stator winding; 5 - terminal block; 6 — back cover; 7 — shield assembly; 8 - rectifier block; 9 - fan; 10 — protective casing; 11 - bearing. Each brake mechanism has two hydraulic cylinders housed in one housing.
Generates alternating current.
Generator G is a three-phase synchronous AC electrical machine with electromagnetic excitation. motorcycle URAL generator 500w how to hook up If the belt bends more or less than specified, adjust the tension.
Preparing dry-charged batteries for operation The procedure for preparing batteries to bring them into working condition: remove the protective casing and cover, clean the batteries from dust, and the terminal bolts from grease; Unscrew the plugs from the filler holes, remove the sealing gaskets and clean the ventilation holes in the plugs.
During this period, you can slightly increase the generator voltage. The procedure for disassembling the generator: unscrew the two screws securing the brush holder and remove the brush holder; unscrew the coupling bolts and remove the cover from the side of the slip rings along with the stator; unscrew the nuts securing the phase leads from the rectifier block and separate the stator from the cover; Unscrew the pulley mounting nut and remove the pulley, fan, and support sleeve.
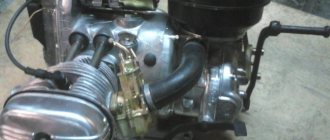
URAL engine diagram Ural cars are equipped with various options of diesel engines with power up to hp. The Urals are used both in geological exploration and by enterprises with difficult operating conditions for equipment, as well as by the armed forces of the Russian Federation.
This allows you to visually monitor the operation of the generator.
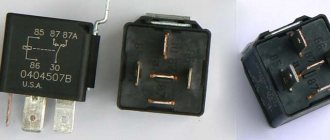
Relay regulator from VAZ for Dnepr Ural motorcycles
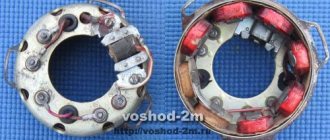
Generator G-11A of the Ural motorcycle.
Checking and adjusting the G-11A generator of the Ural motorcycle can be done in different ways. Serviceability is monitored by a warning light, and if for some reason it is missing or burnt out, then you need to remove one of the wires from the battery terminal at medium engine speeds. If the engine continues to run, then the generator is working.
The generator can also be checked by connecting one end of the wire to a portable lamp to ground, and the other to terminal I of the relay-regulator (in this case, the wires must be disconnected from terminals Ш and И). Then give the engine medium speed, and if the portable lamp lights up, then the generator is working.
Generator G-11A: 1 — drive gear; 2 — oil seal; 3 - armature winding; 4 — front cover; 5 — body; 6 - wooden wedge; 7 - armature core; 8 — pole shoe; 9 — excitation winding; 10 — brush; 11 — brush spring; 12 — contact bolts; 13 - ball bearing; 14 — bearing cover; 15 - coupling bolt; 16 — armature shaft; 17 — brush holder; 18 - collector; 19 — cover; 20 - protective tape.
Characteristics of the G-11 A electric generator → more details.
Adjusting gear mesh
If the generator has been removed, then when installing it in place it is necessary to adjust the engagement of its drive gears.
The procedure for adjusting the G-11 A generator of the Ural motorcycle is as follows: - install it in place in the engine crankcase; — start the engine and listen to the noise the drive makes; — if the drive is noisy, you need to increase the gap between the gears; — and if you hear a knock, reduce the gap; — loosen the bolt of the tightening tape and, turning the generator by the housing, set by ear the required gap between the gears; — secure the tensioning tape and check the noise of the gears again.
Return to contents — ↑
If something is wrong.
- Disconnect the relay regulator (remove the connector). Let's take a tester.
- We set the tester to measure resistance. We check the resistance between ground (engine) and the generator wires (three wires, usually yellow). It shouldn't exist. If at least one has it, your motorcycle's alternator has burned out.
- We check the resistance between the generator wires, the resistance should be the same, about 1 - 3 ohms. If it is more or not the same, your motorcycle's alternator has burned out.
- We set the tester to measure alternating voltage. We start the motorcycle, measure the voltage between the generator wires, it should be more than 18 volts at idle, and more than 40 volts at 3000 - 4000 rpm. If there is no or different voltage, your motorcycle's alternator has burned out.
- If the check in points 2, 3 and 4 went well, most likely your motorcycle has a faulty Relay - Regulator or, which also happens, a wiring fault (clean all terminals, check the integrity of the wires, connections to ground). If your motorcycle's generator burns out, this is the place for you: Rewinding the generator with your own hands.
Generator G-424 motorcycle Ural
Electric generator G-424 is a three-phase machine, with electromagnetic excitation. Generates alternating current. A VGB-2A rectifier is installed, the function of which is to convert the current into direct current, necessary for the electrical consumers of the motorcycle. For normal operation of an electric machine, a relay-regulator PP-330 is required. The work consists of connecting a generator or battery to the mains at a certain moment.
A distinctive feature of the G-424 generator is its inability to operate with a discharged battery. To start the engine and increase to 2400 rpm, the motorcycle runs on a battery. Only after this threshold is exceeded does the electric generator operate in self-excitation mode.
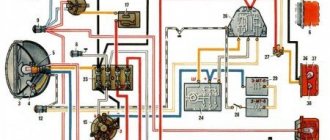
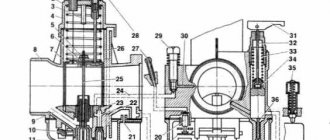
Generator circuit G-424: 1 - cover; 2 — oil seal; 3 - rotor; 4 - stator winding; 5 - terminal block; 6 — back cover; 7 — shield assembly; 8 - rectifier block; 9 - fan; 10 — protective casing; 11 - bearing.
Technical characteristics of G-424
1 – Voltage – 14 volts. 2 – Power – 150 watts. 3 – Full output current – 11 amperes. 4 – Total weight – 3.8 kg. 5 – The direction of rotation of the armature is right. 6 – The polarity of the motorcycle body is negative (minus). 7 – Specific power – 42 W/kg. 8 – Service life – 40,000 km.
The G-424 rotor is driven by a gear mounted on the engine camshaft. The gear ratio between the shafts is 1.33. The cantilever mounting on the crankcase is made with two studs
Adjusting the noise of G-424 gears
Loosen the nuts of the mounting studs and start the engine, turning the generator in one direction or another. We achieve the lowest gear noise. Having established the required gap, tighten the nuts. This is how the gearing of the drive gears is adjusted.
Incorrectly set drive gear engagement leads to overheating, premature gear wear and shaft failure.
Return to contents — ↑?
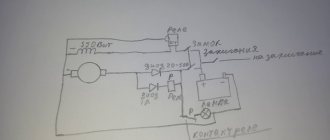
Relay-regulator PP-330, troubleshooting
After I determined that the generator was working. I started searching for the faulty relay regulator. To understand the principle of its operation, a little theory.
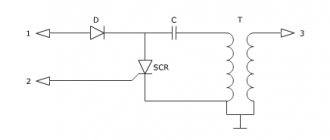
I will not describe in detail the operation of the relay regulator; I will describe the problem that I fixed. This problem was in two relay regulators, and the reason for it was that due to a long time of inactivity of the contacts, the carbon contacts of the R.N. coil. (in the diagram above) oxidized and did not pass current.
During normal operation of all equipment, the process is as follows. When you turn the key S1: “+” from the battery is supplied to the ignition coil and to the V3 contact of the relay regulator. In the relay, power from the VZ contact passes through the RN coil. and to contact “Ш” of the generator, a rotor winding is connected to it. Thus the armature is excited by the battery. When the engine speed increases, an alternating voltage appears on the “~” contact, the R.KL relay is activated, and the warning lamp turns off.
Also, as the speed increases, the voltage at the “+” contact of the generator also increases. It is connected to the R.N. relay, when a certain voltage threshold is reached, the relay is activated and the power goes not directly through the relay coil with a small resistance, but through the load resistances, thereby reducing the voltage on the rotor. By reducing the voltage level on the rotor, the current strength decreases, and, accordingly, the magnetic force of the rotor decreases. Which leads to a decrease in voltage at the outputs of the stator windings. When the voltage in the relay R.N. decreases The relay holding current drops, thereby the R.N. contacts. return to their original state and the process repeats.
If the generator is spun up without a relay-regulator and a load, but the armature is excited, then as the speed increases, the EMF in the stator windings will increase, which theoretically can damage them (break through the insulation). Therefore, it is prohibited to turn on and spin up the G 424 generator without a load.
In my case, the carbon contacts of the R.N. relay were oxidized , thereby providing insufficient voltage to the rotor to excite it. The generator simply did not produce voltage.
Simply cleaning the contacts solved the problem .
Generator G-414 of the Ural motorcycle.
The first production of motorcycles used six-volt electrical equipment. Accordingly, the generator generated direct current at the required voltage. It is installed in a special hole in the engine crankcase and secured with a tightening tape. Adjusting the gear engagement as on the G-11A is described above.
Generator circuit G-414:
1 – anchor; 2 – winding; 3 – bandage; 4 – collector; 5 – cover; 6 – rear bearing; 7 – cover; 8 – output; 9 – shields; 10 – coil; 11 – body; 12 – front cover; 13 – protective washer; 14 – front bearing; 15 – oil seal; 16 – key; 17 – castle nut.
Characteristics of G-414
1 – Constant voltage – 6 volts. 2 - Power - 65 watts. 3 – Full output current – 10 amperes. 4 – Total weight – 3.5 kg. 5 – The direction of rotation of the armature is right. 6 – The polarity of the motorcycle body (ground) is negative (minus). 7 – Specific power – 18.5 W/kg. 8 – Service life – 30,000 km.
Return to contents — ↑
Similar articles:
- Disassembly, assembly and repair of clutch
Video text
Today we will talk about a generator, and as you probably already guessed, instead of the standard one, I plan to install a generator from a tractor with a power of 1000 watts!
I bought it from an oppositionist named Sergei Krasnov. Sergey has a special contact group dedicated to the G-700 and G-1000 tractor generators, which he converts for Ural and Dnepr motorcycles. For those interested, here is the link to the group: https://vk.com/kilovat_uralAnd Sergei also has a separate topic on these generators on Oppzit.ru: https://oppozit.ru/post_83671.html
But, despite the fact that the G-1000 generator from a tractor has already been adapted for installation on Ural and Dnepr motorcycles, it cannot be simply installed))
Time code for the convenience of people installing such a generator on a Ural motorcycle: 1:27 Checking the generator for functionality 3:21 Review of the G-1000 generator, what are its advantages 4:52 Preparing the crankcase for installing a new generator 9:27 Removing the gear from the old generator 11:07 Installing the gear on the new generator G-100013:26 Adjusting the generator, adjusting the gap on the gears of the generator and camshaft16:10 Beautifying and polishing the generator17:44 Final installation of the generator on the gasket using sealant18:45 Connecting electrical wiring to the new generator
The fact is that the original 150 Watt generators of our motorcycle are weak and quite often fail, but the new generators are all Chinese and the opposition does not favor them. But the converted generator from a tractor, adapted to work on our motorcycle, has proven itself very well. In addition to the fact that it is many times more powerful and works more durable, it has several more advantages, such as: - this generator is self-excited, which means , that now you can start a motorcycle from a pusher, even if there is no battery at all. - the relay regulator is already built into the generator itself, which allows you to get rid of some of the wires and the standard relay, thereby making it possible to make a more compact and aesthetically pleasing arrangement of electrical wiring.________________________
ABOUT THE CHANNEL “SANYA CHETODEL”___________________________
As you might guess, they called me that because I am constantly doing something. I really love working and creating things with my own hands. At the same time, I constantly force myself to learn something new and unknown. For example, in these videos I am repairing an old Ural motorcycle, on which, based on the results of the repair, I plan to go on a trip to Crimea. This motorcycle will not only receive a complete overhaul, but will also undergo some tuning. I talk in detail about everything I do with the motorcycle in the playlist “Ural Motorcycle Repair”
Switching elements.
These include switches (high-low, turns, engine stop, etc.) as well as brake and neutral sensors and the ignition switch. You can easily “ring” them with a tester, finding out which contact group is not working.
As can be seen from all of the above, the wiring on Izh Planet is without any special secrets or complex elements, all its parts are easily diagnosed and repairs should not cause difficulties.
Now we advise you to watch the video, which shows in detail and clearly the assembly of the Izh Planet 5 circuit.
Checking the serviceability of the generator can be done on a motorcycle without disassembling the generator.
To carry out the work you will need a multimeter.
1. Place the motorcycle on the center stand or side stand.
2. Disconnect the battery by removing its fuse.
3. Remove the right cover of the power unit.
4. 6mm
unscrew the nuts securing the five “upper” wires of the generator. In order not to confuse the wires during subsequent assembly, we mark them or tie them with thin wire so that we get a cable.
Selection of piston to cylinder
Device Features
Completing and assembling a piston with a connecting rod for a VAZ engine
The piston is made of aluminum alloy and coated with a layer of tin to improve run-in. The piston skirt is oval in cross section and conical in height. Therefore, it is necessary to measure the piston diameter only in a plane perpendicular to the piston pin and at a distance of 52.4 mm from the piston bottom.
The hole for the piston pin is shifted from the axis of symmetry by 2 mm to the right side of the engine. Therefore, for proper installation of the piston into the cylinder, there is a “P” mark near the hole for the piston pin, which should be facing towards the front of the engine.
Since 1986, repair size pistons for all engine models have been manufactured with an outer diameter increased by 0.4 and 0.8 mm. Until 1986, pistons of the following repair sizes were produced: for engines 2101 and 2103 - with an increase of 0.2; 0.4 and 0.6 mm; for 2105 and 21011 - with an increase of 0.4 and 0.7 mm.
Piston rings are made of cast iron. The outer surface of the upper compression ring is chrome plated and has a barrel shape. The lower compression ring is of the scraper type (with a groove along the outer surface), phosphated. The oil scraper ring has slots for oil removed from the cylinder and an internal coil spring (expander).
The piston pin is steel, tubular in cross-section, pressed into the upper head of the connecting rod and rotates freely in the piston bosses.
The connecting rod is steel, forged, with a split lower head in which the connecting rod bearing shells are installed. The connecting rod is processed together with the cover, so during assembly the numbers on the connecting rod and the cover must be the same.
The calculated gap between the piston and cylinder (for new parts) is 0.05-0.07 mm. It is determined by measuring the cylinders and pistons and is ensured by installing pistons of the same class as the cylinders. The maximum permissible gap (if parts are worn) is 0.15 mm. Note. The piston diameter is measured in a plane perpendicular to the piston pin, at a distance of 52.4 mm from the piston crown. According to the outer diameter, the pistons are divided into five classes (A, B, C, D, E) every 0.01 mm, and according to the diameter of the piston pin hole - into three categories every 0.004 mm. The piston class (letter) and piston pin hole category (number) are stamped on the piston bottom.
If a used engine has a gap exceeding 0.15 mm, then it is necessary to re-select the pistons to the cylinders so that the gap is as close as possible to the calculated one.
Spare parts include pistons of classes A, C, E. These classes are sufficient to select a piston for any cylinder during engine repair, since pistons and cylinders are divided into classes with a slight overlap of sizes.
Assembly. Before assembly, fit the pin to the piston and connecting rod. For new parts, the class of pin holes in the connecting rod and piston must be identical to the class of the pin. For used parts, for proper mating it is necessary that the piston pin, lubricated with engine oil, enters the hole of the piston or connecting rod by simply pressing the thumb and does not fall out of it. Replace the finger that falls out with another one of the next category. If a third category pin was inserted into the piston, replace the piston pin and connecting rod.
Assembly of the connecting rod and piston group is carried out in the reverse order of disassembly. After installing the piston pin, lubricate it with engine oil through the holes in the piston bosses. Install the piston rings in the following order. Lubricate the piston grooves and piston rings with engine oil. Orient the piston rings so that the upper compression ring lock is at an angle of 45° to the piston pin axis, the lower compression ring lock is at an angle of approximately 180° to the upper compression ring lock axis, and the oil scraper ring lock is at an angle of approximately 90° to the axis locking the upper compression ring. Install the lower compression ring with the groove facing down. If the ring is marked “TOP” or “TOP”, then install the ring with the mark facing up (towards the piston bottom). Before installing the oil scraper ring, check that the joint of the spring expander is located on the side opposite to the ring lock.
Replacing the piston group in a chainsaw or trimmer
Repairs of this level must always be balanced. How to correctly install rings on a two-stroke piston In installing rings on a piston. In such small engines operating at high speeds, replacing the first piston, which is burned out or jammed, does not give a long result and, if necessary, you need to change the entire piston group. Therefore, you need to consider whether to continue to use this saw or purchase a new saw.
If it is a professional model, then such repairs are worth carrying out, but if it is an old household model like a Husqvarna 40 and it has worked for more than ten or twelve years, it is not profitable to repair it. Because its repair will cost the same as purchasing a new saw, albeit not a Husqvarna, but a PARTNER P350XT CHROME, costing 165, will definitely be enough. Moreover, such saws are sold by Husqvarna, since PARTNER is its subsidiary.
But if you still decide to repair a chainsaw or trimmer, then you need original spare parts, which are not cheap. If the engine is used correctly, the first repair may not occur soon and only the piston ring or rings will have to be replaced, depending on the model. But if the saw jams, then it is necessary to change the entire piston group - the cylinder, piston and rings.
It should be noted that Husqvarna 136/141 chainsaws have a service life of approximately 500-600 operating hours, Husqvarna 340/350 - 1000-1200 operating hours, professional chainsaws have a service life of at least 2000-2500 operating hours, subject to strict adherence to the operating instructions. In fact, you cannot rely on these figures, since the actual resource may differ significantly, both up and down. But approximately we can say that semi-professional saws work 3-4 times longer than amateur ones, and professional ones up to 10 times or more.
Of course, nothing lasts forever, but it’s one thing if you change the piston group after many years of operation and it has worked its hours and has fully paid for itself, but another thing is that this saw was filled with, for example, only gasoline, without oil, and it jammed. This saw has to be repaired, since all other parts are normal.
Many companies deliberately inflate the cost of spare parts so that new models can be purchased. For chainsaws and trimmers, for example, from Stihl, spare parts are available in a larger range than for Husqvarna. Therefore, when choosing a specific model, find out how things are with spare parts. RVT
How to properly install rings on a two-stroke scooter piston
There is nothing complicated about installing rings on the piston of a two-stroke scooter, as well as a four-stroke scooter, and many people know this. But most scooter riders who have only recently acquired such equipment have no idea how to replace the piston on a scooter, how to correctly install the rings on the piston, where the arrow on the piston should point, and much more. In this lesson, I will tell you how to properly put the rings on the piston and assemble the piston in place. Since we have already talked about four-stroke engines before, here we will talk only about two-stroke engines. So, our piston is worn out and requires replacement. The rings and piston wear out first, and usually only those need to be replaced. If the piston is severely worn, it is necessary to bore the cylinder. It is also bored when the piston jams in the cylinder, forming deep scratches on the walls of the latter. There is nothing wrong with this, and if your new cylinder has been properly bored (which will only cost about 10), it will need a repair set of rings with a new piston. Such rings are marked 0.25. The second boring is 0.5, respectively, etc. to one. After purchasing a piston, it needs to be assembled. In the kit, as a rule, you will find the piston itself, two compression rings, a third thin corrugated ring (more on its purpose later), a piston pin and two piston pin retaining rings