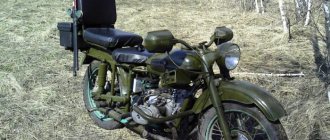
Normal engine operation and comfortable movement on Ural motorcycles require constant care of the vehicle. From time to time and depending on travel conditions, individual spare parts and consumables wear out. Oil seals belong to the second group. If at the moment there is a need to repair a motorcycle and the ability to do it yourself, without resorting to the help of car services, you should use simple instructions, which include not only a list of actions, but also a detailed description of the reasons why you can immediately determine the need for correction defect.
Dismantling the gearbox of a Ural motorcycle.
From time to time, owners of Ural motorcycles have to perform this simple operation of disassembling and assembling the gearbox. We will not describe the repair of failed components in this article; we will limit ourselves to disassembling the main components using the example of an old Ural gearbox without reverse gear.
First you need to drain the oil and remove the gearbox from the motorcycle. Depending on the specific motorcycle, the steps may vary slightly. But the main thing is to put the motorcycle on the center stand, remove the rear wheel, remove the rear axle gearbox along with the cardan drive. Remove the air filter and rubber pipes. Disconnect the speedometer cable. Disconnect the clutch cable. Unscrew the four nuts on the studs securing the box to the engine, and then depending on your luck. For example, on my motorcycle, you have to remove the mufflers, intake pipes, unscrew the top engine mount, pull out the rear engine mounting pin, tilt the engine forward, and only after that can the box be pulled out of the frame.
Well, all the necessary manipulations have been done, let's start disassembling.
Disassembling the gearbox.
Remove the kickstarter lever. To do this, unscrew the nut on the wedge and carefully knock out the wedge.
We remove the clutch release lever, having first removed the rod, the fungus and the bearing from the housing.
We unscrew the seven bolts with a 10mm wrench securing the cover to the crankcase.
Turn the box upside down. We hold the housing slightly with our hand and lightly tap the input shaft with a hammer. The body remains in the hands, and the lid with all the insides goes down.
We take out the trigger disk.
We remove the fork axle from the housing and remove the shift forks.
Unscrew and unscrew the nut 22 holding the elastic coupling fork on the secondary shaft. We take out the fork, having first pulled out the speedometer gear.
Source
MY MOTORCYCLE
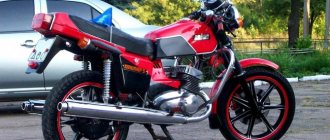
Slowly but surely we assembled the engine; The only thing left to do is to transmit the torque further. Our test subject's gearbox was in need of a rebuild for a long time: the oil was leaking, the gears were knocked out, so it was time to get into it.
Our test subject’s gearbox had difficulty working in conjunction with the old engine, and after the rebuild the engine promises to produce noticeably more power, so the need for an inspection is long overdue. In addition, polishing the engine crankcase would not make much sense without the gearbox housing, since both parts are clearly visible on the motorcycle and look like a single whole when assembled.
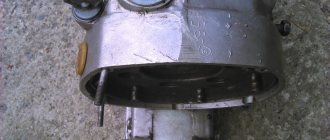
So what's hidden in our Pandora's box? First, you need to drain the oil, which is also half diluted with water - wintering in the open air, coupled with the lack of a plug for the speedometer drive, took its toll. We place the removed and washed assembly on a workbench and begin disassembly by unscrewing both “patches” and removing the gear shift sector along with the roller (photo 1). Then you need to unscrew the front cover of the kickstarter shaft spring and remove the spring preload so as not to damage it during disassembly. Now you can unscrew the nut of the elastic coupling disk (photo 20) and remove the disk, the kickstarter lever and the race of its shaft seal.
Unscrew the bolts of the front cover of the gearbox housing. Unlike modern ones, old M-72 boxes are disassembled not from the front, but from the back. We disassemble the modern box by tapping on the protruding front end of the input shaft, and the old ones by tapping on the rear of the secondary shaft (photo 2), and also, through a drift, on the rear of the input shaft, having previously removed the clutch release parts. If you try to hit the front end of the input shaft when disassembling an old-style box, you can easily damage the crankcase, and this is equivalent to the complete loss of the box.
The internal teeth of the fourth gear moving clutch are licked a little less than completely (photo 3), and the burrs left by the fork are clearly visible on the internal groove. It is clear why the fourth one barely turned on and constantly crashed. The situation is no better with the splines on the secondary shaft and for the gears, and for the fork on which the cardan elastic coupling disk is attached (photo 4). The fork itself is also discarded - longitudinal cuts in the oil seal area will never ensure proper tightness due to dirt that got in many years ago (photo 5).
Then, tapping with a mallet through a small punch, we press out the axis of the gearbox forks and examine them (photo 6): the power fork of the first and second is quite alive, but the third and fourth are the opposite (photo 7). From my attempts to “turn on the non-switchable” it overheated and led, and the output no longer fits into any gate. Now all that remains is to check the wear of the kickstarter shaft (photo and the condition of the bearings, which in our case almost always require replacement.
Initially, we wanted to install shafts from a modern Ural, which would provide smooth operation comparable to foreign cars, but their cost inflated the already long-overdue budget. Therefore, we decided to save money on them by taking as a donor a live box from an M-67 without reverse gear, lying around in the Tru Motor workshop, and removing the live shafts and forks from it. The design of the secondary shaft in boxes with or without reverse gear is different, so to replace the giblets of a box without rear gear, you must use a donor box with a similar set of gears. Attempts to introduce the first gear gear from later models into an old box are doomed to failure.
Now you need to press the new bearing into the rear wall of the gearbox and press the bearings onto the shafts (photo 9). A little trick: you can take the “closed” bearing for the input shaft and remove the cover from one side, pressing it with the closed side towards the engine. This will reduce the likelihood of leakage and make life easier for the seal. This is especially important on boxes of the late Soviet period, when, in pursuit of savings, oil deflector washers were abolished, which, rotating with the shafts, cut off excess oil from the seals. The shafts and all gears must be generously lubricated with transmission oil, after which they can be installed in place by tapping the spacer or bolt inserted into the shaft with a mallet. The main thing is not to hit the outer race of the bearing (photo 10).
An important feature of our box is the thrust plate attached to the kickstarter shaft (photo 11). She tightens the trigger ratchet pawl so that it does not wear out when the box is operating (the trigger shaft gear always rotates, its task is to spray oil around the box). When disassembling, it is better not to remove the plate, but before reassembling, make sure it is present and well fixed - otherwise you will have to disassemble the box again.
Now you can install the forks and carefully press in their axle, not forgetting to lubricate all working surfaces (photo 12). We install the kickstarter shaft and the secondary shaft cover, making sure to use a gasket 0.3–0.5 mm thick (photo 13). At this stage, it is important to check the ease of rotation and axial play of the shafts. It should not exceed 0.2 mm. A gap greater than permissible must be eliminated by placing adjusting washers between the bearings and the gearbox cover (photo 14). If the shafts have excessive axial play, this will lead to seal leaks, unclear gear shifting and accelerated wear of shifting parts.
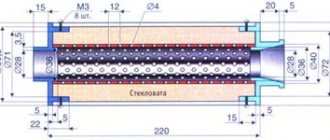
The kickstarter shaft oil seal in our old-style gearbox is collar-type, it does not have an external race, you can find a suitable one on sale, but the quality of spare parts from Chang-Yang leaves much to be desired. Therefore, the Tru Motor workshop found another way out - to grind adapters for modern imported oil seals (photo 15). The starting shaft oil seal is ideal for the Dnepr gearbox, size 20x34. This is exactly what Vasily installed in our control room.
We turn the gearbox over and begin installing the kick spring. First, we make a control assembly and check the axial play of the kickstarter shaft. It is especially important to take this into account in a gearbox with reverse gear: with large backlash, extremely unpleasant effects can occur, such as failure to engage reverse gear or, even worse, failure to turn it off when the rear gear remains engaged simultaneously with one of the forward gears. The consequences can be extremely severe, including jamming of the gearbox, causing the motorcycle to fall, or breakage of gears and shafts.
If the gearbox is without reverse gear, then the consequences of negligence with longitudinal play can result in a leak of the kickstarter shaft seal: after all, in our boxes this shaft is the only one located below the oil level, and its rattling will certainly affect the operation of the seal. So, in our case, the axial play of the shaft was 3 mm. To eliminate the gap, we placed a couple of washers in its front cover, and to prevent them from falling out during installation, we lubricated the insides of the cover with thick lubricant (photo 16). Now you need to align the spring antenna with the hole in the cover, press it and cock the spring ¾ of a turn (photo 17), then tighten the screws with an impact screwdriver (photo 18). All that remains is to press in the oil seals of the primary and secondary shafts and install the clutch fork. To prevent oil from escaping through the fork splines, they can be lubricated with sealant before installation (photo 19). We tighten the installed fork with a new slotted castle nut (torque 8-10 kgf m), insert the key and use a cotter pin (photo 20).
After this, you can assemble the pedal mechanism, having previously pressed a new oil seal into the cover. We place the spring with its tendrils down and tighten the gear sector to the pedal axis with the nut on the thread lock (photo 21).
Perhaps the most difficult and important procedure in assembling a gearbox is its configuration. There are only two adjusting screws, but it is extremely difficult to “guess” the gear shift blindly, so Vasily made a special plate that imitates part of the gearbox cover and fixes the shaft with the fork grooves (photo 22). So, inclusion or non-engagement is visible to the naked eye, and by rotating one or another screw, you can accurately adjust all gears (photo 23).
But they decided not to skimp on the release bearing: even though the original one is sold on every corner and costs a penny, its service life tends to zero, so Vasily insisted on installing a modern one, developed by SKF specifically for our Urals. The part, although expensive, is much more reliable (photo 24). Now you can install the kickstarter and release lever, as well as the backup shift lever (photo 25).
At this point, the box is ready and, together with the engine, is sent to await installation on the motorcycle. Next in line are ignition and wiring, which we will talk about in the next issue.
To be continued…
Issue: MOTO Magazine - October 2015
Author: Dmitry FEDOTOV, photo by the author
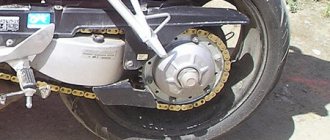
Repair, disassembly, assembly and video of gearboxes of heavy Ural motorcycles
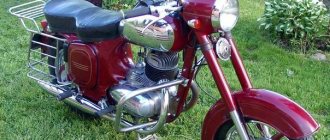
In 2021, Ural offers motorists only two models for purchase - Ural Gear Up 2021 2WD and Ural City. This is a rather expensive equipment that has found the bulk of buyers in the USA and Canada. In the CIS, few fans of two-wheeled “iron” horses buy new motorcycles from IMZ. The main reason is high cost. The price tag starts at 798 thousand rubles. It is justified by the manufacturer’s widespread use of imported components and the small number of units produced. Plus, many consider Ural motorcycles to be morally and structurally obsolete. However, the manufacturer is constantly improving its developments, improving the characteristics of the engine, gearbox and other important components. In this article we will talk in detail about the Ural gearbox.
About the directory
Home > About the directory
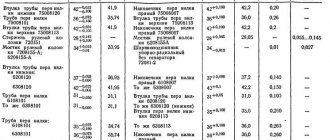
Anyone who wants to purchase a bearing of one size or another, number or type, for auto-moto and special vehicles can use this site, which provides all the detailed information. Searching for a bearing largely depends on the extent to which the bearing search catalog has certain data. It is extremely important that the description contains information about the size, shape, type of bearing and other parameters. Also to yours and “general information about bearings”. A bearing is a device that is used as a part that provides the necessary sliding, rolling or friction. Undoubtedly, the role of bearings in modern industry is undeniable, so there are currently no analogues to this unique invention. One can talk for a long time about the need and purpose of a bearing in various fields of application, but one thing remains indisputable: the bearing must be reliable, durable, and wear-resistant. These characteristics can only be adequately achieved by a bearing made of high-quality steel and various types of alloys.
Bearings are conventionally designated using markings and symbols in accordance with GOST. In addition, the manufacturer must be indicated on the bearing. The standard bearing designation includes seven numbers and an additional designation, which is placed to the left and right of the main one. An additional designation is highlighted with a dash (—) or begins with a particular letter. The symbols are read from right to left. All bearing sizes are strictly regulated in accordance with standards, both Russian and European. It is extremely important to know the bearing number before purchasing it, as similar-looking bearings may differ when interacting with structures. It is worth noting that bearings play an important role and the main focus should be on safety, as an unsuitable bearing can have serious consequences.
Bearings play a big role that is not taken into account. For example, trains moving along railway tracks are subject to friction every day, but if they were not equipped with durable bearings, the consequences could be much more serious. Unfortunately, nothing lasts forever and bearings are also prone to wear, it’s only a matter of time. That is why it is important that the bearings produce their power without any problems, and only then promptly replace them at the end of their life. Bearings must be properly maintained at all times, using only quality, proven products. Both thousands of tons of cargo and people’s lives depend on bearings, because they ensure the operation of a variety of parts of trains. Regardless of the type of bearing, its functions are always defined, so when purchasing, you need to know exactly which bearing you need and for what purpose. For example, rolling bearings are used not only for the railway industries, but also in various types of industries. They largely replace plain bearings.
Motorcycle gearbox design
Over the long history of its existence, the Ural gearbox has undergone several global upgrades. Today it is a modern transmission with reverse gear. Ural is equipped with a 2-shaft four-speed gearbox model 6204. Due to the introduction of the second shaft, the dimensions of the unit have been significantly reduced, and productivity has also increased significantly. In this gearbox, the gears are constantly meshed, and due to the fact that it uses fewer gears when transmitting torque, it is characterized by increased efficiency. There are three initial speed gears located on the input shaft, forming a single whole with the shaft. The gears are rigidly fixed on the secondary shaft and its main purpose is to select the desired speed.
Set of imported URAL gearbox seals
05/07/2017, franz comments I received another parcel - promptly, as always. Excellent quality spare parts. I recommend.
02/11/2017, nekitkam comments
Hello. I received the parcel today. everything arrived relatively quickly and completely in accordance with the order. good quality spare parts. I will be happy to order from you again.
02/08/2017, sergey74 comments
I ordered spare parts for Java 638, I am pleased with the quality of the product. The parcel took a week!!! It's nice to deal with such people.
12/20/2016, belyavskii comments
Great store and no scam...
Friendly staff, and most importantly, they understand what they are selling)))
I will continue to order...
12/16/2016, franz comments
Very efficient store. Large range of motorcycle spare parts.
12/16/2016, uazik comments
I ordered a knee for 638! The original arrived from old stock. I was pleasantly surprised. Guys, I recommend it! I hope you won't disappoint in the future.
12/02/2016, sanya comments
This is not the first time I have ordered spare parts for my Java-638 motorcycle. Thank you, the spare parts are original and of high quality. The package arrives on time and can be tracked... thank you, I will order more and recommend it to other people...
07/12/2016, jons66 comments
I ordered valves and camshaft from the Urals. Because in Moscow all the engine parts are Chinese. Real Ural parts arrived. The parcel took a little longer than a week. They answer all questions by mail. Good store.
02/01/2016, ural1977 comments
I ordered an air filter from the Urals for the starter! I received the goods, everything is fine! I am satisfied with the purchase!
11/23/2015, tvoybatya comments
Excellent quality of goods, reasonable prices, polite and understanding support. I will continue to order, I still have to look for better conditions
09/14/2015, tierfreemen comments
I ordered several times. Spare parts arrive of excellent quality and on time. The staff is responsive. It's a pleasure to work with you!
07/18/2015, gaspel99 comments
Well done guys, I have already received two parcels. Whatever I need is there or will be found in a short time. Prices are cheaper than others and original. I will order more.
07/28/2013, tekton comments
I recently received my second parcel. A little delayed but everything is in good condition or new. Almost everything is there, the channel has been checked. I'm going to order more.
04/18/2013, georgeyouras comments
received my first order. And really new parts. still factory Soviet ones.
Dismantling and assembling the gearbox of a Ural motorcycle
To disassemble the gearbox, proceed as follows:
Complete disassembly of the clutch mechanism, gear selection mechanism and kickstarter is allowed only when repairing them - otherwise there is no need to disassemble them.
The Ural motorcycle gearbox is assembled with reverse gear in reverse order. After assembly, the gear shift mechanism must be adjusted, otherwise problems may arise when choosing them.
The gearbox of a Ural motorcycle with reverse speed begins to be adjusted by placing the motorcycle on the stand. Then the 2nd speed is turned on and the pedal is pressed to the 3rd gear. If the ball coincides with the well, adjustment of the lower adjustment screw is not required. After moving from 3rd speed, you need to return to the second and check the alignment of the ball, tighten the upper screw if it does not match. This completes the gear selection adjustment.
The Ural motorcycle allows you to repair the gearbox with minimal effort, thanks to the simplicity of its design, which distinguishes this model from other two-wheeled vehicles.
How does a gearbox work?
On the secondary shaft, the gears have splined rims, with which the gear clutches alternately engage, moving along the outer splines of the secondary shaft couplings. Gear shifting occurs using splined couplings, the movement of which is ensured by the gear shift fork. The forks are not interchangeable and are driven by a sector welded to the shaft. There are two grooves in the sector where the fork spikes fit. Using the manual gear shift lever, the sector is set to one of five possible positions.
Replacing the oil seal in the Urals
All work begins with loosening the front axle bolts located where the shock absorber is. Next, you will need to hang the vehicle, and then follow these steps:
- the fender and front wheel are removed from the fork;
- the nuts securing the feathers are unscrewed, and then the springs are removed from the fork. It is necessary to ensure that the installation sites are not damaged during the procedure;
- it is necessary to unscrew the nuts securing the lower bridge;
- removing feathers - remove the upper boot of the feather using a slotted screwdriver or a special puller (much faster and more reliable - nothing unnecessary will be affected);
- you need to remove the retaining ring with pliers (attention - this element must not be damaged, so you need to be careful not to pause the process because of the search for a replacement ring);
- loosening the bolt that holds the fork in the yoke - thanks to this, the structure can be removed manually;
- Next, you will need to loosen the bolt securing the shock absorber rod;
- remove the boot and the retaining ring of the feather from below;
- you need to turn off the headlight, which prevents you from removing the remaining elements;
- Place two containers of about 0.5-1 liters near the motorcycle (with a sufficient diameter so that nothing falls on the floor);
- the nuts are unscrewed using a spanner;
- the seals are retracted to the side;
- the fork pipes must be directed into containers to drain the oil - in order for it to flow, you need to unscrew the rod axles;
- dismantling the supporting and sliding pipes.
The main difficulty of the procedure is that the feathers may not be pulled out from the places where they are attached. This can be solved by turning the nut in the opposite direction, as well as by lightly hitting it with a wooden object. If it doesn’t help the first time, you should do it again - the disassembly procedure will be much easier. After replacing the oil seal, boot and other elements that have become unusable, you can reassemble the motorcycle - all operations are carried out in the reverse order.
It is worth considering that when replacing oil seals/boots, you cannot use abrasive tools to clean adjacent elements, otherwise you will have to change not only the oil seals in the foreseeable future - the parts are treated with a special coating that protects against premature wear. Before installing the oil seal in its place, it will be necessary to process this element inside and outside, eliminating premature obsolescence.
Useful videos on the topic:
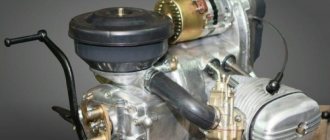
Engine
Engine type – four-stroke two-cylinder. Brand – M-72M. Cylinder diameter, mm – 78. Piston stroke, mm – 78. Working volume, cm³ – 746. Compression ratio – 5.5 ± 0.2. Maximum power, l. With. – 22. Maximum torque, kg m – 4.0. The block head material is aluminum alloy. Head gasket – asbestos metal 0.6 mm. The piston material is aluminum alloy.
Valve distribution phases (according to the angle of rotation of the crank), degrees: – beginning of intake to c. m.t. – 76; – end of inlet after n. m.t. – 92; – beginning of release BC m.t. – 116; – end of release after c. m.t. – 52.
Repair and service
One of the main advantages of the gearbox on a Ural motorcycle is its high maintainability. Each owner can carry out a major overhaul of the gearbox in just a few days, provided that the necessary parts, spare parts, other consumables and tools are available.
To remove the unit from the motorcycle you need to do the following:
Typically, transmission repair involves replacing worn gears and adjusting the gear shift mechanism. Monitor the condition of the seals, since loss of lubricant will lead to unfavorable operating conditions of the unit, which will ultimately cause premature failure.
The need for repairs can be eliminated through high-quality and timely maintenance. While operating the motorcycle, be sure to periodically check the oil level and, if necessary, add the missing amount. If you have to top up frequently, you need to establish the cause of the loss of technical fluid.
If an oil leak is detected, tighten the mounting bolts or replace unsuitable seals and gaskets. Do not forget to change the oil in the box in a timely manner; the recommended maintenance intervals can be found in the user manual. If possible, change the oil even more often than the motorcycle manufacturer recommends.
Signs of seal wear
Among the main signs that it is necessary to change the oil seals on a Ural motorcycle, it is worth highlighting several points:
- normal engine start after a long period of inactivity (several hours or days), but after about five minutes the vehicle begins to lose speed, and it is impossible to reach the maximum speed at all;
- After stopping the engine and starting it again after about ten minutes, there was almost no reaction to the kickstart. It doesn’t start the first time, but then with effort it reaches an adequate speed;
- the engine stalls in the middle of operation (this easily happens on the road - one minute is enough);
- oil leakage onto the floor/asphalt. You need to look and look for characteristic marks under the motorcycle. If they exist and, moreover, you can see where the liquid is leaking from, it is necessary to change consumables;
- noticeable traces of burning on the candle;
- excessive consumption of gasoline. Changing the brand to a better one does not help.
Oil seals
It is also worth paying attention to the oil seals themselves during a routine inspection, when there are no signs of malfunction indicated above. If the seals have become wet on the outside (sticking dust and sand can directly indicate this), then this is a signal about the need for replacement - oil leakage can be dangerous not only due to its excessive consumption, but also getting under the wheels, as well as on the brakes. pads.
Total information
Motorcycle type: with sidecar. Wheelbase, mm – 1430. Ground clearance, mm – 130. Track, mm – 1100
Dimensions, mm: – length – 2420; – width – 1650.
Height (by ignition key) – 1000
Motorcycle weight, kg: – dry – 335; – worker – 380.
Fuel consumption on the highway, l/100 km – 7. Fuel reserve on the highway, km – 310. Highest speed, km/h – 85.
Capacity (oil), l: – engine crankcase – 2.0; – gearbox housing – 0.8; – reverse gear housing – 0.150; – air purifier – 0.2.
Fuel tank capacity, l – 22.
Tools for replacing oil seals
Every garage/workshop should have the following items that allow you to gain access to oil seals and change them:
- a set of ratchet attachments and open-end wrenches;
- set of hexagons;
- rags for cleaning the floor from leaked old oil;
- plastic pipe;
- fresh oil for replacement;
- container for drained oil;
- new seals and anthers. They must match in width, diameter and height for a tight and reliable installation.
It is worth considering that when filling in new oil, you will need to study the technical data sheet of the motorcycle indicating the required amount of consumables. If you have an assistant who will support the vehicle, the master will be able to disassemble a certain motorcycle component much faster and easier.
Some motorcycle owners recommend installing car oil seals and boots that are resized to fit motorcycle consumables, but this operation should not be carried out without skill and preparation.
How to check the foot switch mechanism
The need to adjust the foot shift mechanism may be necessary after the transmission has been rebuilt or if the locknuts have become loose. To do this, move the motorcycle manually and change gears from 2nd to 3rd and vice versa. It is necessary to achieve easy switching. The motorcycle is also placed on a stand, the rear wheel is hung out and the engine is started. When switching from third to second speed, you need to press on the front shoulder of the pedal. Looking to the left, the pedal should turn counterclockwise and the pawl crank clockwise and will therefore rest against the top stop. It needs to be adjusted.
Technical characteristics of modern models [edit | edit code]
Tourist, Tourist 2WD, Gear-UP, Troika Lux [edit | edit code]
| Tourist | Tourist-2WD | Gear-UP | Troika Lux | |
| Model: | IMZ-8.1037 Tourist | IMZ-8.1037 Tourist-2WD | IMZ-8.1037 Gear-UP | IMZ-8.1037 Troika Lux |
| Dimensions L×W×H, mm: | 2580×1700×1100 | 2580×1700×780 | 2580×1700×1100 | |
| Ground clearance, mm: | 125 | |||
| Dry weight, kg: | 350 | |||
| Total weight, kg: | up | |||
| Fuel tank, l: | 19 | |||
| Maximum speed, km/h: | 105 | |||
| Fuel consumption in the city, l/100 km: | 6-7 | |||
| Fuel consumption on the highway, l/100 km: | 4-5 | |||
| Engine: | 745 cm³, 42 l. p., 4-stroke, 2 cylinders, opposed OHV | |||
| Launch: | electric starter and kickstarter | |||
| Electrical system: | 12 V, generator 500 W | |||
| Ignition system: | contact | |||
| Checkpoint: | 4-speed, with reverse | |||
| Main gear: | gimbal | |||
| Gear ratios: [15] | I - 3.6; II - 2.62; III - 1.61; IV - 1.3; Rear: 4.2 | |||
| Main gear ratio: | 4,62 | |||
| Tires: | 4.00x - 19″ | |||
| Wheels: | knitted, painted, 19″ | spoked, chrome-plated, 19″ | knitted, painted, 19″ | spoked, chrome-plated, 19″ |
| Brakes: | front - hydraulic, disc; rear - drums | |||
| Suspension: | front - lever with spring-hydraulic shock absorbers; rear - pendulum with spring-hydraulic shock absorbers, adjustable for load | front - telescopic; rear - pendulum with spring-hydraulic shock absorbers, adjustable for load | ||
| Seat: | separate, double adjustable | solid | separate, double adjustable | solid |
| The package includes additional equipment: | Painted stroller wheel rack, driver's mudguards, passenger handles, parking brake | Chrome-plated rack for the stroller wheel, searchlight, driver's mudguards, stroller glass, shovel, canister, chrome-plated driver's protective bar, chrome-plated stroller protective bar | Stroller wheel rack, searchlight, shovel, canister, driver's mudguards, passenger handles, parking brake, driver's protective bar, stroller's protective bar | Chrome-plated luggage rack on the stroller wheel, chrome-plated passenger handles, velor upholstery of the stroller, leather passenger seat in the stroller, stroller glass, parking brake, driver's roll bar |
Fault Inspection
When inspecting the parts, you should check the ease of movement of the forks along the rod. Condition of fork stays and ring grooves in movable couplings. The amount of axial movement of the forks in the groove of the engagement couplings.
The following malfunctions may occur in the trigger mechanism: - wear, crushing or chipping of the pawl; — jamming of the pawl pusher; — breakage of the pawl spring; — bending the ends of the return spring of the starting pedal; — damage to the working end of the buffer pin; — cracks in the starting lever; - wear of the oil seal.
Source