Replacing clutch discs
You can replace motorcycle clutch discs very quickly. The first thing you need to do is drain the oil from the engine, but we won’t drain it. You just need to place the motorcycle on its right side on the ground.
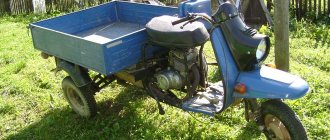
Motorcycles Voskhod, Voshod-2(M) and Voshod-3(M) were produced from 1965 to 1993 and were distinguished by excellent technical and operational qualities for their time. All of them were equipped with 173 cc two-stroke engines, which had one air-cooled cylinder and carburetor power. This allowed the motorcycle, depending on the modification, to reach a maximum speed of 90-105 km/h with a fuel consumption of no more than 4.5-5.5 liters per 100 km. In general, Voskhod has established itself as a reliable and durable vehicle, capable of operating for many years with proper maintenance. However, time takes its toll, and the need to repair Soviet equipment arises more and more often. Let's try to figure out what features are characteristic of restoring the main components and assemblies in the process of repairing a Voskhod motorcycle.
In what cases is it necessary to adjust the clutch of a Voskhod motorcycle.
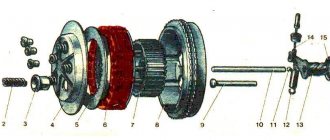
The engine was completely disassembled for a major overhaul. During which the worn coupling parts were replaced. In our case, slave and master disks. The springs that compress the discs were replaced if they were stretched out or damaged. The clutch drum has been replaced. The thread on a bolt or nut is broken; the purpose of these parts is adjustment. If the speedometer gearbox with the clutch release mechanism has been replaced or repaired.
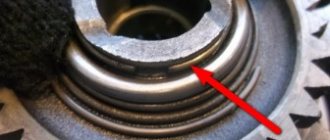
In the photo: 1 - adjusting screw; 2 — fixing nut.
When riding the motorcycle under load, such as on a steep hill. Engine speed increases and speed decreases. The clutch is slipping
.
In the opposite case, we squeeze the lever, we want to disengage the clutch and stop, but this does not happen. The motorcycle does not obey and continues to move. Clutch leads
.
Return to content
Engine
The “heart” of a motorcycle, even with the most careful use, gradually wears out - this is facilitated by the abundance of heterogeneous mechanical loads in the cylinder-piston group and other moving parts, temperature effects on the metal, the chemical composition of the working mixture and exhaust gases. DIY motorcycle repair Voskhod most often includes the following engine work:
- removing the power unit from the motorcycle frame;
- partial or complete disassembly of the internal combustion engine;
- replacing piston rings;
- restoration of the cylinder mirror;
- repair or replacement of the piston, connecting rod, crankshaft;
- replacement of support bearings, liners, seals;
- lubrication, fastening, adjustment work.
Engine repair, like the repair of other units, must be preceded by a comprehensive diagnosis of its technical condition, which includes an analysis of operational parameters (approximate indicators of developed power and speed, fuel consumption, sound of operation, color and character of the exhaust). If necessary, diagnostics are performed on the bench, and specialized instrumentation is used.
It is important to navigate the structure of a two-stroke internal combustion engine of a motorcycle and understand how each specific type of repair is performed. So, when replacing piston rings, you can do without removing the engine. It is enough to unscrew the stud nuts, remove the cylinder cover and, opening access to the piston, bring the piston to top dead center. Then the worn rings are removed and new ones are installed. The engine is assembled, not forgetting to replace the gasket. This completes the repair.
Transmission
During transmission repairs, the following work may be required:
- Adjusting the clutch, replacing its disc and bearing;
- Clutch drive repair;
- Replacement of gearbox bearings;
- Repair of switching module parts;
- Restoration or replacement of gearbox gears.
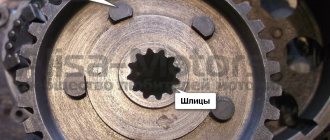
Most of them require high qualifications and are difficult to do at home. The exception is the repair and replacement of drive mechanisms. So, sometimes there is a need to restore the splines for the gearbox foot, replace the clutch cable or its jacket, or adjust the clutch. These works are carried out without disassembling the crankcase.
Repair and operation of the Voskhod motorcycle are closely interconnected due to the age of the model. However, with the proper approach to organizing and carrying out repairs, the motorcycle will remain your faithful friend and assistant for a long time.
Ignition and carburetor
It is these two components that, as a rule, determine the stability of the engine. Often, interruptions in the crankshaft rotation speed, loss of traction, and difficulties starting the engine are associated precisely with their malfunctions. Repairing the ignition and carburetor usually comes down to adjusting them. Setting the ignition includes setting the gap between the coil core and the sensor magnet within 0.295...0.305 mm. The piston ignition timing should be 3.5-5 mm to top dead center. Adjusting the carburetor is somewhat more difficult. If you are repairing a Voskhod-3M motorcycle, then you will have to deal with the K65V carburetor, and the main tools will be the quality and quantity screws included in its design. Using the first, you can lean or enrich the mixture - change the proportion of fuel and air entering the cylinder. The second determines its volume per working cycle. With the standard setting, the quality screw is screwed in completely and then unscrewed half a turn. Then the rotation of the quantity screw achieves the minimum stable speed and the quality of the mixture is re-adjusted. Finding the optimal adjustment balance is a search for maximum traction and stability with minimum fuel consumption.
Clutch adjustment
Clutch adjustment parts are not located on any Soviet motorcycle, as they are on Voskhod. We unscrew the special plug in the center of the left crankcase cover. Inside we see an adjusting screw 1 with a locking nut 2. We insert a key onto the nut and loosen it. An important condition is to hold the nut with a wrench, only then insert a screwdriver into the bolt inside the wrench and start rotating. If this condition is not met, it is not possible to adjust correctly. Because if you don’t hold the nut or bolt and rotate one, they still rotate together, which leads to misadjustment.
We tighten the adjusting screw inward until we feel the stop against the fungus. Then use a screwdriver to unscrew the screw a quarter or half a turn back. So that the screw does not touch the fungus, we hold the screw in this position with a screwdriver. And only then we lock the screw and tighten the nut tightly to secure it.
All the main work is completed, all that remains is to install the recommended free gap of 5 - 10 mm on the control lever. This is done using a special bolt on the lever itself.
The long-awaited exciting moment. We start the motorcycle, warm it up and check our work. We move off smoothly. We sharply increase the engine speed. We give a load to the engine. Switching speeds. We brake and stop. If you don’t like something, you can repeat the adjustment and achieve the optimal clearance.
It’s impossible to do everything perfectly the first time, unless you’re lucky.
Clutch
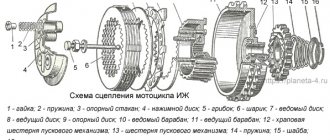
Clutch 10 (Fig. 2.2) is a device that allows you to disconnect and smoothly connect the engine with gearbox 22, which is necessary for starting and changing gears. In addition, by slipping under dynamic (shock) loads, the clutch protects engine and transmission parts from overloads and damage.
Motorcycle sunrise clutch repair
This unit performs another important job - starting the engine. By pressing the kickstarter to start the engine, the sector engages with a gear mounted on the drum on the side of the box. The gear, in turn, begins to rotate the drum and then the chain transmits force to the crankshaft. The engine starts.
The location of the clutch is in the left half of the engine crankcase, on the input shaft of the box. It is closed with a lid with holes for fastening bolts.
At the top of the cover there is a threaded hole and a plug - a dipstick for filling and monitoring the oil level. In the center of the lid there is a threaded plug for adjustment.
Moto / Plant named after V.A. Degtyarev and his brainchildren, which are so close to us / ZDK 4.105 - Owl / Mounting screws for the ZID 200, Owl, Voskhod 3M-01 engine
After quite a long period of time, we again continue work on the motorcycle. Next in line we will have the engine. During this time, all components and parts for its assembly were selected. In this article we will talk about all the fastening elements of the ZID 200 motor itself, those that are screwed into the crankcase and engine covers: screws, bolts, plugs and plugs. The reason for creating this article was the catalog of parts for the Sova and Voskhod 3M-01 motorcycle. There are omissions in the catalog pictures; at least not all the screws holding the crankcase halves are shown. Initially, knowing that there are several types of screws for connecting the two halves of the crankcase, I decided to use the catalog to refresh my memory of where and which screw is installed. I opened the catalog, but that was not the case... I still had to remember some points myself.
Since I couldn’t solve the problem of selecting screws right away with the help of a “motorbook,” I decided to install those screws that I knew exactly where they were. And then, together with the catalogue, remembering and trying on the place, we will install the remaining threaded elements in their places. In fact, everything turned out to be much simpler. Quite a few motors have already been rebuilt and no particular difficulties have arisen. Having placed the fasteners in their places, this is what happened as a result of the work done:
Now let's start in order. Left half of the crankcase. It holds the most screws. From almost all sides. Twelve screws holding the halves together. Four bolts securing parts and gearbox components.
On the reverse side of the same half there are five screws for securing the left crankcase cover. At the top of this part there are two studs for fastening the engine head and cylinder, and at the bottom there is a gearbox fluid drain plug.
Now about these screws in more detail. The two halves of the crankcase are held together with four types of screws. I will number them with the numbers indicated in the parts catalog. I note that what will not be found in the catalog will be further referred to as x1, x2, x3, and so on. In addition to catalog numbers, I will write additional information about the fastener or element.
Group 2, crankcase with covers: - number 18 - Screw VM6-6gx20 - 8 pcs., - number 36 - Screw VM6-6gx55 - 2 pcs., - number 37 - Screw VM6-6gx25 - 1 pc., - number x1 - Screw VM6-6gх42 – 1 pc.
Group 2, crankcase with covers: - number 27 - Oil drain plug - 1 pc., - number 28 - Copper o-ring - 1 pc., Group 10, gear shift mechanism: - number 30 - Bolt M6-6hx17 - 4 pcs. , — number 31 – Lock washer – 2 pcs., — number x2 – Lock washer – 2 pcs.
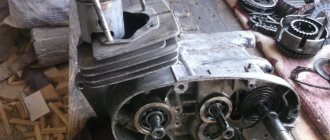
The image below shows examples of all the threaded elements of the left half of the crankcase, but except for those that are installed on the clutch side.
Now let's turn the crankcase half over and look at the fasteners on the other side. There are five screws here. They secure the crankcase cover, under which there is a clutch, kickstarter mechanism and motor chain.
Group 2, crankcase with covers: - number 21 - VM6-6gx42 screw - 3 pcs., - number 22 - M6-6gx75 screw - 2 pcs., - number 32 - O-ring - 2 pcs.
Two long screws 22 have an additional seal in the form of copper washers and gaskets 32.
Right half of the crankcase. There are only six screws and two engine cylinder studs.
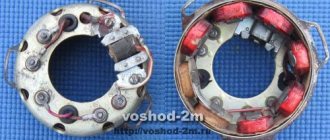
Three screws secure the generator stator and three screws secure the right crankcase cover.
Group 2, crankcase with covers: - number 21 - Screw VM6-6gx42 - 1 pc., - number 36 - Screw VM6-6gx75 - 2 pcs.
The generator stator fastener consists not only of screws, but also includes washers and groovers (spring washers).
Group 26, electrical equipment: - number 5 - Washer 5 - 3 pcs., - number 6 - Spring washer 5 - 3 pcs., - number 7 - Screw VM5-6gx12 - 3 pcs.
The cylinder fastenings of the crankcase halves were left unexamined. The cylinder and head fasteners consist of four studs, four thick washers and nuts.
Group 4, Cylinder and valve: - number 8 - Nut M10-6H - 4 pcs., - number 9 - Washer 10 - 4 pcs., - number 10 - Stud M10-6gx165 - 4 pcs.
Now let's see what is screwed into the crankcase covers themselves. The left cover is where a dipstick is installed to monitor the oil level in the gearbox (I once had a chance to make a drawing for it, you can see it here). There is also a plug installed in it to adjust the clutch.
Group 2, crankcase with covers: - number 31 - Clutch cover plug - 1 pc., - number 33 - Oil level control rod - 1 pc.
In the right engine crankcase cover, the clutch release mechanism is secured inside with two screws.
Group 2, crankcase with covers: - number 18 - VM6-6gx20 screw - 2 pcs., - number 38 - 6.65G washer - 2 pcs.
The above screws are the same in size as one of the types of crankcase tightening screws, only the crankcase is tightened without screws.
The engine itself has several more threaded parts and elements, but they belong to the mechanism parts themselves and are not screwed into the crankcase.
In the next article we will also take a closer look at the gearbox parts of the Voskhod and Sova engines.
Video: CLUTCH REPAIR VOSKHOD 3M 01 #11
Motorcycles Voskhod, Voshod-2(M) and Voshod-3(M) were produced from 1965 to 1993 and were distinguished by excellent technical and operational qualities for their time. All of them were equipped with 173 cc two-stroke engines, which had one air-cooled cylinder and carburetor power. This allowed the motorcycle, depending on the modification, to reach a maximum speed of 90-105 km/h with a fuel consumption of no more than 4.5-5.5 liters per 100 km. In general, Voskhod has established itself as a reliable and durable vehicle, capable of operating for many years with proper maintenance. However, time takes its toll, and the need to repair Soviet equipment arises more and more often. Let's try to figure out what features are characteristic of restoring the main components and assemblies in the process of repairing a Voskhod motorcycle.