Cars admin26.02.2020
The clutch of the Izh-Planet motorcycle, no matter what model: be it “Izh-Planet-Sport”, “Izh-Planet 2″ or even Izh-Jupiter” can rightfully be considered a completely reliable and durable unit. But it has its own design flaws, which are a common cause of breakdowns.
Since their first appearance, the Izhey engines, although not as often as we would like, have been modernized. After all, the power of the Planet-5 engine has almost doubled compared to the same Izh-49, and even more so in some models (Izh-Planet-Sport).
The power was increased - that’s good, but the designers didn’t pay enough attention to the clutch. As it was on the Izh-49, it migrated almost unchanged to later Izh models.
This is where the “root” of all problems grows: we increased the engine power - well done! The stroller was attached - even better! The compression has been increased - where would we be without it? But they forgot about the clutch and ratchet mechanism. But the load on it has increased significantly compared to its progenitor - this is where frequent problems arise in its work.
By the way: later Izhey models began to be equipped with a clutch with a reinforced motor chain and an improved design of the kickstarter ratchet mechanism, the so-called “daisy”. Of course, such an “innovation” did not bring much effect: just as the ratchet on the “Planets” tore, it continued to tear. As the motor chain stretched literally in one season, it continued to stretch...
In this article we will look in detail at the main stages of installing and adjusting the clutch. We will also look at common faults and how to repair them.
It is worth noting: The clutch of almost all Soviet-made two-stroke motorcycles is designed according to the same principle, which means that the faults are almost the same - the basis of the design is the same (German DKW). Therefore, everything said in this article can be safely applied not only to Izh motorcycles, but also to others. Whether it’s “Java” or “Minsk” or even “Voskhod”, perhaps the design of the “Ants” has some differences: their kickstarter mechanism interacts with the basket not directly like the others, but through the input shaft of the gearbox. And “Planets-Sport” installed a gear instead of a motor chain, but this does not change the essence, the “sores” of all Soviet motorcycles are practically the same.
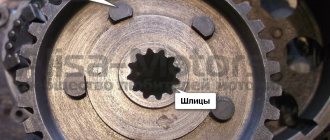
Let's start with the basket - this is the weakest part of the entire mechanism, or rather not the basket itself as such, but the kickstarter ratchet mechanism, which constantly breaks. Therefore, before installing the basket on the engine, the ratchet mechanism must be disassembled and checked for functionality.
Take the basket, remove the locking ring, then remove the thrust washer and spring.
We carefully inspect the teeth of the ratchet mechanism; they should not be chipped or cracked and they should be sharp and not licked. If you find the damage described above, do not rush to throw away the basket. The ratchet mechanism can be easily and quickly replaced with a new one.
True, for this, you will need to sharpen the rivets and, of course, you must have skill in such work; if you don’t know how to rivet, then it’s better not to take it on - you’ll ruin the basket! From the outside, riveting may seem like a simple job!
The next step will be to check the reliability of fastening the ratchet to the basket; the rivets securing the ratchet to the basket tend to become loose over time, so it is very important to identify this malfunction in a timely manner.
We take the basket in our hand, try to swing the ratchet with the other hand, if we feel any play, then that’s it! You will have to drill out the broken rivets and install new ones. It is worth warning: simply pulling rivets will not give any effect! Tested many times! Only replacing the rivets with new ones can correct the situation. And it definitely needs to be corrected! Otherwise, sooner or later, the ratchet will break and then, like it or not, you still have to rivet it...
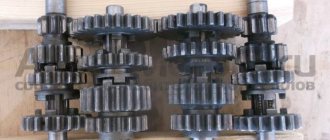
Also, do not forget to pay special attention to the condition of the teeth of the drive sprocket and the basket itself. The teeth must be correctly shaped and not worn out. Unfortunately, there is nothing you can do to help a basket with worn teeth - such a malfunction cannot be “treated.” And finally, we check the basket bearing for acceptable wear; it certainly lasts a long time, but it still wouldn’t hurt to make sure it’s working once again.
A typical example of a basket with heavily worn motor chain teeth. Of course, such a basket will still “use” for some time, but such wear can safely be considered emergency - it is better to replace it.
The body of the “Izhevsk” basket sometimes cracks in the area of the ratchet mechanism rivets; before installation, carefully inspect these places.
The next important step in our work will be adjusting the alignment of the teeth of the basket sprocket and the crankshaft. Everything is simple here: we install a special washer under the crankshaft sprocket (this is described in detail below), put the sprocket on the axle and tighten the bolt with the required force. Next, we put the adjusting washer on the gearbox input shaft, then we put the bushing of our basket there, then the basket itself and from a comfortable position we make sure that the tips of the teeth of the basket and the sprocket are strictly opposite each other. Any deviation is removed by selecting an adjusting washer (we will discuss it later).
How to properly adjust the clutch on the Izh-Jupiter motorcycle?
Adjusting the clutch on motorcycles of the “Jupiter” series is complicated by the fact that here the clutch release must be synchronized in a certain way with the gear shift.
This is not at all difficult to achieve if you follow the established procedure and do not perform these actions thoughtlessly. First of all, you need to remove the left engine cover (after draining the oil, of course!) and, pressing the lever on the steering wheel, watch how the disks move in the grooves of the drive drum. In itself, this movement is insignificant, about 2 mm, so any, even the smallest, misalignment of the disks will lead to incomplete shutdown of the mechanism. By tightening or loosening the corresponding clutch spring nuts, achieve uniform movement of the entire disc pack.
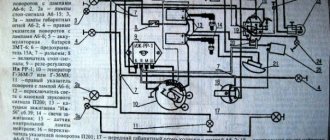
After this, tighten the clutch adjustment screw on the steering wheel until it stops so that it does not interfere with the free movement of the lever. And begin to carefully screw the clutch adjustment screw (Fig. 26) into the pressure plate until a noticeable stop appears. This is where you need to show special sensitivity with your fingers: not just turn the screw, but screw it in until it comes into contact with the pusher passing through the input shaft. (Try turning the screw in and out several times - and you will learn to determine this moment!) After contact, unscrew the screw 1/4. 1/3 turn and secure with lock nut.
Rice. 26. Adjusting the clutch of the Izh-Yu motorcycle
It remains to unscrew the screw on the steering wheel so that the free play of the lever, measured at its end, is 5.8 mm, and the adjustment is complete.
Source
MY MOTORCYCLE
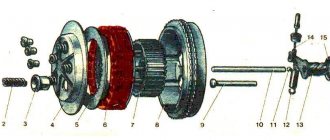
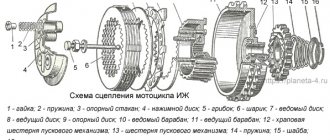
The clutch ensures the transmission of torque from the large gear of the motor transmission to the input shaft of the gearbox, short-term separation and smooth connection between them. IZh motorcycles use a friction multi-plate clutch operating in an oil bath. Let's consider the operation of the clutch using the example of the IZH Planet power unit. The large driven gear of the motor transmission is made integral with the drive drum 8 of the clutch (Fig. 2).
The driving plastic disks
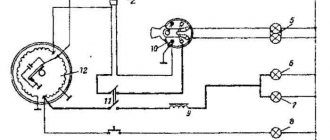
6 fit with their protrusions into the grooves of the large drum 8 . Between the drive disks, driven steel 5 , which are connected in the same way to a small, driven clutch drum 7 , mounted on the splines of the gearbox input shaft. The disk pack in working condition is compressed by five cylindrical springs 2 , which rest on cups 3 fixed in the outer steel pressure disk 4 . The force of the springs can be changed using shaped nuts 1 : during operation, this has to be done when replacing the package in order to move it evenly in the grooves of the drums. The normal position of the clutch is constantly closed, the discs are pressed tightly and with great force against each other. To disengage the clutch, you need to separate the discs and move them away from each other. This is accomplished by a shutdown mechanism mounted on the right engine crankcase cover and a drive. The clutch release lever is located on the left side of the steering wheel. 14 is fixed in it . When you press the lever, the force is transmitted through the cable to the worm 13 ; the latter turns, moves along the three-start thread and presses on the ball 11 , the thrust rod 10 and the pusher 9 and moves the pressure disk 4 , overcoming the force of the springs. At the same time, the clutch discs are released from the force compressing them and are separated, the clutch is disengaged. As soon as you release the lever on the steering wheel, the shutdown mechanism returns to its original position under the action of springs 2 and 12 . Normal operation of the clutch mechanism is ensured only if there is sufficient clearance in the drive (free play on the release lever), and the springs are preloaded so that the discs move without distortion and over a sufficient distance. Approximately, the spring force can be considered normal if the nuts protrude above the caps by approximately 4.5-5 mm. The clearance in the clutch release mechanism is primarily ensured by the adjusting screw 17 . First, this screw must be screwed in until there is a noticeable stop (without, however, allowing the discs to move), and then loosened 1/2-3/4 of a turn and secured with nut 16. Then, use the adjusting screw on the steering wheel to set the free play of the clutch cable: it is at the end of the lever should be 5 mm.
IZH Jupiter engine: clutch and release mechanism The clutch release mechanism of the IZH Jupiter engine (Fig. 3) differs significantly from that described above, primarily in that it is interlocked with the gear shift mechanism. This allows you to disengage the clutch using both the lever on the steering wheel and the pedal, and gear shifting occurs more smoothly and quickly. The shutdown mechanism is also mounted on the right engine crankcase cover. As in the previous case, it is connected to the lever on the steering wheel by a cable drive, the operation of which requires no explanation. As for semi-automatic clutch release, we need to talk about it in more detail. The gear shift pedal is mounted on the left end of the shift shaft; At the right end of this shaft 14 there is a cam 15 of the automatic clutch release. The cam has a complex shape; in constant contact with its working surface there is a roller attached to the end of the double-armed lever 19. In the normal position of the shift lever, the roller is located in the cavity of the cam 15 . When the lever moves down or up (one or another gear is engaged), the cam 15 with its protrusion runs onto the roller, through it presses on the lever arm 19 ; the second arm acts on the pusher 13, the ball 12 and the thrust rod 11 and moves the pressure plate 6. The springs 2 are compressed and release the disks, the clutch is disengaged. The working surface of the cam 15 is designed so that the clutch disengages before one or another gear is engaged; It turns on only after the transmission is detected. You have to pay for convenience - in this case, with more complex adjustments. If in the IZh Planeta clutch release mechanism it was necessary to adjust only the free play of the lever on the steering wheel, then on the Jupiter it is also necessary to adjust the free play of the shift pedal. Moreover, the sequence of adjustments is also important. Start, as in the first case, with the clutch springs. They should protrude above the cups by approximately 3.5-4 mm and ensure uniform, distortion-free movement of the discs when the clutch is disengaged. After this, screw 4 must be screwed into the pressure plate until it stops and unscrew it 1/4-1/2 turn. This may not work right away; for insurance purposes, it is better to perform this operation several times to be absolutely sure of the result. Then lock screw 4 with nut 5 . Only now can you adjust the free play of the lever on the steering wheel. As in the previous case, it should not exceed 5-8 mm at the end of the lever. If the gearbox works perfectly, automatic clutch release is very convenient and significantly makes the life of a motorcyclist easier: if the clutch cable breaks, it is sometimes possible to ride for quite a long time, even in city conditions, using only the foot-operated semi-automatic release. True, starting from a standstill requires a certain skill. When the box “fools”, and this, alas, happens often, it is better to use manual clutch release - this only prolongs the life of the mechanisms.
Disturbances in the operation of the clutch that appear during operation are most often associated with a natural change in the gaps in the drive or loosening of the fastening of its parts. It is not difficult to restore both. Typical clutch failures boil down to essentially two things: the clutch either “drives” or “slips.” The first term means that the disks do not separate completely and torque transmission occurs to one degree or another all the time. This means that the gear cams in the gearbox are constantly pressed against each other and their separation requires considerable effort. The most likely cause is disk misalignment; less likely - a large gap in the shutdown drive. The clutch “slips” if the springs do not create the required force or there is no clearance in the release drive. Both can be eliminated by adjustments. The composition of clutches and drive mechanisms for different models of IZH power units, as well as the applicability of parts, are indicated in the table.
Purpose of the clutch IZ Planet and IZ Jupiter
Clutch - the name speaks volumes about the job it does. In our case, the crankshaft engages the gearbox of the IZH Planet and IZH Jupiter engines. The connection should occur smoothly without jerking, this is necessary to start moving and smoothly change gears. In case of heavy loads, it protects engine parts from damage.
The clutch is located in the left half of the crankcase, under the left engine cover.
To get to the clutch, you need to drain the oil and remove the cover with the gasket, first remove the levers and unscrew the mounting bolts.
The basket is constantly in working condition, the discs are tightly compressed by springs.
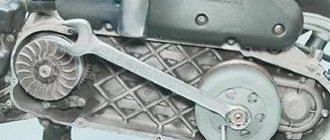
The motor transmission consists of two sprockets. The small drive is located on the crankshaft. A large star driven on a drum. The connection is made by a motor chain.
The engine gear ratio is 2.17 for all single-cylinder IZh models. For IZ Jupiter, the gear ratio is 2.57.
When assembling the motor transmission, the planar arrangement of the stars is controlled. No more than 0.4 millimeters are allowed.
Switching off occurs using a special device. The shutdown mechanism is installed in the right engine cover. This mechanism is used to make adjustments.
Clutch adjustment IZH Planet
To adjust the clutch control mechanism of motorcycles IZH Planet 5, IZH Planet 4, IZH-56, IZH-49, use adjusting screw 1 and locknut 2. By loosening the locknut by turning the screw clockwise, reduce the free play of the control lever. When turning the screw counterclockwise, the free play increases. After completing the adjustment, tighten the locknut. The normal free play value is determined by the free movement of the end of the clutch lever by 5..10 mm.
The normal amount of free play is determined by the free movement of the end of the clutch lever by 5..10 mm.
To watch online, click on the video ⤵
Mokika clutch assembly Carpathians More details
Refinement and adjustment of clutch B 501 Read more
Assembling a clutch with a powerful spring in the field More details
V-50 engine assembly. The finishing touches. More details
How to remove the clutch basket on a Karpaty moped without a puller Read more
Moped CARPATHIANS. Karpatych 3 series. Replacing the clutch basket More details
How to assemble a clutch basket for a Karpaty moped? More details
How to assemble a clutch basket for mopeds: Carpathians, Delta, Verkhovyna. More details
I opened the CLUTCH on the KARPATY MOPED and. More details
Delta V50M. Clutch slips. Clutch repair. More details
Assembling the “Karpaty” clutch Read more
Assembling the clutch for a Karpaty moped Read more
And again about the clutch of the V501M engine Read more
Moped Carpathians, clutch repair Read more
Adjusting the clutch and gearbox of the KARPATY moped. More details
//Clutch repair in Mokika Carpathians// Read more
Grip in the Carpathians. The solution has been found. More details
Source
Clutch adjustment IZ Jupiter
On motorcycles IZH Yu and IZH Yu K, adjustment of the clutch release mechanism begins with the release mechanism, for which the adjusting screw is screwed in all the way and released 1/4 -1/2 turn, after which the lock nut is tightened.
The correct installation is checked by pressing the shift pedal in one direction or another. Moving the front end of the shift pedal 5-5.5 mm from the neutral position should not lead to movement of the pressure plate. After this, the manual release is adjusted using the adjusting screw located in the left post of the clutch lever on the steering wheel (the free play is 5-10 mm).
Adjusting the clutch springs
Adjusting the springs is not difficult, the main thing is to get it right. We start by placing the motorcycle on the center stand. Then remove the lid, draining the oil in advance. We squeeze the lever on the steering wheel to the limit and make sure to fix it. Next we turn on the speed, preferably the first one. We take the wheel and begin to rotate. We try to determine by touch how much effort we are applying. We look at the coupling as it rotates and determine which springs are loosely tightened. We mark them with chalk, then tighten them. We begin to rotate the wheel again and if you feel that the wheel has become easier to spin, then everything has been done correctly. The process must be repeated to achieve a better result. After this, we check the result obtained while moving. If, as the load increases, the clutch begins to slip. All springs must be tightened using nuts. In this case, all nuts must be turned the same number of turns.
Clutch faults
Possible malfunctions that may appear during operation of IZ motorcycles.
The clutch of IZH Jupiter IZH Planet is slipping reasons
The malfunction is noticeable during sudden acceleration. We increase the speed, but the motorcycle does not accelerate. The same thing happens when driving on a steep hill as the load increases. The motorcycle cannot overcome the obstacle and stops, although the crankshaft speed does not drop. The discs get very hot and wear out quickly. It is impossible to operate the equipment in this condition; the cause must be found and eliminated.
This malfunction indicates that the disks are poorly pressed against each other.
There may be several reasons:
- The adjustment was not carried out correctly
- The springs have lost their former elasticity
- The discs have worn out and become thinner.
- Wear of drive parts
A serious problem could be a jammed control cable. The reason is damage to the shell and the resulting rust underneath. Gentle cleaning and lubrication, better replacement.
Check and wash the adjustment mechanism itself located in the right engine cover. Small particles of road sand that get into the mechanism with water can slow down the operation. After squeezing the lever, the parts do not return to their original position.
Drives clutch IZ Planet IZ Jupiter reasons
The clutch is driving - this is when the lever is squeezed all the way, and when the speed is turned on, the motorcycle immediately starts moving and cannot be stopped. You press the brake, the engine stalls. This indicates that the clutch is not completely disengaged.
The main reason is the springs that compress the discs. The discs are not evenly weakened and in some places are in strong contact with each other. The springs need to be adjusted correctly.
There is too much free play in the control lever on the steering wheel. If adjustment is not possible, replace worn control parts.
You need to check the pusher, which is located inside the input shaft of the gearbox. Perhaps the rod has become shorter.
Be sure to check the presence of the ball. Often during disassembly it rolls out and gets lost.
The ball is located inside the input shaft of a two-cylinder engine between the pusher and the thrust rod.
For a single-cylinder unit, the ball is located in the right cover between the screw with a control nut and the thrust rod in the input shaft of the box.
Source
Photo report: Repair and assembly of the clutch of the Izh-Planet motorcycle
The clutch of the Izh-Planet motorcycle, no matter what model: be it “Izh-Planet-Sport”, “Izh-Planet 2″ or even Izh-Jupiter” can rightfully be considered a completely reliable and durable unit. But it has its own design flaws, which are a common cause of breakdowns.
Since their first appearance, the Izhey engines, although not as often as we would like, have been modernized. After all, the power of the Planet-5 engine has almost doubled compared to the same Izh-49, and even more so in some models (Izh-Planet-Sport).
The power was increased - that’s good, but the designers didn’t pay enough attention to the clutch. As it was on the Izh-49, it migrated almost unchanged to later Izh models.
This is where the “root” of all problems grows: we increased the engine power - well done! The stroller was attached - even better! The compression has been increased - where would we be without it? But they forgot about the clutch and ratchet mechanism. But the load on it has increased significantly compared to its progenitor - this is where frequent problems arise in its work.
By the way: later Izhey models began to be equipped with a clutch with a reinforced motor chain and an improved design of the kickstarter ratchet mechanism, the so-called “daisy”. Of course, such an “innovation” did not bring much effect: just as the ratchet on the “Planets” tore, it continued to tear. As the motor chain stretched literally in one season, it continued to stretch...
In this article we will look in detail at the main stages of installing and adjusting the clutch. We will also look at common faults and how to repair them.
It is worth noting: The clutch of almost all Soviet-made two-stroke motorcycles is designed according to the same principle, which means that the faults are almost the same - the basis of the design is the same (German DKW). Therefore, everything said in this article can be safely applied not only to Izh motorcycles, but also to others. Whether it’s “Java” or “Minsk” or even “Voskhod”, perhaps the design of the “Ants” has some differences: their kickstarter mechanism interacts with the basket not directly like the others, but through the input shaft of the gearbox. And “Planets-Sport” installed a gear instead of a motor chain, but this does not change the essence, the “sores” of all Soviet motorcycles are practically the same.
Let's start with the basket - this is the weakest part of the entire mechanism, or rather not the basket itself as such, but the kickstarter ratchet mechanism, which constantly breaks. Therefore, before installing the basket on the engine, the ratchet mechanism must be disassembled and checked for functionality.
Take the basket, remove the locking ring, then remove the thrust washer and spring.
We carefully inspect the teeth of the ratchet mechanism; they should not be chipped or cracked and they should be sharp and not licked. If you find the damage described above, do not rush to throw away the basket. The ratchet mechanism can be easily and quickly replaced with a new one.
True, for this, you will need to sharpen the rivets and, of course, you must have skill in such work; if you don’t know how to rivet, then it’s better not to take it on - you’ll ruin the basket! From the outside, riveting may seem like a simple job!
The next step will be to check the reliability of fastening the ratchet to the basket; the rivets securing the ratchet to the basket tend to become loose over time, so it is very important to identify this malfunction in a timely manner.
We take the basket in our hand, try to swing the ratchet with the other hand, if we feel any play, then that’s it! You will have to drill out the broken rivets and install new ones. It is worth warning: simply pulling rivets will not give any effect! Tested many times! Only replacing the rivets with new ones can correct the situation. And it definitely needs to be corrected! Otherwise, sooner or later, the ratchet will break and then, like it or not, you still have to rivet it...
Also, do not forget to pay special attention to the condition of the teeth of the drive sprocket and the basket itself. The teeth must be correctly shaped and not worn out. Unfortunately, there is nothing you can do to help a basket with worn teeth - such a malfunction cannot be “treated.” And finally, we check the basket bearing for acceptable wear; it certainly lasts a long time, but it still wouldn’t hurt to make sure it’s working once again.
A typical example of a basket with heavily worn motor chain teeth. Of course, such a basket will still “use” for some time, but such wear can safely be considered emergency - it is better to replace it.
The body of the “Izhevsk” basket sometimes cracks in the area of the ratchet mechanism rivets; before installation, carefully inspect these places.
The next important step in our work will be adjusting the alignment of the teeth of the basket sprocket and the crankshaft. Everything is simple here: we install a special washer under the crankshaft sprocket (this is described in detail below), put the sprocket on the axle and tighten the bolt with the required force. Next, we put the adjusting washer on the gearbox input shaft, then we put the bushing of our basket there, then the basket itself and from a comfortable position we make sure that the tips of the teeth of the basket and the sprocket are strictly opposite each other. Any deviation is removed by selecting an adjusting washer (we will discuss it later).
Important: Adjustment of the alignment of the sprocket teeth can only be done after final assembly and adjustment of the gearbox.
We begin assembling the clutch mechanism by installing the kickstarter mechanism.
We install the kickstarter shaft support washer on the gear shift mechanism shaft.
We take the kickstarter shaft with our hand, check the condition of its splines and sector teeth, everything should be perfect - there should be no wear or other damage.
When starting the engine, a very high load is placed on the kickstarter shaft and the entire ratchet mechanism as a whole, especially if your ignition timing is incorrectly adjusted. Kickback to the leg when the ignition is incorrectly adjusted often leads to injury or damage to the shaft or ratchet mechanism. Therefore, before installation, you need to pay special attention to the kickstater parts and, if there is any suspicion, replace them with new ones.
The splines of the winding foot should be in this condition
The sector teeth are like this
We put the winding claw on the shaft, insert the end of the return spring into a special groove in the crankcase and tighten the spring a turn or two and drive the shaft all the way into its place. Do not tighten the return spring too much. Pull it so that it does not stick out anywhere and does not interfere with the operation of the kickstarter, and of course returns the foot to its place.
We install a special spring washer on the crankshaft journal and then insert the key into place.
We put a pre-selected adjusting washer on the gearbox input shaft.
We install the clutch basket drum bushing on the gearbox input shaft.
We put the motor chain on the basket and the sprocket, turn the drive sprocket so that during installation the key fits exactly into its groove and put the whole thing on the assembly in one go onto the shafts.
An important point: before installing the sprocket, carefully inspect both cones so that nothing gets on them and wipe them dry with a clean cloth before installation.
We install the inner drum on the shaft.
Place a special washer on the shaft and screw on the central nut.
We weld some kind of rod or piece of tire to the old unnecessary clutch disc - this will be the key for tightening the nut on the drum. We put it on the inner drum, rest the rod against the kickstarter shaft, take the 22mm socket and tighten the central nut (left-hand thread) with the maximum possible force.
We take a tin rod for soldering or some kind of stick, fit it under the teeth of the drive sprocket and tighten the bolt with the maximum possible force. In this engine, the design of the drive sprocket is slightly changed: our engine is not “purely Planetovsky”, but from a motorized stroller, but there is not much difference between them.
After tightening or before unscrewing the central nut and bolt of the drive sprocket, check the condition of the motor chain. We press on it and look at how much it sag: the permissible sag should not exceed two centimeters. We installed an almost new chain on this engine, so the sag as you can see is minimal.
To ensure that your clutch does not slip after assembly and that its discs do not move, you must check for deformation. Usually no one does this: either it’s laziness, or something else... And then I start to twist and turn it, not understanding what’s going on: I seem to have installed new disks and assembled them correctly - adjusted them, but it either drives or slips...
There is nothing complicated here: we take a piece of thick glass or an ordinary mirror, place a disk on it and touch it with a finger on top; if the disk “dances” on the glass, it means it is deformed. Here you need to decide a little: on plastic discs, slight deformation is allowed, over time the discs will heat up and take on a perfectly even shape, but on steel discs there should be no deformation. Change crooked discs without regret, otherwise you will not get normal operation from the clutch.
After checking the discs, you can begin further assembly of the clutch. First, a support disk is placed on the inner drum with a groove facing the basket. You can easily find the support disk in the kit: it is thicker than the others and has the groove described above on the inside.
Then we put in a plastic disk, then a metal one again, and so alternating the disks with each other we collect a complete set. After all this has been done, install the clutch rod (marked with an arrow) into the input shaft of the gearbox. A regular “Planet” basket can accommodate six plastic disks and six metal ones along with the support one. The very last (sixth) you should have is a plastic disk.
But there is a nuance here: “from the factory” the basket is equipped with a seventh metal disc, which is placed between the last plastic and clutch pressure plate, that is, in the last place. This disk is no different from the others, but it is not necessary to install it at all - you can remove it without fear, it has absolutely no use there.
Next, we install the pressure disk, put the pressure spring cups in their places, making sure that the special protrusions on the cups coincide with the recesses on the disk, install the pressure springs and tighten the special nuts so that the ends of the nuts are higher than the ends of the bolts of the inner clutch drum by 4 -5 millimeters.
To prevent the nuts from unscrewing during work, make a notch with a chisel as shown in the photo. From the factory, the nuts are already marked with a notch, but during the process of disassembling and assembling the clutch, it wears out and loses its functions.
The final step in this work will be to check that the clutch pressure plate is working correctly. To do this, we turn the engine over or place it directly on the motorcycle frame, place the ball on the sprocket side in the gearbox input shaft, then place the second clutch rod there and screw on the generator cover. We adjust the clutch, then fully squeeze the lever and watch how the pressure plate moves away. If the disk comes off skewed, then tighten or loosen the nuts a little in the right places and that’s it. Try to adjust the tension of the nuts so that when you press the clutch lever, the disc moves out as smoothly as possible - without distortion.
Purpose of the clutch IZ Planet and IZ Jupiter
Clutch - the name speaks volumes about the job it does. In our case, the crankshaft engages the gearbox of the IZH Planet and IZH Jupiter engines. The connection should occur smoothly without jerking, this is necessary to start moving and smoothly change gears. In case of heavy loads, it protects engine parts from damage.
The clutch is located in the left half of the crankcase, under the left engine cover.
To get to the clutch, you need to drain the oil and remove the cover with the gasket, first remove the levers and unscrew the mounting bolts.
The basket is constantly in working condition, the discs are tightly compressed by springs.
The motor transmission consists of two sprockets. The small drive is located on the crankshaft. A large star driven on a drum. The connection is made by a motor chain.
The engine gear ratio is 2.17 for all single-cylinder IZh models. For IZ Jupiter, the gear ratio is 2.57.
When assembling the motor transmission, the planar arrangement of the stars is controlled. No more than 0.4 millimeters are allowed.
Switching off occurs using a special device. The shutdown mechanism is installed in the right engine cover. This mechanism is used to make adjustments.
Clutch modification
My comrades and I have mopeds: some have “Riga”, some “Verkhovyna”, some “Karpaty”.
The engines of all these machines are of the B-50 type - with a double-disc clutch. The driven (plastic) discs of such a clutch have a very unpleasant quality - they break at the most inopportune moment. However, they are practically never available for sale, and neither are they at Posyltorg stores. This seemingly insoluble problem was solved by me quite simply. Instead of looking for discs in a store, I made them myself from a more durable material - textolite, which also has good friction properties. To do this, I selected a blank - a sheet 3mm thick (4mm is possible). I marked the outline of the disc, using the failed one, and the clutch basket itself. You can cut out the parts with a regular jigsaw, after which you need to cut grooves on the surface of the resulting rings with a needle file. It took me less than two hours to make a set of these discs. Time has shown that homemade discs practically do not wear out - in any case, in two years of operation they have never let me down. A cone will help out
Clutch parts for the B-50 engine, which is installed on all heavy two-speed motorcycles today, have always been in short supply. And this despite their depressing unreliability! At first I tried to make steel discs instead of plastic ones, but I soon realized that the problem was not so much their lack of strength as the defects of the double-plate clutch itself. Attempts to remake this unit, I think, were crowned with success. Since April 1988, I have been using a homemade cone coupling on my Karpaty-2 mokick - and the problem associated with the periodic failure of this unit has practically disappeared. The main parts of the cone clutch: a metal driving cone disk, a metal driven cone disk and a floating (self-orienting) gasket made of antifriction material. All other parts are standard. The advantages of my version of the clutch compared to the standard one include a significantly lower force on the clutch cable - up to 1 kG. Engine vibration has been significantly reduced, which should have a beneficial effect on increasing its service life. Engaging and disengaging the clutch became smoother, and this eliminated shock loads on the teeth of the gearbox gears when the clutch was engaged. I would very much like to know the opinion of the specialists of the Siauliai Motor Plant about the improvements I propose to this mechanism. Maybe they will interest the factory workers?
Clutch adjustment IZH Planet
To adjust the clutch control mechanism of motorcycles IZH Planet 5, IZH Planet 4, IZH-56, IZH-49, use adjusting screw 1 and locknut 2. By loosening the locknut by turning the screw clockwise, reduce the free play of the control lever. When turning the screw counterclockwise, the free play increases. After completing the adjustment, tighten the locknut. The normal free play value is determined by the free movement of the end of the clutch lever by 5..10 mm.
The normal amount of free play is determined by the free movement of the end of the clutch lever by 5..10 mm.
Malfunctions and clutch adjustment of Izh motorcycles
There are two possible types of clutch malfunction: incomplete disengagement of the discs and slipping. If the motorcycle is slipping, it will not develop speed as the crankshaft speed increases. The reasons for this malfunction may include: wear of the discs, insufficient spring pressure due to loss of elasticity or loose adjusting nuts, incorrect adjustment of the clutch mechanism. When the clutch is not fully disengaged, the motorcycle wheel continues to rotate while the control lever is fully pressed. This may also be due to incorrect adjustment, or this malfunction may occur when thick oil is used, especially in cold weather. First of all, if you discover one of the clutch malfunctions, try to eliminate it by correct adjustment. First, you need to adjust the gap in the shutdown mechanism; this is done using the adjusting screw located on the right engine cover. To do this you will need a screwdriver and a 13 mm wrench. Using a wrench, loosen the locknut and use a screwdriver to tighten the screw until it stops, and then turn it in the opposite direction half a turn - one turn. Tighten the locknut with a wrench. Secondly, after this, adjust the free play of the lever using the cable adjusting screw on the left handlebar handle. It should be within 5-10 millimeters. The correct clutch adjustment can be checked in this way: place the motorcycle on a stand, engage first gear and try to manually turn the rear wheel with force. If the adjustment is correct, you will not be able to do this. Now you need to perform one more check: to completely disengage the clutch. To do this, in the same position (motorcycle on a stand, rear wheel not touching the ground), start the engine and engage first gear. Then fully depress the clutch control lever and apply the rear brake, the wheel should stop. Release the brake, the clutch is depressed, and the wheel should remain stationary if adjusted correctly. If it starts to rotate when the lever is pressed, you need to loosen the adjusting bolt on the right side of the engine.
Checking the clutch drum
The first step is to check the foot start ratchet mechanism. This is where the main load falls. Turn the clutch basket over with the ratchet facing you, remove the retaining ring and disassemble the ratchet.
We inspect the teeth of the ratchet: they should be sharp without chips or other damage. If the teeth are wrinkled or broken, the winding foot will slip 100%. Many suffer from this problem due to thick oil or a weak spring - in fact, the reason for the foot slipping lies in the ratchet.
If the teeth on the basket are not worn out, it is advisable to rivet the ratchet: buy a new one in the store or remove it from another basket and rivet it. I riveted several baskets and they went without any problems until the “victory”...
An example of ideal ratchet teeth.
Often and thickly, the rivets on the ratchet weaken and if you don’t notice this in time, they are cut off. To prevent this trouble from happening to you, move the ratchet with your fingers. If it wobbles, drill out the old rivets and rivet them again. Pulling old rivets usually does nothing.
If you are making a clutch “for yourself” and for a long time, be sure to check the condition of the teeth for the motor chain.
If the teeth have already begun to turn back, then such a basket should be immediately thrown into the trash. It will no longer be of any use: the operating noise will increase, it will 100% eat up the motor chain, and there’s never an hour when one “fine” day it will lick your teeth and you will then be forced to push your jalopy for a long time and tediously...
Clutch adjustment IZ Jupiter
On motorcycles IZH Yu and IZH Yu K, adjustment of the clutch release mechanism begins with the release mechanism, for which the adjusting screw is screwed in all the way and released 1/4 -1/2 turn, after which the lock nut is tightened.
The correct installation is checked by pressing the shift pedal in one direction or another. Moving the front end of the shift pedal 5-5.5 mm from the neutral position should not lead to movement of the pressure plate. After this, the manual release is adjusted using the adjusting screw located in the left post of the clutch lever on the steering wheel (the free play is 5-10 mm).
Life hack: how to adjust the clutch on an Izh-Jupiter 5 motorcycle yourself?
The adjustment procedure depends on the design features of Izhevsk motorcycles. The fifth generation is equipped with a shutdown mechanism, which is combined with a gear shift device. Adjusting the clutch control should begin by centering the machine's cam relative to the roller with the lever, which are mounted on the body of the right crankcase cover.
First of all, the distortions of the pressure plate (No. 1 in the photo) are removed, for which the lever on the steering wheel is secured with wire or rope in the squeezed position. Next, turn on 1st speed and rotate the rear wheel, while observing the axial runout between the pressure plates and the end of the drum. The nuts (No. 2 in the photo) that are closer to the point of maximum deflection need to be tightened, and the tightening force should be determined experimentally. Repeat the operation until the runout becomes minimal.
"Sores"
“Planet” was good in its time, except for the ill-conceived launch mechanism. For those who have “Planet”, I think there is no need to explain what “return” means. Personally, once it gave so much that it tore the kickstarter shaft in half, bent the gearshift shaft and tore the ratchet on the clutch basket. Those whose slippers fly into the sky are lucky compared to my version...
Adjusting the clutch springs
Adjusting the springs is not difficult, the main thing is to get it right. We start by placing the motorcycle on the center stand. Then remove the lid, draining the oil in advance. We squeeze the lever on the steering wheel to the limit and make sure to fix it. Next we turn on the speed, preferably the first one. We take the wheel and begin to rotate. We try to determine by touch how much effort we are applying. We look at the coupling as it rotates and determine which springs are loosely tightened. We mark them with chalk, then tighten them. We begin to rotate the wheel again and if you feel that the wheel has become easier to spin, then everything has been done correctly. The process must be repeated to achieve a better result. After this, we check the result obtained while moving. If, as the load increases, the clutch begins to slip. All springs must be tightened using nuts. In this case, all nuts must be turned the same number of turns.
IZH Planet clutch malfunction
Possible malfunctions that may occur during operation of the IZH motorcycle. Let's start with clutch slippage. This error indicates that the drives are slightly pressed together.
There may be several reasons:
- Incorrect setting
- The springs have lost their former elasticity
- The discs are worn out and become thinner
- Wear of drive parts
Clutch wires. This is when the lever is pushed all the way and the clutch is not completely disengaged. The discs are not evenly weakened in places that are in close contact with each other.
The main reason is the springs that compress the discs.
- © 2014 – 2021 MosCatalogue.net
- Blog
- Requests
- Copyright holders
- Denial of responsibility
- Privacy Policy
- Terms of use
- About the service
- Contacts
Engine clutch V-50, V-501M.
mitroxa,
BoNkA , New gears (if you installed a new basket or a different one) can howl until the teeth break in. This is due to errors in the manufacture of gears.
Or also vice versa. The transmission will howl the more the teeth wear out.
It is difficult to determine gear wear by eye, but significant wear can be seen immediately by the profile of the teeth and their working surface.
If the gears are exactly changed (one of a pair or both (it doesn’t matter), then the running-in of the teeth is disrupted and some time must pass before the teeth get used to each other. In this case, the gears should work in a gentle mode. If you give a full load, the risk of tooth breakage increases. As the gears run in, their noise decreases on its own, reaching a certain reasonable limit.
So drive carefully and everything will go away on its own. If you don’t want to, change the gears in pairs from where they already worked.
BoNkA , What do you think is on the basket? Isn't it a gear? Or did you separate the basket from the gear and then weld it again?
I am writing to you that if the gear is not used and the second mating gear is not worn out, then they will make noise until they break in.