In this article we will consider in detail the issues that relate to the correct adjustment of the clutch of the IZH Jupiter 5 motorcycle. The name of this motorcycle unit itself speaks about the main functions it performs, or rather, the crankshaft engages directly with the engine gearbox. Optimally, the clutch should be as smooth as possible without jumps. This is necessary for the movement of the motor vehicle and subsequent switching while driving. The clutch is located on the left side of the crankcase under the installed engine cover. In order to get to the clutch as quickly as possible, you will need to first drain the oil and unscrew the cover. In this case, you will need to unscrew all the necessary mounting bolts and then carefully remove all the levers.
REPAIR OF THE KICKSTARTER OF THE MOTORCYCLE “IZH-JUPITER”
After several years of operation of the IZH-Jupiter-ZK-01 motorcycle, released in 1980, the kickstarter pedal began to “fail,” making it impossible to start the engine.
At first this appeared sporadically, then more and more often, and finally the mechanism completely failed. After disassembling and superficial inspection of the ratchet clutch (Fig. 1), I found slight wear and small nicks in the teeth of ratchet 2 (part designation according to the catalog IZHYU1-128) and gears 4 (part IZHYU1-127). It seemed that by themselves they should not lead to refusal. An attempt was made to eliminate the defect by installing a homemade, stiffer spring 3 instead of the factory part IZHYU1-143. This caused the engagement to occur more frequently, but the defect could not be completely eliminated. I had to disassemble the unit again and study its operation more carefully. At the same time, it was discovered that, firstly, due to uneven wear, and perhaps inaccuracy in the manufacture of parts in some positions, simultaneous engagement of all teeth of the ratchet clutch is not ensured. In addition, the kickstarter gear 4 has a small height H; Even with slight wear and an increase in the gap, it warps - this is shown in Fig. 1. The picture that emerges is something like this. First, when you press the start pedal, when sector 6 of the kickstarter acts on gear 4, engagement occurs only with individual teeth. Then, as the parts wear out, the skew of the kickstarter gears 4 increases. Some teeth begin to work with the upper worn, rounded part. Pushing. the component increases, the ratchet teeth disengage (Figure 2) and the kickstarter pedal “falls”. Of course, in this situation it would be necessary to replace the worn parts - but where will you get them?
And I had to think about restoring the operation of the node on my own. There was no point in restoring the leading edge of the teeth by welding or in any other way at home (in mine, at least). The teeth are well hardened and their manual machining is almost impossible. A fairly common situation has arisen when it seems that nothing can be done, but it is absolutely necessary.
I have a small selection of tools; The most versatile device is an electric sharpener. I pinned all my hopes on him. For ease of operation, rivets 5 securing the ratchet were drilled out and the ratchet was removed from the outer clutch drum. Using a hard steel plate, the whetstone was “sharpened” to produce a sharp working edge. The first attempt to process the teeth, naturally, on another, completely unusable similar part, was unsuccessful, since the height of the teeth was small, and the working surface of the stone quickly wore out and became rounded. Then, instead of a stone, I attached a cutting sanding wheel approximately 2.5 mm thick to the sharpening axis.
Since it is impossible to apply lateral forces to the cutting wheel, I did not even try to restore the previous shape of the teeth. I immediately decided to trim them so as to ensure reliable engagement even when exposed to a twisting force. It was uncomfortable to work with, I held the parts suspended in my hands, and assessed the result “by eye.” True, all the work was carried out slowly, in order to avoid, at least, gross mistakes and not to overheat the metal of the teeth. In Fig. Figure 4 shows the electric motor of the sharpener 1, the cutting wheel 2 and the position of the workpiece 3.
In general, the processing turned out to be rough, but after assembling the unit and installing it in place, the final result, as they say, exceeded all expectations - the performance was completely restored, the engagement became absolutely reliable (Fig. 3). For those who want to repair the trigger mechanism on their motorcycle, go-kart or walk-behind tractor in this way, I can advise you to point the cutting wheel at an angle of approximately 45° (Fig. 4), but this value depends on the thickness of the circle itself. It is necessary to strive to ensure that the angle of engagement of the teeth is within 20-30°, and the engagement is carried out by all teeth simultaneously.
Do not strive to achieve a necessarily sharp upper edge of the teeth - in this case you will inevitably overheat it and weaken its strength. It is better not to approach the top of the tooth closer than 1-1.5 mm at all (see Fig. 16). Perhaps specialists with access to good equipment will say that the repairs were carried out in a barbaric manner. I won't argue. But, on the one hand, if necessary, many motorcycle owners can easily repeat it on their own, and on the other hand, without it, my motorcycle would have been sitting motionless in the garage for two years.
IZH Planet clutch malfunction
Possible malfunctions that may occur during operation of the IZH motorcycle. Let's start with clutch slippage. This error indicates that the drives are slightly pressed together.
There may be several reasons:
- Incorrect setting
- The springs have lost their former elasticity
- The discs are worn out and become thinner
- Wear of drive parts
Clutch wires. This is when the lever is pushed all the way and the clutch is not completely disengaged. The discs are not evenly weakened in places that are in close contact with each other.
The main reason is the springs that compress the discs.
I mounted the clutch and installed cork discs.
I decided to experiment, if I don’t like it, I’ll return the standard ones. To adjust, I used an electronic caliper, 4mm from the nut head to the bolt.
There are now fewer metal disks. I was still thinking about the chain guide, but I didn’t bother yet and assembled it without it. I think next year. Well, the visibility of the clutch has become many times easier. Previously, more effort had to be made, but now it’s almost like foreign cars.
I like I like 2
Other entries in this logbook
Again a rarity. Ignition switch, tray in the glove compartment.
Time passes, and I still slowly continue to equip the motorcycle with original spare parts. This time they were found in the vastness of Avito. Read more
Air filter mount.
As always, I am a hunter for rare parts) While going to the market, I accidentally noticed a motor from Izh Jupiter 2, and that’s what I saw on it. Read more
I assembled the motor.
After finishing the bolt and minor modifications, the assembly of the motor began. The gaskets were cut out independently. Armor is stuffed under the cylinder. Read more
Comments
Only authorized users can leave comments
won't it slip?
- Answer
- November 16, 2021 at 05:36
__vorbik__
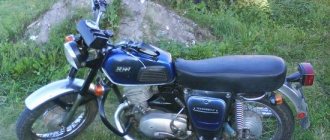
IZH Jupiter 5 “MRAZOTA”
My parents bought this motorcycle with wedding money in 1988. and in 1994 they put it in the garage because the family got a car. In 2007 I got it, and our relationship began. There’s no other way to call it) he and I are like cats and dogs, we love to test our nerves to the limit. 2007 Pulled it out of the barn next to the chicken coop. I washed it off the shit, started it, and drove around with minor repairs. 2009 The engine died and there were no funds for repairs. 2010 Complete disassembly, painting, engine overhaul with replacement of shafts, bearings, seals, gaskets, piston. A month later, the piston burned out (because at that time I was not yet a nanomechanic and had not heard anything about the thermal gap). As a result, I bought a piston kit with new cylinders assembled in short. 2011 April. 13 km from the house, the chain lock opened and gutted the rear casing of the star (in common parlance, a guitar) and that was the last straw. After that, the motorcycle was kicked into the barn with the words: GET OUT OF THE SOVIET MOTOR INDUSTRY! And a new YBR125 was purchased. 2015 My soul yearned for my friend, old grievances were forgotten, and my friend was transported from my grandmother to my garage. 2021 Attempts to revive this barn were ongoing. The day of dancing with a tambourine at the contact ignition was exhausting. We bought an optical ignition and it STARTED! and it didn’t just start, it FLYED. 2021 I decided to modify the engine and not touch the frame. But then, as always, I decided to go all out. Again a complete disassembly and then Ostap suffered!
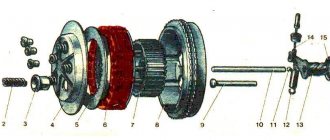
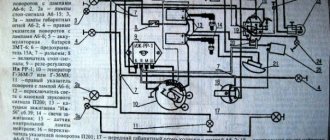
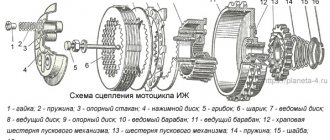
Clutch device of the IZH Planet 5 motorcycle
For those who are not good at technology, it is worth recalling that the clutch acts as a connecting element between the crankshaft and the gearbox. The large clutch gear is connected to the small crankshaft sprocket by a chain transmission, which is how torque is transmitted. In the normal state, the system ensures constant communication between the gearbox and the crankshaft and only when the clutch lever is pressed, the drive mechanisms increase the gaps between the elements in the multi-disc clutch system, thereby disconnecting the box from the crankshaft.
Owners of the IZH Planet 5 motorcycle are lucky; their clutch release system is simpler in comparison with the similar 5th Jupiter, which means it is unpretentious and easier to set up with your own hands. It looks like this:
- Shaped nuts;
- Springs;
- Cups;
- Pressure disk;
- Driven (steel) disk;
- Drive (plastic) disk;
- Driven drum;
- Large drum with large gear motor transmission;
- Clutch release pusher;
- Kernel;
- Ball;
- Spring;
- Worm;
- Cable;
- Washer;
- Screw;
- Screw.
When does the clutch need adjustment?
Clutch adjustment of IZH Planet 5 is required in two cases:
- Clutch "slipping". In this case, the clutch discs are not tightly connected to each other, which causes slippage of the drive discs and incomplete transmission of torque. You can notice this in the lag in actual engine speed and motorcycle acceleration. Especially noticeable during sudden acceleration or driving uphill. This situation can occur if the springs do not create enough force or there is no free play in the drive mechanism. Less commonly, slippage may indicate wear on the disc pack. Most often, the problem is solved by a simple adjustment; in other cases, disassembly, replacement of the package and assembly of the IZH Planet 5 clutch are carried out.
- The clutch "drives" . The opposite story is where the disks are partially connected all the time. This is expressed in kicks when engaging first gear, the motorcycle trying to leave with the lever depressed, or turning the rear wheel hanging out in gear. The reason may be a misaligned position of the pressure disk, as well as an increased gap on the engagement mechanism or clutch lever.
Note! If the IZH Planet 5 clutch basket has been disassembled/assembled, then adjustment of the mechanism is mandatory.
Often, clutch slipping and kicks during shifts do not appear due to a simpler and more common problem - cable wear. Before proceeding with full or partial adjustment of the mechanism itself, make sure that the drive cable is in satisfactory condition, it is securely fastened on both sides and moves easily inside the braid. After all, if it is stretched or rusted, it can become sour and then the clutch begins to slip.
Malfunctions and clutch adjustment of Izh motorcycles
There are two possible types of clutch malfunction: incomplete disengagement of the discs and slipping. If the motorcycle is slipping, it will not develop speed as the crankshaft speed increases. The reasons for this malfunction may include: wear of the discs, insufficient spring pressure due to loss of elasticity or loose adjusting nuts, incorrect adjustment of the clutch mechanism. When the clutch is not fully disengaged, the motorcycle wheel continues to rotate while the control lever is fully pressed. This may also be due to incorrect adjustment, or this malfunction may occur when thick oil is used, especially in cold weather. First of all, if you discover one of the clutch malfunctions, try to eliminate it by correct adjustment. First, you need to adjust the gap in the shutdown mechanism; this is done using the adjusting screw located on the right engine cover. To do this you will need a screwdriver and a 13 mm wrench. Using a wrench, loosen the locknut and use a screwdriver to tighten the screw until it stops, and then turn it in the opposite direction half a turn - one turn. Tighten the locknut with a wrench. Secondly, after this, adjust the free play of the lever using the cable adjusting screw on the left handlebar handle. It should be within 5-10 millimeters. The correct clutch adjustment can be checked in this way: place the motorcycle on a stand, engage first gear and try to manually turn the rear wheel with force. If the adjustment is correct, you will not be able to do this. Now you need to perform one more check: to completely disengage the clutch. To do this, in the same position (motorcycle on a stand, rear wheel not touching the ground), start the engine and engage first gear. Then fully depress the clutch control lever and apply the rear brake, the wheel should stop. Release the brake, the clutch is depressed, and the wheel should remain stationary if adjusted correctly. If it starts to rotate when the lever is pressed, you need to loosen the adjusting bolt on the right side of the engine.
To check the ease of movement of the clutch cable in the sheath, press the lever and release sharply. The lever should spring back to its original position. It may be worth lubricating the cable with a few drops of liquid oil, such as Autol.
Adjusting the IZH Jupiter clutch
On IZH-Yu and IZH-YUK motorcycles, adjusting the clutch release mechanism begins with adjusting the machine, for which the adjusting screw is screwed in all the way and released 1/4.1/2 turn, then tighten the lock nut. Correct adjustment is checked by pressing the switch pedal in any direction. Moving the front end of the shift pedal 5-5.5 mm from the neutral position should not lead to movement of the pressure plate. Then adjust by manually pressing the adjustment screw located in the left column of the clutch lever
on the steering wheel (free play 5-10 mm)
Checking clutch discs
The main clutch problems occur due to the fault of the discs. If the discs are crooked or worn out, then no amount of even a super couture adjustment will correct the poor performance of the clutch.
Wear is determined visually and only on plastic discs: we inspect the disc and if we find a crack or a broken hook on it, with which it enters the outer drum, or we see that the round protrusions on the working surface have long been worn out, we throw such a disc in the trash.
The curvature of the disks is determined as follows: place all the disks on the glass one by one and try to swing them
- If the disk wobbles, it means it is 100% crooked and should be in the trash.
- If the disk lies flat, leave it.
Adjusting the alignment of the motor transmission teeth
We put an adjusting washer on the input shaft of the gearbox, then we put the spacer sleeve of the outer clutch drum there. We put a spring washer on the crankshaft journal. We install the outer drum and the drive sprocket of the motor transmission on the engine, tighten the bolt on the sprocket. We apply a ruler to the sprockets and look at the alignment of the teeth under the motor transmission.
- If the teeth do not converge, we adjust their convergence by placing or removing adjusting washers under the clutch basket
In my case, the teeth of the basket and drive sprocket are aligned.
After adjusting the alignment of the teeth, remove the drum and sprocket from the engine and leave the adjusting washers and spacer sleeve.
We put the thrust washer of the kickstarter return spring on the gearshift shaft.
We put the kickstarter shaft on the shaft of the gear shift mechanism and insert the return spring hook into a special groove.
To avoid injury to your hand, tension the kickstarter spring only with the crank!
We put the claw on the shaft, tighten the bolt and, depending on personal preference, tension the spring. Personally, I tensioned the spring two turns. It turned out a little tight, but the paw didn’t dangle like snot and always returned to its place.
We install a basket with a sprocket and a motor chain on the shafts. We place a tin rod or stick under the chain and tighten the bolt on the sprocket with the maximum possible force.
We install the inner clutch drum on the shaft, put a special lock washer on it, screw on the nut, fix the drum with a puller and tighten the nut with the maximum possible force (left-hand thread, pull counterclockwise).
We look for the thickest one in the set of metal clutch discs - this is the thrust disc, it still has a groove on the inside - you can’t go wrong. We place the thrust disc with the groove towards the engine on the inner drum of the clutch basket, then we put a plastic disc and alternating the discs with each other we assemble the basket.
There can be 7 pieces of plastic disks on the “Jupiter” baskets. There are only 6 at Planetovskie.
We install the clutch rod into the input shaft of the gearbox: on “Jupiters” the rod is normal, on “Planets” it has a fungus. We put the pressure disk on the basket, insert the cups under the pressure springs into the holes of the pressure disk, then insert the springs into them and clamp the springs with special nuts.
Before installing the nuts, they need to be hammered: lay the nut on its side and hammer it into the flange with a chisel. Where to put it at risk, you will see: there are factory ones. There is no need to tighten the nuts tightly - screw them so that their ends are 5-6 mm higher than the bolts, this will be quite enough.
After final assembly of the clutch, we carefully adjust it.
Functional purpose of the gearshift clutch
Before you adjust the clutch on the Izh-Jupiter 5 motorcycle, it’s a good idea to understand its purpose and principle of operation. The essence of the transmission clutch:
- Ensuring the transmission of torque from the large gear of the motor transmission to the gearbox input shaft.
- Short-term separation and smooth connection of transmission elements to each other.
Izh motorcycles were equipped with a mechanical clutch, the operation of which is based on the friction force between the driven and driving disks. It is a multi-disc design operating in an oil bath - a classic arrangement that the Izhevsk Machine Plant used until 2008. Working in tandem, the main chain drive and four-speed gearbox are reliable and proven by many generations of motorcyclists.
Clutch Spring Adjustment
Adjusting the springs is not difficult, that's the main thing. understand correctly. Let's start by mounting the motorcycle on the center step. Then remove the cap before draining the oil. The clutch lever is compressed to the limit and will definitely lock. Next comes speed, preferably first. Take the wheel and start spinning. We are trying to determine how much effort we are making. We look at the clutch as it rotates and determine which springs are loose. We mark them with chalk and then tighten them. We start turning the wheel again, and if you feel that the wheel is turning easier, that means everything is done correctly. The process must be repeated to achieve the best result. After that, we check the result while moving. If the load starts to clip when the load increases. All springs must be tightened using nuts. In this case, all nuts must have the same number of turns.
An important detail - the cable
Owners of used motorcycles do not always take into account the essential role of the cable in the clutch control system. The cable itself is practically not subject to stretching, but the sheath loses its qualities. Its frame is a spiral under a layer of PVC.
After prolonged use, the frame becomes pliable and excessively springy, which affects the useful stroke of the lever. If the cable sheath is worn out, the clutch will not operate normally, so it is important not to miss the moment and replace the cable in a timely manner.
Source
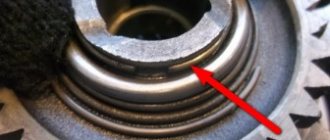
Checking the clutch drum
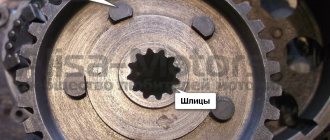
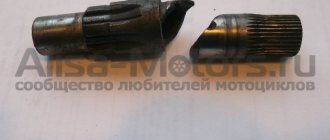
The first step is to check the foot start ratchet mechanism. This is where the main load falls. Turn the clutch basket over with the ratchet facing you, remove the retaining ring and disassemble the ratchet.
We inspect the teeth of the ratchet: they should be sharp without chips or other damage. If the teeth are wrinkled or broken, the winding foot will slip 100%. Many suffer from this problem due to thick oil or a weak spring - in fact, the reason for the foot slipping lies in the ratchet.
If the teeth on the basket are not worn out, it is advisable to rivet the ratchet: buy a new one in the store or remove it from another basket and rivet it. I riveted several baskets and they went without any problems until the “victory”...
An example of ideal ratchet teeth.
Often and thickly, the rivets on the ratchet weaken and if you don’t notice this in time, they are cut off. To prevent this trouble from happening to you, move the ratchet with your fingers. If it wobbles, drill out the old rivets and rivet them again. Pulling old rivets usually does nothing.
If you are making a clutch “for yourself” and for a long time, be sure to check the condition of the teeth for the motor chain.
If the teeth have already begun to turn back, then such a basket should be immediately thrown into the trash. It will no longer be of any use: the operating noise will increase, it will 100% eat up the motor chain, and there’s never an hour when one “fine” day it will lick your teeth and you will then be forced to push your jalopy for a long time and tediously...
An example of worn teeth.
It is not uncommon for the basket body to burst. Unfortunately, the body is made of cast iron and welding it will be problematic. If you find cracks on the body, try to find a welder who welds non-ferrous metals, the so-called “argon welder”; they usually take on welding cast iron.
An example of cracks in the basket body. By and large, this basket can still be saved: chamfer the cracks, weld and turn the seams on a lathe. But the teeth under the motor chain were worn out and I threw it away.
Clutch setting
Adjusting the springs usually does not take much time and is not considered a complicated procedure. To carry out these actions, the motorcycle is placed on the stand, the oil is drained, and then the installed cover can be removed. After this, the special lever will need to be squeezed to the maximum and securely fixed. Then it is recommended to turn on the first or second speed, take the wheel and start rotating. Based on the load, we determine which springs are more tense and which are looser.
Motorcycle design
But structurally the motorcycles of these modifications did not differ from each other. All components of the motorcycle were mounted on a tubular frame. To provide suspension for the rear wheel, there was a subframe at the rear of the frame, attached to the frame by a non-rigid bolt connection. A power unit with a gearbox and a steering column equipped with a telescopic fork were installed on the front part of the frame. The fuel tank was located above the engine, and in front of it was the steering wheel, dashboard and headlight.
Behind the tank, the entire upper part of the motorcycle was allocated under the seat, with a rear fender with a brake light attached to it. Below the seat there were two glove compartments. The left one was for the battery, and the right one was for tools.
The rear wheel was installed on the existing subframe. To provide its suspension, the subframe, in addition to the non-rigid bolted fastening, was connected to the frame by means of spring-loaded oil shock absorbers. The springs had three-position adjustment, which provided a change in the rigidity of the rear suspension. The rear wheel was driven by a chain drive.
Exhaust pipes extending from the engine stretched along the entire motorcycle. To protect the driver and passenger from possible burns, the pipes were attached under the running boards.
The motorcycle was equipped with two-cam drum brakes with mechanical drive on both wheels. Subsequently, some versions were equipped with hydraulic front disc brakes.
IZh Planeta-5
This model has been produced since 1987 and, thanks to its quality and reliability, is still loved by many today. The bike is resistant and unpretentious to the weather, starting it will not be a problem even at -30, and you can ride on any roads.
Engine characteristics and repairs in general
Planet-5 has a 346 cc single-cylinder engine. cm, which operates in 2 clock cycles. Its power is twenty-two horsepower, which is a very good indicator, especially considering its small volume. This is quite enough for a speed of 120 km/h, but many are thinking about how to make the engine more powerful. Fortunately, its design is very simple, and even a less experienced motorist can handle disassembly if desired. If you want to stand out, the engine can easily be modified with a few manipulations. Boosting can be very different: from quite complex changes to a simple muffler replacement, due to which the vibration will become weaker and the sound will be generally more aesthetically pleasing. The motorcycle is equipped with standard electrical equipment, a multi-disc clutch, a four-speed gearbox, an air cooling system, and one muffler. Planet-5 is fueled with a mixture of gasoline and oil. An undoubted advantage is that there is no need to remove the engine to repair the gearbox. Repair of the IZH Planet-5 motorcycle consists mainly of operations with the engine. However, before you begin to disassemble it, especially not for regular repairs, but to improve it, you need to delve into the maintenance of your pet in order to avoid troubles in the future. It is recommended to carry out engine repairs according to the instructions in the factory maintenance book. But it happens that it is lost or was not even received - then you need to follow the algorithm of actions given below.
Engine overhaul
This process goes like this:
put the repair area in order, and also thoroughly wash the engine itself: if dirt gets inside, it can cause a new breakdown; remove the exhaust pipe (it is better to do this not completely, only from the motor side, fixing it with a stable part); remove the cylinder cover by unscrewing its 4 bolts, and then the cylinders
You need to act carefully so as not to damage the gasket, as this will cause problems with pressure and compression; disconnect the chain boot tube; knock out - carefully so as not to bend - the front pin that secures the engine; Unscrew the bolts and nuts from the back to unfasten the engine, then remove it and install it in a stable place; unscrew all 7 bolts on the pallet, then remove it; remove the flywheel plate with the gasket, then mount the engine - either on a workbench or on a solid table; loosen the bolt that secures the take-out flywheel (for this you need a long, strong pry bar, as well as a socket wrench), the thread of the head is very soft, do not overdo it, so as not to tear it off; divide the pallet (no need to remove the halves too far, they will still be needed); remove the flywheel with veneer; remember the position of the adjustment washers and remove the shafts one by one - front, rear, and then the tail shaft; take care of the crank covers: remove them and the rings, carefully unscrewing the pins; remove the crankshafts from the pallet halves; remove the crankcase bearings; clip, unscrew the crankshaft screws; remove the installation rings, then knock out the seals.. The internal combustion engine is assembled in exactly the opposite order
It should be remembered that the bolts must be tightened with force.
The internal combustion engine is assembled in exactly the opposite order. You should remember that you need to tighten the bolts with effort.
Adjusting the Voskhod motorcycle clutch
The engine was completely disassembled for a major overhaul. During which the worn coupling parts were replaced. In our case, slave and master disks.
The springs that compress the discs were replaced if they were stretched out or damaged. The clutch drum has been replaced. The thread on a bolt or nut is broken; the purpose of these parts is adjustment.
If the speedometer gearbox with the clutch release mechanism has been replaced or repaired.
In the photo: 1 – adjusting screw; 2 – fixing nut.
In the opposite case, we squeeze the lever, we want to disengage the clutch and stop, but this does not happen. The motorcycle does not obey and continues to move. Clutch leads
All you need is a minimal adjustment tool
One simple screwdriver and a special 10mm tubular socket wrench.
One important condition: the screwdriver must fit freely inside the key and be a little longer
Clutch adjustment
Clutch adjustment parts are not located on any Soviet motorcycle, as they are on Voskhod. We unscrew the special plug in the center of the left crankcase cover. Inside we see an adjusting screw 1 with a locking nut 2. We insert a key onto the nut and loosen it.
An important condition is to hold the nut with a wrench, only then insert a screwdriver into the bolt inside the wrench and start rotating. If this condition is not met, it is not possible to adjust correctly
note
Because if you don’t hold the nut or bolt and rotate one, they still rotate together, which leads to misadjustment.
We tighten the adjusting screw inward until we feel the stop against the fungus. Then use a screwdriver to unscrew the screw a quarter or half a turn back. So that the screw does not touch the fungus, we hold the screw in this position with a screwdriver. And only then we lock the screw and tighten the nut tightly to secure it.
All the main work is completed, all that remains is to install the recommended free gap of 5 - 10 mm on the control lever. This is done using a special bolt on the lever itself.
The long-awaited exciting moment. We start the motorcycle, warm it up and check our work. We move off smoothly. We sharply increase the engine speed. We give a load to the engine. Switching speeds. We brake and stop. If you don’t like something, you can repeat the adjustment and achieve the optimal clearance.
It’s impossible to do everything perfectly the first time, unless you’re lucky.
Adjusting the IZH Planeta clutch
To adjust the clutch control mechanism of IZH Planet 5, IZH Planet 4, IZH-56, IZH-49 motorcycles. adjusting screw 1 and lock nut 2. Loosen the lock nut by turning the screw clockwise to reduce the free movement of the clutch lever . Turning the screw counterclockwise increases the free movement of the lever. Once the adjustment is complete, the lock nut is tightened and the normal free wheel is determined by moving the end of the clutch lever by 5.10 mm.