The IZH Planet 5 motorcycle, created in 1987 by the Izhevsk plant, is still popular among motorcyclists. This is a very high-quality and reliable bike, characterized by durability, simplicity and affordability. Disassembling the IZH Planet 5 engine is quite simple even for amateurs. The design of the motorcycle itself does not contain complex elements.
Planet 5 is unpretentious to weather conditions. If you want to start the engine in a cold winter, it will surprise you, even if it is -30 degrees outside the window. Moreover, the motorcycle was designed to ride on various types of roads, which makes it very passable and an excellent assistant in agricultural work.
Like its counterpart, Jupiter 5, IZH Planet 5, whose engine performance is not much inferior to its “brother,” has a strict classic style. However, it has a number of advantages over Jupiter, the main of which are:
- single cylinder engine;
- disassembly and repair of the gearbox without removing the engine;
- presence of one muffler.
However, there is also a big disadvantage . The Planet's crankshaft is much more massive, so it operates at lower speeds, which makes it less powerful. Although the design of the IZH Planet 5 engine is practically no different from the Jupiter one. True, breakdowns occur no less frequently, so if you switched from one motorcycle to another, there should not be any special problems with operation and maintenance.
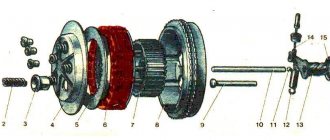
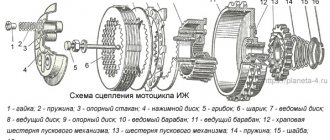
IZH Planet 5 engine diagram
| 1 - spark plug; | 2 - cylinder head; |
| 3 - cylinder: | 4 - piston; |
| 5 - piston ring; | 6 - piston pin: |
| 7 - crankcase; | 8 — channel for lubrication of the main bearing; |
| 9 — roller bearing; | 10 — left oil seal; P - left cover; |
| 12 — motor chain; | 13 - ball bearing; |
| 14 — crankshaft sprocket: | 15 — outer drum of the clutch; 16 — clutch disc; |
| 17 - inner drum: | 18 — pressure disk; |
| 19 — spring; | 20 - shaped nut; |
| 21 - pusher; | |
| 22 — ball bearing; | 23 — trigger gear; |
| 24 — gear shift lever; | 25 — trigger lever: |
| 26 — trigger shaft; | 27 — gear shift shaft; |
| 28 — trigger sector; | 29 - spring: |
| 30, 31, 32. 39, 40, 42 — gearbox gears; | 33 — gear shift fork; |
| 34 — emphasis; | 35 — gear shift shaft; |
| 36 — gearbox cover; | 37 — installation sleeve; |
| 38 — right cover; | |
| 41 - intermediate shaft; | 43 - ball bearing; |
| 44 - roller bearing: | 45 - secondary shaft; |
| 46 - input shaft: | 47 — clutch adjusting screw: |
| 48 - worm ball; | 49 — clutch worm; |
| 50 — cap of the secondary shaft nut; | 51 - oil seal; |
| 52 — asterisk; | 53 - generator; |
| 54 — right oil seal; | 55 — roller bearing; |
| 56 - gasket; | 57 - crankshaft; |
| 58 - bypass channel; | 59 — exhaust window; |
| 60 - decompressor |
With a power of 22 horsepower, the engine capacity of the IZH Planet 5 is 346 cc . This is a very good indicator for such a small volume. For normal use, a speed of 120 km/h is sufficient. True, the dynamics of the Planet are slightly worse than Jupiter, and unnecessary vibrations are disturbing on the road. However, not everyone is satisfied with such indicators, so many are thinking about how to increase the engine power of the IZH Planet 5.
In general, the bike has standard electrical equipment, an air cooling system, a multi-disc clutch and a 4-speed gearbox. The engine itself operates in two strokes. An oil-gasoline mixture is used for refueling. As you can see, the performance of IZH Planet 5, whose engine characteristics are not much different from Jupiter, can allow it to act as a “workhorse”.
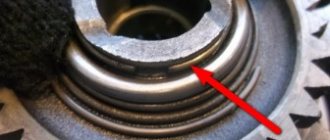
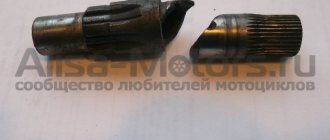
Checking the clutch basket inner drum
The inner drum is eternal by definition. The only problem that arises with it is that it breaks and sometimes cuts off the splines and the fit of the bolts under the pressure springs becomes loose.
Place the drum on the shaft and swing it:
- If the drum dangles too much on the shaft, inspect the splines and if they are broken, replace the drum with a new one.
Loosen the bolts under the compression spring one by one:
- If the bolts wobble, knock them out of the drum, anchor the seats and hammer them back into the drum.
Assembly and disassembly
Before you think about power, you need to understand motorcycle maintenance. Often, chasing speed and appearance, owners forget about the basic rules for operating their pet. Due to negligence, and not only, various types of breakdowns occur. You can troubleshoot problems yourself. Considering that disassembling and assembling the IZH Planet 5 engine is very simple, they can be done at home. However, it is recommended that you consult the factory-produced motorcycle operation and maintenance book.
There are cases when the maintenance book was lost long ago, or was not received at all upon purchase. In this case, here is a simple procedure for disassembling the engine:
It should be noted that the cleaner your workplace is, the better the repair will be done, since dirt that gets inside the engine can make it difficult to operate and even cause another breakdown. Don't be too lazy to wash the engine well before work .
Write down or mark the progress of your actions. This will help with assembly. Group the parts in the order they are disassembled and assemble them by location. The more organized the disassembly process is, the faster you will assemble the IZH Planet 5 engine, the technical characteristics of which will once again delight you.
- So, the first thing you need to do is remove the exhaust tube. It will be most convenient not to unscrew it completely, but only from the engine side and tie it to a stable part.
- Now proceed to remove the cylinder cover, which is secured to four bolts and the cylinders themselves, being careful not to damage the gaskets. Damage to the gaskets will lead to loss of engine pressure and compression.
- Remove the tube from the chain boot.
- Knock out the front pin strengthening the engine. Knock it out carefully; the bent part will not fit back in.
- Now proceed to the engine mounts. Remove all nuts and bolts from the rear of the engine.
- When the engine is not secured, move it to the side on a stable surface. There are seven bolts on the pallet that need to be unscrewed. Then carefully remove the tray. Remove the outboard flywheel plate and gasket and secure the engine. It is better to fix the engine on a workbench; if you don’t have one, then a massive table will do.
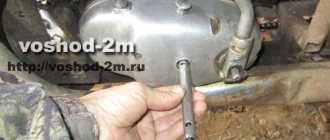
- Let's move on to the take-out flywheel. To loosen the bolt holding the flywheel in place, you will need a socket wrench and a long, sturdy pry bar. The carving on the cap is quite soft; if you overdo it, you can tear it off.
- Then we separate the halves of the pallet. They will still be needed, so we don’t put them away in the “far corner”.
- Now we move on to the take-out flywheel and veneer. They are easy to remove and do not require any special skills.
- Having remembered the locations of the adjusting washers, remove the front, rear and follower shafts in sequence.
- Let's move on to the crank chamber covers. After unscrewing the pins, carefully remove the covers and rings.
- Then you need to return to the pallet again. Remove the crankshafts from its halves.
- Next, remove the bearings of the crankcase halves. Unscrew the race and screws with the crankshaft oil seal.
- And the last step. Remove the installation rings and knock out the seals. Assembly is carried out in the reverse order, but it is necessary to tighten the bolts and studs with certain efforts. Otherwise, there should be no questions about how to assemble the IZH Planet 5 engine.
Installation of bearings and seals
We install a retaining ring in the left half of the crankcase.
Depending on the model of the main oil seal, we install a spacer sleeve in the mounting hole of the main bearing, or, if the oil seal was initially wide (there are some), we heat the crankcase and, on the inside of the crankcase, place the oil seal until it stops against the retaining ring.
My engine had a regular narrow oil seal, so I put in a bushing.
Using a mandrel, install the main oil seal into the preheated crankcase.
Quickly, before the crankcase cools down, place the oil guide washer on the oil seal. The oil guide washer has a saucer-shaped profile. We place it on the oil seal so that the concave side faces us, and the curved side faces the clutch basket.
While the crankcase has not cooled down, we press the outer race of the main bearing into it using a mandrel.
If you are going to replace the main bearings with new ones, don’t be lazy: find a sheet of iron 7-8 mm thick, cut a wedge in it for the connecting rod, pass the sheet of iron between the cheeks of the crankshaft and use a mandrel to drive the main bearing onto the axle.
This way you will protect yourself from damage to the crankshaft. The main bearing has a very high interference and fits into the axle with a very large force. It is not uncommon for people to simply knock out the axle (the axle on the planetary crankshaft is pressed into the cheek) inside the crankshaft, but they were never able to put the bearing on.
Native made in USSR 2505 KM
Supply and demand
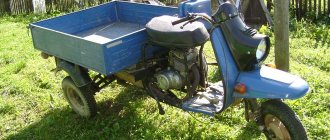
Initially, the model was created in a single version; later, the design bureau developed a side trailer, which became an addition to the motorcycle. The new IZH Planeta-5 with a sidecar was produced in small batches, since customer demand was low. The main production was focused on the mass production of two-wheeled motorcycles. IZH Planet-5, whose technical characteristics were at the level of general consumer demand, was modernized many times. At the same time, the quality of the motorcycle increased, the exterior became more modern, and the service life of the units increased.
Transmission
Its characteristics are as follows:
- transmission of rotation to the clutch from the crankshaft - double-row chain;
- clutch - multi-disc in an oil-sealed ditch;
- Gearbox - three-shaft, four-speed, located in the engine crankcase;
- transmission of rotation to the rear wheel from the gearbox is a single-row chain.
The IZH Planet-5 engine is characterized by the following transmission ratios:
- crankshaft/clutch - 2.17;
- Gearbox/rear wheel - 2.33;
- first gear - 3.88;
- second gear - 2.01;
- third gear - 1.26;
- fourth gear - 1.0.
Running parameters
This model has the following parameters:
- frame - welded, tubular;
- front suspension - telescopic fork, with hydraulic shock absorbers and springs;
- rear suspension - pendulum, lever, with hydraulic shock absorbers, spring-loaded;
- tire dimensions in inches - 3.50 x 18;
- wheels – spoked, with vertical-axial adjustment;
- front brake - disc with hydraulics or drum two-cam with mechanical drive, depending on the production series;
- rear brake - drum, with mechanical drive.
Additional equipment of the IZH Planet 5 motorcycle: trunk, roll bars, fairings. For those who like to travel, it is recommended to attach bags for small items on the sides of the trunk.
Improved ride quality
The icing on the cake, and in our case the final touch of tuning, is the improvement in driving performance. Some of the tuners approached this issue earlier when they sawed the frame of their motorcycle or raised the tail of a future crossover. For the rest, first of all, you should get rid of your original tires. Among its advantages, only wear resistance can be noted, for which you pay with your safety. It is both universal and useless. The lugs are practically useless; if they get into a mess, under normal conditions on the highway it is noisy, but relatively holds the road, turning into a killer on a wet highway.
Therefore, without hesitation, we throw it away and purchase road, cross or all-purpose tires, based on your requirements. The second point is the suspension. If everything is generally clear with the rear shock absorbers, they are extremely reliable and, in addition, have stiffness settings, then the front fork does not leak only for those who have chosen a different brand. There are two ways to get out of this situation. The first is to add thicker oil. The second is to carry out a complete overhaul of the feathers and replace all parts. Both options do not last long, so the most demanding owners simply change the fork to an imported one, while the rest endure all the shortcomings of their iron horse.
Load capacity
The IZH Planeta-5 motorcycle differs from other models in its class in that its engine has powerful traction at low speeds. This makes it possible to operate the machine in off-road conditions, when you have to move at a speed of 5-6 km/h. First gear ensures smooth running with low fuel consumption. Comfortable driving at low speeds is also facilitated by a 7-disc clutch with a cam engagement mechanism, which allows you to reduce engine speed to minimum values. Thus, “IZH Planet 5” will go where the engines of other motorcycles stall and they have to be transported by hand. The motorcyclist gets the opportunity to pass through an uneven section of the road with minimal losses.
Photo report: Repair (repressing) of the crankshaft of the Izh-Planet motorcycle - SCOOTERS AND MOTORCYCLES
Due to a gross design miscalculation, the crankshaft of the engine of the Izh-Planet (SZD) motorcycle, having traveled some measly 5,000 km, successfully “grunted” (knocked). Even Chinese plasticine goes through many times more, but here is “Planet”. How so? Of course, to clarify the picture, it’s worth making a little reservation: The crankshaft, the repair of which will be discussed in this article, is slightly different in design from the original “planet” one, since it is from the SZD (motorized sidecar) engine. But in essence, there is practically no difference between these shafts and engines. The reason for the rapid failure of the crankshaft was that the bearing of the lower head of the connecting rod, due to a gross design flaw, was not at all lubricated with oil during operation.
Here, that same depression in the cheek, of unknown purpose. But the oil channel (ordinary chamfer) on the “native” connecting rod, the channel must be said: it was made to “fuck off”, and it’s not a channel in essence, but another Soviet bullshit ( Even the Chinese don’t allow themselves to do this). Through such a channel, lubricant cannot even theoretically flow to the bearing. Now look, if you put a new connecting rod with developed channels for lubrication, then all the same, the channels are blocked by the walls of the recess. Our task for today: Install a new connecting rod, instead of the old one, in the crankshaft, having previously taken care of its normal lubrication. And then, the whole thing must be carefully aligned using special measuring tools. First, the crankshaft must be disassembled.
We place the crankshaft on the sheet. We lay the sheet on some powerful beams so that the crankshaft journal hangs freely in the air, take a suitable mandrel, place it on the finger and use a heavy sledgehammer to knock the finger out of the cheek. After removing the finger from one cheek, take the second cheek, place it on the sheet and knock out the finger in the same way. Before removing the finger, remember the main rule: Never try to knock out a worn finger all the way through the second cheek! During engine operation, the working surface of the bearing pin of the lower connecting rod head takes on an elliptical shape, so if you decide to knock out the pin with a worn surface through the cheek, the result will be the same - you will violate the geometry of the hole for the pin in the cheek. Because of this, the new finger will no longer stay in such a hole! Previously, a new connecting rod was purchased from the online store (factory-made, not 100% made in China). We are looking for the thinnest and most worn-out diameter cutting disc for the grinder, prepare a container with water in advance, install the disk on the grinder and proceed to finalizing our connecting rod
Such a groove is quite enough to lubricate the bearing; as you can see, due to the timely cooling of the part with water, there are completely no traces of blue. After cutting the groove, we take the files and carefully sand all the burrs, sharp corners, “other jambs” both inside and outside. The connecting rod is modified, now you can start assembling. We lay any cheek on some flat surface (preferably wooden) and Using a mandrel, a heavy hammer or a small sledgehammer, we drive the bearing pin into the cheek. Be careful that your finger does not stick out of your cheek. We put the support washer on the finger, then we put the connecting rod with the pre-washed bearing there and put the second washer on top.
You shouldn’t push the cheeks together too much; bring them together so that there is a small gap (0.15-0.2 mm) between the connecting rod and the cheek. The final stage in all this work will be the final alignment of the crankshaft.
In case of any discrepancies in the thickness of the crankshaft, we either move the cheeks in the desired direction or compress them. Until the thickness of the crankshaft in all measurement locations is absolutely the same.
After we have equalized the thickness, we place the crankshaft on the prisms, install the indicator on the stand and proceed to the final one. We turn the crankshaft so that the indicator arrow shows maximum runout. We take a chalk and put a mark along the axis of the indicator. We take a metal plate, cover it with a sheet of some non-ferrous metal, in our case the role of the non-ferrous metal is played by a piece of lead. And lightly hit (where the mark is) with the marked cheek on the slab. Afterwards, we install the crankshaft on the prisms and check the runout, and repeat this until we can reduce the runout of the axles to the minimum possible value (no more than 0.03 mm).
Noise reduction
At the very beginning of production, the new IZH Planet-5 motorcycle caused quite a lot of complaints about the high noise level. In this regard, it was necessary to modernize the engine. At medium and high speeds the piston skirt could be heard knocking. There was a need to increase the diameter of the piston by several microns so that it interacts more closely with the cylinder mirror. However, this method does not always pay off, since there is a danger of the engine jamming. Nevertheless, the design bureau took a risk, calculated the dimensions correctly, and the engine noise decreased significantly.
Sources of noise also lay in the chassis. The rear suspension, which is the most active part of any motorcycle, needed to seal the connection between the hydraulic shock absorbers and the pendulum fork. Special rubber silent blocks were installed to insulate the metal parts, resulting in reduced noise.
The muffler, which was originally direct-flow, raised quite a lot of questions. The exhaust rumble exceeded the permissible decibel limits. We had to radically change the design of the damper. The internal cavity of the muffler was equipped with mesh partitions, which significantly reduced the noise level.
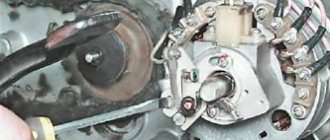
Ignition
The production of the IZH Planeta-5 motorcycle began during the perestroika years. The USSR was experiencing changes that affected almost all sectors of the national economy. At the same time, the staff of the Izhevsk Machine-Building Plant tried in every possible way to maintain its production potential. Motorcycle production was expanding its base. The IZH Planet-5 model began to be equipped with a modern ignition system operating on an electronic basis. The contactless principle was new at that time, and many consumers were distrustful of the “know-how.” However, domestic motorcyclists soon became convinced of the reliability of the BESZ and the ease of maintenance of the electronic system. The main problem of the standard distributor-breaker, contact burning, is a thing of the past. The first motorcycle on the territory of the USSR, on which the most modern functional devices were installed, was considered the IZH Planet 5. Electronic operating principle ignition was one such device. However, some motorcycles were produced with outdated, but quite reliable contact breakers.
Wiring
The IZH Planeta-5 motorcycle is equipped with a standard set of incandescent lamps, switches and instruments. The 12-volt lamps are arranged in such a way that each can be replaced if necessary within a few minutes. The total number of light bulbs is 17 pieces, including:
- parking light bulb;
- high and low beam headlights;
- control lamp, responsible for the operation of the generator;
- speedometer indicator light;
- turn signal lamps on the motorcycle handlebars, rear fender and side trailer;
- side trailer marker lamp;
- trailer brake light;
- tail light lamp;
- motorcycle brake light lamp;
- high beam indicator light;
- light for monitoring the neutral position of the gearbox;
- turn signal indicator light;
- neutral signal light.
The electrical circuit of the motorcycle includes the following devices:
- generator;
- turn signal switch;
- brake light switch;
- fuse;
- neutral switch;
- ignition switch;
- sound signal;
- accumulator battery;
- turn signal switch;
- spark plug;
- ignition switch.
The electrical system includes a generator that powers an automatic non-contact ignition, independent of the battery. The IZH Planeta-5 motorcycle, whose wiring meets all safety requirements, is considered a good example of the rational use of electrical appliances.
Clutch adjustment IZ Jupiter
On motorcycles IZH Yu and IZH Yu K, adjustment of the clutch release mechanism begins with the release mechanism, for which the adjusting screw is screwed in all the way and released 1/4 -1/2 turn, after which the lock nut is tightened.
The correct installation is checked by pressing the shift pedal in one direction or another. Moving the front end of the shift pedal 5-5.5 mm from the neutral position should not lead to movement of the pressure plate. After this, the manual release is adjusted using the adjusting screw located in the left post of the clutch lever on the steering wheel (the free play is 5-10 mm).
Modifications
- The IZH Planeta-5 model is basic.
- Model with two mufflers, hydropneumatic front suspension, disc brake.
- Modification with separate lubrication circuits, contactless electronic ignition system, spring shock absorber with hydraulics.
- Modification with cast light alloy wheels.
- Model with double-cam drum brake mechanism of the front wheel.
- Model with a drum brake on the front wheel and a combined lubrication system.
- Modification equipped with knee fairings and a luggage rack.
- Model with cast wheels, luggage rack, half-fairings and roll bars.
- Modification with two mufflers and front drum brake.
Required Parts
In order for the ignition system to work correctly, a number of auxiliary parts are required. They are listed below:
- Switch for BSZ VAZ cars. You should not choose exclusively from the low price segment. The Astro switch has a lot of positive reviews;
- Hall Sensor. The best option for Jupiter 5 is a similar manufacturer VAZ. By purchasing it in branded packaging, you protect yourself from counterfeits;
- Ignition coil with two terminals. You should choose between the gazelle engine number 406 or Oka with an electronic ignition system;
- A pair of silicone armor wires with rubber caps;
- The modulator is a butterfly-shaped plate made of iron.
Modulator
The most difficult stage is the production of the modulator
It is important to maintain the required shape. The more reliably the required dimensions are observed, the lower the likelihood of problems occurring after implementing the system, that is, there will be no need to adjust it using a file
The ignition timing must match on any cylinder used.
The bolt hole must be located in the middle. Otherwise, the engine operation will not be synchronized. It is also recommended to check the integrity of the crankshaft bearings. If you find defects, you should immediately replace it.
The contact ignition is not able to work normally if the bearings are damaged. The thickness of the part should not exceed one and a half millimeters. If it is thin, it will not be possible to avoid deformation, and if it is thick, it will come into contact with the surface of the hall sensor housing.
To create the plate, it is allowed to use any material except steel. Aluminum and others should not be used as they are not magnetic. The drawing that must be followed can be found in the public domain. The presented diagram will be useful to those people who decide to modernize the vehicle ignition device. Below are methods for installing electrical ignition devices in Jupiter.
It must be turned by a professional turner. He will make a simple disk and draw on it the markings of elementary distances between the corners. Then, in accordance with it, you will cut out the necessary sectors at home. The cost of the modulator is seventy rubles.
It is not advisable to use an ordinary plate, since its width is less than twelve millimeters. This will not be enough to fully accumulate the energy resource in the coil. Of course, it can be installed, but achieving four thousand revolutions per minute will become impossible.
In addition to the above you will need:
- A stud with an applied thread of seven millimeters, pitch 1, as well as a pair of nuts with washers of the corresponding parameters. The priority material for these components is brass. This is explained by the least magnetization of the plate from the generator rotor. If you use a standard bolt, then difficulties may arise with the introduction of ignition. The bolt tends to follow the modulator as it is tightened. However, it is necessary to observe the leading indicator, maintain the same position of the rotor and modulator, and tighten the bolt. It is advisable to use a pin, since many are not able to perform all the necessary actions in total;
- A set of wires with connectors for ignition without contact from VAZ. This part can be purchased or made with your own hands.
"IZH Planet 5": repair and prevention
Motorcycles, like any road equipment, need maintenance and repair. The IZH Planet-5 model has a fairly long service life, but at the same time the machine requires preventive and sometimes major repairs. Routine maintenance of the motorcycle can be limited to timely lubrication of the hinge and sliding components, which include the rear suspension bushings, chain drive, accelerator handle and front brake lever.
The brake mechanisms themselves also need periodic cleaning. If the front wheel of the motorcycle is equipped with a disc brake, it must be disassembled and washed with a liquid cleaner such as Schnell-Reiniger or another product of a similar effect. As a rule, front disc brake maintenance is carried out when replacing the pads.
If the motorcycle has drum brakes, they also need to be periodically disassembled, cleaned and adjusted. This must be done at least once a year, and in the event of extraneous sounds during movement, knocking or friction, an inspection of the brake mechanism should be carried out immediately. The malfunction can be eliminated by adjusting the unit, and if the part breaks or becomes deformed, it must be replaced. It is unacceptable to ride a motorcycle with faulty brakes.
Crankshaft alignment
The crankshaft has been assembled, all that remains is to eliminate the runout of the shafts (balance), many people think that you can’t do this without a lathe, but everything ingenious is simple.
Measure each neck with a caliper as shown in the photo below, usually they are the same size, but sometimes they are slightly different in size. This dimension must be taken into account when aligning the crankshaft.
Photo. We measure the crankshaft cheeks.
All that remains is to attach the rod to the crankshaft cheek as shown in the photo below. It will be like this, first place the barbell on one cheek and press it with your finger, the barbell will lie perfectly flat on the cheek, if this cheek is shifted upward, a gap will appear between the barbell and the second cheek. If the cheek is lower, the bar will lie slightly obliquely.
Photo. A motorcycle crankshaft with a rod is shown; the arrow shows the gap between the rod and the cheek.
Your task is to achieve alignment of the crankshaft cheeks without gaps by applying the bar alternately to each cheek. The photo below shows how you can move the crankshaft cheek with a hammer blow. Just be sure to take into account the strength of the crankshaft cheeks, the crankshaft on which I am showing from a cross-country ChZet, it is hardened and is not afraid of impacts. But most of the crankshafts from road motorcycles have soft metal, so you can only hit the place where the bar is not applied.
Photo. This way you can move the crankshaft cheek.
If one cheek of the crankshaft turns out to be larger in diameter than the other, then when centering the crankshaft, take into account the gap between the cheek and the rod; this gap should be visually the same when applying the rod to the larger cheek on both sides.
Photo. The crankshaft of the motorcycle is centered, the rod lies without gaps on the crankshaft cheeks.
If you do everything right, everything will be correct, you will save money on a new crankshaft by replacing only the connecting rod on the old one, for this you only need your hands and a smart head.
Major renovation
A technical revision of the IZH Planet-5 model should be carried out as necessary:
- when the piston group wears out, when compression decreases and engine power drops;
- when extraneous noise appears in the gearbox;
- when the clutch “drives”.
Simultaneously with the overhaul of the motorcycle, you should carry out an inspection and preventive maintenance of all components and assemblies without exception, as well as touch up scratches and level out dents on the motorcycle body, if any.
If it is necessary to replace individual parts, they should only be replaced with new ones purchased in specialized stores. Spare parts for IZH Planet-5 are sold in a sufficient range.
Preventive motorcycle repairs can be done in a home workshop or garage. It is important that you have a set of necessary tools at hand, these are spanners and open-end wrenches, drifts, files and rasps, a vice, a drilling machine and a grinder.
Checking the clutch drum
The first step is to check the foot start ratchet mechanism. This is where the main load falls. Turn the clutch basket over with the ratchet facing you, remove the retaining ring and disassemble the ratchet.
We inspect the teeth of the ratchet: they should be sharp without chips or other damage. If the teeth are wrinkled or broken, the winding foot will slip 100%. Many suffer from this problem due to thick oil or a weak spring - in fact, the reason for the foot slipping lies in the ratchet.
If the teeth on the basket are not worn out, it is advisable to rivet the ratchet: buy a new one in the store or remove it from another basket and rivet it. I riveted several baskets and they went without any problems until the “victory”...
An example of ideal ratchet teeth.
Often and thickly, the rivets on the ratchet weaken and if you don’t notice this in time, they are cut off. To prevent this trouble from happening to you, move the ratchet with your fingers. If it wobbles, drill out the old rivets and rivet them again. Pulling old rivets usually does nothing.
If you are making a clutch “for yourself” and for a long time, be sure to check the condition of the teeth for the motor chain.
If the teeth have already begun to turn back, then such a basket should be immediately thrown into the trash. It will no longer be of any use: the operating noise will increase, it will 100% eat up the motor chain, and there’s never an hour when one “fine” day it will lick your teeth and you will then be forced to push your jalopy for a long time and tediously...
An example of worn teeth.
It is not uncommon for the basket body to burst. Unfortunately, the body is made of cast iron and welding it will be problematic. If you find cracks on the body, try to find a welder who welds non-ferrous metals, the so-called “argon welder”; they usually take on welding cast iron.
An example of cracks in the basket body. By and large, this basket can still be saved: chamfer the cracks, weld and turn the seams on a lathe. But the teeth under the motor chain were worn out and I threw it away.
Resource
An important condition for the long-term operation of an engine that has undergone a major overhaul is proper running-in. The process consists of two stages - running the engine on a stand or on a stationary motorcycle; the second cycle is a test run in road conditions, on the move.
In both cases, the proportions of oil in the combustible mixture should be increased to 1:10, and the engine speed should be adjusted to the minimum. After 4 hours of running-in, you can increase the speed to medium, but make the process cyclical - after working for one hour, turn off the engine for 30 minutes, then start it again.
After a full break-in, the motorcycle should be maintained in a certain mode, avoiding overload and, most importantly, overheating of the engine. The machine must be operated for a certain period of time with only one driver, no passenger, no side trailer and no load. In this case, the final grinding of the cylinder/piston pair will occur.
400 kilometers is the optimal distance that a motorcycle should travel without a load, then it will be possible to reduce the amount of oil in the fuel mixture to a ratio of 1:25, and also operate the car with a side trailer.
Two-wheeled motorcycle IZH Planet 5 engine, which developed only 22 hp. pp., throughout almost the entire period of its production, and from 1987 to 2008 it was considered one of the most common middle-class motorcycles among domestic buyers.
Adjusting the clutch springs
Adjusting the springs is not difficult, the main thing is to get it right. We start by placing the motorcycle on the center stand. Then remove the lid, draining the oil in advance. We squeeze the lever on the steering wheel to the limit and make sure to fix it. Next we turn on the speed, preferably the first one. We take the wheel and begin to rotate. We try to determine by touch how much effort we are applying. We look at the coupling as it rotates and determine which springs are loosely tightened. We mark them with chalk, then tighten them. We begin to rotate the wheel again and if you feel that the wheel has become easier to spin, then everything has been done correctly. The process must be repeated to achieve a better result. After this, we check the result obtained while moving. If, as the load increases, the clutch begins to slip. All springs must be tightened using nuts. In this case, all nuts must be turned the same number of turns.
Content:
This motorcycle was developed and manufactured at the Izhevsk Machine-Building Plant (Izhmash), which is located in the capital of the Republic of Udmurtia. The main advantages that ensured the popularity of Izhevsk motorcycles, and not only in Russia, should be considered:
- Ease of use.
- Simplicity of design and maintenance.
- High overall reliability.
- Economical, repairable motors.
- Affordable prices.
In addition, Izhmash constantly sought to make changes and improvements in the design of its products, including the Izh Planet 5 motorcycle model and the Izh Planet 5 engine. At the plant itself, production was regularly modernized in order to improve quality. Thus, the assembly of power units, including the assembly of the IZH Planet 5 engine, was carried out at a specialized technological site.
In what cases is ignition adjustment necessary?
During the operation of the vehicle, the owner faces many problems. The most serious failure is related to the engine. In order to spend significant funds on major repairs, it is necessary to monitor the technical condition of the motorcycle and carry out preventive work, including adjusting the valves and valves (video author - Hana Rulyu).
If you do not monitor the SZ, then the motorcycle engine may not reveal its full potential and will not work at full capacity. This can lead to a reduction in its service life. An ignition adjustment is necessary if the engine is running poorly, the muffler or carburetor is firing. True, before setting up the SZ, you should make sure that the cause of the malfunction is in it.
It happens that the flywheel bolt, which connects the two halves of the crankshaft, comes loose, begins to play and does not work well. Sometimes he even cuts the key.
Setting up the SZ may be necessary after repairing the ignition switch Izh Jupiter 5. The installation and connection itself are carried out according to the diagram.
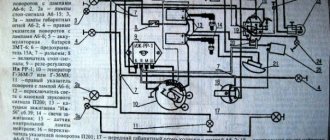
SZ diagram of the IZh motorcycle
Engine for the fifth model.
The Izh Planet 5 engine contains the following main characteristics and indicators:
- – two-stroke with one cylinder;
- cylinder - 345 cc. cm;
- – 72 mm;
- – 22.0 l. With. at 4800 crankshaft rpm;
- – 12 volts;
- – air;
- – contactless;
- oil and gasoline (A 76) - 1/30.
Such engine characteristics gave it a very important feature, which was to provide high traction performance at low speeds, which is important in rural road conditions.
Reasons for repair.
Complete disassembly of the Izh Planet 5 engine during repair work is carried out if damage or breakdown of the following elements occurs:
Failure of these parts can occur due to engine jamming, general severe wear, which is accompanied by increased noise during operation, as well as various knocking noises in the crankcase. In addition, repair of the Izh Planet engine with its complete disassembly is carried out when the crankshaft seals are worn out.
The presence of such a breakdown is indicated by the following points: difficult starting of the internal combustion engine, loss of power, increased smoke.
At the initial stage of production of power units, the reed valve on the Izh Planet 5 had certain technological shortcomings associated with low strength. Therefore, it quickly collapsed, its elements fell inside the cylinder, which required further disassembly and, in most cases, replacement of the Izh Planet 5 piston. After a certain time, the manufacturer eliminated this defect.
If, when operating the engine, all routine and technical maintenance procedures established by the manufacturer were observed, and appropriate technological materials and fluids were used, then it was operated for a long time, while maintaining its technical parameters.
Recovery process
When the euphoria of the purchase wears off, a lot of questions arise regarding its repair and restoration with your own hands.
The main task of the new owners:
- Restore the electrical system - and there are no particular problems with this, since the electrical wiring of IZ Jupiter 2 and Planet of the second and third generations is identical and interchangeable;
- Starting the engine is a more difficult task due to the need to overhaul the power unit and the availability of spare parts;
- Return the motorcycle to its original appearance. It is also quite complex and, perhaps, the most painstaking work of the entire project.
The video below shows the restored models.
Factory layout for several generations of motorcycles
- Whether to switch to contactless ignition or change the voltage from 6 to 12V is up to you to decide.
- If you have such a desire, and you manage to get your hands on a native Izhevsk generator 281.3701, then the replacement process will be much easier.
- The publication IZ Jupiter 3 wiring diagram will familiarize you with the details of the alteration.
central locking
Let's consider the process of restoring the central lock, since in most surviving models it is faulty.
Appearance of the headlights and controls of IZH Planet 2
The difficulty is that finding the original lock is very difficult, almost impossible. Moreover, at 6V, since later the Izhevsk Motor Plant transferred all subsequent models to 12-volt equipment.
This is what the filling of the original 6V ignition switch looks like
Therefore, many motorcycle owners adapt parts from later versions of Planets and Jupiters.
The difficulty of installation in this case is as follows:
- Uncertainty about whether the lock will work;
- How to properly connect wires.
Wiring diagram for IZH Planet 2 to the lock
Headlight
Many owners do not attach importance to adjusting the head light, believing that a working light bulb and intact glass are enough for “driving” during daylight hours.
Using this scheme it will be easy to connect all consumers
In fact, this is not so, and adjusting the light is not only desirable, but also mandatory, especially since it can be easily done independently, spending no more than half an hour of personal time on it.
Scheme for adjusting the angle of luminous flux
Engine modernization.
The design features of the IZH Planet 5 motorcycle are that the owner, having certain technical skills, could do tuning work with his own hands to give his motorcycle a more modern look and increase its power.
External changes consisted mainly of installing higher wings, replacing turn signals, using an individual windshield, using larger side mirrors and a number of other attachments.
Tuning the Izh Planet 5 engine was aimed at increasing its power. Such work usually began with repressing the crankshaft of the IZH Planet 5 engine, which made it possible to increase its power by 10-15%.
The next measure to increase power was to bore the cylinder to a repair size of 76 mm and modify the piston group. In some cases, a piston group from an IZH Sport motorcycle was installed.
The next step was to change the basic clutch since it could not work with a more powerful engine. For this purpose, the clutch was disassembled and the standard discs were replaced with thicker metal ones. This increased the heel area, which correspondingly reduced slippage during shifts.
For more charged versions, turbocharging was used on the engines of IZH Planet 5 motorcycles. But, no matter how well the work on modifying the IZH Planet 5 engine is carried out on your own, this still leads to a decrease in service life and an increase in the number of repairs.
Checking clutch discs
The main clutch problems occur due to the fault of the discs. If the discs are crooked or worn out, then no amount of even a super couture adjustment will correct the poor performance of the clutch.
Wear is determined visually and only on plastic discs: we inspect the disc and if we find a crack or a broken hook on it, with which it enters the outer drum, or we see that the round protrusions on the working surface have long been worn out, we throw such a disc in the trash.
The curvature of the disks is determined as follows: place all the disks on the glass one by one and try to swing them
- If the disk wobbles, it means it is 100% crooked and should be in the trash.
- If the disk lies flat, leave it.