These problems can be eliminated by switching to BSZ. Make the adjustment with the low beam on in accordance with the screen markings in Fig. Ignition coil 5.
As a result, a charge of less than 12 V appears on the spark plug, which poorly ignites the combustible mixture in the cylinders. Photo gallery: IZH Planet 5 generator and its design IZH Planet 5 generator Generator design Battery To supply all components, a low-power 12-volt energy storage device is required, since IZH Planet 5 does not have a starter. WIRING TO IZH (PLANET 5)
The wire must be screwed into the lug until it stops. Wiring diagram for IZ Planet 5: connecting instruments and controls Tip: a video on servicing a particular motorcycle component is a good help these days.
It is unable to hold the ignition angle advance settings for a long time, has failures in operation and low accuracy. The sound strength can be adjusted using an adjusting screw located on the body.
Battery for IZH 7 motorcycles.
You can create a modulator with your own hands. Elementary about the complex wiring of IL
Original and color wiring diagram for IZH Planet 3
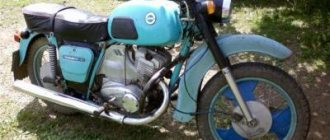
4 years after the appearance of the second Planet (1966), the factory workers made a number of changes to its design, designed to improve the technical parameters and appearance of the motorcycle. This is how IZ Planet 3 was born, which became a real symbol of freedom for many of our compatriots. Despite its advanced age, IZH Planet 3 still serves its owners well
Differences from the second Planet
For many modern citizens, the information that domestic motorcycle manufacturers worked tirelessly to improve their models in an era of total shortages may come as a surprise.
Note! The fact takes place, moreover, it is supported by official documents, in particular 1970N04P16-17 - this is the outgoing number of the factory newsletter, which described the changes made. In the photo - official materials of the Izhmash Design Bureau
Modifications
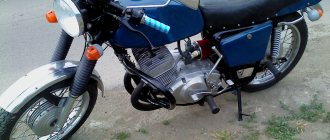
But the creator engineers did not stop there and, having released the five-millionth car from the production line, presented a modification of the IZH Planet 3-01. Mirror and safety arches are the distinctive features of the new modification
- Rear passenger footrests;
- Roll bars;
- Rearview mirror;
- New steering wheel design.
For reference: The buyer paid for the changes out of his own pocket. In particular, the price for IZH Planet 3-01 was 750 rubles, the version with a stroller was 1140, and the “rural version” was even more expensive. Fortunately, care instructions were included with purchase, which made maintenance easier.
IZH Planet 3-01 with wide wheels of smaller diameter - “rural version”
Distinctive features of electrical equipment
The wiring diagram used on IZ Planet 3 was traditional, and the main parameters of the electrical equipment are presented below in the table.
| Ignition system | Battery, ZMTR-10 |
| Mains voltage | 6 volts |
| Electricity source | Generator G-35M7 (later replaced by a modified G-36M8), 45 W |
| Ignition coil | IZH 56 |
| Voltage regulator relay | IZH RR-1 |
| Electrical wiring IZH Planet 3 | Single-wire, with “-” output to ground |
Colored original diagram (clickable)
Lighting devices
- Left and right direction indicators with A6-6 lamps;
- Turn signal switch P201;
- Turn signal relay RS-419;
- Brake light bulbs A6-15;
- Side light bulbs A6-2;
- Light mode switch with sound signal button P200;
- Transmission position sensor (neutral) with warning lamp A6 0.25;
- Headlight lamp A6-32+32;
- Indicator lamp A6 0.25 generator operation;
- Side light lamp A6-2 (front);
- Speedometer scale illumination lamp A6-1;
Attention! For lovers of the “original” and authenticity, the photo below shows the “native” black and white wiring diagram of IZH Planet 3 with a breakdown of all the elements.
Lighting devices for models with a stroller
- Stroller brake light lamp A6-15;
- Stroller size lamp A6-2;
- Right direction indicator for stroller A6-6;
- Front side light of stroller A6-2.
Note! The standard wiring of the IZH Planet 3 provided for disconnecting the sidecar for operating the motorcycle without it in a two-wheeled version. At the same time, the connecting terminals required care.
In the presented video you can watch the repair of an old motorcycle, which received a new life in capable hands. According to the author of the video, complete restoration cost him the equivalent of $130. Moreover, he did most of the work with his own hands.
Finally
Electrical equipment IZH Planet 5
Motorcycles IZH 3, 4, 5 and 6 are equipped with 12-volt electrical equipment. The wiring of IZH Planet 3 and 5 consists of standard 12-volt incandescent lamps, a set of instruments and switches.
The electrical wiring is single-wire, there is no negative wire, its role is played by the bike frame. Planet 4 is similar to the electrical circuit of Planet 5.
The electrical circuit includes the following main components:
- generator;
- turns and side lighting;
- Headlight;
- contactless ignition system.
The power source on both IZh 5 and 6 motorcycles is a battery and a 3-phase alternating current generator. In the generator, alternating current from the windings is supplied to the rectifier and converted into direct current. Power is supplied to all consumers through the ignition switch (video author: altevaa TV).
The head light circuit of the IZH Planet 5 motorcycle consists of: a headlight bulb, a blue turn-on indicator light, a parking light bulb, and a rear brake light bulb.
The following control devices are installed on the bike:
- tachometer, on which there are indicator lights for the headlights and turns;
- speedometer showing total and daily mileage;
- power engine temperature indicator;
- voltmeter.
What to do if there is no charging (6 volts)
12/08/2016 NEMEC Add a comment 5493
In this article, the author explained the main problems and how to deal with them. Everything applies to motorcycles with this type of electrics.
First of all, by external inspection, make sure that all the wires are securely fastened, the tips are not oxidized, the battery is charged, and the indicator lamp for the generator is working properly. It would be useful to open the cover of the relay regulator and check the condition of the contacts.
Have a diagram of your motorcycle.
a) When the engine is not running and the ignition is on, the indicator lamp on the headlight lights up with a low glow. Check the battery charge level. Check the reliability of the connection of the electrical wire contacts in the battery - central switch circuit, as well as the condition of the central switch contacts, the warning lamp holder and the battery terminals for oxidation. Remember: have you recently tightened any long screws or self-tapping screws in the generator area that could cause a short circuit?
b) The control lamp lights up at all engine speeds with an even glow. First of all, check the operation of the generator, for which connect the “W” terminal of the generator to “ground” and connect the lamp to the “I” and “W” terminals for 6 volts. If while the engine is running (do not rev too much - it won’t take long to burn the lamp) the lamp does not light up or burns with a weak glow, then the generator is faulty, and in this case it is necessary to check:
1. Ease of moving brushes in the brush holder. In case of jamming, clean the brush holder. (Brushes are a special topic: if you have changed them, check them with an Avometer/multimeter; their resistance should be about 1 ohm; now brushes with a high carbon content and a low graphite content are on sale, their resistance is 20-30 ohms - they are not suitable , definitely throw it away. We try using a drill, a VAZ-classic, and grind it first.)
2. Presence of contact between the brush and the current-carrying wire—external inspection. If necessary, replace the brush.
4. Condition of the surface of the collector - external inspection; if the surface of the lamellas is dirty or oily, wash the collector with gasoline or clean it with glass sandpaper. (I insist with glass sandpaper)
5. Check the serviceability of the generator stator excitation coils with an avometer/multimeter. If there is no avometer, disconnect the wires coming from the bundle from the terminals “M”, “I”, “W” of the generator, without removing the output wires of the excitation coils from the terminals “I” and “W”. Disconnect the output wire of the excitation coils (an additional resistance that is available on motorcycles with an IZH-56 relay-regulator) from ground. Then connect one terminal of the battery to the generator terminal “I” or “W”. Connect any motorcycle lamp in series to the second terminal of the battery, and the second contact of the lamp to the free terminal “I” or “W”. If the lamp does not light, it means that there is a break in the excitation coils (usually due to the lack of contacts at the junction of the excitation coils). It is necessary to check the connections of the coils and, if necessary, solder them.
If there is no break in the field windings, i.e. the lamp is on, then it is necessary to additionally check that the field windings are not shorted to ground. To do this, connect one terminal of the battery to the “ground” of the generator, and the second - through the lamp to the “I” or “W” terminal. If the lamp does not light, then there are no short circuits and the generator stator is working. If the lamp is on, then you should find the location of the short circuit. To do this, remove the stator from the engine and re-check the absence of a short to ground of the stator coils using the above method. If the short circuit is eliminated after removing the stator, it means that it was caused by contact of the generator mounting screws with the field coil due to insulation failure or contact.
Izh 56 6 volt circuit diagram
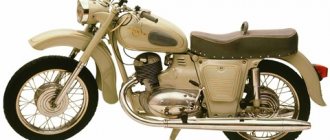
August 13, 2008 - a new exhibit, the IZH-56 motorcycle (1955-1962), appeared in the exhibition of the Lomakovo Museum of Antique Cars and Motorcycles. It has not been restored, but is more or less complete. It was found about 15 years ago, in the village of Belaya, Moscow region, standing in a barn. On the run. There are no original mufflers (bottle type). The steering wheel is homemade, “country rocker” type.
Unlike its predecessor (IZH-49), the IZH-56 used a welded tubular frame instead of a stamped frame; the double saddle gave the motorcycle a new shape, determined a new, semi-sporty driver's position, the rear wheel suspension was carried out using a swinging fork and two spring-hydraulic shock absorbers pivotally connected to the frame, the front and rear wheels are interchangeable, the chain running from the gearbox to the rear wheel was protected by a sealed casing. The engine of this motorcycle had a cylinder consisting of a finned aluminum jacket with a cast iron liner pressed into it. 677,428 IZH-56s were produced.
From the network: “The motorcycle went on sale in two versions - with dual and with separate saddles. The option with one seat is widely known - it began to be used further on all IZHs. A more interesting option is with separate seats. The driver's seat (in the factory booklet - the rider) was a copy of the previous model - a rubber “frog”, nothing special. But the passenger seat was like the back half of a solid seat, a kind of cushion. I won’t say that it was more comfortable than the “frog”, but it made the passenger seat lower than on the IZH-49. Hence the better handling when driving with a passenger.”
| Power: 13 hp at rpm |
| Speed: up to 100 km/h |
| Weight, kg |
| Fuel consumption: liters per 100 km |
| Engine: single-cylinder, two-stroke, carburetor |
| Ignition: |
| Cylinder volume: 350 cm cubic. Compression ratio 6.8 - for 66 gasoline |
| Gas tank volume: liters |
| Wheels: 19 inches |
| Carburetor: K 28 D |
| Fork: telescopic |
| Clutch: |
| Dimensions: |
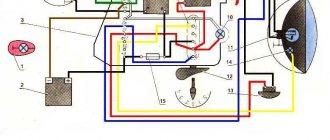
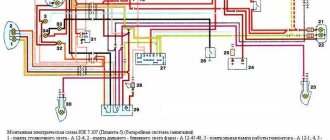
Electrical diagram of the IZH-56 motorcycle:
1 — brake light switch; 2 — brake light lamp A6-15; 3 — rear position lamps A6-6 (3a — on the stroller); 4 — battery 3MT-6; 5 — light switch with sound signal button P25 or P200; 6 — sound signal C37; 7 — neutral control lamp switch; 8 — ignition coils IZH-56 sb. 39 (on IZH-56 and IZH-Planet - one); 9 - fuse 15A; 10 — relay-regulator; 11 — generator G-36M-1 or G-36M-2; 12 — speedometer scale illumination lamp A6-1; 13 — neutral control lamp A6-32+21; 15 — front side light lamp A6-4; 16 - central switch; 17 — control lamp for generator operation A6-0.25.
Come to our Museum and see our exhibits with your own eyes, live.
Motorcycle Features
According to industry norm, the motorcycle had an alphanumeric index:
- IZH 7.107-010 – basic model;
- IZH 7.107-020 was already equipped with a new lubrication system and improved front axle suspension. In addition, the wiring diagram of the IZH Planet 5 motorcycle had a contactless ignition system, independent of the battery;
- IZH 7.107-030 was equipped with a spring-hydraulic shock absorber and a redesigned rear wheel brake drive;
- IZH 7.107-040 was produced with modified kinematics and a modified front wheel brake. The wiring diagram on IZH Planet 5 remained contactless until 2008.
In addition, a side trailer (sidecar) or a universal cargo platform (without a seat) could be attached to the motorcycle.
These include switches (high-low, turns, engine stop, etc.) as well as brake and neutral sensors and the ignition switch. You can easily “ring” them with a tester, finding out which contact group is not working.
Switching also includes the Izh electronic turn signal relay. Its malfunction is visible by the absence of interruption or no voltage supply to the turn signals.
As can be seen from all of the above, the wiring on Izh Planet is without any special secrets or complex elements, all its parts are easily diagnosed and repairs should not cause difficulties.
Now we advise you to watch the video, which shows in detail and clearly the assembly of the Izh Planet 5 circuit.
Electrical diagram of IZH PLANET
The diagram on the Izh Planet completely coincides with the Izh 56 motorcycle. However, the electrics of this motorcycle are a separate story. Amazing but true: all electrical parts were used on subsequent motorcycle models without any changes! That is, by and large, the electrical circuit of the Izh Planet was basically the same as the subsequent models of the series. Perhaps “double” ignition on Jupiters. And I can't say anything bad about the electrics on these bikes. Archaic now, the 6-volt electrical system was standard back then. The DC generator, contact relay-regulator and battery worked quite reliably together. Moreover, if the battery had to be recharged, and the brushes of the generator had to be changed and the commutator cleaned, then the relay-regulator worked flawlessly. And it still works on a lot of motorcycles. The reliability of the generator is amazing - they still work! Compare with the long-dead magnets of the Voskhod generators. There is no need to talk about the quality of lighting - the battery system made it possible to obtain an even light from the headlights, regardless of engine speed. For example, on 6-volt emkas there is nothing like light! However, the power of the 45-watt generator was only enough for this motorcycle. Its use on Jupiters with their increased electricity consumption for ignition was not entirely successful.
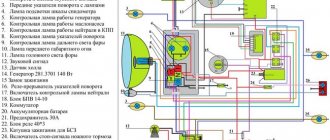
Wiring diagram Izh Planet:
1 — brake light switch; 2 — brake light lamp A6-15; 3 — rear position lamps A6-6 (3a — on the stroller); 4 — battery 3MT-6; 5 — light switch with sound signal button P25 or P200; 6 — sound signal C37; 7 — neutral control lamp switch; 8 — ignition coils IZH-56 sb. 39 (on IZH-56 and IZH-Planet - one); 9 - fuse 15A; 10 — relay-regulator; 11 — generator G-36M-1 or G-36M-2; 12 — speedometer scale illumination lamp A6-1; 13 — neutral control lamp A6-32+21; 15 — front side light lamp A6-4; 16 - central switch; 17 — control lamp for generator operation A6-0.25.
Setting up the Izh Planet ignition:
1. Place the motorcycle on the center stand or side stand and engage neutral gear.
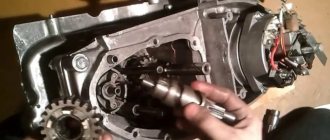
2. Remove the right crankcase cover (see photo).
3. Turn out the spark plug.
4. Turn the crankshaft to the position of the maximum open contacts (to do this, you can “grasp” the head of the generator rotor mounting bolt with a 12 mm wrench).
5. Use a screwdriver to slightly loosen the contact fastening screw.
6. Place a probe 0.35-0.45 mm thick between the contacts and, turning the adjusting eccentric screw with a screwdriver, achieve a position in which the probe plate slides along the contacts with some force.
Izh-56 engine repair
For a long time, almost half a year, I haven’t written about my Izh-56, since I didn’t have much time, and I didn’t do anything special with the motorcycle. As I wrote earlier, I put my Izh in order externally back in the fall, but I still had to work on the engine, because it’s very unpleasant when a beautiful and well-maintained motorcycle that attracts a lot of attention suddenly refuses to start, and the sound of the engine also left much to be desired . Riding such a motorcycle is not particularly pleasant and sometimes even a little scary, but you want the motorcycle to be reliable and not let you down when traveling over any distance. And so, after waiting for the first warm days, I decided to inspect and repair the engine on the Izh-56, followed by installing a 12V contactless ignition on it, which I had successfully purchased earlier. Disassembling the engine showed the need to replace almost everything: the piston, rings, connecting rod pin, connecting rod pin bushing, clutch discs, all crankshaft and gearbox bearings, oil seals - which simply dried out and fell apart. I myself don’t understand how a motorcycle with such a deplorable state of the engine could still work, travel from Kharkov to Donetsk and take me around my beloved Donetsk. Of course, I didn’t think that it would take me so much effort and time to repair it; it seems to me that it’s easier to repair a car engine than to repair this old and worn-out Izh-56 engine! All bearing seats in the engine crankcases were loosened. I had to purchase new bearings and weld metal onto them for a tighter fit. All bearings for the engine were purchased and installed, made in Czechoslovakia and Japan (I decided not to save money so as not to look into the engine in the near future). The sealant used for assembly was American made. All engine parts were washed and damaged, and the cylinder head, cylinder, and crankcase covers were lightly sanded with fine sandpaper to remove dirt and metal oxide from many years of operation. The contact foot of the neutral gear indicator in the gearbox was repaired by soldering. I had to consult a lot and often about the nuances of repairing and assembling the engine with my friend Sergei, who had a lot of experience in repairing his 3 Izh-49s and the availability of special tools, for which of course a HUGE THANKS to him! A new contactless ignition and generator 12V 90 W was successfully installed instead of the “dead” 6V. I had to dig through a lot of information about adapting the wiring and the new generator for the Izh-56. New wiring was installed according to a custom design. And yesterday I was able to hear the first sounds of the exhaust of my Izhik and see for the first time its dimensions, headlights and brake lights! (previously, nothing on the motorcycle except the ignition worked). Of course, emotions are overwhelming, I was finally able to see the fruit of my work repairing the engine, hear the rumble of the restored engine, and even take the Izh-56 for a ride in the garage. I hope the motorcycle will appreciate my work and effort spent to give it a second life and will serve me faithfully for many years to come!
Solving the problem of using 6-volt charging
All users of classic or other equipment based on 6 volts know that this is the most vulnerable and problematic part of the entire motorcycle. In this article we will try to find solutions to the main difficulties associated with the use of this type of electrics.
Repairs and adjustments must begin with studying and researching the problem. To begin with, you should make sure that there is no damage to the wiring, and also inspect the condition of the tips and the generator warning lamp. If everything is in order, you should carefully examine the insides of the regulator.
When making repairs, a motorcycle diagram will be an incredibly useful thing.
Main problems and methods for solving them
- When the ignition is turned on and the engine is not running, the indicator lamp lights up with a barely visible glow. This often happens when there is a short circuit when the user screws long bolts into the generator area. Another reason may be oxidation of the contacts in the wiring circuit of the central switch - battery. The problem can also be caused by a simple battery discharge.
- The control lamp lights up with normal heat at any engine speed. This may be due to a generator failure. To check this, you need to connect terminal Ш, which is located on the generator, to ground, then connect the lamp to terminals I and Ш for 6 volts. A generator breakdown will be detected when the engine is running and the warning lamp is not working and the indicator light is low.
If there are problems with the generator, it is worth checking the following:
a) Brushes and their correct operation in the holder. If the brushes move with difficulty, the seat should be cleaned. Brushes can also be from a third-party manufacturer. The motorcycle wiring is designed for special brushes with a resistance of exactly 1 ohm. Modern parts come with increased resistance, which can lead to incorrect operation of the entire system. To replace it, you should use brushes from a drill, or from a classic Vase, having previously sharpened them. You can check the resistance of your brushes using an Avometer or a multimeter.
b) Check the contact on the brushes and wire. If it is missing, replace the brushes.
c) Contact between brush and commutator. With high wear of the brushes, contact may be lost, so worn brushes up to a size of 11 mm should be immediately replaced with new ones. It is worth recalling that the brush connected to terminal I is isolated from ground.
d) Check the surface of the collector itself. If it is heavily soiled, it should be cleaned with gasoline or sanded with glass sandpaper.
e) Some problems may be associated with incorrect operation of the excitation coils. You can use an Avometer to check them. If it is not there, you can disconnect the wires going to terminals Ш, М and И from the generator, without removing the lead wires from the coils from them. Next, you need to disconnect the output wire of the excitation coils (and any other resistance that comes on the Izh-56 models) from ground. The next step is to connect one terminal of the battery to terminal I or Ш, which is located on the generator. To the remaining terminal of the battery, connect any lamp located on the bike in series order. Attach the second contact coming from the lamp to the free terminals Ш or Ж. If the lamp does not light up, then the problem is in the coils. Either there is a break there, or there is a bad connection that needs to be soldered.
If the lamp lights up, you need to check for a short circuit in the field windings to ground. To find out, you need to connect one terminal of the battery to ground on the generator, and the other, through any lamp installed on the motorcycle, to terminals W or Z. If the lamp lights up, this means that there are short circuits in the stator and they need to be corrected. To do this, you need to completely remove the device and recheck it for short circuits. If there are no short circuits on the removed stator, this means that the problem was due to the contact of the generator mounting screws that were in contact with the coil. Such problems are associated with poor insulation or oxidized contact between devices.
Battery
The battery in the motorcycle is low-power. The motorcycle does not have a starter, so its task is only to supply voltage to the ignition system and the generator excitation winding during starting. Thanks to the battery, designed for 12 volts, a stable start of the fifth Planet is ensured; up to the third model, the wiring was 6 volt, and the ignition was not always clear.
Possible battery malfunctions:
- - housings, plates, leakage of electrolyte.
- - determined by measurements using a hydrometer.
- - detected by measuring resistance.
- minus not on the body (frame) of the motorcycle - all the electronics will not work.
Wiring diagram for IZH Planet 3: transition to operation without battery
In 1970, the IZH Planet 3 model appeared in the production program of the Izhevsk Motor Plant.
Unlike its predecessor with the index “2,” the motorcycle received a new shaped gas tank, a more powerful engine and direction indicators.
Motorcycle Features
The electrical wiring of IZH Planet 3 was designed for 6 volts. It served as the basis for other motorcycle models produced later (see also wiring diagram for IZH Planet 5).
Among the features are:
- Generator G36M7, which was later modified;
- Voltage regulator relay RR-1;
- Ignition coil IZH 56;
- Turn signal relay PC419.
For reference: The installation of markers and turn signals was used for the first time on domestic motorcycles. In general, for its progressive design and high quality, the IZH Planet 3 model received the state quality mark, which can be seen in the video of previous years.
Converting the electrical circuit to work without a battery
Unlike cars that have a closed engine and electrical wiring, parts of the IZH Planet 3 motorcycle are more susceptible to external factors than others:
- Rain and snow;
- Direct sunlight;
- Mechanical damage from bushes.
The owners are especially troubled by the standard battery, which is also quite difficult to maintain (see also the Ural motorcycle wiring diagram).
The factory instructions provide:
- The need to constantly check the electrolyte level in banks, because when the motorcycle tilts, it inevitably leaks out;
- The need to constantly check the electrolyte density. This forces motorcycle owners to have a hydrometer, distilled water and hydrochloric acid on hand to restore the required density with their own hands.
Stages of electrical equipment modification
The entire procedure for switching to a battery-free circuit comes down to:
- Replacement of components for 12 volt equipment;
- Remaking the generator, and sometimes borrowing it from another model;
- Replacing lamps from 6V to 12V.
For reference: the wiring diagram on IZH Planet 3 does not change significantly - only the circuits of the generator, coil and voltage regulator relay are replaced.
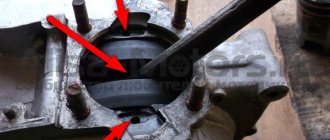
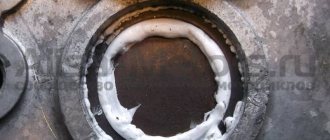
Generator
- Two 6 mm holes are drilled to allow the ring to be secured on the right half of the crankcase;
- To attach the generator to the ring, three M5s are drilled;
- A segment is cut out of the ring to facilitate installation under the partition of the right half of the crankcase;
- Cutouts for the crankcase cover bosses are made on the right and bottom.
The numbers on the diagram indicate:
Electrical diagram
When converted to work without a battery, the wiring diagram of the IZH Planet 3 motorcycle remains standard:
Advice: motorcyclists who have done this modification note the undoubted advantages of switching to contactless ignition. The wiring of IZH Planet 3 remains almost unchanged, but there is a complete refusal to use the battery. And the cost of reconstruction is small.
Conclusions: the proposed conversion method has been tested on thousands of motorcycles of domestic owners (see also the IZ Jupiter 5 wiring diagram). And it has proven its worth with trouble-free operation, improved spark generation and reliable engine starting in harsh winter conditions.
Electrical equipment IZH Planet 5
The motorcycle uses 12-volt electrical equipment. The electrical wiring of the IZH Planet 5 motorcycle is single-wire, the role of the negative wire is performed by a metal frame.
Among the main components are:
- Power supplies;
- Ignition system;
- Headlight;
- Side lighting and turns.
For reference: as is customary in auto and motorcycle construction, modification of components and assemblies allows you to reduce the cost of products. For consumers, the advantage is that the price is low and a number of parts are interchangeable.
Generator
The motorcycle is equipped with a three-phase alternating current generator with an electromagnetic excitation circuit.
The principle of its operation is as follows:
- Electric current from the windings located on the stator is supplied to the rectifier;
- It converts it to direct current;
- And supplies it to consumers through the ignition switch.
The instructions provided include the following items:
- Voltage regulator with rectifier BPV-14-10;
- Generator rotor;
- Generator stator with windings;
- Current collector brushes;
- Ignition system cam (battery);
- Ignition system contact unit
For reference: on three-phase generators of the IZH Planet 5 motorcycle, the windings are connected according to a “star” or “delta” circuit. The rectifier is installed as a separate unit, and the IZH Planet 5 electrical wiring is connected to it.
Headlight
Unlike European countries, where there is a requirement that motorcycles with permanent magnet generators must be equipped with a battery - since a motorcycle with a non-working engine must have side lights - there are no such restrictions in Russia (see also about the Ural motorcycle wiring diagram).
For reference: with such a generator, IZH Planet 5 did not need an external current source when starting the engine. Therefore, the battery was not included in the electrical equipment.
The head light circuit includes:
- headlight lamp (35W);
- blue indicator lamp (2W);
- headlight parking light (4W);
- rear brake light lamp (15W).
The simplest test of a motorcycle generator IZ Jupiter, Planet 6 volt
Hi all. And so my epic with the restoration of the IZH Jupiter 3 motorcycle continues. Here I made a short video about how you can check the generator of this old motorcycle without unnecessary instruments and relays, and only one light bulb is needed for this. In short, I’ll say it’s very simple and easy, you just need to disconnect 2 wires from the RR 1, this is the relay regulator and throw in a light bulb, oh, and connect one more terminal to ground, and if the generator is viable, then when the engine is running, our control light will light up. Thank you all for your attention, write down your methods for testing generators!
No duplicates found
Jupiter3 they brought it to me in a bag
what if you don't have a multimeter?
why react so sharply and even with obscenities, he passed by and that’s all
Champion of Morality
Dumplings investment
A guy approaches a group of his acquaintances, IT students:
- We need to fix the computer. Reward guaranteed.
- I can! - responded the little cheerful girl, and made a plaintive look, - I even agree to dumplings.
Here it is necessary to mention that the guy was a real kitchen chauvinist, from the series that “a woman in the kitchen is supposed to scratch her back and wash the dishes, but a man should cook!” And he was a great cook, but he was not at all friendly with computers. And the girl, on the contrary, studied very well to become an IT specialist, but she was not very good at cooking - scrambled eggs were her culinary ceiling, the same cooking of dumplings turned into an action comedy, and well, if not into a drama/thriller.
He decided to tease her and prepared dumplings. Only homemade, homemade in broth, etc. Well, there's something else there.
As the girl admitted, after such a meal she started thinking about sex.
Ten years have passed since then. This is how they live together. She studied, works, and earns 4 times more money than him.
His friends still tease him about the “extremely profitable investment in dumplings.”
"I'm just a clown"
A child is crying on the plane. Girl. A year and a half. Cries loudly, continuously and inconsolably. It is impossible to be angry, only sorry. And a child who feels bad on an airplane - closed space, strange sounds, stuffy ears, and it’s already late - you should go to bed, and they’re taking you somewhere. And an exhausted mother who no longer knows what to do. There she is, across the row ahead of me. I sit so that I can see both her and the girl. And I hear, of course.
Suddenly a man sitting across the aisle turns to them. I don't see his face, only the back of his head. I can't hear what he says. I only see that he is doing something - it seems he is making faces and showing some gestures.
The crying stopped. From my place I see wide-open children's eyes looking at the man. I see children's lips, which soon spread into a happy smile. And a little later I hear a child’s loud laughter.
The girl didn't cry anymore. Right up until landing she smiled. And her tired mother even dozed off.
Passengers get off the plane. I pull my backpack out of the luggage rack and find myself next to a man, a girl and her mother.
- Thank you very much! You are simply a magician! — the rested young woman says admiringly.
- Yes, you will say the same. What kind of wizard am I? “I’m a clown,” the man answers good-naturedly, winking at the girl.
From the slightly raised eyebrows and embarrassed smile of the woman, it becomes clear that she does not know how to react to this phrase. But the man himself interrupts the awkward pause:
- I really am a clown. I work in the circus.
Pit stop
When you're trying to be quiet at night so as not to wake anyone up
Gratitude
Jamaican steeplechase hurdler Hansle Parchment took the wrong bus and risked missing the start of his 110m final. A volunteer girl paid for his taxi fare, thanks to which he made it in time for the warm-up and won. He found her to thank her for winning the gold and return the dogle.
Jamaican hurdler Hansl Parchment told the dramatic story of his victory at the Tokyo Olympics last weekend, Insider reports.
Heading to the Olympic 110m hurdles final, Parchment took the wrong bus from the Olympic Village and arrived at the aquatic stadium instead of the athletics stadium. The runner tried to contact the organizers but found that the only way to get to the right place was to return to the Olympic Village and take the correct bus. However, in this case, he risked being late for the warm-up, and this could not but affect his result.
Then Parchment rushed with a plea for help to an unfamiliar volunteer girl at the bus stop. Despite strict regulations that prohibited her from going beyond her duties, the girl hailed a taxi and paid the driver to take the runner to the stadium. In the end, Parchment arrived on time, had time to warm up and won gold.
For 31-year-old Jamaican runner Hansl Parchment, the Tokyo medal was his first Olympic gold. He received bronze at the 2012 Olympics, but missed the 2021 Games due to injury. On the way to the final, Parchment did not show the best result, but in the end he managed to become first.