Engine wear is not a death sentence for your unit. There is no need to panic if the following phenomena are observed while driving your car:
- dynamics deteriorated sharply;
- fuel and engine oil consumption has increased significantly;
- problems appeared with starting the engine in the cold season, although they had not existed before.
You should definitely pay attention to these signs. Since when driving for a long time with worn-out parts of the unit, you can “end up” with more serious repairs than the usual replacement of its components. Most likely, the cause of the problem is wear on the piston rings, which, in turn, entails a sharp drop in engine compression.
Replacing them yourself has its advantages:
- save money on mechanic's wages;
- you will definitely be sure that the parts are really new, since not all mechanics are conscientious about their tasks, and sometimes they simply pretend that they changed the part;
- you will choose them yourself in the store, which will guarantee their quality and long-term operation.
But if you are planning to carry out this procedure yourself, you need to know how to change the piston rings correctly. This is exactly what we will try to talk about in this article.
What do we need
As with any other procedure, first you need to prepare all the necessary tools:
- spanners;
- ratchet heads;
- dynamic key;
- a device called a piston ring puller;
- the rings themselves, bought in the store.
Piston ring installation tool
This tool is used for both dismantling and installing parts. It has a fairly simple design and is relatively inexpensive. If you don’t have this tool in stock, you should ask one of your auto mechanic friends to borrow it. If this is not possible, then you will have to buy it.
It is worth noting that its presence is mandatory. Otherwise, when dismantling and installing parts, both the piston and the rings can be damaged.
How to choose piston rings
You can talk for a long time about the importance of these parts for the normal operation of the engine. But in a specific case, we will talk about replacing them. And here it is important to put high-quality rings on the pistons without any defects or flaws. This will directly determine how well the unit will work in the future and how long the installed parts will last. It is clear that no one wants to change them often.
- First, you need to pay attention to the price category. Cheap parts definitely won't last long.
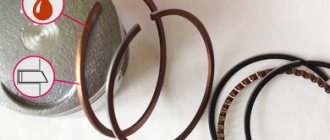
- We look at the appearance of the packaging and the rings themselves. The packaging must indicate information about the manufacturer, material, etc.
- They must be marked to indicate the top side.
- There should be detailed instructions for installing the parts inside or on the packaging.
- The parts themselves should not have any even the smallest defects. And don’t listen to the seller, who may claim that the unevenness in the metal will rub in over time.
Features of choosing rings
In order for the engine to operate reliably after repair, it is important to choose the right rings. Don't buy the cheapest set. Such rings will not last long, and you will have to go through the labor-intensive replacement process again.
It is also important to inspect the packaging and the parts themselves. The packaging must contain all the information about the manufacturer and material of manufacture. The rings must be marked. It denotes the top side. Manufacturers usually include instructions inside the package that tell in detail how to correctly install rings on the piston. The latter should not have any defects, even the smallest ones.
Instructions for replacing parts
If you follow the correct installation procedure, this process will not take much time. As a result, the engine will delight you with good dynamics and low fuel consumption.
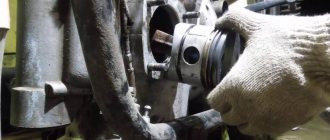
- We dismantle the oil pan. At the same time, you can remove the fuel pump in order to check how much it is worn.
- We unscrew the connecting rod caps and push out the connecting rods themselves. It is better to secure them firmly with a clamp.
- Using a special tool, remove the piston rings.
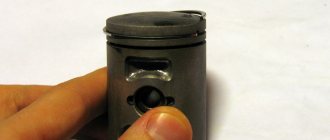
- We remove carbon deposits from the grooves, as it will interfere with the installation of new rings. We do this using a piece of an old ring. Carbon deposits will also need to be removed from the piston bottoms.
- We install the rings in the following order: first the oil scraper ring, then the second and first compression rings.
- The second compression and oil control piston rings should be installed especially carefully, since they are made of a rather brittle metal. It is important not to loosen them too much.
- We monitor the correct location of the piston ring locks. They should be placed at approximately 120 degrees to each previous lock.
- We install the pistons back into the cylinders. To do this, you will need one more simple device - a mandrel for piston rings. Its presence greatly simplifies the entry of pistons with new rings installed on them. But you can also use a regular piece of a tin can. The cylinder must first be lubricated with engine oil.
- We assemble the engine and install the oil pan in place.
Tools and accessories for work
To replace parts yourself you will need:
- Piston ring expander, in order to separate spare parts and not damage them.
- A wrench with a built-in dynamometer and a set of attachments for it.
- Crimping device.
- Hammer for tapping parts.
- A vice to secure the piston.
- Motor oil for fresh processing.
- Use a rag to remove old grease from parts.
You may need some more equipment. But this is a matter of personal preference. Since the above equipment copes well with the task.
Checking engine operation
After new rings are installed on the pistons, you should ensure that the unit is operating normally. To do this, start the engine and let it idle for a while. A good sign is the stable operation of the unit. For the first two to three thousand kilometers, the engine will need to be operated quite carefully. It should not be overloaded, you should avoid fully loading the car, long climbs, refrain from increasing the speed above three thousand, and the engine will definitely need to be warmed up before you start driving.
The video shows how to install piston rings:
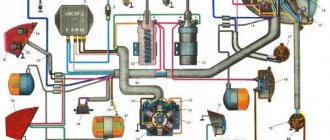
Carrying out compression measurements in cylinders
Let's look at an example of working on classic VAZ models. It is necessary to measure compression on a warm engine. Readings from a cold engine can distort the picture. For measurements, you will need a special pressure gauge equipped with a threaded tip. It can be bought at any auto store.
Compressometer appearance
The check begins by unscrewing all the candles from their sockets. Then the central cable from the ignition coil is disconnected. We set the gear to neutral and turn the throttle valve to the maximum opening. After this, screw the compression gauge into one of the spark plug holes. At this time, an assistant must turn the starter handle. Two or three pumps will be enough.
Level 10 to 12 is also acceptable. But if the numbers are below 10 kg/cm2, then this indicates low compression. If compression still reaches a satisfactory level, but a little late, then the valves may be responsible.
To clarify, you can pour about 20 ml of oil into the disputed chamber and crank the starter again, taking a measurement. When normal compression is established at 12 kg/cm 2, the reason lies in the rings. Correct installation of the piston rings can solve this problem. If the pressure remains low, then the valves are the cause of the decrease.
Installation using a mandrel
Disassembling the engine to replace rings
Before replacement, it is necessary to perform a number of preparatory work:
- it is necessary to drain the used engine oil, because after installing new rings you need to fill in fresh working fluid;
- We loosen the exhaust pipe of the muffler;
- you need to remove the valve mechanism cover and align the engine to the marks;
- we dismantle the camshaft star, and for front-wheel drive VAZs we remove the bolt securing the belt drive pulley, and then the timing belt itself with the pulley;
- in the classics, we loosen the tensioner, and then also dismantle the chain and sprocket mounted on the camshaft;
- then we dismantle the rocker with springs, laying everything out in the correct order to assemble the parts into place;
- remove the block head, before this you need to disconnect the manifold;
- unscrew and get rid of the pan and oil pump;
- remove the connecting rod caps, and then push the connecting rods up so that they can be pulled out along with the piston.
Checking rings and pistons
Each ring is removed from the pistons and checked in its own cylinder. In order not to confuse them with each other, it is necessary to immediately lay out the parts in a certain order. When checking old rings, their outer diameter should not create a gap with the cylinder walls of more than 1 mm. For comparison, you can insert a new ring into the same cylinder.
Checking the thermal gap in the rings
Measurements will usually be more accurate at the top of the block bore since wear is minimal.
The gap can also be checked in special gauges. You need to pay attention to the thermal gap in the piston rings, which should be in the range from 0.25 to 0.45 mm. It can be checked with a dipstick. If the parameter is smaller, then it is possible to increase the gap by filing the end plane with a diamond file.
The diameter of the pistons is checked at the bottom (skirt). This is done with a micrometer.
It is necessary to compare this indicator with the table of acceptable values. Additionally, you need to check the gap between the piston groove and the ring. If exceeded, the pistons must be changed. The tolerance limit is 0.15 mm. The pistons are also checked visually for cracks and the integrity of the ring bridges. After washing, satisfactory pistons can be used further.
Installation procedure
Branded products from trusted manufacturers have convenient markings, which make it clear how to correctly install the piston rings. On one side is written "TOP", which means "top" in English. This side should face the combustion chamber or the top of the piston.
This is interesting: The advantage of an atmospheric engine over a turbocharged one
Designation on the sides of the rings
If no inscription is found, then there should be a groove along the entire diameter. With this step you need to turn the ring down.
There are usually two installation methods used. One of them is safer, and the second is more often used by either great professionals or absolute beginners. Both are suitable for independent use during repairs.
Installation using metal plates
In the first case, you will need to cut several flat pieces of tin, approximately 0.3 to 0.5 mm thick. Three or four such sheets are placed along the diameter of the piston. Rings are put on them. And they drop down to the level of the slot. Then the mandrel for the piston rings is removed from the plates, and the ring fits into the desired groove. The method is perfect for any master.
Piston ring installation
The second option requires certain experience and skills. It consists of using your fingers to open the gap, increasing the inner diameter of the ring to the extent that you can pass the piston through it and install it in the desired groove. The disadvantages are that often inexperienced locksmiths break many rings by using more force than necessary.
Principle of operation
During the power stroke of the piston, pressure forces the first compression ring against the bottom wall of the groove. A gap is formed on top of it, into which gases rush. Having entered the ring, they push it away from the piston and press it against the cylinder wall. A reliable seal is created and intensive heat removal from the piston.
When the rings lie down and the gaps are filled with carbon deposits, the part is not pressed sufficiently against the sleeve, seals worse and cannot remove heat. The result is oil consumption, a drop in power, gas breakthrough into the crankcase and local overheating of the piston.
Some of the gases that have passed into the thermal gap rest against the second compression ring. It also slows down their progress and also helps the oil scraper remove the oil film. The oil scraper ring drives the lubricant down the cylinder liner in front of it, returning it to the sump through the holes in the annular groove of the piston. The design of piston seals can be different, depending on the ideas put forward by the developers: their sections, lock configurations, and so on differ. The task of the car owner is to operate them correctly, and for those involved in repairs to know how to properly install the piston rings.
Necessary actions after installing the rings
When each ring has taken its place in the groove, you need to install the slots approximately 120 degrees from each other. This reduces the likelihood of gases breaking through from the fuel chamber into the crankcase cavity.
Incorrect installation of piston rings
There is evidence that the first ring holds about 75% of the total compression, and the second - about 20%.
If the thermal gaps are separated, then when a certain amount of gas breaks through the first ring, it will not have time to get further, in contrast to the closer position of the second gap.
Errors when installing piston rings
Installing new rings in cylinders that are worn out is absolutely ineffective. This is due to the fact that the worn hole is shaped like an ellipse. The expected high-quality grinding cannot occur.
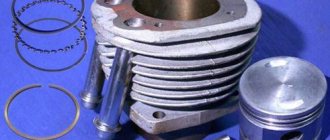
Piston ring set
Also, at high speeds, the second ring, made of cast iron, can simply burst.
During operation, the rings fill the grooves with grooves. Such gaps depressurize the combustion chamber and gases enter the crankcase from it. And oil comes in the opposite direction. Such a design can last for several thousand kilometers, and then repairs must be carried out again.
It would also be a gross mistake to deliberately install gaps opposite each other. The gases overheat one side of the piston, resulting in a deformed part. The metal burns out and additional deformation of all elements occurs.
How to install piston rings correctly?
When clouds of bluish smoke begin to escape from the exhaust pipe of a car, it seems that an inevitable stage in the life of the car has arrived - engine repair. Signs of piston group wear are increased gasoline consumption, high oil consumption, bluish-colored exhaust gases, engine compression drops below 10 kgf/cm2. Sometimes you can get away with simply replacing the piston rings without even removing the engine from the car. In this case, only new gaskets for the head and block pan will be required. The remaining unusable parts will be identified during disassembly. We will tell you how to install piston rings correctly in our article.
Technical problems in the manufacture of piston rings.
High-quality production of piston rings requires precise, expensive equipment. Careful quality control must be observed at literally every operation. And there can be about a hundred of them. Car manufacturers abroad do not produce rings themselves. They prefer to order them from specialized companies. Such companies produce a huge number of rings in both standard and repair sizes.
Checking the piston rings.
It happens that manufacturers supply pistons without piston rings. Some engines have a huge number of modifications. When purchasing piston rings, check their height and radial width to ensure they match the piston grooves. It is easier to determine the gap between the ends of the ring and the groove if you install the ring in the groove and use a set of feeler gauges. In this case, the end gap should be within 0.05-0.1 mm. If it turns out to be more than 0.12 mm, then this indicates that the piston ring or groove has unacceptable dimensional deviations. It is also necessary to check the gap in the ring locks. To do this, the rings must be installed one by one in the upper part of the cylinder. Using a set of feeler gauges, measure the gap in the lock. It should be approximately 0.4-0.6 mm.
Installing rings on the piston.
This operation is very responsible. If the work is not done carefully, the ring itself may break. Most often this happens with the middle ring. And if the orientation of the rings is disturbed, the oil consumption of the repaired engine may increase. The top rings usually have the word TOP (top). This side of the ring should face the piston bottom. If the middle rings are of the scraper type, then install them with the scraper down. For rings that have chamfers on the inner surface, most often the chamfer should face up. When installing the rings, pay special attention to the oil scraper rings that have a dual-function spring expander. When installing disks, the expander rings should not overlap at the joint. Only after installing the oil scraper ring are the middle and upper rings installed on the piston. When installing, you need to use special pliers. After installing the rings, do not forget to check that they rotate easily in the grooves.
Sequence of installation of piston rings on the engine.
1. Prepare the piston rings for installation. To do this, remove the grease. To do this, simply wash them in either gasoline, kerosene, or white spirit. Then wipe and let dry. Do not allow aggressive substances or even water to come into contact with the surface of the ring.
2. Before installing the piston rings, lubricate both the piston and piston rings with a thin layer of engine oil.
3. The oil scraper lower ring is installed first. Before you install the oil scraper ring, you need to check the correct location of the spring expander joint. It should be located on the side opposite the ring lock. On most models, the oil scraper ring consists of three separate sections. Having seated all three components of the oil scraper ring in the lower groove of the piston, you need to check the freedom of sliding in the groove of the upper and lower working sections.
4. Then install the lower compression ring. The lower compression piston ring must be installed so that the marking is turned towards the piston bottom. Follow the ring manufacturer's instructions. Use a special landing tool. Be careful not to push the ring lock further apart than necessary. Do not confuse the second compression ring with the first, upper, compression ring. They have different cross sections.
5. And finally, install the upper compression ring.
Typical mistakes in repair practice when working with piston rings.
1. Some mechanics believe that the gaps in the ring locks should be minimal. But sometimes this can lead to scuffing of rings and cylinders. When the ring heats up, the gap in the lock will decrease. And if it is already minimal, then the ring will crash into the cylinder wall. Remember that replacing rings on pistons that have worn grooves or when there is significant wear on the cylinders is usually ineffective. Such a replacement may lead to increased oil consumption.
2.Do not install oversize rings into a standard-size cylinder. Due to the deformation of the pressure diagram of the ring on the wall, a gap appears.
3. When replacing piston rings, you need to pay attention to the wear of the cylinder. If the worn cylinder is not repaired, the upper ring may rest against the groove formed as a result of wear. The fact is that new pistons often have some deviations in size. Under such conditions, new parts will quickly break.
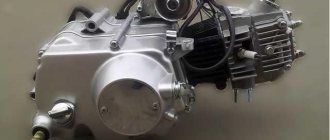
Four-stroke scooter engines
So, there is a set of rings, and the owner does not know what to do with them. The set contains five rings - two thin, one oil scraper, and two compression rings. The scooter piston has three grooves.
After lubricating the piston with oil, very carefully place a thin ring into the lower groove. An oil scraper is put on it. Then thin again. Three rings must be installed in one groove. The oil scraper should be between two thin ones.
After this, compression rings are put on. They must be installed in the upper grooves. It is not recommended to use any third-party tool for installation. It should be remembered that the rings are very fragile and break easily. If the compression parts are different, then one is usually rounded, and the second is trapezoidal. The rounded one is placed in the upper groove, and the trapezoidal one is placed below. The bevel should expand from top to bottom. The ring should be wider at the bottom of the groove than at the top.
Locks are not stacked on top of each other. They should be at an angle of 120 degrees to each other. Here's how to install rings on a moped piston. As you can see, there is nothing complicated here.
How to install piston rings correctly?
When clouds of bluish smoke begin to escape from the exhaust pipe of a car, it seems that an inevitable stage in the life of the car has arrived - engine repair. Signs of piston group wear are increased gasoline consumption, high oil consumption, bluish-colored exhaust gases, engine compression drops below 10 kgf/cm2. Sometimes you can get away with simply replacing the piston rings without even removing the engine from the car. In this case, only new gaskets for the head and block pan will be required. The remaining unusable parts will be identified during disassembly. We will tell you how to install piston rings correctly in our article.
Technical problems in the manufacture of piston rings.
High-quality production of piston rings requires precise, expensive equipment. Careful quality control must be observed at literally every operation. And there can be about a hundred of them. Car manufacturers abroad do not produce rings themselves. They prefer to order them from specialized companies. Such companies produce a huge number of rings in both standard and repair sizes.
Checking the piston rings.
It happens that manufacturers supply pistons without piston rings. Some engines have a huge number of modifications. When purchasing piston rings, check their height and radial width to ensure they match the piston grooves. It is easier to determine the gap between the ends of the ring and the groove if you install the ring in the groove and use a set of feeler gauges. In this case, the end gap should be within 0.05-0.1 mm. If it turns out to be more than 0.12 mm, then this indicates that the piston ring or groove has unacceptable dimensional deviations. It is also necessary to check the gap in the ring locks. To do this, the rings must be installed one by one in the upper part of the cylinder. Using a set of feeler gauges, measure the gap in the lock. It should be approximately 0.4-0.6 mm.
This is interesting: What does the color of spark plugs mean?
Installing rings on the piston.
This operation is very responsible. If the work is not done carefully, the ring itself may break. Most often this happens with the middle ring. And if the orientation of the rings is disturbed, the oil consumption of the repaired engine may increase. The top rings usually have the word TOP (top). This side of the ring should face the piston bottom. If the middle rings are of the scraper type, then install them with the scraper down. For rings that have chamfers on the inner surface, most often the chamfer should face up. When installing the rings, pay special attention to the oil scraper rings that have a dual-function spring expander. When installing disks, the expander rings should not overlap at the joint. Only after installing the oil scraper ring are the middle and upper rings installed on the piston. When installing, you need to use special pliers. After installing the rings, do not forget to check that they rotate easily in the grooves.
Sequence of installation of piston rings on the engine.
1. Prepare the piston rings for installation. To do this, remove the grease. To do this, simply wash them in either gasoline, kerosene, or white spirit. Then wipe and let dry. Do not allow aggressive substances or even water to come into contact with the surface of the ring.
2. Before installing the piston rings, lubricate both the piston and piston rings with a thin layer of engine oil.
3. The oil scraper lower ring is installed first. Before you install the oil scraper ring, you need to check the correct location of the spring expander joint. It should be located on the side opposite the ring lock. On most models, the oil scraper ring consists of three separate sections. Having seated all three components of the oil scraper ring in the lower groove of the piston, you need to check the freedom of sliding in the groove of the upper and lower working sections.
4. Then install the lower compression ring. The lower compression piston ring must be installed so that the marking is turned towards the piston bottom. Follow the ring manufacturer's instructions. Use a special landing tool. Be careful not to push the ring lock further apart than necessary. Do not confuse the second compression ring with the first, upper, compression ring. They have different cross sections.
5. And finally, install the upper compression ring.
Typical mistakes in repair practice when working with piston rings.
1. Some mechanics believe that the gaps in the ring locks should be minimal. But sometimes this can lead to scuffing of rings and cylinders. When the ring heats up, the gap in the lock will decrease. And if it is already minimal, then the ring will crash into the cylinder wall. Remember that replacing rings on pistons that have worn grooves or when there is significant wear on the cylinders is usually ineffective. Such a replacement may lead to increased oil consumption.
2.Do not install oversize rings into a standard-size cylinder. Due to the deformation of the pressure diagram of the ring on the wall, a gap appears.
3. When replacing piston rings, you need to pay attention to the wear of the cylinder. If the worn cylinder is not repaired, the upper ring may rest against the groove formed as a result of wear. The fact is that new pistons often have some deviations in size. Under such conditions, new parts will quickly break.
Mopeds “Alpha”
This technique is very popular in Russia. When do you need to replace rings and pistons? This work is carried out when the compression is reduced to 450 kPa. It can also be measured with a compression meter. The outlet will also indicate the need for replacement: if there is smoke in the gas, then the rings need to be changed. They are changed on such mopeds every 10-12 thousand kilometers.
Before installing the parts, they must be manually adjusted to the groove in the piston. They are sawed through with a file and treated with sandpaper. Then it is worth measuring the gap in the ring lock, which is inserted into the cylinder without distortion. The normal parameter for new compression parts is 0.04–0.08 millimeters. The ideal clearance for oil scrapers is 0.025–0.065 millimeters.
If compression parts are replaced, they are replaced with non-chrome ones. Experts tell us how to install rings on an Alpha piston: a ring that is correctly fitted to the piston fits into the groove under its own weight. If it doesn't fit, you can press it down a little manually.
Purpose of piston rings
Piston rings, the installation of which will be described below, are designed to eliminate the possibility of gas leakage through a special thermal gap, which must be located between the piston and the cylinder itself in order to achieve free play.
Often the ring is made of cast iron, but they do not lose their elasticity. Such elements between the two aforementioned engine parts are called compression elements. As for other varieties, the lower ring (it is wider than the compression rings) is distinguished by special slots, since its function is to remove excessive amounts of oil that collects on the cylinder walls. That is why it is called oil scraper.
Preparatory stage
First of all, you need to disconnect the battery. After this, you will need to drain the coolant from the cooling system and the engine oil from the oil pan. Replacing piston rings is possible in two ways: with or without removing the engine from the car. A check will help determine whether the engine needs to be removed: you need to remove the cylinder head and visually assess the condition of the liners.
If signs of wear are visible on the cylinder walls (wear, any scratches or scuffs), the power unit will definitely have to be removed in order to bore the liners to the next repair size. If this is not done, simply changing the rings will not be enough, since they will quickly become unusable due to damaged cylinders.
If there are no exhausts, new ones can be installed without removing the engine from the car. The work steps for replacing piston rings, with the exception of dismantling the engine for restoration work, are the same.
General recommendations for replacement
When the exhaust pipe begins to “spit” blue smoke, engine repair is inevitable. In fact, always, signs of wear of piston parts are also increased consumption of both oil and gasoline. In this case, engine compression also decreases, making even diesel engines unprotected. It follows from this that choosing the right new piston elements is the first priority of any vehicle owner and, at best, repairs will cost only them. To do this, you also need to install just a couple of new gaskets and a tray for the block. Other damaged parts will already be identified during disassembly of the motor.
When purchasing a piston, you should carefully inspect its packaging, since the ring may not be included in the kit. Many manufacturers do this. This is due to the fact that there is more than one engine that has a lot of modifications, so when purchasing piston group products, you must first compare their width and height with the corresponding characteristics of the piston grooves.
The gap between the groove and the ends is much easier to determine if you place the ring in the same groove and use a set of feeler gauges. It should be no more than one tenth of a millimeter and no less than 0.05 mm. Otherwise, this will mean that the ring or groove does not fit. The clearance of their locks should also be checked. To do this, such parts of the piston group should be fitted one by one to the cylinder in its upper part, and then, using feeler gauges, measure the gap itself, which should not exceed 0.6 mm, but should not be less than 0.4 mm.
Replacement on motorcycles
On scooters and mopeds this is a common procedure that is performed approximately once or twice a season. Rings in such engines are consumables. Even if the engine is Japanese, the piston elements in it are at best Taiwanese, and most are Chinese.
In Japan, after a breakdown, it is customary to get rid of equipment - it is cheaper and easier to buy a new scooter. There, a serious breakdown is considered to be a drop in compression due to wear of the rings and pistons. In fact, repairs come down to replacing parts of the piston group. Let's look at how to install rings on a scooter piston.
Replacement
If you decide that installing piston rings is exactly what you need for a complete engine overhaul, then the next step is to purchase them. Usually, quality goods are packaged appropriately and tastefully. When choosing, you should pay attention to the appearance of the product and the quality of its coloring. There must also be markings.
To begin the repair correctly, you need to open the cylinder head. After this, you need to carefully analyze the condition of the parts and decide whether it is necessary to bore the cylinders themselves or grind the valves. How to prepare piston rings, how to install them without much difficulty, etc. - all this will be described below.
Preparation
The device itself for installing piston rings is sold in relevant stores, and it is in the form of pliers. If it is not possible to purchase them, then a small flat-head screwdriver will do, but when using it you should be as careful and careful as possible. Old piston parts can either be broken or removed.
However, piston rings, which are extremely easy to install, require the grooves to match their dimensions as closely as possible. Therefore, at least one old compression part can be broken, since carbon deposits form under it during operation, which will make installing a new one very difficult. A piece of such an old broken part would be perfect for tidying up his previous workplace.
Installation on piston
This is precisely the moment when a device for installing piston rings is indispensable, since repair work of this type is an extremely responsible matter and making mistakes is simply unacceptable. The elements of the piston group themselves are fragile, so you need to be careful and attentive. The middle one is considered the most fragile. When installing it, there is a high risk of breakdown.
It is very important to maintain the correct orientation, otherwise you will achieve increased oil consumption. Each ring has its own markings with marks, so there should not be any problems with correct placement.
The upper piston rings, which are installed first, are marked “TOP” and this side of the marking should be directed towards the piston bottom.
As for such a scraper-type part, it is installed with the scraper down. Installation of parts with chamfers should be carried out so that these same chamfers “look” upward. If you are dealing with assembled oil scraper elements that have a special two-function spring-type expander, then the upper and middle ones must be installed first. After this repair scheme is completed, it is necessary to check the ease of their rotation in the grooves themselves.
Installing pistons into the cylinder
During major repair work, the obsolete cylinder is bored or honed. They also use new repair-size pistons and ring elements of the same type, but with a larger diameter, with their subsequent compression. They should be lubricated with oil before installation so that they can easily “sit” in place. The fit should also not be too tight, since thermal expansion due to heating will cause the piston itself to jam.