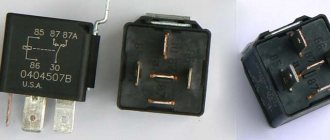
because Planet 5 offers poor charging with light rechargeable battery including seats
What is in the headlight behind the bulb so that it does not remain charged by the battery?
are they new or old brushes?
Old or new is not everything. Clean the anchor. Brushes should move freely... Post 2, p. 195-196 Reading program - post 6
I have the same charge in Java, there is a lot of ash, the battery boils and after a while I turn on the light and sit down
If the battery is discharged (and continues to work for a long time), the battery has lost capacity due to constant charging, it is better to throw it away and look for the cause of the problem, then buy a new one.
Damn, the charge on Jupiter has disappeared again. First, I changed the armature and a charge appeared (even if it was minimal). I didn't even ride a bike. A week later I started it up, but there was no charge. And I noticed when it starts to glow and appears with a charge, but soon disappears again. What is the reason? It’s already charging all my brains, you * blah!!
Most likely, your relay-regulator is not working, I had such a battery on the road, it’s good that it happened not far from the business market, I went to Renat and bought a new relay-regulator at my own peril and risk and asked if he could run the reels . When I started the engine, I inserted the battery and left, never thinking about the problem again
PS But, of course, before buying it is better to try to change the regulator to a known and working one, because it is not cheap at all.
I have the same charge in Java, there is a lot of ash, the battery boils and after a while I turn on the light and sit down
Generator - serviceability check
Checking the serviceability of the generator can be done on a motorcycle without disassembling the generator.
To carry out the work you will need a multimeter.
1. Place the motorcycle on the center stand or side stand.
2. Disconnect the battery by removing its fuse.
3. Remove the right cover of the power unit.
4. 6mm
unscrew the nuts securing the five “upper” wires of the generator. In order not to confuse the wires during subsequent assembly, we mark them or tie them with thin wire so that we get a cable.
5. Check the short circuit of the stator windings to ground. To do this, touch the probes of the multimeter to the generator housing and alternately the three terminals of the windings. The ohmmeter should show infinity.
6. Check the stator windings for breaks. To do this, touch the probes of the multimeter in turn to all three terminals of the stator windings. The resistance should be about 8 ohms.
7. Check for a short to ground in the excitation (rotor) winding. To do this, touch the probes to the generator housing and one of the terminals of the brush assembly. The ohmmeter should show infinity.
8. Check the field winding (rotor) for open circuit. To do this, install probes on both brushes. The ohmmeter should not show infinity.
Source
Checking the motorcycle's charging.
- We take a tester and set it to measure constant voltage (if there is a gradation of measurements, set it to 20 V). We measure the battery with the motorcycle not running. A fully charged battery is 12.8 - 12.9 volts (if less, it is advisable to charge the battery so that further measurements are correct, and also check the battery - you can read how to do this in the article: How to check the battery .)
- If the battery is serviceable and infected, we proceed to check the charging of the motorcycle. We measure the voltage on the battery with a tester, with the motorcycle running (idling, without consumers turned on: lights, heated handles, etc.), the voltage should be 13-15 volts. If the motorcycle charging test does not meet the criteria, move on.
- We turn on only “natural consumers” (lights), the voltage should be at least 12.8 volts (ideally, about 13.5 volts). If less, something is wrong.
- We turn on all consumers (additional equipment), if the voltage drops below 12.8 volts, try raising the idle speed to 1000 - 1100, the voltage should be at least 12.8 volts. If it is smaller, the generator does not pull all consumers (additional equipment) and may burn out.
- We give the gas 3000 - 4000 revolutions, the voltage should rise to 13 - 15 volts with all consumers turned on. On some motorcycles, the voltage rises to a maximum at 3500 -4000 rpm, and at higher rpm it drops, but not more than 13 volts (this is due to increased load at high rpm: the injectors begin to consume more power (they are open almost all the time), this is normal ). If less, something is wrong.
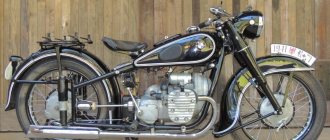
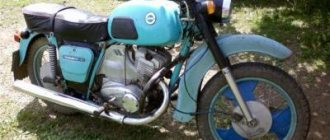
Technical features of the motorcycle
Basic data: the distance between the wheel axles is 1,450 mm; With an absolute load and tire pressure within normal limits, the ground clearance is 135 mm. The dimensions are as follows: length - 2200 mm, width - 810 mm, height - 1200 mm, weight (dry) - 158-165 kg, maximum load capacity - 170 kg, including the load on the trunk equal to 20 kg. The power of the motorcycle is 22 horsepower. At an optimal speed of 90 km/h, fuel consumption is 5 liters per hundred kilometers.
If something is wrong.
- Disconnect the relay regulator (remove the connector). Let's take a tester.
- We set the tester to measure resistance. We check the resistance between ground (engine) and the generator wires (three wires, usually yellow). It shouldn't exist. If at least one has it, your motorcycle's alternator has burned out.
- We check the resistance between the generator wires, the resistance should be the same, about 1 - 3 ohms. If it is more or not the same, your motorcycle's alternator has burned out.
- We set the tester to measure alternating voltage. We start the motorcycle, measure the voltage between the generator wires, it should be more than 18 volts at idle, and more than 40 volts at 3000 - 4000 rpm. If there is no or different voltage, your motorcycle's alternator has burned out.
- If the check in points 2, 3 and 4 went well, most likely your motorcycle has a faulty Relay - Regulator or, which also happens, a wiring fault (clean all terminals, check the integrity of the wires, connections to ground). If your motorcycle's generator burns out, this is the place for you: Rewinding the generator with your own hands.
Our service will help you check the charging of your motorcycle.
Check the integrity of wires and connections.
They will eliminate all problems associated with charging the motorcycle.
If the motorcycle is not sufficiently charged, the following may fail: battery, relay - regulator, generator.
Source
How to check the charging of the Izh Planet generator
First you need to check whether the generator windings are shorted to ground. To do this, take a 12 volt lamp, solder 2 wires (probe) to it, turn off the BPV, turn on the ignition, connect one wire of the lamp to the wire that connects to terminal X8 (BPV), this will be the “+” of the battery (AK). We connect the second wire one by one to wires X5, X4, X7, X1 - the lamp should NOT light up. If the lamp lights up, even not at full strength, it means that the windings are shorted to ground - these could be the wires that go to the generator or a short in the generator itself. X5, X4, X7 - stator windings, X1 - excitation winding.
(if the excitation winding is short to ground, quite unpleasant consequences are possible! such as melting of the brushes, blown AK fuse, if you have one of course :), if not, then the wiring will burn.)
We check the serviceability of the generator operation indicator lamp. To do this, we short-circuit X8, X3 (BPV is turned off, the ignition is on), the control lamp should light up, if not, check the lamp and the wires suitable to it. Now we check the excitation winding, for this we connect one wire of our probe to ground, and the second to X1 (the BPV is turned off, the ignition is on), the probe should light up, if it does not light up, the excitation winding is faulty. (this could be a stuck brush, a break in the wire leading to the brush, or a break in the field winding).br/> If all our tests give a positive result, we check the operation of the generator. To do this, we close wires X1-X2 (the BPV is off), turn on the ignition, start the motorcycle, connect the probe with one wire to ground, and alternately connect the second wire to wires X5, X4, X7, the probe should light up. If the lamp does not light on any wire, it means that the stator winding or the wire suitable for it is faulty. If everything is OK, then the generator is working.
After you have made sure that the generator is working, but there is no charging on the AC or the indicator lamp does not go out when the engine is running, it means that the BPV is faulty.
Source
Izh Yu 3 does not work without battery
If there is no charging (6 volts).
Since questions about the lack of charging on 6-volt motorcycles have become more frequent on the forum, I offer a simple guide to action in such cases. First of all, by external inspection, make sure that all the wires are securely fastened, the tips are not oxidized, the battery is charged, and the indicator lamp for the generator is working properly. It would be useful to open the cover of the relay regulator and check the condition of the contacts. Have a diagram of your motorcycle. Let's get started.a) When the engine is not running and the ignition is on, the indicator lamp on the headlight lights up with a low glow. Check the battery charge level. Check the reliability of the connection of the electrical wire contacts in the battery - central switch circuit, as well as the condition of the central switch contacts, the warning lamp holder and the battery terminals for oxidation. Remember: have you recently tightened any long screws or self-tapping screws in the generator area that could cause a short circuit? b) The control lamp lights up at all engine speeds with an even glow. First of all, check the operation of the generator, for which connect the “W” terminal of the generator to “ground” and connect the lamp to the “I” and “W” terminals for 6 volts. If, while the engine is running (do not over-gas the lamp, it won’t take long to burn out) the lamp does not light up or burns with a low glow, then the generator is faulty, and in this case it is necessary to check: 1. Ease of movement of the brushes in the brush holder. In case of jamming, clean the brush holder. (Brushes are a special topic: if you have changed them, check them with an Avometer/multimeter; their resistance should be about 1 ohm; now brushes with a high carbon content and a low graphite content are on sale, their resistance is 20-30 ohms - they are not suitable , definitely throw it away. We try with a drill, a VAZ-classic - grind it first.) 2. The presence of contact between the brush and the current-carrying wire - external inspection. If necessary, replace the brush. 3. Presence of contact between the brushes and the commutator, no hanging of the brush in the brush holder on the wire - external inspection; if there is no contact due to excessive wear, replace the brush. (A brush is considered worn out when worn by 1/4 of the length, i.e. up to a size of 11 mm .) do not forget that the brush connected to the “I” terminal is isolated from ground. 4. Condition of the surface of the collector - external inspection; if the surface of the lamellas is dirty or oily, wash the collector with gasoline or clean it with glass sandpaper. (I insist with glass sandpaper)
5. Check the serviceability of the generator stator excitation coils with an avometer/multimeter. If there is no avometer, disconnect the wires coming from the bundle from the terminals “M”, “I”, “W” of the generator, without removing the output wires of the excitation coils from the terminals “I” and “W”. Disconnect the output wire of the excitation coils (an additional resistance that is available on motorcycles with an IZH-56 relay-regulator) from ground. Then connect one terminal of the battery to the generator terminal “I” or “W”. Connect any motorcycle lamp in series to the second terminal of the battery, and the second contact of the lamp to the free terminal “I” or “W”. If the lamp does not light, it means that there is a break in the excitation coils (usually due to the lack of contacts at the junction of the excitation coils). It is necessary to check the connections of the coils and, if necessary, solder them. If there is no break in the field windings, i.e. the lamp is on, then it is necessary to additionally check that the field windings are not shorted to ground. To do this, connect one terminal of the battery to the “ground” of the generator, and the second - through the lamp to the “I” or “W” terminal. If the lamp does not light, then there are no short circuits and the generator stator is working. If the lamp is on, then you should find the location of the short circuit. To do this, remove the stator from the engine and re-check the absence of a short to ground of the stator coils using the above method. If the short circuit is eliminated after removing the stator, it means that it was caused by contact of the generator mounting screws with the excitation coil due to insulation failure or contact of the screws with the excitation coil wires at the connection points. If the lamp lights up when the stator is removed, the field coil is closed by contact with the pole. To determine the location of the damage, alternately disconnecting the excitation coils from each other, check each for the absence of a short circuit to ground using the method indicated above. Remove the damaged coil by unscrewing the screws securing the pole, apply insulation to the damaged area, securely fasten the coil with pole to the stator. It should be borne in mind that if the pole fastening screws are not tightened sufficiently, it may touch the anchor. If the stator is working and the generator is not working, then the armature is faulty. The anchor needs to be replaced and it is difficult to rewind. C) The generator is in good working order, but the control lamp lights up with an even glow at all engine speeds (that is, checking under point b) showed that the lamp is on - the generator is excited). Check the operation of the relay regulator. First, with the engine running, check whether the contacts of the reverse current relay are closing. If there is a short circuit of the contacts, i.e. the armature is pulled up, then it is necessary to turn off the engine, turn off the ignition and clean the contacts of the reverse current relay with a safety razor blade. It is unacceptable to clean the silver contacts of the relay with emery cloth or glass sandpaper, since in this case the abrasive cuts into the metal and breaks the electrical contact. If the relay contacts do not close and the armature is attracted, then you should check the adjustment of the gaps and the operating torque. In the case when the armature does not pull up and the contacts do not close, check the adjustment of the regulator, since at low voltage the reverse current relay may not operate.
D) The warning light goes out only at high engine speeds. The reason is the low voltage maintained by the relay regulator. Check and adjust the voltage regulator. D) When the engine speed increases and the lights are on, the lamps burn hot or burn out due to the high voltage maintained by the relay regulator. Check and adjust the voltage regulator. E) The control lamp burns with incandescence as the engine speed increases. The battery is connected incorrectly (reverse polarity of the battery terminals) or the generator is reversed polarity. Check and, if necessary, correctly connect the battery to the electrical circuit. If the battery is connected to the electrical circuit correctly, then the generator has been reversed. To reverse the polarity of the generator, it is necessary to open the relay-regulator and, with the ignition on but the engine not running, briefly close the contact of the reverse current relay.
If you can’t purchase a generator, you can rewind it (but then it’s better to think about installing 12 volt equipment) Armature winding PELBO or PEV-2-0.8 mm Number of turns in the section 9 Number of turns in the groove 18 Turn pitch along the groove from 1 to 6 Step turns along the collector ... from 1 to 11 Number of slots in the armature package ... 31 Excitation winding PEL-0.9 MM Number of turns in the coil. . 126 Number of coils 6 Resistance winding PEVMM-0.5 mm Resistance 6-7 ohm Wire length 2700-3000 mm Number of rows 2 Number of turns in each row 8-9
a resistance winding is only needed if you have PP-IZH-56; with PP-1 it is not required. I wish you good luck! when writing, materials from the book “Advice to the driver of an IZH motorcycle” by V.A. Abrahamyan and V.A. Zabelin were used. There is also this addition: the G-36 generators are self-excited due to the residual magnetization of the stator. If you are installing a stator that has been idle for a long time, and even if it is surrounded by pieces of iron, it would not be a bad idea to magnetize it. Either we close the reverse current relay, or briefly apply + to the “I” terminal of the generator, while raising one brush
Content:
There is no need to have special stands and equipment for repairs. A minimum knowledge of electrical engineering and a simple avometer (tester) is enough; even often you can get by with just a test lamp.
We will tell you in more detail about the main electrical wiring components and possible malfunctions. Finding a broken wire or damaged insulation is easy (for example, a bad contact always gets hot).
But pay special attention to the fact that the electrical circuit is designed not only for 12 volts, there is also a high-voltage cable (connecting the coil and the spark plug), which cannot be checked with a regular ohmmeter.
In this case, we look to see if there is a spark at the coil output and at the output at the spark plug contact. Now in detail about the main wiring components of the Izh Planet.
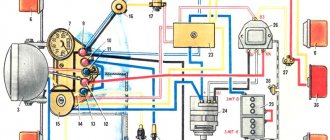
Electrical equipment IZH Planet 5
Motorcycles IZH 3, 4, 5 and 6 are equipped with 12-volt electrical equipment. The wiring of IZH Planet 3 and 5 consists of standard 12-volt incandescent lamps, a set of instruments and switches.
The electrical wiring is single-wire, there is no negative wire, its role is played by the bike frame. Planet 4 is similar to the electrical circuit of Planet 5.
The electrical circuit includes the following main components:
- generator;
- turns and side lighting;
- Headlight;
- contactless ignition system.
The power source on both IZh 5 and 6 motorcycles is a battery and a 3-phase alternating current generator. In the generator, alternating current from the windings is supplied to the rectifier and converted into direct current. Power is supplied to all consumers through the ignition switch (video author: altevaa TV).
The head light circuit of the IZH Planet 5 motorcycle consists of: a headlight bulb, a blue turn-on indicator light, a parking light bulb, and a rear brake light bulb.
The following control devices are installed on the bike:
- tachometer, on which there are indicator lights for the headlights and turns;
- speedometer showing total and daily mileage;
- power engine temperature indicator;
- voltmeter.
Generator
The heart is the generator (sometimes called a magneto, but they were never used on Izh Planet). Three windings produce alternating current. For excitation, an additional coil is used instead of a permanent magnet. Therefore, it is impossible to jump start a motorcycle with a completely dead or missing battery.
A diode bridge for current rectification and a voltage regulator assembled in one unit are mounted on the Izh Planet 5 generator (they are not even highlighted in the Izh Planet wiring diagram manuals).
Possible breakdowns in this unit:
- It is checked by measuring their resistance of current-carrying conductors and insulation. If the generator is damaged, it will become noticeably hot.
- — the output voltage will differ significantly from the nominal level or be absent.
- Although the electrical circuit includes short circuit protection, it happens that the automation does not work and most often the output transistor burns out.
Distinctive features of electrical equipment
The wiring diagram used on IZ Planet 3 was traditional, and the main parameters of the electrical equipment are presented below in the table.
| Ignition system | Battery, ZMTR-10 |
| Mains voltage | 6 volts |
| Electricity source | Generator G-35M7 (later replaced by a modified G-36M8), 45 W |
| Ignition coil | IZH 56 |
| Voltage regulator relay | IZH RR-1 |
| Electrical wiring IZH Planet 3 | Single-wire, with “-” output to ground |
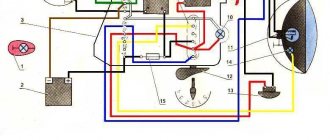
Colored original diagram (clickable)
Lighting devices
The following lighting devices were installed on the IZH Planet 3 motorcycle:
- Left and right direction indicators with A6-6 lamps;
- Turn signal switch P201;
- Turn signal relay RS-419;
- Brake light bulbs A6-15;
- Side light bulbs A6-2;
Appearance of instruments and controls
- Light mode switch with sound signal button P200;
- Transmission position sensor (neutral) with warning lamp A6 0.25;
- Headlight lamp A6-32+32;
- Indicator lamp A6 0.25 generator operation;
- Side light lamp A6-2 (front);
- Speedometer scale illumination lamp A6-1;
Headlight and direction indicators
Attention! For lovers of the “original” and authenticity, the photo below shows the “native” black and white wiring diagram of IZH Planet 3 with a breakdown of all the elements.
Lighting devices for models with a stroller
Added to the existing list:
- Stroller brake light lamp A6-15;
- Stroller size lamp A6-2;
- Right direction indicator for stroller A6-6;
- Front side light of stroller A6-2.
Option with stroller
Note! The standard wiring of the IZH Planet 3 provided for disconnecting the sidecar for operating the motorcycle without it in a two-wheeled version. At the same time, the connecting terminals required care.
In the presented video you can watch the repair of an old motorcycle, which received a new life in capable hands. According to the author of the video, complete restoration cost him the equivalent of $130. Moreover, he did most of the work with his own hands.
Battery
The battery in the motorcycle is low-power. The motorcycle does not have a starter, so its task is only to supply voltage to the ignition system and the generator excitation winding during starting. Thanks to the battery, designed for 12 volts, a stable start of the fifth Planet is ensured; up to the third model, the wiring was 6 volt, and the ignition was not always clear.
Possible battery malfunctions:
- - housings, plates, leakage of electrolyte.
- - determined by measurements using a hydrometer.
- - detected by measuring resistance.
- minus not on the body (frame) of the motorcycle - all the electronics will not work.
Engine characteristics
The IZH Planet-4 motorcycle is equipped with a 2-stroke engine with a cylinder size of 72 mm and a volume of 3,346 cm3. The lubrication system is separate, equipped with an oil pump that doses the flow depending on the frequency at which the crankshaft rotates and the load engine. There is an electronic non-contact type ignition system with regulation (automatic) of the ignition advance depending on the frequency with which the engine crankshaft rotates. However, it does not depend on the battery. For operation, it is advisable to use gasoline with an octane rating of at least 76. The engine uses an air cooling system. Transmission from the engine to the clutch is carried out using a double-row bushing drive chain.
Ignition system
The ignition chopper is used to ignite a spark at a certain point in the piston stroke. In early modifications of the electrical wiring of Izh Planet 5, contact was mounted, later electronic.
The main malfunctions of this unit:
- Burning of breaker contacts is determined visually.
- Failure of a sensor or switch elements - the easiest way to detect it is to use the method of installing a known-good unit. The lubrication system sensor valve is also checked using the same method.
- An incorrectly set ignition timing is visible from the fuzzy operation of the engine. It can be eliminated by adjustment using special probes.
The ignition coil increases the voltage to several kilovolts so that the discharge can ignite a spark at the spark plug electrodes. The secondary winding is made of a fairly thin wire; most often it burns out. Although a breakdown between the turns or onto the housing is also possible. The same troubles can (but less often) happen to the primary circuit. Everything is revealed using resistance measurements.
Electrical equipment IZH Planet 5
The motorcycle uses 12-volt electrical equipment. The electrical wiring of the IZH Planet 5 motorcycle is single-wire, the role of the negative wire is performed by a metal frame.
Among the main components are:
- Power supplies;
- Ignition system;
- Headlight;
- Side lighting and turns.
For reference: as is customary in auto and motorcycle construction, modification of components and assemblies allows you to reduce the cost of products. For consumers, the advantage is that the price is low and a number of parts are interchangeable.
Generator
The motorcycle is equipped with a three-phase alternating current generator with an electromagnetic excitation circuit.
The principle of its operation is as follows:
- Electric current from the windings located on the stator is supplied to the rectifier;
- It converts it to direct current;
- And supplies it to consumers through the ignition switch.
The instructions provided include the following items:
- Voltage regulator with rectifier BPV-14-10;
- Generator rotor;
- Generator stator with windings;
- Current collector brushes;
- Ignition system cam (battery);
- Ignition system contact unit
For reference: on three-phase generators of the IZH Planet 5 motorcycle, the windings are connected according to a “star” or “delta” circuit. The rectifier is installed as a separate unit, and the IZH Planet 5 electrical wiring is connected to it.
Headlight
For reference: with such a generator, IZH Planet 5 did not need an external current source when starting the engine. Therefore, the battery was not included in the electrical equipment.
The head light circuit includes:
- headlight lamp (35W);
- blue indicator lamp (2W);
- headlight parking light (4W);
- rear brake light lamp (15W).
Control devices
The following control devices are installed on the motorcycle:
- speedometer with daily and total mileage counters;
- tachometer with indicator lamps for direction indicators and headlights;
- engine temperature indicator;
- voltmeter.
Wiring diagram Izh planet - 5, how to determine the malfunction
While easily fixing mechanical failures, motorcyclists experience difficulties if the electrics fail. It’s completely in vain, the wiring diagram of the planet Izh 5 is not complicated, it’s easy to figure out.
There is no need to have special stands and equipment for repairs. A minimum knowledge of electrical engineering and a simple avometer (tester) is enough; even often you can get by with just a test lamp.
We will tell you in more detail about the main electrical wiring components and possible malfunctions. Finding a broken wire or damaged insulation is easy (for example, a bad contact always gets hot).
In this case, we look to see if there is a spark at the coil output and at the output at the spark plug contact. Now in detail about the main wiring components of the Izh Planet.
Generator
The heart is the generator (sometimes called a magneto, but they were never used on Izh Planet). Three windings produce alternating current. For excitation, an additional coil is used instead of a permanent magnet. Therefore, it is impossible to jump start a motorcycle with a completely dead or missing battery.
Possible breakdowns in this unit:
Battery
The battery in the motorcycle is low-power. The motorcycle does not have a starter, so its task is only to supply voltage to the ignition system and the generator excitation winding during starting. Thanks to the battery, designed for 12 volts, a stable start of the fifth Planet is ensured; up to the third model, the wiring was 6 volt, and the ignition was not always clear.
Possible battery malfunctions:
- Mechanical damage - housing, plates, leakage of electrolyte.
- Loss of electrolyte density is determined by measurements using a hydrometer.
- The short circuit of the plates in the banks is detected by measuring the resistance.
- Possibly incorrect connection minus not on the body (frame) of the motorcycle - all the electronics will not work.
Ignition system
The ignition chopper is used to ignite a spark at a certain point in the piston stroke. In early modifications of the electrical wiring of Izh Planet 5, contact was mounted, later electronic.
The main malfunctions of this unit:
The ignition coil increases the voltage to several kilovolts so that the discharge can ignite a spark at the spark plug electrodes. The secondary winding is made of a fairly thin wire; most often it burns out. Although a breakdown between the turns or onto the housing is also possible. The same troubles can (but less often) happen to the primary circuit. Everything is revealed using resistance measurements.
Headlight and alarm lamps
Regular incandescent lamps are used; it is not difficult to find a burnt coil.
Switching elements
These include switches (high-low, turns, engine stop, etc.) as well as brake and neutral sensors and the ignition switch. You can easily “ring” them with a tester, finding out which contact group is not working.
As can be seen from all of the above, the wiring on Izh Planet is without any special secrets or complex elements, all its parts are easily diagnosed and repairs should not cause difficulties.
Now we advise you to watch the video, which shows in detail and clearly the assembly of the Izh Planet 5 circuit.
Warm greetings to everyone! We continue to restore IZH-Jupiter 4, which we recently purchased. The history of the acquisition can be read here: Part 1 We are slowly going to great lengths and starting an irreversible process))) Anyone who is interested, you are welcome under cat. After waiting in line at government services, I managed to make an appointment for the next day to re-register the motorcycle. In the evening we decided to check the motorcycle, since it had not been touched for almost a month before. It didn't start right away, there was no charging. It was decided to take a spare battery to get there and back. After starting, it began to ring very violently, as if the fist of friendship was about to come out. What’s even more disgusting is that after 2 attempts to start the kickstarter flew off along with the gearshift foot... The splines there had been licked long ago, they just tightened it to the fullest extent and stomped it as far as was enough. Oh, yes, the sector itself has not yet returned to its original position. Morning. I anxiously go into the garage and think: if only I got there, if only I got there... I got there without any problems, the registration was done quickly. And when it was time to go home, as luck would have it, he didn’t want to start. I had to dance with a tambourine in front of everyone: I stomped it twice, picked it up from the ground, twirled it, and so on. Started up! That's it, go home. On the way I had to overtake a car, and when I passed it, I decided to put it in 3rd gear, BUT! The shift foot and kick starter have successfully disappeared! Oh, I had to stop and go look for them on the side of the road... I found them, installed them, and drove off. I got home and realized that such a shame had never happened before. Well, it was scary to drive in such a ruin (there’s no other way to call it). And we also had a path to a warm garage with a load in the stroller awaiting us. With which? But... This is how we transport motorcycles) I was too lazy to hook up a trailer to the car and load it all there. It would be better if he took it away on a trailer... After a kilometer of travel with such a load, the kick got lost again. And the devil pulled me and my friend to carry the donor in a stroller. Passers-by looked at us as if we had escaped from madness. And at the end of the road, about 100 meters from the garage, the donor fell on the steering wheel and it got jammed on the left side, keeping this barge from entering the bushes, we somehow taxied out and got to the garage. I have never had such a quest before. This is too much)
All! Finally, this hellish day is over and both motorcycles are delivered to the garage! I got so tired of them within a day that I didn’t come to the garage for 2 days, my eyes wouldn’t have seen them!
After a short break, I decided to start this difficult task. It was necessary to completely disassemble the units and evaluate what was there and how. I started with a donor that had low mileage.
He understood it easily. After a thorough wash, all the dirt was knocked off, which made disassembly very easy. I decided to keep all the fasteners.
Half an hour later the motorcycle was dismantled. I haven’t damaged anything yet, I just put everything in a corner and decided to do it after disassembling the second copy. I put all the little things in drawers and then sorted through and weeded out the trash.
Well, one is disassembled. Second - get ready!
And here he is! I don’t even know what to call him, a victim of circumstances or a lucky guy? In any case, I have not yet completely recovered from that hellish day)
This is how the wing was secured... Everything there was so rusty that half fell apart and half couldn’t be unscrewed. Well, in general, we dropped him off during the evening so that he could just get there, and he got there, even though he was banging like a pan with stones, but he survived.
But this has been heating me up for a long time! Then we found a spacer in the stroller, which the owner used to hammer the kick onto the shaft all the way, apparently he also suffered for a long time, but was in no hurry to repair it.
An hour later, the second motorcycle was also dismantled. Everything was worse here, everything was rusty and dead. I'm even thinking about replacing the frame with a newer one.
The color of the mood is orange)) And again a bunch of spare parts.
Does anyone need a box of potatoes? Okay, I'll leave it to myself.
Well, the day has passed, everything has been sorted out. Then everything will need to be sorted out and prepared for painting.
I decided to keep the original fasteners and have them galvanized so that they look like new. As a result, I collected all the good fasteners and small parts in the garage, that is, I scooped up almost everything that could be given for galvanizing. BUT, all this needs to be prepared - as I was told, there should be no oil, grease, or dirt. And most of the parts and fasteners were covered in oil, dirt and grease. I had to clean almost every bolt, nut, and part with a metal brush, and yes, THIS whole mountain had to be cleaned by hand.
Then he added more spare parts and gave it all away for transformation.
It's time to disassemble the engine and see what's left alive.
Everything is more or less here.
The piston was badly worn, the gap between the piston and the liner was very large. It was for this and several other reasons that it rang.
Drained the oil. Well, like butter... At first it seemed to me that I had milked a cow. This is the kind of emulsion we got.
Well, someone has already climbed. Strange homemade washer. It’s already a common occurrence to see a broken sector of the ratchet.
Having removed the covers of the guns, I was dumbfounded. Some smart guy installed all the main bearings as sealed type ones. 3 bearings simply jammed, I couldn’t even turn them by hand. How did this engine even work?! It felt like the seats on the axles were already loose and were simply spinning in the bearing race. Hmmm... Well the engine was “repaired”. Moreover, due to the heating of the crankcase, half of the bearings simply fell out, as you guessed, all seats were gone. There is only one way out - to change the crankcase, since assembling these is already a perversion, and restoring the seats is too expensive. Forgive the engine, but you want to go to non-ferrous metal. As a result, half the engine went into ferrous metal - the chain, the basket, the crankshafts, half the gearbox, the winding shaft, the crankcase... Just like that.
But what to do!? That's right, I have a crankcase with a mileage of 6000 km, where all the seats are perfect, and no one has climbed into the engine except me. I will do it. True, out of grief that he was drowned, I didn’t remove the cover of the gun, I’ll have to do it now. There are creepy footage from the scene.
That's why the engine was stuck. To remove the covers and press out the bearings, I had to heat the crankcase with a burner for a very long time, everything was rusty.
I have a question about cleaning the engine. I was already tired of washing all this, and there was a lot of dirt and oil, which were somehow removed with a screwdriver. I gave it all to a specialist. washing and gave the installation to spare no chemicals. The guys at the car wash were understanding, also izhatniks, so they understood everything almost without words and did everything perfectly! The next day I didn't recognize the engine. Everything was clean, everything sparkled. Not a speck of dust under every rib! They also washed the inside, I was satisfied. Now I will give all the engines there, it’s time to save energy and time)) This is such a beauty. And next to it is another replenishment... In principle, I should not be allowed to go where they sell engines or spare parts for IZHs, I couldn’t resist and bought an almost new engine from Yu6. It's been about a week, I've already managed to take all the parts for painting. And then I was informed that the galvanization of parts and fasteners was completed, and I could pick it up. But not everything was so simple; the locality in which the parts were located was not very accessible in terms of road. It was possible to get there by car along a good road, making a detour of 50 kilometers or a little more. But the road was shorter, only 15 kilometers were in such a terrible condition that it was decided to overcome them on Jupiter, and at the same time take one last ride before winter. You know, I love autumn landscapes, the air is so special. I like this atmosphere.
This is the fucking road! Such pits as after a bombing. Moreover, the cars that were unlucky enough to drive here were driving in 1st or 2nd gear, but on the IZh it was convenient to go around everything and maintain 60 km/h, which is nonsense for such a road. It’s like the 21st century, but the roads are like under Tsar Pea. But once there was asphalt here.
I returned home and brought a whole bag of updated parts. Yeah, it looks completely different!
Beauty! Well, now the hands themselves are reaching out to collect. We are slowly getting out of the thorns, the fasteners and parts have been updated, the engine has been cleaned, the frame and trim will soon be painted, spare parts have been purchased - assembly is coming soon. That's not all, I found many more parts in the garage and decided to donate all the leftovers for such a transformation, since they will soon be used for other motorcycles. And this set is enough for almost 2.5 motorcycles. Now you don’t need to buy new bolts, everything is original)
For comparison. On the right is a new factory fastener, on the left is a restored one. Looks quite decent. I also forgot to mention that most often the store does not have bolts with the required length, thread pitch, or special bolts, such as for fastening the center stand. So, rather than running around looking for new bolts, which are most often raw materials, these will last as long as they lasted before.
You can start assembling, almost everything is prepared for this.
Pendulum. We change the bushings. I will leave the old axle between the bushings, since the new one is very thin and does not inspire confidence. Wash the old one, wipe it and put it back in its original place.
We install everything in its place and generously fill it with lubricant. Now it will last for a long time.
On the running boards, only the rubber bands and cotter pins themselves were updated, the rest is original. Beautiful.
Slowly the frame is acquiring attachments. The fasteners look original, of course.
The rear shock absorbers are in poor condition. It's not for long.
Now everything is washed and ready for assembly. The glasses were already galvanized before.
We collect. Everything worked out.
We install it in place. Also below are the original stoppers, or whatever you call them.
Let's move on. Maybe all these little things bore you, but I liked it when everything original and updated fell into place. This time, during restoration, attention is paid to every detail.
Assembling an anti-theft lock. The bolts, interestingly enough, came from the ignition switch from a VAZ-2108. Successful unification)
We assemble the damper.
The steering column is ready. Not a single ball fell out)) The grease is also clogged, so it will last a long time.
It's time for the instrument panel. All connectors have been cleaned, small things are ready - just collect them.
So the tool boxes are in their place.
Rear casing line. Here, too, what can be done has been transformed.
The casing is assembled. Before assembly, the covers were ground in to ensure a perfect fit. The grease was clogged into the drive sprocket bearing. The covers were placed on a thin layer of sealant to prevent dirt from getting into the casing. It has already been verified from experience that after such assembly the inside is always clean.
Slowly everything is falling into place. It has a view!
It came down to the turn signals. Also like new.
Getting the remotes ready for painting. At least one of them is new, but it was poorly painted. So let's redo it.
One of the last dirty jobs. Disassemble all 4 pens. The best feathers were on a motorcycle with 6000 miles, so we choose the best inner liner and collect it. The native feathers have already completely died... Although what is dead cannot die)))
I'm fixing a couple of bugs. I put the shock absorbers on the wrong side, and the adjusting bolt for the brake pedal position. Now everything is as it should be.
The front end is almost ready too.
Now the remotes are ready for assembly. We also lubricate the runners a little and assemble them.
Before the inspiration went away, I updated the oil dipstick. Do this do this.
Now it's the engine's turn. Although it has been washed, the remaining dirt still has to be completely removed.
I remove the pins and start cleaning everything. Moreover, there was rust and even traces of water in the hairpin thread.
Now you can assemble the engine. There is already light eroticism here - completely naked carters without any trifles. I've been waiting for this moment for a long time, since the engine is my favorite activity, especially when everything is so clean and tidy. Hands reach out to collect themselves. Having removed the casting flaws, almost polished the KShM chambers, everything was ready, but on this note I will end the second part, since a lot fit into it))) And stop tormenting you with a long story, it’s better to leave the sweet stuff for later.
To summarize, a lot of work has been done! There is as much more to come, if not less. It’s worth it, because now everything has been sorted out and assembled slowly, using original components. Although this is not a factory assembly, I think it is no worse. All that remains is to gain strength and finish the motorcycle, fortunately there is less and less left. I hope that in Part 3 there will be a summary of all the restoration work. Thank you for your attention, see you soon! Do not be ill))
Switching elements.
These include switches (high-low, turns, engine stop, etc.) as well as brake and neutral sensors and the ignition switch. You can easily “ring” them with a tester, finding out which contact group is not working.
Switching also includes the Izh electronic turn signal relay. Its malfunction is visible by the absence of interruption or no voltage supply to the turn signals.
As can be seen from all of the above, the wiring on Izh Planet is without any special secrets or complex elements, all its parts are easily diagnosed and repairs should not cause difficulties.
Maintenance
The owner can independently perform some maintenance procedures:
set the gap between the breaker contacts;
The need to inspect and adjust the wiring arises if:
- the motorcycle moves in the rain for a long time, as this causes oxidation of the contacts;
- a motorcyclist rides in an area with a lot of vegetation that damages wiring;
- The driver rides in snow in winter, which can stick to electrical wiring parts and damage them.
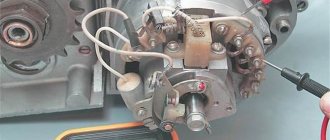
Self-check of the Planet 5 motorcycle generator in case of loss of charge
The cause of loss of charge in the IZH Planet 5 battery is most often a breakdown of the generator.
To check it yourself you need:
- multimeter device;
- straight screwdriver.
Step-by-step instruction
The following steps must be followed:
- Disconnect the wires from the battery and remove the generator cover.
- Disconnect the top 5 wires from the generator, first unscrewing their fastenings. In order not to mix up the wires during assembly, it is worth marking them.
- Measure the winding resistance using a multimeter in ohmmeter mode. To do this, you need to touch the body with one probe, and the other should be connected in turn to the 3 wires of the winding. There should be no short circuits, as indicated by the inscription on the multimeter screen.
- Test the resistance between the stator contacts: you need to touch them one by one with the multimeter probes. The value on the screen should be 8 ohms.
The presence of a short circuit in the 3rd stage or a discrepancy in the indicators in the 4th will indicate problems with the generator.
Photo gallery: stages of checking the IZH Planet 5 generator in case of loss of charge in pictures
How to correctly set the gap between the contacts of the breaker?
In order to set the gap between the breaker contacts, you will need:
- straight screwdriver;
- wrench 10;
- candle key;
- probe 0.4 mm thick (+/– 0.05 mm).
Next, you need to follow the steps sequentially:
- Place the motorcycle on a stand and place the gearbox in neutral.
- Remove the right crankcase cover and unscrew the spark plug.
- Using a 10mm wrench, grab the generator rotor mounting bolt and turn the crankshaft to a position where the contacts are as far apart as possible.
- Loosen the screw securing the contact.
- Place the probe between the contacts and adjust the tightening of the eccentric screw until the probe passes the contacts with little resistance.
- Tighten the contact fixing screw.
Photo gallery: adjusting the gap between the breaker contacts
Troubleshooting the audio signal and improving signal quality
Poor sound signal quality is mainly caused by improper adjustment.
The following tools will be needed for setup:
- wrench 7;
- a simple screwdriver.
Step-by-step instruction
To adjust, do the following:
- Loosen the locknut with a wrench.
- Turn on the ignition.
- Press the button to turn on the sound signal.
- Adjust the sound by rotating the adjusting screw.
- When the desired result is achieved, tighten the locknut.
Photo gallery: sound signal of IZH Planet 5 and its settings
Head lighting
In European countries, there is a requirement that motorcycles and similar equipment must be equipped with a battery with permanent magnet generators. There are no such restrictions in the Russian Federation. With the generator installed, the IZH Planet-4 motorcycle does not require a removable current source to start the engine. Accordingly, this is why the basic package does not include a rechargeable battery.
The headlight circuit consists of a rear brake light, a parking light, and a blue warning light. The motorcycle is equipped with a speedometer with mileage indicators (daily and total), a tachometer, indicator lamps for turn signals and head lights, a voltmeter and an engine temperature sensor. Very often during operation it is necessary to adjust the gap between the contacts of the breaker. To do this, it is best to use a diagram and special tools to know which elements need to be dismantled.
Generator stator 281.3701 for IZH motorcycles
The stator is installed on the right half of the engine crankcase and secured with three bolts. The frame is made of special sheet steel. It has 18 tooth-shaped places for winding phase windings. The phase winding is made of one solid wire with a diameter of 0.9 mm and is wound on six teeth. Each tooth has 20 turns of copper wire wound around it. There are six teeth in total on the winding, so 120 turns are wound. There are three such windings. The connection of the windings is made with a star. The terminals of the phase windings are connected to the terminals of the comb.
The generator stator is covered with an aluminum alloy cover. There are special places on the cover and threaded holes where the carbon brush holder is installed. A breaker with a capacitor to produce a spark. Special comb for connecting wires.
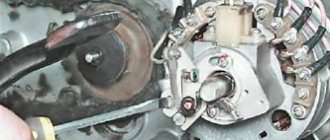
Generator rotor 281.3701
The generator rotor 1 is located inside the stator. It is installed on the crankshaft using bolt 3 and key 5. An excitation winding 6 is wound on the rotor core with a copper wire with a diameter of 0.56 mm, 600 turns are made. The winding resistance is approximately 6.4 ohms. For contact with the winding, two copper rings 2 and carbon brushes are used. They perform the work of a current collector.
How to remove the generator rotor 281.3701
The breaker cam 4 is installed in one position on the rotor shaft in a special socket and secured with a mounting bolt 3. Under this cam there is a thread that is intended for removing the rotor from the crankshaft. To remove the rotor, you need to screw the screw from the chain disassembly device into the thread. The device is located in the motorcycle tool. If there is no screw, you can use a regular bolt with an M10 thread. The only condition for the thread must be at least 70 mm. Turn until the screw rests on the crankshaft. Then we apply more force to tighten it, and the rotor is removed from the shaft.