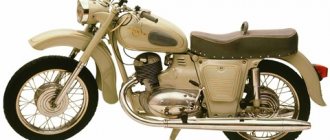
4 years after the appearance of the second Planet (1966), the factory workers made a number of changes to its design, designed to improve the technical parameters and appearance of the motorcycle. This is how IZ Planet 3 was born, which became a real symbol of freedom for many of our compatriots.
Despite its advanced age, IZH Planet 3 still serves its owners well
Differences from the second Planet
For many modern citizens, the information that domestic motorcycle manufacturers worked tirelessly to improve their models in an era of total shortages may come as a surprise.
Note! The fact takes place, moreover, it is supported by official documents, in particular 1970N04P16-17 - this is the outgoing number of the factory newsletter, which described the changes made.
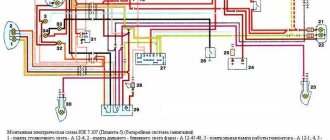
In the photo - official materials of the Izhmash Design Bureau
The new generation motorcycle received:
- Direction indicator lights are a first in domestic practice;
- Semiconductor relay for controlling direction indicators (installed in the headlight);
- New size of wheels and tires (3.50x18 versus previous - 3.25x19);
- New brand increased capacity battery (old one on IZH Planet 2 - ZMT-6);
- And, of course, more engine power. The power unit now developed 18 hp.
Modifications
But the creator engineers did not stop there and, having released the five-millionth car from the production line, presented a modification of the IZH Planet 3-01.
Mirror and safety arches are the distinctive features of the new modification
Among the innovations it should be noted:
- Rear passenger footrests;
- Roll bars;
- Rearview mirror;
- New steering wheel design.
For reference: The buyer paid for the changes out of his own pocket. In particular, the price for IZH Planet 3-01 was 750 rubles, the version with a stroller was 1140, and the “rural version” was even more expensive. Fortunately, care instructions were included with purchase, which made maintenance easier.
Motorcycle service
Unlike other models, both domestic and foreign, IZH Jupiter 3 is distinguished by enviable survivability.
Here are a few instructions for resuscitating a motorcycle that has stood motionless:
- It is enough to replace or clean the candles yourself;
- Adjust the ignition;
- Replace high-voltage wires from the coils with spark plugs;
- Change the engine oil;
- Install a new battery or charge the existing one.
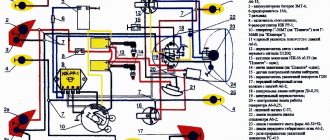
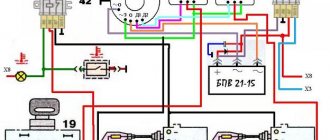
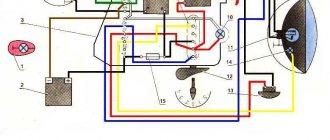
Modern scheme, more understandable to the younger generation
And it will start and drive. And this is its distinctive feature, which is well known to the generation of the 80s. You can restore the old paintwork, reupholster the seat, or polish the chrome parts to a shine later, the main thing is its durability.
Advice: wiring IZ Jupiter 3 after long-term storage also requires close attention. Inspect it for abrasions and damage to the insulation. If any, replace the wires. Don't repair, just replace.
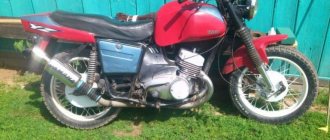
In the photo - the restored IZ Jupiter 3 (right) looks no worse than modern models
In the video below you can get acquainted with the features of this model. It should be noted that the cost of restoration is quite affordable for most, and the difficulty lies only in the lack of spare parts and the need to modify those found from other models.
Changes made by owners
The unreliability of individual components and faulty wiring on IZ Jupiter 3 forced the owners to delve into all the intricacies of the modernized elements.
And the first to cause numerous complaints were changes in the primary circuit of power supplies:
- Battery;
- Generator.
As well as ignition systems and circuits for lighting devices of the trailer module - a cargo-passenger stroller. In most cases, the reason for the refusal was a banal manufacturing defect.
Battery charging system
Given the total shortage of spare parts for motorcycles that existed in those years, unplanned failure:
- battery;
- voltage regulator relay;
- ignition coils;
left the owners without transport for a long time. In addition, poor-quality assembly of individual elements led to unstable operation of all systems. This forced me to improve and polish the factory defects with my own hands (for example, see how to modernize the wiring diagram of IZH Planet 5).
Tip: the regulator circuit presented above has been tested on many motorcycles of the IZh family. Its peculiarity lies in the separate power supply - when turned on, the ignition circuit receives “+” from the battery. And the excitation windings are powered from the generator (terminal “I”) and do not discharge the battery when the engine is stopped.
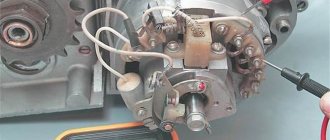
Generator replacement
The operation of the standard G36M7 DC generator also caused a lot of comments. Frequent breakdowns and unstable operation forced the owners to look for a replacement.
The new modifications of the IZh family with 12-volt generators that appeared immediately attracted the attention of the owners of the IZH Jupiter 3, who were able to find a way to convert their motorcycle to a new operating scheme (see also the IZH Jupiter 5 wiring diagram).
And among those that were freely available was the generator 281.3701, suitable for all series of “Planets” and “Jupiters”.
To re-equip the work it was required:
- Working generator 12 V;
- Block BPV 14-10;
- New 12-volt battery 6MTS-9, or another battery ZMT-8 (standard);
- New 12-volt light bulbs (to replace standard ones with 6V ones);
- Steel adapter plate for mounting a new generator;
- Right engine cover from IZH Planet 5 or Jupiter 5 models.
If there is no charging on the Izh Jupiter motorcycle.
This article was written to help those motorists who decided to find and fix a malfunction in the battery charging system on IZH 12V motorcycles themselves.
Of the special instruments, you will need the simplest tester with a continuity function (tweeter) and resistance measurement. If you do not have this device, then you can use a light bulb with a battery to determine the contact or break in the circuit.
In this case, you need to install a well-charged battery on the motorcycle, or power the on-board network from another external power source with a constant voltage of 12 V. First of all, we check the presence of voltage with the ignition switch on at the positive terminal of the regulator relay. There should be +12v.
If there is no voltage, then we look for a break from the positive terminal of the battery through the ignition switch and to the + terminal on the relay regulator.
Next, we measure the voltage on the brushes. There should be +12V on one of the brushes. If not, we call the wiring from the relay to the generator brushes.
Next step. We take the brushes out of the holder and ring each of them from the terminal to the graphite. It happens that at the point of contact of the wire with the graphite body of the brush itself, the contact is lost.
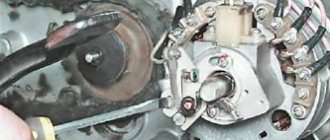
Troubleshooting the generator
Stator
Three phase wires are disconnected from the stator and the winding (connected to each other according to a star circuit) is connected. That is, the windings should ring with each other and have approximately the same resistance. If some winding does not ring, this means that there is a break and the stator is not working properly.
Next, all three phases are called relative to the body (mass). If it rings, it means the windings are broken into the housing and the stator is not working properly.
Anchor
We ring the armature winding (on copper rings). If the rings ring among themselves - good, if not - there is a break, the armature is not working.
The next step is to wire the armature winding relative to the armature body.
If it doesn’t ring, it’s good; if it rings, the winding is broken into the housing and the armature is not working properly!
That's it with the generator.
Relay regulator
If all the wiring is in order, the brushes, stator and rotor are ringing and everything is working, all that remains is the relay regulator! In my experience, even if you don’t have much knowledge of radio electronics, you can at least remove the back cover of the relay regulator and wipe off all the dirt. Carefully look at all the contacts, fastening parts, wires, jumpers; sometimes the contact or soldering simply falls off due to vibration. The diode bridge is practically “eternal”. But the control thyristors sometimes fly out! They are also called simply - to check for breakdown on the housing and between the cathode and the control electrode!
They are also easy to change; a 10 mm nut is unscrewed from below and the wires are unsoldered from above.
That's basically it!!! And there is absolutely no need to change entire components at random; there can be a lot of reasons, even banal bad contact on the chips or oxidation of the wires in the connector
Sergey Sharikov
The editors of the magazine thank Sergei Sharikov for kindly providing materials for the article.
If you have something to share with readers and would like to publish your story or photo report about your travels on our website, please send the materials to:
This might be interesting
- Tuning the Izh motorcycle. BSZ on Izh Jupiter The main “soreness” of the Izh Jupiter motorcycle engine is the standard contact ignition system. Any owner of Jupiter...
- On bicycles through the mountains This is a report on a journey by bicycles through the Caucasus Mountains of completely unprepared people. Read this article and you...
- Car loan. Article 5. Reviews about car loans It’s up to you to decide whether to take out a car loan or not. We publish reviews from consumers and car owners who at one time...
Ignition adjustment
First you need to determine which contact is used for which cylinder. Set the contact gaps to 0.4 millimeters; if the cam is very worn, reduce the gap to 0.3 millimeters. Next, unscrew the spark plugs and set the piston in one cylinder to top dead center. Insert any clean stick instead of a candle and make a mark. Measure 3 millimeters from this mark and align the piston to the new mark. Using a screwdriver, loosen the contact plate of this cylinder. Insert tissue paper between the contacts and turn the plate counter-clockwise until the paper can be pulled out. Instead of paper, you can connect a light bulb, one wire to ground, the second to contact. Rotate the plate until the light comes on. The second cylinder is adjusted in the same way as the first.
After all the procedures, all that remains is to add oil and gasoline, the motorcycle is ready for use. Correct wiring is the key to long and flawless operation of the Izh Jupiter 3.