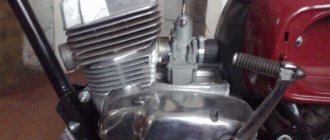
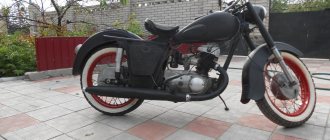
The IZH Planet 5 motorcycle, created in 1987 by the Izhevsk plant, is still popular among motorcyclists. This is a very high-quality and reliable bike, characterized by durability, simplicity and affordability. Disassembling the IZH Planet 5 engine is quite simple even for amateurs. The design of the motorcycle itself does not contain complex elements.
Planet 5 is unpretentious to weather conditions. If you want to start the engine in a cold winter, it will surprise you, even if it is -30 degrees outside the window. Moreover, the motorcycle was designed to ride on various types of roads, which makes it very passable and an excellent assistant in agricultural work.
Like its counterpart, Jupiter 5, IZH Planet 5, whose engine performance is not much inferior to its “brother,” has a strict classic style. However, it has a number of advantages over Jupiter, the main of which are:
- single cylinder engine;
- disassembly and repair of the gearbox without removing the engine;
- presence of one muffler.
However, there is also a big disadvantage . The Planet's crankshaft is much more massive, so it operates at lower speeds, which makes it less powerful. Although the design of the IZH Planet 5 engine is practically no different from the Jupiter one. True, breakdowns occur no less frequently, so if you switched from one motorcycle to another, there should not be any special problems with operation and maintenance.
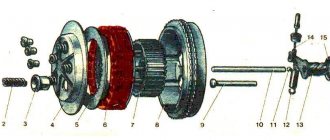
IZH Planet 5 engine diagram
| 1 - spark plug; | 2 - cylinder head; |
| 3 - cylinder: | 4 - piston; |
| 5 - piston ring; | 6 - piston pin: |
| 7 - crankcase; | 8 – channel for lubrication of the main bearing; |
| 9 — roller bearing; | 10 — left oil seal; P - left cover; |
| 12 — motor chain; | 13 - ball bearing; |
| 14 — crankshaft sprocket: | 15 — outer drum of the clutch; 16 — clutch disc; |
| 17 - inner drum: | 18 — pressure disk; |
| 19 — spring; | 20 - shaped nut; |
| 21 - pusher; | |
| 22 — ball bearing; | 23 — trigger gear; |
| 24 — gear shift lever; | 25 — trigger lever: |
| 26 — trigger shaft; | 27 — gear shift shaft; |
| 28 — trigger sector; | 29 - spring: |
| 30, 31, 32. 39, 40, 42 — gearbox gears; | 33 — gear shift fork; |
| 34 — emphasis; | 35 — gear shift shaft; |
| 36 — gearbox cover; | 37 — installation sleeve; |
| 38 — right cover; | |
| 41 - intermediate shaft; | 43 - ball bearing; |
| 44 - roller bearing: | 45 - secondary shaft; |
| 46 - input shaft: | 47 — clutch adjusting screw: |
| 48 - worm ball; | 49 — clutch worm; |
| 50 — cap of the secondary shaft nut; | 51 - oil seal; |
| 52 — asterisk; | 53 - generator; |
| 54 — right oil seal; | 55 — roller bearing; |
| 56 - gasket; | 57 - crankshaft; |
| 58 - bypass channel; | 59 — exhaust window; |
| 60 - decompressor |
With a power of 22 horsepower, the engine capacity of the IZH Planet 5 is 346 cc . This is a very good indicator for such a small volume. For normal use, a speed of 120 km/h is sufficient. True, the dynamics of the Planet are slightly worse than Jupiter, and unnecessary vibrations are disturbing on the road. However, not everyone is satisfied with such indicators, so many are thinking about how to increase the engine power of the IZH Planet 5.
In general, the bike has standard electrical equipment, an air cooling system, a multi-disc clutch and a 4-speed gearbox. The engine itself operates in two strokes. An oil-gasoline mixture is used for refueling. As you can see, the performance of IZH Planet 5, whose engine characteristics are not much different from Jupiter, can allow it to act as a “workhorse”.
Installation of the cylinder-piston group
It is not advisable to remove the gearbox cover until the sealant has dried; there is no need to rush in this matter. It’s better not to rush things and install the cylinder while the sealant dries.
Add some motor oil:
- into the upper head of the connecting rod
- lower connecting rod head
- into both oil channels of the crank chamber
To improve lubrication, it is advisable to drill holes in the piston bosses. But you don’t have to drill - it depends on your desire.
Install the piston pin retaining ring into the boss. Before installation, it is advisable to bend the locking ring a little and be sure to check how it fits after installation:
- If the retaining ring dangles, straighten it or replace it with a new one.
- If the retaining ring is not completely flat, replace it with a new one.
We heat the piston with a hairdryer and, using a mandrel, drive the finger into the piston so that it comes out no more than 5-6mm.
We look for an arrow-shaped mark on the bottom of the piston.
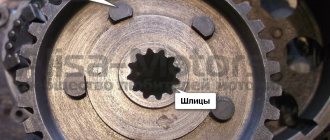
We orient the piston with the arrow towards the exhaust port of the cylinder (“towards the exhaust”), put the piston on the connecting rod, hammer in the piston pin and install the second retaining ring.
We insert the rings into the cylinder and measure the gap between the locks with a feeler gauge:
- If the gap is less than 0.3-0.45, sharpen the ring locks with a file
- If the gap is greater than 0.3-0.45, install new rings; if that doesn’t help, bore the cylinder to the repair size
To improve the wearability of the rings and reduce noise from engine operation, it is advisable to chamfer the edges of the rings. If hunting gets too much trouble: place the ring on a flat surface and use a file to slightly round the edges.
We put the rings on the piston, fill the piston with the rings with oil, install a gasket under the cylinder (preferably with sealant), tighten the rings with a clamp. We cut the clamp out of tin and from the same tin we bend the bracket with which we will fix it.
We put on the cylinder.
After the rings go into the cylinder, unfasten the clamp, lower the cylinder and screw it to the crankcase.
We turn the crankshaft several times and if the piston moves in the cylinder easily and without grinding, lower it down a little, pour a little engine oil into the cylinder, install a new gasket on the cylinder and screw the head on.
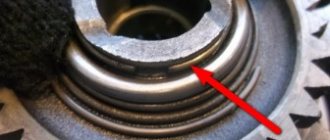
We install the additional crankshaft support bearing in its place, place the required number of adjusting washers on top and secure it with a retaining ring. The adjusting washers must ensure axial play of the crankshaft within 0.1 mm.
Before installation, sealed bearings must be opened! Here goes the usual 304.
On the other side of the crankshaft we install a flange with a main oil seal. Pay attention to the oil channel through which oil flows to the right main bearing of the crankshaft. According to the good old collective farm tradition, this channel is sealed with sealant and the lubrication of the bearing stops. To avoid this trouble, place the flange dry without sealant and everything will be fine.
After the sealant has dried, you can begin adjusting and assembling the gearbox and replacing the clutch basket.
Numbers of bearings and oil seals for the Izh-Planet motorcycle engine 2, 3, 4 and fifth model.
- Crankshaft main bearings 2505k
- Additional crankshaft support bearing 304
- Right oil seal IZH-yu sb. 1-48-3
- Left main oil seal IZH-yu sb. 1-50
Assembly and disassembly
Before you think about power, you need to understand motorcycle maintenance. Often, chasing speed and appearance, owners forget about the basic rules for operating their pet. Due to negligence, and not only, various types of breakdowns occur. You can troubleshoot problems yourself. Considering that disassembling and assembling the IZH Planet 5 engine is very simple, they can be done at home. However, it is recommended that you consult the factory-produced motorcycle operation and maintenance book.
There are cases when the maintenance book was lost long ago, or was not received at all upon purchase. In this case, here is a simple procedure for disassembling the engine:
It should be noted that the cleaner your workplace is, the better the repair will be done, since dirt that gets inside the engine can make it difficult to operate and even cause another breakdown. Don't be too lazy to wash the engine well before work .
Write down or mark the progress of your actions. This will help with assembly. Group the parts in the order they are disassembled and assemble them by location. The more organized the disassembly process is, the faster you will assemble the IZH Planet 5 engine, the technical characteristics of which will once again delight you.
- So, the first thing you need to do is remove the exhaust tube. It will be most convenient not to unscrew it completely, but only from the engine side and tie it to a stable part.
- Now proceed to remove the cylinder cover, which is secured to four bolts and the cylinders themselves, being careful not to damage the gaskets. Damage to the gaskets will lead to loss of engine pressure and compression.
- Remove the tube from the chain boot.
- Knock out the front pin strengthening the engine. Knock it out carefully; the bent part will not fit back in.
- Now proceed to the engine mounts. Remove all nuts and bolts from the rear of the engine.
- When the engine is not secured, move it to the side on a stable surface. There are seven bolts on the pallet that need to be unscrewed. Then carefully remove the tray. Remove the outboard flywheel plate and gasket and secure the engine. It is better to fix the engine on a workbench; if you don’t have one, then a massive table will do.
- Let's move on to the take-out flywheel. To loosen the bolt holding the flywheel in place, you will need a socket wrench and a long, sturdy pry bar. The carving on the cap is quite soft; if you overdo it, you can tear it off.
- Then we separate the halves of the pallet. They will still be needed, so we don’t put them away in the “far corner”.
- Now we move on to the take-out flywheel and veneer. They are easy to remove and do not require any special skills.
- Having remembered the locations of the adjusting washers, remove the front, rear and follower shafts in sequence.
- Let's move on to the crank chamber covers. After unscrewing the pins, carefully remove the covers and rings.
- Then you need to return to the pallet again. Remove the crankshafts from its halves.
- Next, remove the bearings of the crankcase halves. Unscrew the race and screws with the crankshaft oil seal.
- And the last step. Remove the installation rings and knock out the seals. Assembly is carried out in the reverse order, but it is necessary to tighten the bolts and studs with certain efforts. Otherwise, there should be no questions about how to assemble the IZH Planet 5 engine.
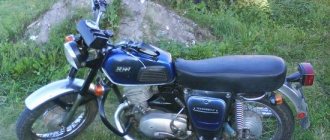
Hello everyone Not long ago I wrote about the restoration of the Izh-Jupiter 4 motorcycle. Judging by the comments, you liked this project and therefore I hasten to please you with another one. So, I decided to assemble the IZH-Planet 5-01 motorcycle. Why this one? But because after reading about it in magazines, reviews on forums and other Internet resources, I decided that this modification of the famous five has become quite rare and is not often found in good condition. Plus, this “Planet” had the maximum set of everything that a production model of this motorcycle could have. So, here is the standard we decided to strive for.
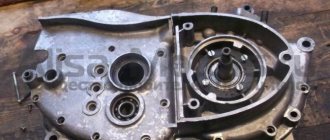
As you noticed, the engine here is equipped with a separate lubrication system and a permanent magnet generator. This means that a regular crankcase will not work... The ignition system is now contactless - there is no need to adjust anything. But for it you will have to look for an analogue of the BPV and the switch. In general, there will be plenty of work! And finding other small things will be a long process. Someone will say: “Why these complex and unreliable lubrication systems and so on?” If it were an unreliable unit, it would hardly be put on the assembly line. Moreover, you don’t often see such an engine. It’s better to put everything together than to tear it apart and sell it, which is what some bad people like to do. But let's not talk about sad things. How did it all start? One of my friends was selling a crankcase from this model, I found out about it in time and offered an exchange for a recently purchased engine from a regular Planet-5 which required a cap. repair. They exchanged, and it seemed like things had moved forward. That's what started the whole thing.
There was no cylinder at that time, but by luck, when I bought a liquid-cooled engine for my Jupiter, I was given a cylinder from Planet 5 with a fan head in addition. True, the cylinder needed boring... And so - the crankcase was washed, the cylinder was bored. Everything is thoroughly washed from dirt! Everything was so clean that the hands themselves reached out to collect it as quickly as possible. But there were no insides and the search for them began, but for now the clean crankcase was assembled and was waiting in the wings.
Now I started looking for internals and a separate lubrication system. I found the crankshaft, gearbox and other things without much difficulty. A good man sold the remains of his IZH and sold it to me cheaply. In general, I found everything I needed for the insides.
And so began the long assembly procedure. Unfortunately, in two places the tension was no longer the same, since the old owners simply knocked out all the bearings without heating the crankcase. There were many shortcomings after “other people’s hands.” Particular attention was paid to the CPG, since this unit requires careful assembly and adjustment of parts to the appropriate group. Luckily for me, I had a Soviet piston, rings and pin in my supplies, which gave me hope for long work, since I am silent about the quality of the new pistons.
A small lyrical digression. Factory parts for an IZH motorcycle become very scarce when you assemble a motorcycle from scratch. You always want to assemble a high-quality engine, but due to the curvature and inaccuracy of new spare parts, the quality drops and the desired effect is not present. So sometimes you have to look all over the country for good spare parts. A little advice, if you still have spare parts from these motorcycles made in the USSR or even Russian ones, but factory ones, then do not rush to scrap them, there are people who are ready to take them from you. Let's move on) So, the engine is assembled. The checkpoint is working. The crankshaft is in almost perfect condition and still inspires hope. After assembling conventional engines, this one seems completely different... It seems to be the same filling, but visually it is something new and unknown.
The main thing is that everything is assembled and the engine is basically ready for work, but the long-awaited spare part was already on the way. The separate lubrication system is one of the long-awaited parts that is difficult to obtain. One good person sold it to me, without any markup in price. Since it was a little incomplete, the price was even reduced. And then she came! The long-awaited moment! When you only see it in pictures, but here it is - twist and turn as much as you like. It seems like a piece of hardware for someone, but it’s a joy for you
And immediately try this system on the engine. Before installation, I had to completely disassemble the oil tank and clean it of dirt. In the grid for filling the oil, I found a key for the generator, which I was surprised about, maybe this is a bonus... Even when you just disassemble this system, you try not to accidentally break anything, since some people want too much for its individual parts. Special thanks to Izhevsk engineers for writing about the operation and features of this system in the repair manuals. This was especially helpful when completely disassembling the oil pump, which was dirty. Well, okay, we did it! Similar fittings were found for the intake pipe and, in principle, the engine was already completely assembled. I’m immediately preserving the engine, since I still don’t have the frame with the documents and I’m leaving for the army the other day, so the assembly is stalled for a year. Well, it doesn't matter!
The engine is assembled, let's put it aside. The next thing I got my hands on was an Orion fork with cast wheels. According to the old tradition, either everything that was killed or incomplete comes to me. The fork was killed here... Well, in general, a complete overhaul.
After 2 days, I purchased 2 more forks in a dead state. From the entire set I began to assemble 2 working forks. One for yourself, and another for a friend. He really wanted one like this. And the work began to boil! In principle, this fork is easier to sort out than a regular one, but when the drain screws turn sour, it brings mountains of happiness, and if the previous owners added thread locker to it, then it’s just a holiday!
I was lucky that I had experience in overhauling such a fork. This one took a lot less time. Surprises were delivered only by soured hydraulics. After a little time, both forks were rebuilt and assembled in proper form. After such a long rebuild, you sit down, look at these new fresh forks and think - how nice it is that they will still work and will not continue to rust somewhere. Intermediate readiness. Fully ready - put it on the frame and go.
After that it's time for the rear brakes. The drum was in terrible shape and condition! I was lucky to find a new sprocket and pads for it from the USSR era. All the best goes to the new motorcycle. That's how, in one day, an old drum becomes a new one with fully working brakes. It may be a small thing, but it will be nice to look at the “BEFORE” and “AFTER”. Before.
After.
Also a small thing, but nice. A neighbor just gave away the factory switching remotes of a new type - you also don’t see those often. Another addition to the motorcycle.
The fork and rear casing have been successfully rebuilt. Everything is working. One thing - you need to change the tires on the rear wheel. Well, these are minor things.
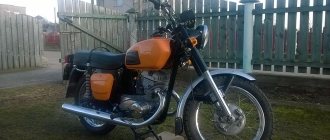
That's all for the first part. Here is another almost standard that inspires.
That's all I've managed to collect so far. In the case of Jupiter, I started with the frame, but here it’s the other way around. The search for a frame with documents is now underway, and there is already one in mind. When the frame is complete, part 2 of this story will be written. Looking ahead to the future, this motorcycle will be used extensively on long trips. The first of them is planned for Izhevsk. We will also look for spare parts for the engine and electrics, so that there is a small supply for the future, since every day there are fewer and fewer good spare parts. You have to make provisions for a rainy day. I hope you liked it, thanks for your attention.
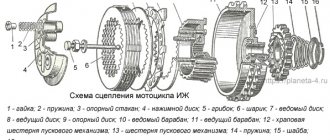
When is it necessary to repair and adjust the gear clutch on an Izh motorcycle?
Regardless of the amount of experience the motorcyclist has, the feelings regarding gearbox malfunctions are almost the same:
- At first it seems that the clutch is slipping slightly. After two or three days, confidence appears - yes, it is slipping, because as soon as you add speed, the acceleration rate lags behind the engine speed level. The breakdown is especially obvious when moving uphill.
- The clutch “leads” or the clutch is incompletely disengaged when the control lever is depressed. In such a situation, the disks of the assembly remain pressed against each other and do not stop transmitting torque to the gearbox. You can finally verify such a breakdown after lifting the rear wheel - it continues to rotate in this situation.
If you want to know how to adjust the clutch on an Izh-Jupiter 5 motorcycle, then information about the reasons causing the listed factors would be useful:
- Use thicker oil in winter.
- Weakening of pressure springs.
- Worn clutch discs.
- Wear of clutch control mechanism elements.
In most cases, if signs of slipping or incomplete disengagement of the clutch are detected, a simple adjustment of the mechanism is required. To do this, it is enough to have a “13” key and a slotted screwdriver.