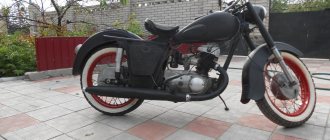
The IZH Planet 5 motorcycle, created in 1987 by the Izhevsk plant, is still popular among motorcyclists. This is a very high-quality and reliable bike, characterized by durability, simplicity and affordability. Disassembling the IZH Planet 5 engine is quite simple even for amateurs. The design of the motorcycle itself does not contain complex elements.
Planet 5 is unpretentious to weather conditions. If you want to start the engine in a cold winter, it will surprise you, even if it is -30 degrees outside the window. Moreover, the motorcycle was designed to ride on various types of roads, which makes it very passable and an excellent assistant in agricultural work.
Like its counterpart, Jupiter 5, IZH Planet 5, whose engine performance is not much inferior to its “brother,” has a strict classic style. However, it has a number of advantages over Jupiter, the main of which are:
- single cylinder engine;
- disassembly and repair of the gearbox without removing the engine;
- presence of one muffler.
However, there is also a big disadvantage . The Planet's crankshaft is much more massive, so it operates at lower speeds, which makes it less powerful. Although the design of the IZH Planet 5 engine is practically no different from the Jupiter one. True, breakdowns occur no less frequently, so if you switched from one motorcycle to another, there should not be any special problems with operation and maintenance.
Engine repair IZH Planet 5
The IZH Planet 5 motorcycle, created in 1987 by the Izhevsk plant, is still popular among motorcyclists.
This is a very high-quality and reliable bike, characterized by durability, simplicity and affordability. Disassembling the IZH Planet 5 engine is quite simple even for amateurs. The design of the motorcycle itself does not contain complex elements. Planet 5 is unpretentious to weather conditions. If you want to start the engine in a cold winter, it will surprise you, even if it is -30 degrees outside the window. Moreover, the motorcycle was designed to ride on various types of roads, which makes it very passable and an excellent assistant in agricultural work.
Like its counterpart, Jupiter 5, IZH Planet 5, whose engine performance is not much inferior to its “brother,” has a strict classic style. However, it has a number of advantages over Jupiter, the main of which are:
- single cylinder engine;
- disassembly and repair of the gearbox without removing the engine;
- presence of one muffler.
However, there is also a big disadvantage .
The Planet's crankshaft is much more massive, so it operates at lower speeds, which makes it less powerful. Although the design of the IZH Planet 5 engine is practically no different from the Jupiter one. True, breakdowns occur no less frequently, so if you switched from one motorcycle to another, there should not be any special problems with operation and maintenance.
Recovery process
When the euphoria of the purchase wears off, a lot of questions arise regarding its repair and restoration with your own hands.
The main task of the new owners:
The video below shows the restored models.
Factory layout for several generations of motorcycles
central locking
Let's consider the process of restoring the central lock, since in most surviving models it is faulty.
Appearance of the headlights and controls of IZH Planet 2
The difficulty is that finding the original lock is very difficult, almost impossible. Moreover, at 6V, since later the Izhevsk Motor Plant transferred all subsequent models to 12-volt equipment.
This is what the filling of the original 6V ignition switch looks like
Therefore, many motorcycle owners adapt parts from later versions of Planets and Jupiters.
The difficulty of installation in this case is as follows:
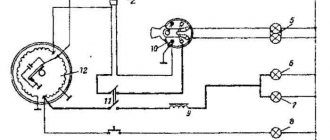
Wiring diagram for IZH Planet 2 to the lock
Headlight
Many owners do not attach importance to adjusting the head light, believing that a working light bulb and intact glass are enough for “driving” during daylight hours.
Using this scheme it will be easy to connect all consumers
In fact, this is not so, and adjusting the light is not only desirable, but also mandatory, especially since it can be easily done independently, spending no more than half an hour of personal time on it.
Scheme for adjusting the angle of luminous flux
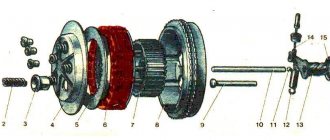
IZH Planet 5 engine diagram
| 1 - spark plug; | 2 - cylinder head; |
| 3 - cylinder: | 4 - piston; |
| 5 - piston ring; | 6 - piston pin: |
| 7 - crankcase; | 8 – channel for lubrication of the main bearing; |
| 9 — roller bearing; | 10 — left oil seal; P - left cover; |
| 12 — motor chain; | 13 - ball bearing; |
| 14 — crankshaft sprocket: | 15 — outer drum of the clutch; 16 — clutch disc; |
| 17 - inner drum: | 18 — pressure disk; |
| 19 — spring; | 20 - shaped nut; |
| 21 - pusher; | |
| 22 — ball bearing; | 23 — trigger gear; |
| 24 — gear shift lever; | 25 — trigger lever: |
| 26 — trigger shaft; | 27 — gear shift shaft; |
| 28 — trigger sector; | 29 - spring: |
| 30, 31, 32. 39, 40, 42 — gearbox gears; | 33 — gear shift fork; |
| 34 — emphasis; | 35 — gear shift shaft; |
| 36 — gearbox cover; | 37 — installation sleeve; |
| 38 — right cover; | |
| 41 - intermediate shaft; | 43 - ball bearing; |
| 44 - roller bearing: | 45 - secondary shaft; |
| 46 - input shaft: | 47 — clutch adjusting screw: |
| 48 - worm ball; | 49 — clutch worm; |
| 50 — cap of the secondary shaft nut; | 51 - oil seal; |
| 52 — asterisk; | 53 - generator; |
| 54 — right oil seal; | 55 — roller bearing; |
| 56 - gasket; | 57 - crankshaft; |
| 58 - bypass channel; | 59 — exhaust window; |
| 60 - decompressor |
With a power of 22 horsepower, the engine capacity of the IZH Planet 5 is 346 cc . This is a very good indicator for such a small volume. For normal use, a speed of 120 km/h is sufficient. True, the dynamics of the Planet are slightly worse than Jupiter, and unnecessary vibrations are disturbing on the road. However, not everyone is satisfied with such indicators, so many are thinking about how to increase the engine power of the IZH Planet 5.
In general, the bike has standard electrical equipment, an air cooling system, a multi-disc clutch and a 4-speed gearbox. The engine itself operates in two strokes. An oil-gasoline mixture is used for refueling. As you can see, the performance of IZH Planet 5, whose engine characteristics are not much different from Jupiter, can allow it to act as a “workhorse”.
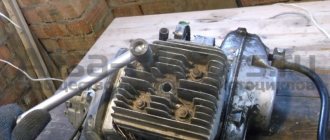
Assembly and disassembly
Before you think about power, you need to understand motorcycle maintenance. Often, chasing speed and appearance, owners forget about the basic rules for operating their pet. Due to negligence, and not only, various types of breakdowns occur. You can troubleshoot problems yourself. Considering that disassembling and assembling the IZH Planet 5 engine is very simple, they can be done at home. However, it is recommended that you consult the factory-produced motorcycle operation and maintenance book.
There are cases when the maintenance book was lost long ago, or was not received at all upon purchase. In this case, here is a simple procedure for disassembling the engine:
It should be noted that the cleaner your workplace is, the better the repair will be done, since dirt that gets inside the engine can make it difficult to operate and even cause another breakdown. Don't be too lazy to wash the engine well before work .
Write down or mark the progress of your actions. This will help with assembly. Group the parts in the order they are disassembled and assemble them by location. The more organized the disassembly process is, the faster you will assemble the IZH Planet 5 engine, the technical characteristics of which will once again delight you.
- So, the first thing you need to do is remove the exhaust tube. It will be most convenient not to unscrew it completely, but only from the engine side and tie it to a stable part.
- Now proceed to remove the cylinder cover, which is secured to four bolts and the cylinders themselves, being careful not to damage the gaskets. Damage to the gaskets will lead to loss of engine pressure and compression.
- Remove the tube from the chain boot.
- Knock out the front pin strengthening the engine. Knock it out carefully; the bent part will not fit back in.
- Now proceed to the engine mounts. Remove all nuts and bolts from the rear of the engine.
- When the engine is not secured, move it to the side on a stable surface. There are seven bolts on the pallet that need to be unscrewed. Then carefully remove the tray. Remove the outboard flywheel plate and gasket and secure the engine. It is better to fix the engine on a workbench; if you don’t have one, then a massive table will do.
- Let's move on to the take-out flywheel. To loosen the bolt holding the flywheel in place, you will need a socket wrench and a long, sturdy pry bar. The carving on the cap is quite soft; if you overdo it, you can tear it off.
- Then we separate the halves of the pallet. They will still be needed, so we don’t put them away in the “far corner”.
- Now we move on to the take-out flywheel and veneer. They are easy to remove and do not require any special skills.
- Having remembered the locations of the adjusting washers, remove the front, rear and follower shafts in sequence.
- Let's move on to the crank chamber covers. After unscrewing the pins, carefully remove the covers and rings.
- Then you need to return to the pallet again. Remove the crankshafts from its halves.
- Next, remove the bearings of the crankcase halves. Unscrew the race and screws with the crankshaft oil seal.
- And the last step. Remove the installation rings and knock out the seals. Assembly is carried out in the reverse order, but it is necessary to tighten the bolts and studs with certain efforts. Otherwise, there should be no questions about how to assemble the IZH Planet 5 engine.
Improved ride quality
The icing on the cake, and in our case the final touch of tuning, is the improvement in driving performance. Some of the tuners approached this issue earlier when they sawed the frame of their motorcycle or raised the tail of a future crossover. For the rest, first of all, you should get rid of your original tires. Among its advantages, only wear resistance can be noted, for which you pay with your safety. It is both universal and useless. The lugs are practically useless; if they get into a mess, under normal conditions on the highway it is noisy, but relatively holds the road, turning into a killer on a wet highway.
Therefore, without hesitation, we throw it away and purchase road, cross or all-purpose tires, based on your requirements. The second point is the suspension. If everything is generally clear with the rear shock absorbers, they are extremely reliable and, in addition, have stiffness settings, then the front fork does not leak only for those who have chosen a different brand. There are two ways to get out of this situation. The first is to add thicker oil. The second is to carry out a complete overhaul of the feathers and replace all parts. Both options do not last long, so the most demanding owners simply change the fork to an imported one, while the rest endure all the shortcomings of their iron horse.
Source
How to assemble and disassemble the engine of Izh Planet 5
Domestic motorcycles of the IZH brand, despite their age, are still popular in various parts of our country. This simple and unpretentious transport is especially popular among residents of rural areas. Not every imported motorcycle can start at +40 or -30, run on any gasoline, and when modified with a sidecar, it turns into a universal transport for a hunter or fisherman. Unfortunately, these motorcycles also have a significant drawback - low engine life. It’s rare that an IZh can work for several seasons and not fail. That is why below you will find step-by-step instructions on how to disassemble and reassemble the IZH Planet 5 engine.
Crankshaft alignment
The crankshaft has been assembled, all that remains is to eliminate the runout of the shafts (balance), many people think that you can’t do this without a lathe, but everything ingenious is simple.
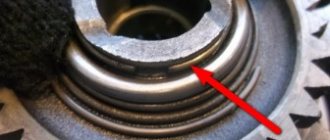
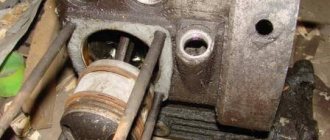
Measure each neck with a caliper as shown in the photo below, usually they are the same size, but sometimes they are slightly different in size. This dimension must be taken into account when aligning the crankshaft.
Photo. We measure the crankshaft cheeks.
All that remains is to attach the rod to the crankshaft cheek as shown in the photo below. It will be like this, first place the barbell on one cheek and press it with your finger, the barbell will lie perfectly flat on the cheek, if this cheek is shifted upward, a gap will appear between the barbell and the second cheek. If the cheek is lower, the bar will lie slightly obliquely.
Photo. A motorcycle crankshaft with a rod is shown; the arrow shows the gap between the rod and the cheek.
Tools
Tools you will need:
- Drill or screwdriver
- Metal drill 4 - 5 mm
- Flat file
- Technical hair dryer
- Mandrels. Plumbing fittings can be used as mandrels
- Powerful flat head screwdriver
- Open-end or socket wrench 14
- Clamp
- Hammer or mallet
- Oil can or syringe
- Sealant
Installation of bearings and seals
We install a retaining ring in the left half of the crankcase.
Depending on the model of the main oil seal, we install a spacer sleeve in the mounting hole of the main bearing, or, if the oil seal was initially wide (there are some), we heat the crankcase and, on the inside of the crankcase, place the oil seal until it stops against the retaining ring.
My engine had a regular narrow oil seal, so I put in a bushing.
Using a mandrel, install the main oil seal into the preheated crankcase.
Quickly, before the crankcase cools down, place the oil guide washer on the oil seal. The oil guide washer has a saucer-shaped profile. We place it on the oil seal so that the concave side faces us, and the curved side faces the clutch basket.
While the crankcase has not cooled down, we press the outer race of the main bearing into it using a mandrel.
If you are going to replace the main bearings with new ones, don’t be lazy: find a sheet of iron 7-8 mm thick, cut a wedge in it for the connecting rod, pass the sheet of iron between the cheeks of the crankshaft and use a mandrel to drive the main bearing onto the axle.
This way you will protect yourself from damage to the crankshaft. The main bearing has a very high interference and fits into the axle with a very large force. It is not uncommon for people to simply knock out the axle (the axle on the planetary crankshaft is pressed into the cheek) inside the crankshaft, but they were never able to put the bearing on.
Native made in USSR 2505 KM
Required Parts
In order for the ignition system to work correctly, a number of auxiliary parts are required. They are listed below:
Modulator
The most difficult stage is the production of the modulator
It is important to maintain the required shape. The more reliably the required dimensions are observed, the lower the likelihood of problems occurring after implementing the system, that is, there will be no need to adjust it using a file
The ignition timing must match on any cylinder used.
The bolt hole must be located in the middle. Otherwise, the engine operation will not be synchronized. It is also recommended to check the integrity of the crankshaft bearings. If you find defects, you should immediately replace it.
The contact ignition is not able to work normally if the bearings are damaged. The thickness of the part should not exceed one and a half millimeters. If it is thin, it will not be possible to avoid deformation, and if it is thick, it will come into contact with the surface of the hall sensor housing.
To create the plate, it is allowed to use any material except steel. Aluminum and others should not be used as they are not magnetic. The drawing that must be followed can be found in the public domain. The presented diagram will be useful to those people who decide to modernize the vehicle ignition device. Below are methods for installing electrical ignition devices in Jupiter.
It must be turned by a professional turner. He will make a simple disk and draw on it the markings of elementary distances between the corners. Then, in accordance with it, you will cut out the necessary sectors at home. The cost of the modulator is seventy rubles.
It is not advisable to use an ordinary plate, since its width is less than twelve millimeters. This will not be enough to fully accumulate the energy resource in the coil. Of course, it can be installed, but achieving four thousand revolutions per minute will become impossible.
In addition to the above you will need:
Gear diagram of the engine of the IZH Planet 5 motorcycle:
1) Gearbox input shaft. 2) Gearbox second gear. 3) Thrust washer. 4) Installation ring. 5) Gear of the second and fourth gears of the gearbox. 6) The assembled gearbox input shaft. 7) Puck.
Gearbox secondary shaft with bearing. 9) Gearbox secondary shaft star. 10) Lock washer. 11) Secondary gearbox shaft nut. 12) Cap of the secondary gearbox shaft nut. 13) Ring. 14) Gearbox intermediate shaft. 15) Gearbox third gear. 16) Installation ring. 17) Gear of the first and third gears of the gearbox. 18) Gear of the first and third gears of the gearbox.