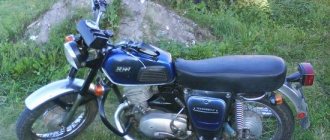
The Soviet motorcycle Voskhod 3m has not been produced for many years, but it can still be found on the roads. This motorcycle appears especially often lately, this is due to the Soviet motorcycles that have become fashionable. Living specimens quickly increase in price; if not on the move, they are bought and carefully restored. The only drawback is low power. The factory 14 horsepower is clearly not enough in modern conditions, so owners are thinking about tuning the engine and other parts. The owners of the once famous and fashionable Java motorcycle, which was a dream for many Soviet motorcyclists, often do the same. To give their iron horse a second life, they tune the Java motorcycle in their own garage. Thus, an outdated motorcycle is transformed into a powerful and modern means of transportation.
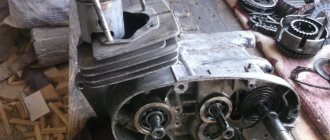
Photo report: Motorcycle engine repair "Voskhod-3m"
Before any repair or assembly of the engine, we carefully inspect all parts for wear or damage, paying special attention to the condition of the engine crankcase and threaded connections. You will find all the answers on crankcase repair in the article: Photo report: Repairing the crankcase of a scooter engine
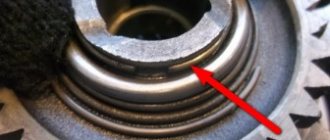
Next, we carefully wash the engine parts, clean all the oil channels (marked with an arrow in the first photo, the second channel is located there only in the other half of the crankcase), buy a new set of gaskets and oil seals (a prerequisite for a quality repair), lay the engine on planks so that the shafts hang in the air and do not interfere with work.
The engine that we will be repairing today was initially in good condition, only the crankshaft bearings were badly worn and the return spring of the gear shift shaft was broken. Therefore, the entire repair will consist of installing new bearings, seals and gaskets with subsequent engine assembly. You will find all the details on disassembling this engine in the article: Photo report: Disassembling the engine of the Voskhod-3M motorcycle
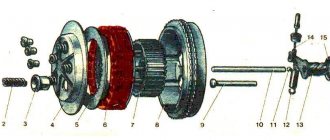
We begin repairing the Voskhod-3M motorcycle engine by installing the crankshaft main bearings into the crankcase.
We install retaining rings in both halves of the crankcase, then install the main bearings there using a mandrel.
So that the crankshaft “stands” exactly in the center of the crank chamber, that is, the distance between the cheek and the wall of the crank chamber is the same on both sides. We need to take some measurements with a caliper before installing it in the engine.
So, we take a caliper and, using a bore gauge, measure the depth of the crank chamber one by one.
We look at what happened and write down the value in a notebook.
We measure the second chamber in exactly the same way and write down the value in a notebook, after all the measurements taken, we add up both values and add to it the thickness of the gasket, my gasket will be homemade from paronite with a thickness of 0.6 mm, therefore, to the sum of the depth values of the crank chambers we add another value equal to: 0 ,6mm.
The result is this: 26mm + 26.5mm+0.6mm = 53.1mm, feel free to round the sum of the values to: 53mm.
Now we measure the thickness of the crankshaft itself, as you can see in the photo, the thickness of this crankshaft is exactly 50mm.
We make the last calculation: from the first value we subtract the second 53mm-50mm = 3mm, now having received the difference between these two values, divide it by two and get the exact distance between the crankshaft cheek and the wall of the crank chamber: 3mm/2 = 1.5mm, which, as they say, is what was required prove. The quality of Soviet motorcycles always left much to be desired, therefore, your digital values may differ significantly from those given in the article.
It should be noted: the crankshaft fits into the new bearings with great force, which naturally creates an unusual axial load on the ball bearings (if installed according to the collective farm), but they really don’t “like” this and after such “bullying” they quickly fail. Plus, if you install the crankshaft in the “classic collective farm way”, hammering it into half of the crankcase, there is a high risk of misalignment of the crankshaft journals, and this is not good.
Features of piston group selection
When selecting a new piston or piston-cylinder pair, be sure to pay attention to the correspondence of their markings. Each motorcycle model has from two to four piston size groups. Their diameter can vary from 0.01 to 0.025 mm.
The group marking is usually applied in the form of a stamp on the piston bottom and the lower end of the cylinder. Make sure these numbers match.
Before installing a new piston, check how it moves in the cylinder liner. A properly selected lubricated part should fall within a second under its own gravity. If the piston falls with a characteristic knock or moves with force, then it is selected incorrectly.
The cylinder must be bored before installing the piston. If the piston has sharp internal corners left after machining or due to casting defects, they must be rounded with a file and polished.
To position the piston correctly, follow the arrow stamped on the bottom of the part. If it is missing or not visible, position the piston in the same way as the locking pins: they should “look” at the vertical sectors of the liner without windows.
When choosing a suitable finger, pay attention to its markings. Just like pistons and cylinders, it belongs to one of several size groups. Usually a dot of a certain color is placed on the end of the pin; the same mark is on the boss inside the piston.
The piston pins of modern motorcycle engines typically engage the boss with a slight force at room temperature. In older models, the fingers were pressed in after heating in boiling water. To avoid mistakes, you should read the vehicle’s operating instructions.
Join us
- About company
- Press center
- Dealer network
- We and society
- Our services
- Industry Solutions
- Articles
- MODENGY
- EFELE
- Molykote
- DOWSIL
- Xiameter
- PermabondMerbenit
© 2004 – 2021 ATF LLC. All copyrights reserved. ATF LLC is a registered trademark.
DIY motorcycle repair Voskhod
Motorcycles Voskhod, Voshod-2(M) and Voshod-3(M) were produced from 1965 to 1993 and were distinguished by excellent technical and operational qualities for their time. All of them were equipped with 173 cc two-stroke engines, which had one air-cooled cylinder and carburetor power. This allowed the motorcycle, depending on the modification, to reach a maximum speed of 90-105 km/h with a fuel consumption of no more than 4.5-5.5 liters per 100 km. In general, Voskhod has established itself as a reliable and durable vehicle, capable of operating for many years with proper maintenance. However, time takes its toll, and the need to repair Soviet equipment arises more and more often. Let's try to figure out what features are characteristic of restoring the main components and assemblies in the process of repairing a Voskhod motorcycle.
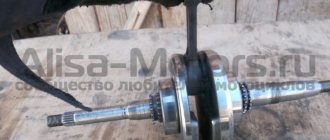
Pressing the crankshaft
It’s not difficult to press the crankshaft, I didn’t bother pressing the good crankshaft, I’ll explain everything in words. It is advisable to press the crankshaft on an anvil or an old cast-iron car block. Hammer the new finger into the crankshaft cheek in which the finger remained when pressed, this will make it easier to press in the second cheek. The new pin is driven from the inside of the crankshaft to the end. Place the new needle bearing and connecting rod on the pin. Place the crankshaft cheek with the hammered pin on the anvil so that the pin rests on the anvil. Place the other cheek on your finger and hammer in with a heavy hammer as shown in the photo below.
When you put the second cheek on the crankshaft, be careful not to hit the threads or the cone of the crankshaft axis. At this point, there is no need to worry too much about the alignment of the crankshaft shafts; it is enough to roughly position it correctly.
The koleval has been pressed, now check the size between the cheeks with a caliper, if possible, spread the cheeks less, if more, beat the cheeks to the desired size.
Also, be careful that the crankshaft pin does not come out from one of the cheeks; if it comes out, drive it in with a mandrel.
Photo. Pressing a motorcycle crankshaft
Engine
The “heart” of a motorcycle, even with the most careful use, gradually wears out - this is facilitated by the abundance of heterogeneous mechanical loads in the cylinder-piston group and other moving parts, temperature effects on the metal, the chemical composition of the working mixture and exhaust gases. DIY motorcycle repair Voskhod most often includes the following engine work:
- removing the power unit from the motorcycle frame;
- partial or complete disassembly of the internal combustion engine;
- replacing piston rings;
- restoration of the cylinder mirror;
- repair or replacement of the piston, connecting rod, crankshaft;
- replacement of support bearings, liners, seals;
- lubrication, fastening, adjustment work.
Engine repair, like the repair of other units, must be preceded by a comprehensive diagnosis of its technical condition, which includes an analysis of operational parameters (approximate indicators of developed power and speed, fuel consumption, sound of operation, color and character of the exhaust). If necessary, diagnostics are performed on the bench, and specialized instrumentation is used.
It is important to navigate the structure of a two-stroke internal combustion engine of a motorcycle and understand how each specific type of repair is performed. So, when replacing piston rings, you can do without removing the engine. It is enough to unscrew the stud nuts, remove the cylinder cover and, opening access to the piston, bring the piston to top dead center. Then the worn rings are removed and new ones are installed. The engine is assembled, not forgetting to replace the gasket. This completes the repair.
Much more complicated is the process of replacing the crankshaft bearings and its seals, the need for which, especially if the motorcycle is used incorrectly, arises quite often. You will need to disconnect and remove the internal combustion engine, clean its external surfaces, disassemble the crankcase, allowing access to the crankshaft, and dismantle the latter. It is important to be careful when knocking out old bearings - if they become distorted, they can damage the seat. And, no matter how trivial it may sound, do not forget to remove the retaining rings. Then the new bearings are carefully pressed in, the crankshaft is installed on the left side of the pan and the engine is turned over. A pin is put on the nuts and the assembled module is screwed into the studs. The power unit is assembled in the reverse order. In case of wear of the inner surface (mirror) of the cylinders, they are bored to repair size and ground. This is a complex and highly precise job that must be carried out by experienced professionals and using special equipment. However, preliminary work - removing and disassembling the internal combustion engine - can be done independently. After the repair, you will have to replace the piston with rings with parts from the corresponding repair group.
Causes of bearing wear
Otherwise, a complete replacement of the shaft or repair along the path of metal spraying is required. Do not forget also about emergency situations, such as jamming of the piston in the cylinder. This will inevitably lead to bending of the crankshaft, which, by the way, can occur during unprofessional disassembly of the motorcycle, when the shaft is knocked out with a hammer or sledgehammer.
If the bend can be eliminated, then physical damage cannot. Don’t also forget about replacing worn out oil seals in a timely manner. Replacing crankshaft oil seals on a Minsk motorcycle will allow you to avoid such troubles as the release of a gasoline-oil mixture into the generator. Many owners also experience difficulty starting the engine and a sharp drop in power.
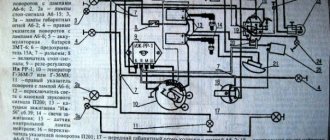
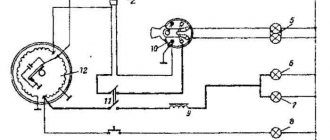
Ignition and carburetor
It is these two components that, as a rule, determine the stability of the engine. Often, interruptions in the crankshaft rotation speed, loss of traction, and difficulties starting the engine are associated precisely with their malfunctions. Repairing the ignition and carburetor usually comes down to adjusting them. Setting the ignition includes setting the gap between the coil core and the sensor magnet within 0.295...0.305 mm. The piston ignition timing should be 3.5-5 mm to top dead center. Adjusting the carburetor is somewhat more difficult. If you are repairing a Voskhod-3M motorcycle, then you will have to deal with the K65V carburetor, and the main tools will be the quality and quantity screws included in its design. Using the first, you can lean or enrich the mixture - change the proportion of fuel and air entering the cylinder. The second determines its volume per working cycle. With the standard setting, the quality screw is screwed in completely and then unscrewed half a turn. Then the rotation of the quantity screw achieves the minimum stable speed and the quality of the mixture is re-adjusted. Finding the optimal adjustment balance is a search for maximum traction and stability with minimum fuel consumption.
Force
To increase power on Voskhod 3M, you can do engine tuning yourself. Even simple manipulations like an air filter can increase performance.
For a stronger increase in power, you can replace the intake system. For example, install a new carburetor. Perhaps even from another motorcycle with a similar system. There is an option in which you can install two carburetors, but you will have to connect pipes to it and weld the channels, filling the cracks with epoxy liquid.
Transmission
During transmission repairs, the following work may be required:
- Adjusting the clutch, replacing its disc and bearing;
- Clutch drive repair;
- Replacement of gearbox bearings;
- Repair of switching module parts;
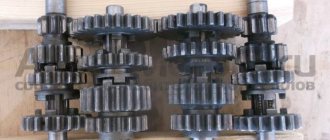
- Restoration or replacement of gearbox gears.
Most of them require high qualifications and are difficult to do at home. The exception is the repair and replacement of drive mechanisms. So, sometimes there is a need to restore the splines for the gearbox foot, replace the clutch cable or its jacket, or adjust the clutch. These works are carried out without disassembling the crankcase.
Repair and operation of the Voskhod motorcycle are closely interconnected due to the age of the model. However, with the proper approach to organizing and carrying out repairs, the motorcycle will remain your faithful friend and assistant for a long time.
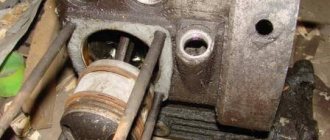
Removing the kickstarter
We put the claw on the kickstarter shaft, pull the shaft towards us, unwind the return spring and remove the kickstarter from the shaft
Second jamb
Cracks often appear where the kickstarter shaft enters the crankcase. It is advisable to weld crankcase cracks
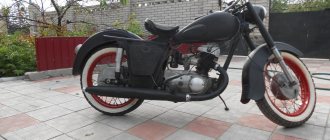
Tuning
The motorcycle can be easily transformed, both technically and externally. Homemade methods of increasing engine power by boring the cylinder lead to rapid failure of the entire engine. Therefore, if you decide to tune your Voskhod, it is better to turn to professionals. Below are photos of tuned Voskhod motorcycles
Spare parts for Voskhod 3m are quite cheap and easily available. For reference, for example, the cost of a new pair of front shock absorbers costs 1,500 rubles, and a clutch kit costs only 220 rubles. On the used motorcycle market it is easy to find any spare parts at a price several times lower than new ones.
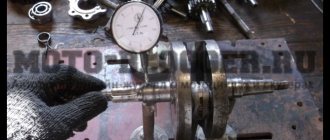
Crankshaft alignment
The crankshaft has been assembled, all that remains is to eliminate the runout of the shafts (balance), many people think that you can’t do this without a lathe, but everything ingenious is simple.
Measure each neck with a caliper as shown in the photo below, usually they are the same size, but sometimes they are slightly different in size. This dimension must be taken into account when aligning the crankshaft.
Photo. We measure the crankshaft cheeks.
All that remains is to attach the rod to the crankshaft cheek as shown in the photo below. It will be like this, first place the barbell on one cheek and press it with your finger, the barbell will lie perfectly flat on the cheek, if this cheek is shifted upward, a gap will appear between the barbell and the second cheek. If the cheek is lower, the bar will lie slightly obliquely.
Photo. A motorcycle crankshaft with a rod is shown; the arrow shows the gap between the rod and the cheek.
Your task is to achieve alignment of the crankshaft cheeks without gaps by applying the bar alternately to each cheek. The photo below shows how you can move the crankshaft cheek with a hammer blow. Just be sure to take into account the strength of the crankshaft cheeks, the crankshaft on which I am showing from a cross-country ChZet, it is hardened and is not afraid of impacts. But most of the crankshafts from road motorcycles have soft metal, so you can only hit the place where the bar is not applied.
Photo. This way you can move the crankshaft cheek.
If one cheek of the crankshaft turns out to be larger in diameter than the other, then when centering the crankshaft, take into account the gap between the cheek and the rod; this gap should be visually the same when applying the rod to the larger cheek on both sides.
Photo. The crankshaft of the motorcycle is centered, the rod lies without gaps on the crankshaft cheeks.
If you do everything right, everything will be correct, you will save money on a new crankshaft by replacing only the connecting rod on the old one, for this you only need your hands and a smart head.
Disassembly
To disassemble the clutch, it is not at all necessary to drain the oil, much less remove the engine from the frame. It will be enough to turn the motorcycle on its side, unscrew the parts that interfere with removing the clutch cover and then remove the cover itself and that’s it. In my case, it just so happened that the engine was one way or another, but it was necessary to remove it from the frame in any case.
This is what the clutch parts look like under the cover. As you can see: there is nothing complicated, much less fundamentally new, here.
First of all, we check the motor chain: press it with a screwdriver or finger and see how much it sags. If the sag is more than 20mm, then we change the chain; if the sag is less, then it can be safely used.
Using a homemade hook from an old bicycle spoke, remove the spring tendrils from the clutch pressure plate.
Remove and set aside the pressure plate and remove the clutch rod from the gearbox input shaft.
We take the discs out of the basket and carefully inspect them. We inspect plastic discs first of all for wear, cracks and the integrity of the protrusions with which they enter the basket.
We check metal disks, including the pressure and support disks, for warping of the working surfaces. To do this, place them one by one on a mirror or piece of glass and look. If the disk does not lie on the glass with its entire surface and when pressing on it it wobbles, then such a disk must be replaced with another one.
If this moment is neglected, the clutch will lead and slip, and no amount of adjustment will correct the situation.
Use an old, unnecessary screwdriver to unbend the lock washer under the inner drum nut. We put a puller on the inner clutch drum, which is an unnecessary clutch disc to which the tires are welded. And with a 17mm head we unscrew the nut on the drum and remove it from the shaft (left-hand thread).
Is it possible to replace the crankshaft cheek by taking it from another?
I did it in different ways, but it is advisable not to change the crankshaft cheek, since it happens that there is a slight displacement from the center of the hole and the center of the crankshaft, so by assembling the cheeks from different crankshafts it is not possible to remove the axial displacement of the shafts. But it happens that even different cheeks sit like native ones. Crankshafts are drilled on one machine with one setting, if the crankshaft is from a different batch, then it was drilled on another machine, and here there may be a slight displacement of hundredths and tenths of millimeters, this little thing does not affect the engine, but when assembling the crankshaft from different cheeks, there may be a displacement.
Supply system
To make the bike go faster, you need to adjust the original carburetor for a higher fuel supply or replace it with a more efficient one. To install a new carburetor, you need to perform the following steps:
- we grind aluminum bushings under the flange of the pipe attaching the carburetor to the cylinders;
- cut off the edge of the inlet channel;
- take a flange from an old carburetor;
- We fasten all the elements using cold welding.
The assembled carburetor must line up exactly with the intake port.