DIY scooter trike
Added: 06 Oct 2021, 17:21
Figure 14 shows two rotors, the top one that burned out, the bottom one new. Why do I not recommend rewinding the rotors? If you look closely at the lower rotor, you will see a gray plaque; on the upper one it is simply not visible. The rotor was balanced at the factory; when rewinding, it is not always possible to balance it and the electric drive can quickly fail.
• Shuttlecocks are circles with different inner radii. The width of all shuttlecocks is the same - 10 cm. The circle must be cut in one place along the shared thread. The flounce is sewn onto the inner line of the circle.
Step two
By the way, there is an easy way to check the functionality of the power supply. To do this, it must be disconnected from the motherboard. Simply disconnect the connectors of the wires leading from the block to the plateau. Connectors can be 20 or 24 pins (4 or 6). To check whether the unit is working, you need to short-circuit contacts 14 or 15 with each other (if the connector is twenty-pin) or 16 and 17 (if it is twenty-four pin). That is, green (sometimes gray) and black wires are connected to each other. Then the unit itself is connected to the network through an outlet. If the cooler fan starts working, then everything is in order, it is not the cause. You need to look for other damage. You can also sew a blanket envelope for a newborn. Compared to the previous version, it has a simple and easy to sew pattern. This envelope is very easily transformed into a baby blanket, then, if necessary, reassembled into an envelope. Sewing it will take a small amount of time, but the convenience of this item is undeniable.
Proper installation of door hinges ensures correct functioning of the door. Make a ponytail that was fashionable in the 60s with a backcomb at the crown from an ordinary ponytail.
Each of us remembers the New Year celebration, especially the beautiful Christmas tree with toys, garlands, confetti and candles. In order not to buy a real Christmas tree or make some addition to it, it is possible to create Hand Made decorations for the holiday from what you have on hand. This craft will surely delight your family and friends.
To obtain a polyline, perform the following steps: Hello! I have two LED table lamps. Both burn well and very brightly. But yesterday I needed to transport them from one city to another, and after transporting one of the lamps began to burn very dimly, and then stopped altogether. I tried unplugging it from the socket and plugging it back in and turning it on. The LEDs lit up, but very very faintly, but two LEDs now don’t light up at all. Tell me, please, is it possible to somehow fix the lamp? And what caused this breakdown? Could it be that I hit the case and now it doesn't work? Thank you in advance for your response!
If we continue the topic of choosing gifts for the older generation, then this task is quite difficult. Not every dad, who has long since become a grandfather, can be gifted a parachute jump or quad biking. A photo book would be a good gift for parents for the New Year. As a rule, on the eve of the New Year holidays there is usually a lot of work in photo workshops, so you should start thinking about ordering such a gift as early as possible. To order a photo book, you will need to select the most interesting photos together, come up with text for each page of the book, you can add photos of parents with their grandchildren, brothers and sisters, and friends. Of course, you will have to spend a lot of time, but such a gift will make an indelible impression, becoming one of the most original and unforgettable. As an alternative, you can give a photo frame with pre-uploaded photos as a New Year's gift.
transparent glass container with a lid. There were a variety of doll designs, but they all had one common feature - the absence of a face. This is easy to explain: through facial features, a doll can be exposed to dark forces and bring negative energy into the house.
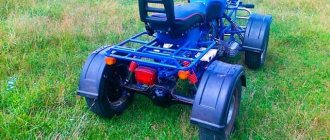
MANUFACTURE AND PREPARATION OF MAIN COMPONENTS AND ASSEMBLY:
First of all, it was decided to start production by preparing the wheels and rear axle of the tricycle.
The wheel motor was clamped in a vice and the tire and tube were replaced. The hole for the nipple in the aluminum wheel rim had to be slightly drilled out with a 9mm drill, since the base of the nipple on the new camera was noticeably thicker:
The result was these impressive bagels:
It was decided to use a 20x20x2 profiled pipe as the rear axle. The diameter of the axle of the motor-wheel itself is 16mm, and I previously tested on a small piece of material how the square profile fits on the axle. There was a small play of 1 mm, but given the planned tightening of the axle in the profile with two bolts, this play suited me. Then I bought 3 meters of a new profile, and now it fit the motor-wheel axle just perfectly, it even had difficulty getting into tension, it turned out even better than I expected.
Accordingly, I cut off a piece of the profile for the future tricycle axle and prepared the nuts and bolts for fixing the motor wheels:
I drilled holes in the profile and estimated where to attach the nuts:
I welded the nuts and tightened the bolts:
I prepared holes for the output of wires from the motor wheels and assembled the finished rear axle:
The rear subframe was made from a 40x20x2 profile, made cuts in the profile and bent the shape of the future subframe in a vice:
I welded the internal jumper of the subframe and welded all the joints:
I took the purchased reaction rod with silent blocks, cut it in half, fastened both halves with an M12x170 bolt through a spacer sleeve, marked it and welded it to the subframe structure. Note: I'm still a welder! Experienced people know, but I did not immediately realize that when actively laying welded seams, it is necessary to take into account the thermal expansion of the elements; accordingly, the subframe jumper where I welded the halves of the rod became hot, it had nowhere to expand, and it went in a slight arc. It didn’t play a special role, but the moment was not very pleasant.
The spacer sleeve turned out to have a slightly larger internal diameter than expected - 16 mm, but it was not possible to find a smaller diameter. Therefore, I proceeded in the same way - drill a hole, weld a nut and fix the axle in the bushing with an M8 bolt:
We place our resulting subframe and try on a square frame profile, grab and weld the bushing to the frame profile:
We connect the frame profile and the subframe, use a bolt, washers and an M12 nut:
To attach the subframe shock absorber, I prepared plates from a 40x4 strip and made 8mm holes. I made several holes for possible replacement of the shock absorber and changing its position:
We set the angle of inclination of the subframe to the frame and try on the plates with the shock absorber, cut the plate to the desired angle for attaching to the subframe pipe and weld it:
We prepare the shock absorber mounting mate from a piece of 20x20x2 profile and plates with an 8 mm hole:
We try on the shock absorber response bracket to the frame, cut it and weld it. I’ll say right away that I then had to cut it off and cook it a little further, because I laid the angle of the subframe to the frame too small, and even with a small load the subframe came out flush with the axis of the frame:
I prepared and welded the rear seat mounting plates, with 8 mm holes:
Likewise the front seat plates:
To continue the work, it was necessary to make the seats themselves, because the place of attachment of the footpegs for the driver and passenger, as well as the point of attachment of the front part of the bicycle to the frame of the tricycle, depended on them.
I cut out the bases of the seat and back from 12 mm plywood with a jigsaw (this time not on a sawing table, since he lost a saw for working outside):
Marked the mounting holes and hammered in the M8 mustache nuts
The foam rubber left over from making the bed (40mm + 10mm) was glued to the bases:
A few years ago I bought a piece of black faux leather on sale at a leather store, which I decided to use for this project. We cover the bases of the chairs with leather using a furniture stapler:
I subsequently painted the lower part of the plywood base of the seat with black paint, but for the back part of the back it was decided to make a panel from 6 mm plywood and also cover it with leather:
I made the seat frame from a 40x20x2 profile, made a cut, bent it at the desired angle, welded the joints, marked and drilled 8mm holes for fastening to the brackets on the tricycle frame:
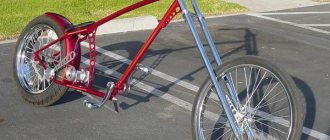
It's time to dock the front of the tricycle. We cut the children's bicycle, place the frame on the block, shape the pipes of the bicycle frame to fit the tricycle frame, call the children and measure the required mounting distance from the seat, weld the parts:
We fasten the rear axle to the subframe with M8 bolts, drill holes and fasten:
I made the footrests for the driver and passenger from 20x20x2 pipes and 40x4 plates. We fasten with M6 bolts:
I planned to place the controller board and the tricycle battery in the subframe itself; for this, the profile height of 40 mm was not enough, and I extended it down to the level of the rear axle with a 20x20x2 profile, for a total compartment depth of 60 mm:
I decided to make the upper and lower compartment covers from plexiglass:
I fastened the covers using M6 bolts and cut the threads with a tap directly in the subframe profile:
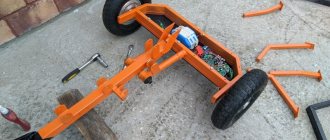
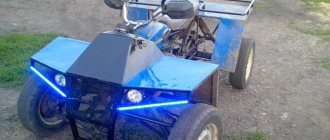
We take all the parts of the tricycle and send them to prime and paint:
To close the ends of the profiles, I purchased end caps for the profile, and before painting I used a primer for plastic:
I sanded the “engine” compartment cover with 120 grit and also sent it for painting:
The elements of the frame and subframe were painted orange; black was chosen for the seats, covers of the “engine” compartment and the transition of the front part from the bike to the frame:
While the primer, paint and varnish are drying, we can take a break again and move on to the electronic part of our vehicle.
Even before the launch of the project, I received the ST-LINK V2 programmer and downloaded the firmware from the author ILYANOV through the STM32 ST-LINK Utility program (https://www.st.com/en/development-tools/stsw-link004.html). Everything worked out. At this link you can find the author's firmware files and his connection diagrams: link. But later I discovered an alternative firmware from another author, which will be discussed further.
For this project, only the main Segway/Hoverboard is used, additional gyroboards are folded out. There is a good picture on the Internet with the designation of all I/O boards:
In accordance with the existing components and the board, the following connection diagram was obtained:
My board is based on an STM32F103 microcontroller. I took the required +3.3V voltage from the body of the AMC1117 converter with a separate wire, which I connected to the common wiring harness from USART2 (on USART2 itself there is only +15V, which cannot be used):
To ensure that the USART2 ADC lines are not subject to interference, as well as to protect against inadequate response of the board to a wire break from the accelerator or brake handle, it is necessary to bypass the ADC2 and ADC1 pins with a 0.1-0.01 μF capacitor and pull up with 2-μF resistors. 10 kOhm to GND. I didn’t have SMD parts, so I used regular pins, and the smallest capacitor I had was 2200 pF, which also worked. Without capacitors, even my wheels began to spin briskly when I simply touched the housings of the motor wheels with my fingers:
To install resistors and capacitors, we had to remove the heatsink from the board and put it back. Pay attention to the protruding red wire on the side of the board (circled in red).
This is exactly the +3.3V wire that I added. During the rotation of the board when installing the radiator, this +3.3V wire came into contact with the radiator body as a bare conductor, and a short circuit occurred. The capacitors on the board were not discharged, and I shorted +3.3V. The result was not long in coming - the board does not work. At first I thought that the +3.3V AMC1117 power converter had failed, since it only had 1.2V when power was applied, but after replacing it (I took it from the gyroboard) nothing changed. Upon further diagnostics, it was discovered that the STM32 chip was dead, short circuited. There was no limit to disappointment. I had read before that when performing any manipulations with boards, it is necessary to discharge the capacities, especially since on this board this is done by simply holding down the power button, but for some reason you remember about this when everything is already bad. So much work has already been done, and that’s it, there is no payment.
The next morning, several hoverboard repair shops were called, and the price for a used hoverboard board was received - 2000 rubles. And a little later, a small search on Avito produced several results for used hoverboards in the city at a similar price. By evening, a whole hoverboard was purchased, with a non-working battery, for 2000 rubles.
As a result, I ended up with a board, a non-working battery (6 of the cells in the battery were dead, the other 14 were with a voltage of 3.5-3.8V), and a set of new motor wheels for the next project. On the old board it is necessary to change the microcontroller chip, but there is no soldering station-hair dryer available, only T12, and there is no experience yet.
The new board turned out to be based on the GD32F103 chip, which initially alarmed me. But according to reviews from enthusiasts, it is also flashed with the same firmware as the STM32. Now I can say that there are no problems with compatibility. Also, on this board the mosfets are screwed to the heatsink with nylon screws; on the red board there were steel screws with plastic bushings-washers:
The board was placed on the base of the “engine” compartment on stands made of screws, nuts and M3 washers
To switch all the incoming lines from control devices, power buttons and the charging connector to the board, I decided to make just such a small board with screw terminal blocks. There is also a variable resistor on the board, which I planned to use to regulate the strength of the electronic brake, because I use a simple button for the brake with two values 0% and 100%. In practice, it turned out that a variable resistor is not needed, and you use the electronic brake only when the front manual brake is not enough, and maximum brake efficiency is only welcome.
To connect the wires from the battery, fuse and battery disconnect button, I used small feed-through terminal blocks on a mini-DIN rail.
I purchased a fuse holder from a car store to protect the battery from various troubles:
I placed the switching board and DIN rail with terminal blocks on the base:
I placed the battery accordingly, secured it with a standard clamping part, painted the base on the reverse side with black paint, and connected everything:
Place the base on the subframe:
We screw the rear axle of the tricycle and connect the phase wires of the motor-wheels and connectors from the Hall sensors:
Homemade moped: manufacturing features and video instructions
Nowadays, many people have begun to engage in constructive creativity. Fortunately, there is time for this, materials and video instructions that can be easily found. If a homemade bicycle is interesting to some part of our society, then there is nothing to say about a homemade scooter or tricycle, which are easy to make. In city conditions, this is a very useful type of transport, which can be maneuvered quite successfully. You can buy a scooter or a tricycle, but making them yourself means turning all your ideas into reality, a unique opportunity to save money, and much more. You can always make it using a high-quality video guide.
DIY three-wheeled scooter
To stay up to date with the latest news in the morning, just press the second button on the TV remote control from 5.00 to 9.00. A powerful information base is the key to the success of the program. It is based on contact with all major news agencies and a huge network of its own regional correspondents. Hundreds of messages arrive on news agency feeds every day. The task of the creative team is to select the most important and interesting. The pride of any TV channel is exclusive information. Undoubtedly, Morning of Russia is the leader in this area. Every half hour the Vesti program is broadcast with the main news. Regional news appears twice an hour on Morning of Russia. They are produced by local television stations (in Moscow - Moskva-Vesti). The program presents the latest news from politics, economics, science, sports, and culture. From the stories of special correspondents, you will learn about the most interesting events in the field of culture: exhibitions and concerts, performances and opening days, world film premieres, new musical releases and star tours. For lovers of the world of speed and adrenaline - the latest news from Russian roads. Changes in traffic rules, relations between drivers and pedestrians and, of course, new products in the car market. In the “Healthy Morning” section, experts will help you navigate any life situation. How to choose a quality product? How to protect your rights? And where can you save money? Answers to these and other questions every day on the morning broadcast. Consultations in the field of finance will be given to you by the most famous and authoritative experts. And every week an economist and an astrologer will make their forecast. Compare the accuracy of their predictions and share your observations on the program forum. Special correspondents talk about the latest innovations in the world of medicine and education, about the most notable and simply interesting events in Russia and abroad. These are human stories, scientific discoveries, and news from the world of art.
Video Do-it-yourself three-wheeled scooter from RealVolya channel
Main parts of a moped
First, let's look at the main parts of this technique. In other words, let's take our future scooter apart, so to speak, and find out its main elements so that making a moped is easy.
Main moped components
It is clear that without a good engine you cannot go far on a scooter. In this case, it is usually installed on the D-6 power unit. Recently, chainsaws have also become very popular, from which a homemade moped is made. In the video instructions you can see in detail how to do this. Chainsaws will be discussed in more detail below.
Exhaust system: forward flow
It is necessary to carefully consider a high-quality exhaust system so that the muffler does not have a negative impact on the power unit with which homemade mopeds are equipped, but, on the contrary, helps to quickly get rid of the remaining air-fuel mixture. A direct flow made by yourself will be what you need.
Suspension: pendulum fork
A pendulum fork that looks much better than other versions of this part of the scooter. The fact is that a large number of varieties of forks can be made, but any expert will confidently tell you that nothing is better than a pendulum one, nothing has been invented yet. As you know, this part of the scooter bears the hardest work. It is the fork that takes the brunt of the impact when going over various bumps, and generally uneven sections of the road. This is a kind of suspension on which the driving characteristics depend. Thanks to the pendulum fork, you can achieve stability of the scooter on any road.
Other parts
Finally, the bracket, shock absorbers, frame and steering column define all parts of the moped.
How to make a three-wheeled trike with your own hands (48 photos)
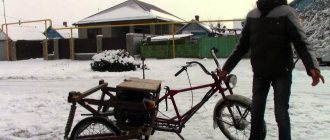
According to the author and owner of this three-wheeled trike, he got the idea to build his own unique motorcycle with his own hands back in 2003. In 2004, he bought himself an ordinary motorcycle, but after riding it for only one season, he decided to make a trike with his own hands. So, Be sure to look further at the detailed photo report of how this unique three-wheeled bike was created, and what spare parts were used for it.
Be sure to look further at the full instructions.
Comments (27)
Old New With the highest rating With the lowest rating
Show comments first:
Information
Please register or log in to post comments on the site.
trinixy.ru
Scooter and tricycle made from a chainsaw
Chainsaws, as mentioned above, are very popular among home craftsmen. They are distinguished by their light weight and dimensions, and in terms of power they are what you need. Today on the Internet you can watch many video tutorials on how to make a tricycle, scooter or moped from a chainsaw . More often mopeds and scooters are made from the Druzhba chainsaw. An old bicycle is also taken, onto which all the parts are installed, including a forward flow muffler.
An example of a homemade tricycle scooter
It is the forward flow muffler that becomes almost the main feature of making a homemade scooter, because you need to know some of the secrets of its installation. The forward flow muffler was originally invented for sports cars. A forward flow muffler in itself already increases the power of a scooter engine.
Air filter
An air filter for a homemade moped or tricycle is also made by hand. First of all, the filter must be reliable. It is recommended to use an oil filter from Moskvich, a washbasin siphon, a metal pin, silicone and a self-adhesive micro-pork to make such an element.
- The filter is clamped between the neck of the siphon and the rest of it;
- The whole thing is held together with a metal pin, the length of which is selected on the spot;
- Place the plug on the metal pin;
- We collect everything and treat the cracks with silicone;
- We glue a micropork onto the flange of the siphon neck.
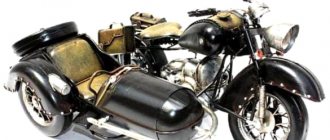
Homemade tricycle from a motorcycle
A tricycle made from an IZH Planet motorcycle and an Ant scooter.
Alexey, a craftsman, built a tricycle with his own hands; the donors for the homemade product were an IZH motorcycle and an Ant scooter.
Below you will find photos of the work involved in assembling the three-wheeler.
The author had this old IZH.
The motorcycle frame was partially redone, and the rear part of the cargo scooter frame was welded to it.
The front fork remains unchanged, the rear suspension is from the Ant truck.
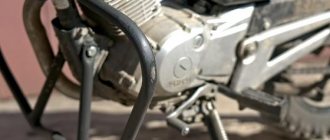
The engine is installed from IZh.
The trunk is made from profile and round pipes.
We painted the frame, roll bars and fuel tank.
This is not the final project yet, the author plans to modify his homemade tricycle, put wings on the rear wheels, install a brake light, etc.
Homemade author: Alexey. Petrozavodsk.
avto-samodelki.ru
Homemade tricycle from IZH Jupiter
A tricycle built on the basis of the Izh Jupiter motorcycle: photo and description of the homemade product, as well as a video review of the trike’s design.
The craftsman assembled a homemade tricycle with his own hands, using Izh Jupiter as a donor. Below are photos and drawings of the trike.
The design of the tricycle is quite simple: a rear axle is installed, torque is transmitted via a chain drive to the driven axle sprocket.
Rear wheels from VAZ.
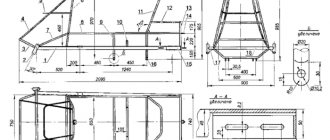
The figure shows the dimensions of the rear axle of the tricycle.
The rear axle is made of a thick-walled pipe with an outer diameter of 42 mm, machined axle shafts from a VAZ are installed.
A sprocket from an Izh motorcycle is installed on the axle.
We recommend watching the author’s video, where he talks in detail about the construction of his homemade tricycle.
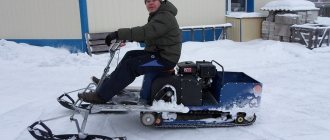
Video: winter drift on a tricycle.
Do-it-yourself tricycle: 25 photos on how to make a homemade product
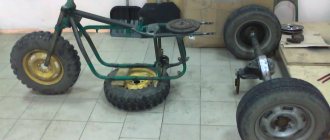
Homemade tricycle “Jupiter”: step-by-step assembly of a three-wheeled vehicle with a photo and description of the homemade product.
The owner of this original tricycle made it from a sidecar from an IZH Jupiter motorcycle and an engine from a moped, the design is quite interesting, I suggest you look at all the photos of the step-by-step construction of the tricycle.
The engine, rear wheel and part of the frame are taken from an old scooter.
The engine with the drive wheel will be installed behind the stroller.
Assembling a frame for a tricycle.
Now assembling the front suspension.
The steering knuckles of the front wheels will be made from a cardan from Kamaz.
The steering knuckle is made from a cardan.
The front suspension of the tricycle emerges.
Installing scooter steering.
This video shows how a tricycle's suspension works.
Painting the frame and body.
In the photo, the finished result of the craftsman’s work is a homemade original tricycle “Jupiter” made with his own hands.
The result was a very original tricycle from a moped engine and a motorcycle sidecar.
Author of the homemade product:
(1 ratings, average: 3.00 out of 5)
sam-stroitel.com
Homemade moped: manufacturing features and video instructions
Nowadays, many people have begun to engage in constructive creativity. Fortunately, there is time for this, materials and video instructions that can be easily found. If a homemade bicycle is interesting to some part of our society, then there is nothing to say about a homemade scooter or tricycle, which are easy to make. In city conditions, this is a very useful type of transport, which can be maneuvered quite successfully. You can buy a scooter or a tricycle, but making them yourself means turning all your ideas into reality, a unique opportunity to save money, and much more. You can always make it using a high-quality video guide.
Scooter tuning / Photo
A wheelchair is a necessary, and sometimes the only, means of transportation for people with impaired musculoskeletal system functions. Most models of chairs for disabled people are designed
Nowadays, many people have begun to engage in constructive creativity. Fortunately, there is time for this, materials and video instructions that can be easily found. If a homemade bicycle is interesting to some part of our society, then there is nothing to say about a homemade scooter or tricycle, which are easy to make. In city conditions, this is a very useful type of transport, which can be maneuvered quite successfully. You can buy a scooter or a tricycle, but making them yourself means turning all your ideas into reality, a unique opportunity to save money, and much more. You can always make it using a high-quality video guide.
Main parts of a moped
First, let's look at the main parts of this technique. In other words, let's take our future scooter apart, so to speak, and find out its main elements so that making a moped is easy.
Main moped components
It is clear that without a good engine you cannot go far on a scooter. In this case, it is usually installed on the D-6 power unit. Recently, chainsaws have also become very popular, from which a homemade moped is made. In the video instructions you can see in detail how to do this. Chainsaws will be discussed in more detail below.
Exhaust system: forward flow
It is necessary to carefully consider a high-quality exhaust system so that the muffler does not have a negative impact on the power unit with which homemade mopeds are equipped, but, on the contrary, helps to quickly get rid of the remaining air-fuel mixture. A direct flow made by yourself will be what you need.
Suspension: pendulum fork
A pendulum fork that looks much better than other versions of this part of the scooter. The fact is that a large number of varieties of forks can be made, but any expert will confidently tell you that nothing is better than a pendulum one, nothing has been invented yet. As you know, this part of the scooter bears the hardest work. It is the fork that takes the brunt of the impact when going over various bumps, and generally uneven sections of the road. This is a kind of suspension on which the driving characteristics depend. Thanks to the pendulum fork, you can achieve stability of the scooter on any road.
Other parts
Finally, the bracket, shock absorbers, frame and steering column define all parts of the moped.
DIY three-wheeled scooter
Such a scooter can be made independently by any owner of a two-wheeled scooter or Alpha moped with a motor power of up to 150 cubic centimeters, including the possibility of upgrading a vehicle with one shock absorber. The only condition that the manufacturer of the TMS kit sets for the user to be able to convert it into a scooter-trike with his own hands is that the scooter engine must have a top mount.
An example of such tuning is the Chinese scooter Gryphon Racer, with a single-cylinder, four-stroke air-cooled engine with a volume of 150 cubic centimeters installed on it. The power of the motor, started by an electric or foot starter, is 9 horsepower. The transmission is a variator, the maximum speed that the Gryphon Racer can reach with a permissible load of 190 kilograms is 90 kilometers per hour.
The front suspension of the Racer 150 scooter is telescopic, and the rear suspension is pendulum, equipped with a monoshock absorber. Aluminum wheels of size R12 (front) and R13 (rear), shod with off-road tires, are equipped with reliable disc brakes. The scooter was equipped with a removable rear axle with a differential from TMS complete with R13 wheels, which increase the cost of the KIT kit to approximately $210. The price of the kit itself is a little more than $800.