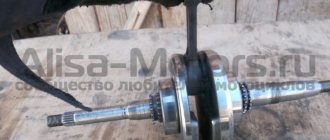
The main signs of wear on the clutch pads on a scooter
So, signs that it’s time to change the clutch pads:
- The scooter starts moving at increased speeds
- the smaller the thickness of the linings, the greater the centrifugal force required to contact the pads with the clutch bell. - The scooter begins to move jerkily, with twitching -
the linings can wear out to such a level that they can no longer properly cling to the bell, which means there will be no high-quality grip. The scooter will eventually move, but its operation will be problematic, and the clutch will overheat. - Creaking and extraneous sounds in the scooter's clutch -
if the linings have worn down to the material of the pads, which is usually made of aluminum alloy, then all the above symptoms will also be accompanied by a characteristic creaking and grinding sound when starting to move.
REMOVAL
1. Unscrew the driven pulley nut. This nut is tightened with a fairly large torque, so in order to unscrew it, you need to fix the pulley. It is best to use a special stopper, which is easy to make yourself, or simply insert a metal rod of suitable length between the clutch drum hole and the surface on which the scooter is installed. We put the spanner on the nut, lightly use a hammer to loosen the nut and unscrew it.
2. Remove the clutch drum from the shaft.
3. Remove the driven pulley assembly with the clutch block.
4. Inspect the clutch pads for wear and mechanical damage. It is necessary to make sure that the friction material of the pads has no mechanical damage, chips, deep scratches, and that the adhesive connection between the friction material and the pads is not damaged. If such damage is present, the pads must be replaced.
5. Measure the thickness of the friction layer on the pads. If the thickness is less than the minimum allowable specified by the scooter manufacturer (usually about 1 mm), the pads must be replaced. It is also important that the thickness of the friction layer on all pads is the same, and wear is uniform over the entire area of the lining.
6. In order to separate the clutch assembly from the driven pulley, it is necessary to unscrew the central nut. To loosen the nut, it is necessary to clamp the assembly in a vice.
Attention!
To avoid damaging the friction material of the pads, you should clamp the assembly in a vice with the minimum necessary force and use aluminum jaws or spacers made of any soft metal.
When holding the assembly in a vice, do not unscrew the nut completely, but only loosen it. Otherwise, the compressed spring, which is located inside the mechanism, will “shoot” and may cause injury.
7. We ask an assistant to firmly press the clutch to the pulley, as shown in the photo, and unscrew the nut. After this, the assistant gradually loosens his hands, allowing the spring to slowly unclench.
8. Remove the clutch assembly and spring from the pulley.
9. We inspect all parts for external damage. It is necessary to make sure that the halves of the driven pulley rotate freely relative to each other without jamming (in the driven pulley, as a rule, the halves are connected using the “groove-key” principle. A bushing is rigidly attached to one of the pulley halves, on which the second half of the pulley rotates freely Its movement is limited only by the oblique groove in which the key slides. It is this mechanism that ensures that the distance between the pulley halves changes when one half rotates relative to the other). If the sliding surface of the bushing is dirty, it is necessary to wash it with carburetor cleaner, kerosene or nitro paint solvent, and then lubricate it with penetrating silicone grease or engine oil.
It is also necessary to remove belt wear products (rubber dust) and clutch linings from all parts.
10. The clutch is ready to replace the pads.
11. Using narrow pliers, remove the retaining rings from the guide blocks.
12. Remove the pressure plate.
13. Lightly tap the center of the base of the assembly with a hammer handle to knock it out of the block package.
Attention!
At the base of the unit, rubber dampers are installed under the pads. Once the pads move, the dampers may fall out. The dampers must be removed.
14. Remove the package of pads from the base.
15. Remove the springs connecting the pads and disassemble the pad package.
Attention!
All springs in the clutch mechanism are calibrated. They are not allowed to be stretched, compressed or changed in shape. The springs connecting the pads must be of the same stiffness (usually the springs are color coded).
16. Before assembly, clean the clutch pad axles from dirt and old grease, and apply a thin layer of high-temperature grease to them.
Attention!
Lubrication must be done carefully; after installing new pads on the base, remove excess lubrication. Contact of lubricant on the working surfaces of the pads is unacceptable.
Settings
The standard clutch is adjusted solely by replacing the springs with stiffer ones. Most manufacturers produce special sets of several sets of springs of varying stiffness. You can, of course, reduce the weight of the pads by grinding them down somewhere, but this method is strongly not recommended. Firstly, it will take many attempts before you achieve the desired result, and secondly, the mass of all three pads must be exactly the same - this is not so easy to achieve at home. Do not forget also that the capabilities of the native clutch are limited by the material of the pads. At high speeds, it will transmit rotation with excessive slippage, and this will lead to premature wear and heating.
Manufacturers of tuning clutch units offer different tuning technologies: replaceable springs, variable spring pretension, replaceable weights that regulate the weight of the pads. Of course, this allows you to adjust the clutch quickly and accurately. Another important role is played by the different material of the working pads, which helps to minimize slippage. To summarize, we can say that for tuning Sport it is enough to replace the springs in the original clutch. Those who consciously chose Racing tuning are recommended to replace the entire clutch assembly.
Maintenance and repair of transmission of chain scooters using the example of BM
Maintenance and repair of transmission of chain scooters using the example of BM Mint
Many owners do not even suspect that the “leg” of their scooter may not be a classic V-belt variator, but a chain drive. The instruction manual says little, and not a word about repairs at all. Let's try to fill the gap. A few words about the design. The transmission consists of two sprockets (driver and driven), a roller chain and two dampers. The drive sprocket is mounted on the centrifugal clutch drum. When the engine is stopped or idling, the drum is not connected to the crankshaft journal. When you increase the engine speed, the clutch pads located on the axle will separate and, through friction, transmit torque to the clutch drum and drive sprocket. The driven sprocket is rigidly fixed to the rear wheel gearbox shaft. The chain connecting the sprockets is bush-roller. To prevent the motor from falling into an indefinite trance and the chain to last longer, the transmission is closed with a sealed casing, and it is partially filled with oil. Your mission is to periodically carry out maintenance, and it comes down to: first, monitoring the oil level, and second, changing it on time. You need to check the oil level after a long period of parking or if you find streaks on the casing. But look into it for the first time immediately after purchasing a scooter.
| When you unscrew the bolt from the control hole, oil should flow from there. | To drain the oil, remove the drain plug at the rear of the transmission housing. | The filler neck is closed with a plastic screw plug. Numbers are stamped nearby - the approximate capacity of the casing. |
Place the “stool” on the center stand on a horizontal platform. Unscrew the screw from the inspection hole - it is located just below the middle of the casing cover. If the level is normal, oil should flow out of it in a thin stream. Doesn't it flow? Tilt the scooter towards you slightly. “Dry” again? So, add oil - it should be the same brand that has already been filled. If you change the oil, you can use any engine oil. The only thing that the manufacturer stipulates is its viscosity - 10W40. Unscrew the plug in the upper rear part of the casing. On its casting it is usually indicated how much oil needs to be poured, but approximately. In our case - 450 ml. But if you like, fill the casing until the oil begins to overflow from the control hole. Before disassembling the transmission, drain the oil. Unscrew the plug located at the bottom of its rear part. Unfortunately, this is not the lowest point of the casing. A little oil (about 70 ml) will remain in the front end and flow out as soon as you unscrew the screws securing the cover. Be prepared: move the container into which the oil was drained to this place and stock up on rags or rags in advance to wipe up any puddles. The oil pump for the separate lubrication system is located at the rear of the “leg” under a separate cover. Remove this cover. Without touching the oil hoses, unscrew the pump mounting bolts, remove it from its seat and move it upward. Then remove the transmission housing cover. In principle, you don’t have to touch the kickstarter lever, but we dismantled it - without it it’s more convenient to unscrew the cover screws. These screws are different in length - you won't get them mixed up during assembly.
Tuning motor
Why it is so important to engage the clutch at higher speeds on forced engines can be seen in the diagram. The use of racing exhaust systems, for example, increases peak power, but shifts the peak to higher rpm. But because of this, a failure occurs at low speeds.
The blue line shows a typical standard motor. It engages the clutch at approximately 4500 rpm. Maximum power of 4.5 hp is achieved at 7000 rpm. We call this point peak power rpm. The standard engine maintains a power of 4-4.5 hp on a very long “shelf” of revolutions of 5000-8000. The red curve shows the engine with a racing exhaust system and extended valve timing. The power of 8-9 hp here is achieved in a narrow speed range (8000-9500), but at the same time it is 2 times higher than that of a standard engine! Up to 5000 rpm, the standard engine has 1 hp more power than the tuning one. To overcome this failure, they make the clutch engage at 7000 rpm.
We hope that it is now once again clear that it is one thing to get an increase in peak power, and another thing to implement it correctly.
Scooter clutch
What is a centrifugal automatic clutch? This is a mechanical device that automatically, at certain engine speeds, using centrifugal forces, connects the variator secondary shaft to the gearbox. It is used to smoothly start the scooter from a standstill without any handles or pedals. This clutch is installed mainly on all types of scooters where a V-belt variator is installed.
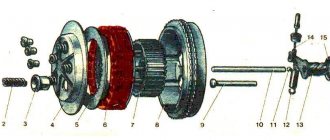
Let's look at the operating principle of an automatic centrifugal clutch using the figure:
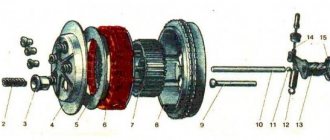
The secondary shaft of the V-belt variator 2 (hereinafter simply the variator shaft) is installed on the primary shaft of the gearbox 4 (hereinafter simply the gearbox shaft) on bearings 8, and thanks to this, the two shafts rotate independently of each other at a time when the scooter is not started or is idling.
A plate 2 is installed on the variator shaft to which the pads 3 are attached (using bushings 7) with asbestos pads 5 glued to them. The pads are pressed under the action of springs 6 towards the center of the variator shaft. At certain engine speeds, under the influence of centrifugal forces, the springs expand and the pads 3 begin to move in the direction indicated by the arrows with the letter C. In this case, the pads 5 are smoothly pressed against the disk 1, which is rigidly screwed to the gearbox shaft 4, the gearbox shaft is connected to the variator shaft and they begin to rotate synchronously.
How does it happen that the scooter starts moving smoothly? Very simple. At engine speeds, at which the scooter is just starting to move away, the force C shown by the arrows in the figure is not yet large, so the pads slide (rub) along disk 1, and it begins to rotate, but at an even lower speed than the variator shaft. With increasing speed, when this force increases, the slippage gradually decreases and a moment comes when the pads 3 with linings 5 are pressed so hard that they engage rigidly and the speed of the secondary shaft of the variator 2 is freely transmitted to the gearbox 4 and becomes equal.
Scooter chain drive
A scooter, like any other vehicle, can break down during use. Various breakdowns occur due to natural wear and tear of components and assemblies or incorrect operation of equipment. When the chain drives in scooters fail, it is impossible to continue using the vehicle. A breakdown causes great discomfort to its owner. Every driver is interested in the serviceability of the vehicle, and in the event of a breakdown, in immediate repair.
If spare parts for various brands of cars are sold by many stores in almost every city in our country, then the situation with parts for scooters is a little more complicated. Owners of this type of transport often encounter problems when the need arises to purchase a certain spare part.
The Scooter-ZiP company offers scooter owners high-quality service and is ready to immediately provide them with all the necessary spare parts. If you operate a scooter, know that if you replace failed components or purchase the necessary accessories, you will no longer encounter problems. When purchasing everything you need for a scooter, contact professionals who are ready to guarantee:
- a wide range of spare parts and accessories for scooters created by various manufacturers;
- attentive attitude to each client;
- constant availability in stock of all items that you see in the online catalogue;
- willingness to send products to any city in the country with the help of logisticians.
