01/18/2021 15,979 Consultation with a specialist
Author: Ivan Baranov
The fuel gauge always shows a full tank. I changed the float and it still shows a full tank. I rang the wiring - to no avail. What to do? (Sergey)
Hello, Sergey. Our resource specialist has studied your question and is ready to give a comprehensive answer to it.
[Hide]
Fuel level sensor does not work
The FLS, like any other elements of the car, can systematically fail, resulting in the need for repair work. Now we will take a closer look at the most common causes of this phenomenon:
- If the FLS readings are constantly changing (“jumping”), it is possible that the contact tracks on the board are worn out, which are erased under the influence of time as a result of the device’s slider constantly moving along them. If the worn area is not large, try bending the slider so that it is located above the worn area; however, if the worn area is large, the problem can only be solved by replacing the sensor.
- It happens that when the fuel tank is full, the indicator arrow of the sensor returns to zero. A possible cause of this phenomenon is an incorrectly placed float stop.
- When the engine is running and the ignition is on, the indicator arrow remains stationary. As a rule, the reason lies in damage to the connecting wires, oxidation of their tips, a malfunction of the pointer receiver or a blown fuse.
- If the fuel level indicator needle constantly drops to zero and also twitches, you should check the current collector; it is probably not touching the sensor resistor enough, or the winding of the resistor has broken.
- In addition, the warning lamp about the minimum fuel level in the tank may stop working altogether or work incorrectly, intermittently. In this case, most likely the problem lies in the resistor and you may have to replace it.
The most common problem with potentiometric sensors is their rapid wear, as well as oxidation of the tracks, which determines the appearance of the problems described above.
Adjusting the fuel level in the scooter carburetor
Published 01/08/2013 | Author: Midas
For the carburetor to operate correctly, it is necessary that the gasoline level in the float chamber is adjusted correctly. If there is too much gasoline, the carburetor will excessively enrich the working mixture, which will cause increased fuel consumption and contamination of the cylinder and exhaust with carbon deposits. If there is little gasoline, then a lean mixture will lead to engine overheating and loss of power.
To check the fuel level in the float chamber, with the engine running, you need to move the drain tube (it is transparent) upward and use a slotted screwdriver to unscrew the drain screw. After a couple of seconds, gasoline will fill the tube and you will see its border. In a normal case, the level should be approximately where the edge connecting the float chamber cover to the carburetor body is. In the photo below you can see that the level is above the edge and should be lowered.
To adjust the fuel level, you need to disassemble the carburetor. The fuel level is adjusted by bending the float blade on which the shut-off needle hangs. If we bend the petal slightly upward, we will raise the fuel level, and if downward, we will lower it. The photo shows what position of the float we are talking about (in the working position it is turned vertically the other way around).
In a working carburetor, the installed float should be parallel to the edge. But if the needle or its seat is worn out, the float should protrude slightly with its free edge (opposite the axis) upward.
Cleaning and adjusting the 4t carburetor, part 1
note2auto.ru
Preparation for removing or replacing the fuel sensor on the VAZ-2110 and Lada Kalina
Replacing the FLS on a VAZ-2110 and Lada Kalina is possible only after preliminary dismantling of the fuel module. It is advisable that during work the tank is filled with gasoline to no more than half.
The procedure for preparatory operations for the VAZ-2110 and Lada Kalina is the same:
- Remove the lower part of the rear seat.
- We bend the protective mat and sound insulation of the body above the fuel module hatch.
- We clean the hatch cover and the body around it from dust and debris.
- Using a Phillips screwdriver, unscrew the 4 screws securing the hatch cover to the body.
- Remove the cover.
- We remove accumulated dirt and dust from the fuel module.
- Having released the connector block lock, disconnect the connector with wires from the fuel module body.
- We relieve the gasoline pressure in the fuel line - turn on the starter for 10–15 seconds so that it rotates the crankshaft during this time (if the engine starts, then wait until the gasoline from the fuel line is exhausted and the engine stalls itself), and then turn off the ignition.
- We disconnect the “ground” of the car with a button or by disconnecting the battery terminal.
During subsequent replacement operations, keep in mind that some gasoline remains in the fuel line after the pressure is released.
Setting the sender
Once you receive your new fuel gauge kit, you should follow the instructions that apply to your new unit. In general, the installation will involve the following steps
Note that senders are typically not connected devices. The length of the sender arm can be changed according to the dimensions of your fuel tank
This also ensures that the sensor is reading correctly.
First, measure the depth of the fuel tank from the top of the tank, near the sending unit, to the base. This measurement determines the length of the sending unit's float arm. Then cut the transmitter arm and match it to the depth of the tank. A pair of wire cutters usually does the trick, but some require a hacksaw. Once you have cut the float arm to the correct length, secure it with set screws to the flange of the new sender that will be screwed into the top of the tank.
The sending wire comes from the post in the center of the flange. There may also be a ground wire that comes from the second pin at the edge of the flange. Both wires lead to the rear of the fuel gauge. Turn off power to vehicle systems before disconnecting wires. Then disconnect the positive wire and ground wire from the old sending device
Note that if the sensor is grounded directly to the tab on the tank, there may be a missing ground wire. Unscrew the screws that hold the sending unit into the tank and remove it
Next, remove the three wires on the back of the old sensor. One wire goes to the center pin on the tank sending unit, one goes to ground, and the third connects to the 12V source, usually the ignition switch. Remove the fuel level indicator.
Install the new sender by lowering the float into the tank. Be sure to insert a new gasket under the flange, then align the gasket with the holes in the sender and in the tank. Once the gasket is aligned, mark it against the flange as it may rotate while you center the screw holes to match the tank holes. Mark the screw holes in the tank for easy alignment; the flange will cover them and make them difficult to find. Make sure the float arm can move freely and will not stick to the corner of the tank or vertical wall.
Orient the sender block so that the movement of the float is not obstructed. You can test this in advance by holding the sender close to the tank before installing it to see how the float can move freely. Once you know the correct orientation, duplicate it when you place the device in the tank. To minimize confusion, use a marker to show the direction the float arm will move when the screw holes are aligned. Insert new screws and tighten them.
Features for gasoline and diesel cars
The same DRTs are used for diesel and gasoline engines. Installing the device on gasoline internal combustion engines is considered unprofitable, since gasoline quickly corrodes the internal mechanism of the controller and quickly wears it out. An alternative for a gasoline internal combustion engine can be a contactless sensor or a control system with a CAN bus.
The passage of diesel through the sensor, on the contrary, helps to lubricate the moving parts of the device, which increases its service life. Low-quality diesel fuel with a high content of paraffins and additives can reduce performance. The internal elements of the structure become clogged and incorrect signal transmission occurs. On diesel fuel lines, the DRT is systematically removed and cleaned.
Design and operating principle
The sensitive element of the sensor is a rheostat (variable resistor). The sensor output consists of two control wires; ground is connected separately. The level sensor is based on a lever. A small plastic float is installed on one end of it, but the other end is connected to the rheostat, or more precisely, to its slider connected to ground.
The rheostat has two outputs, one of which (the lower one) is not connected to anything, and the upper one produces an analog signal that goes to the fuel level indicator. The control system measures voltage. The indicator is a voltmeter, its full scale is equal to the supply voltage. In simple terms, the indicator measures the voltage, and the level sensor changes its value depending on the amount of fuel in the tank.
The slider is also responsible for turning on the warning lamp. When there are five liters of gasoline left in the tank, the light on the indicator lights up. This is achieved by the fact that the second contact coming from the sensor body is connected to a control lamp. The positive terminal is connected to this lamp, and the negative one goes to the sensor.
Adjusting the fuel level in the scooter carburetor
For the carburetor to operate correctly, it is necessary that the gasoline level in the float chamber is adjusted correctly. If there is too much gasoline, the carburetor will excessively enrich the working mixture, which will cause increased fuel consumption and contamination of the cylinder and exhaust with carbon deposits. If there is little gasoline, then a lean mixture will lead to engine overheating and loss of power.
To check the fuel level in the float chamber, with the engine running, you need to move the drain tube (it is transparent) upward and use a slotted screwdriver to unscrew the drain screw. After a couple of seconds, gasoline will fill the tube and you will see its border. In a normal case, the level should be approximately where the edge connecting the float chamber cover to the carburetor body is. In the photo below you can see that the level is above the edge and should be lowered.
To adjust the fuel level, you need to disassemble the carburetor. The fuel level is adjusted by bending the float blade on which the shut-off needle hangs. If we bend the petal slightly upward, we will raise the fuel level, and if downward, we will lower it. The photo shows what position of the float we are talking about (in the working position it is turned vertically the other way around).
In a working carburetor, the installed float should be parallel to the edge. But if the needle or its seat is worn out, the float should protrude slightly with its free edge (opposite to the axis) upward.
Please note: This article and the images in it are subject to copyright. Partial or complete reproduction on other resources without permission is prohibited.
scooter777.ru
Types of FLS and their operating principles
Popular FLS designs: lever, tubular and electronic. The principle of operation is the same for all. The controller reads the position of the float and transmits the information to the indicator. The accuracy and reliability of operation depends on the design of the equipment.
Lever
Consists of a float, a movable connecting lever and a potentiometer (slider with resistor plates).
When the tank is full, the float is located at the top level. It is connected through a lever to a potentiometer. The latter, through the indicator, with the on-board electrical network. The resistance is 7 Ohms, the filling is reflected in the readings of the device on the panel.
As gasoline is burned, the level drops. The float goes down. The slider connected to it moves along the resistor plates and increases the resistance of the potentiometer, up to a maximum of 230-240 Ohms. When it reaches this value, the indicator shows that the tank is empty.
The design is very reliable. The only drawback is related to the wear of parts, which reduces accuracy.
Tubular
The design includes a float, a hollow tube and a contact group. The sensor works similarly to the previous one, but there are design differences. The float has slip rings. The housing contains a resistive wire and a guide post. To connect the control, a mounting flange is provided.
Gasoline enters the housing from below. When the tank is full, the float is located at the top. At this point, the minimum section of the contact wire is connected to it, the resistance is the least. As fuel is consumed, the float lowers and resistance increases. At the bottom it will be maximum.
The advantage of the system is that the float is located in a limited space. The vibrations of the machine are smoothed out, and the readings are much more accurate than those of a lever circuit. But there are installation restrictions.
Electronic
This is a modern model in which the parts do not come into contact with fuel. The reading node is connected to the lever through a magnetic field. The measurement error is no more than 1%. Such devices are used when the car is refueled with gasoline based on methanol, ethanol or biodiesel. Other designs are ineffective in such cases.
The sensor's actuator unit is located in a sealed housing. Only the lever and the magnetic float come into contact with the fuel. The height of the float is measured by magnetic field pulses. Changes are recorded along established intervals. Their passage changes the amplitude of the return signal. The indicator updates the readings after the sensor passes the next mark.
Operating principle of the sensor
The operating principles of different types of devices differ.
Operating principle of a lever-type sensor
The float, made in the body of a hollow sealed component, is always located on the surface of the fuel. The device itself can be made of plastic or metal. When fuel is consumed, this component is lowered, and as a result of the action of the lever, the potentiometer slider moves.
The float is in contact with the sectors to which the conductors are connected. The latter are connected to the fuel indicator located in the dashboard. As a result of changing the number of plates connected to the potentiometer circuit, the resistance value changes.
When the fuel tank is full, the slider is set to the extreme position; accordingly, the current flows along the shortest path in the potentiometer. Current transmission is carried out on the sector through a plate located at the edge. Therefore, the resistance value is quite low and is about 7 Ohms. When the fuel is consumed, the slider of the device moves, which contributes to the addition of new plates to the electrical circuit, because of this the resistance value increases. If the tank is half full, the resistance value is about 120 ohms.
The GLONASS monitoring channel Fuel control showed the nuances of using monitoring systems.
If the tank is completely empty, then the plate part of the system is fully activated. Therefore, the resistance parameter will be as high as possible and will be about 330 Ohms. All described resistance values are approximate, since different controller models have certain parameters.
The main advantage of a lever fuel level sensor is the simplicity of the device, due to which such controllers are considered reliable. Their price is low. The main disadvantage of the lever controller is the wear of the contact component. In addition, such sensors have a certain error in values, in particular, we are talking about machines equipped with analog controllers.
Operating principle of a tubular sensor
The operating principle of tubular devices is somewhat different. Fuel passes through the technological hole located in the lower part of the device into the protective pipe. A float is located on the surface of the fuel. As a result of changing the position of the element with an increase or decrease in the volume of fuel, the resistance value changes.
When the vehicle's fuel system reservoir is full, the float is located on top of the safety tube. As the volume of fuel decreases, the float drops and the length of the electrical circuit increases, which leads to an increase in the resistance parameter on the wire section.
Setting up the carburetor on a scooter
Today, scooters are more advanced than before. The main direction of their modernization is related to the carburetor, which performs a very important function. It is responsible for high fuel consumption, difficulty starting the engine, failures in operation, etc. The carburetor on a scooter often needs adjustment. This article is about how to set it up.
Carburetor
This is one of the most important components of a scooter. You won't go far without a properly tuned carburetor. Therefore, it is very important to know where this element is located, how to set it up, and how to clean the carburetor. But first, let's figure out what a scooter carburetor consists of.
A tube
The main part of the carburetor is the Venturi tube.
- A characteristic feature of the tube is its different diameter. The tube narrows towards its center and then expands again;
- The air flow passes through it in the narrowest place, due to which low pressure is created;
- The flow pressure equalizes as soon as the movement continues and the diameter of the tube increases;
- If you place a smaller tube filled with gasoline in the middle of this very tube, then, heading into a low-pressure zone, the fuel will begin to leave the small tube, atomize and evaporate, coming into contact with the air flow inside the large tube.
Flap with needle
This operating principle for a scooter motor is quite justified. Although in this case, mandatory adjustment of the incoming mixture into the combustion chamber is necessary, which is carried out by pressing the accelerator pedal. A special restriction valve is installed directly in the center of the Venturi tube. It regulates the volume of incoming air.
A needle must be installed on such a valve, which determines the amount of incoming fuel. When the driver presses the accelerator pedal, the throttle is actuated and at the same time the needle rises. Due to this, the required amount of the mixture is supplied.
Float chamber
The float chamber is designed to constantly maintain the level of gasoline in the tube. It works quite simply:
- After the level drops, the float moves to the lower part of the chamber and opens the valve through which fuel enters;
- After filling the required level, the float rises, closing the valve.
The toilet cistern works on the same principle.
Idle system
The system located in the carburetor and responsible for idling. It works not only at idle, but also at low speeds. In the first case, fuel is supplied through another carburetor channel located behind the limiter.
This system consists of many components:
- The system screw or mixture quality screw is responsible for the volume of air passing through the system. When the driver turns it on, the amount of air entering the system decreases and the mixture becomes richer (more gasoline in it). Conversely, in order for the mixture to become leaner, the screw is unscrewed.
- A special channel through which fuel flows from the carburetor. A special valve closes the channel as soon as the carburetor throttle valve opens. This valve is very important, since it is it that prevents the system from negatively affecting the operation of the scooter’s power unit at high speeds.
- The jet responsible for setting.
Idle system? the most vulnerable part of any carburetor. Most often, the cause of the malfunction is jets with a small cross-section, which become clogged easily and quickly.
The diaphragm that shuts off the system may wear out over time and will no longer be able to keep the valve closed. The fuel supply is disrupted, which leads to serious and obvious consequences.
The valve itself may also lose its tightness, to maintain which there is a rubber ring between the membrane cover and the carburetor body. If the seal is broken or broken, air will flow into the intake manifold, leaving the fuel mixture leaner.
There are other elements in the carburetor:
- Start-up enrichment;
- Spool;
- Acceleration pump.
[ads-pc-1]
Adjustment
The carburetor of a scooter can be located in different places. It depends, first of all, on the brand of the scooter. For example, on the Honda Dio-35 this element is located on the left side, closer to the rear wheel. A throttle cable and a fuel hose lead to it. Everything is clearly visible and you won’t have to look for the carburetor for long.
Adjusting the scooter carburetor is necessary in the following cases:
- The engine does not start or it takes a long time to start;
- The equipment loses its former dynamics and acceleration;
- With unstable idle;
- When the scooter engine speed is too high;
- With increased fuel consumption;
- When black smoke appears from the muffler.
The adjustment should be made with the engine warm. But before starting it, it is recommended to rinse and thoroughly clean the carburetor. First of all, the idle speed is adjusted, then the mixture quality is adjusted and the fuel level is adjusted.
The idle speed is adjusted using a screw. This adjustment will come in handy if the scooter has been sitting idle for a long time. After it, the carburetor will seem to gain a new life.
- If you need to increase the speed, the screw must be tightened.
- To reduce the speed, unscrew it.
We remind you that the adjustment is carried out after warming up the engine for at least ten minutes!
Adjusting the mixture quality
Adjusting the quality of the mixture is also very important. It is recommended to always adjust it according to the factory proportions. If the mixture is too lean, the scooter will often overheat and lose power and dynamics. On the contrary, if the mixture is too rich, fuel consumption will increase and carbon deposits will accumulate in the chamber more often.
This parameter is adjusted using a special screw or by moving the needle in the throttle valve. Often adjustment is carried out in the second way, since the screw responsible for this parameter may be damaged or simply missing in this model.
The principle is the same:
- Clockwise ? the mixture becomes richer.
- Counter-clockwise ? depleted.
In the case of a needle:
- Does the needle rise? enriches itself.
- Does the needle go down? depleted.
The most noticeable results can be achieved by combining these two adjustment methods.
Again, before making adjustments, the scooter engine must be warmed up for several minutes, and the carburetor must be clean inside.
The quality of the mixture is correctly adjusted in the following cases:
- The scooter began to accelerate smoothly;
- While driving, there are no failures in engine operation;
- There are no jerks;
How to find out the degree of enrichment of a mixture using a candle
- What if the scooter's spark plug is black and has a lot of carbon on it? mixture is too rich.
- If the spark plug of the scooter is white and looks like it’s brand new? mixture is too lean.
Level setting
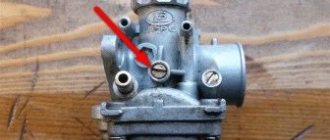
The fuel level is adjusted after checking. At the very bottom of the scooter carburetor there is a transparent tube, by which you can determine the level.
- Unscrew the butter screw;
- We lift the handset up;
- Checking the level;
- If the level is just below the carburetor cap curb, everything is fine.
- If not, then adjustments are made: The cover is removed;
- The tendril of the needle, which acts as a locking mechanism, is bent. This type of tuning must be done in very small ranges.
Let us remind you once again that the carburetor must be clean during adjustment. It is necessary to fill only with fuel with the octane number recommended by the manufacturer, and the jets and other parts must be standard, and not homemade or removed from the carburetor of another scooter.
motoaria.ru
Types of fuel level sensors
Before considering the question of how to check the fuel level sensor, it is worth studying what types of such devices there are. Modern sensors are characterized by a certain number of advantages, among which are:
- reliability, accessibility and simplicity of design;
- high levels of measurement accuracy;
- low cost.
Among the disadvantages is the presence of built-in elements that are susceptible to frequent breakdowns due to oxidation.
The fuel system of modern cars uses devices of two main categories - lever and tubular. The main similar element of such devices is the float. For their manufacture, thin sheet metal, foam and hollow plastic are used. The remaining details of these devices are somewhat different, so each type must be considered separately.
Lever type
Such devices consist of a potentiometer, a float and a lever. The float is connected to the sensor contact via a small lever made of high-quality metal. By their design, sensors of this type are a sector divided into strips of metal of a special resistive type.
Such sensors can be mounted separately or in the unit itself responsible for fuel supply. Thanks to this versatility, the sensors can be used on almost all types and categories of fuel tanks.
Tubular type
In this sensor, the float moves inside the hollow part of the tube. There are also special wires that create a certain resistance. At the ends there are slip rings for the included float. Among the main features of such a device are:
- High level of resistance to vehicle vibrations.
- The main element is completely enclosed, which protects contact with the fuel being used.
- The float here is connected to the lever via a magnet.
The magnet moves along a sector where metal plates of different lengths are installed. The generated magnetic field creates a special electronic signal that determines the current level of the fuel mixture in the fuel tank at the time of measurement.
Faulty fuel level sensor: consequences
A faulty fuel level sensor is a fairly serious problem, in the presence of which it is not recommended to operate the car until it is completely eliminated.
Firstly, the driver risks being left without fuel on a section of the road far from gas stations, and this means a long period of vehicle downtime, a colossal loss of time, and possibly money.
Secondly, due to a faulty fuel level sensor, other parts and mechanisms may fail. For example, the fuel pump of an injection engine, which is constantly located in the fuel tank and is cooled with the help of fuel. If the needle deviates significantly from the actual parameters or the fuel level sensor is always at zero, the motorist cannot determine the actual volume of fuel. If there is too little of it in the tank, the fuel pump overheats. In addition, debris gets into the fuel tank, which clogs the filters.
Checking the fuel level sensor with a multimeter
After a visual inspection, a check with a multimeter may also be necessary. In other words, to understand why the fuel sensor is not working, the specified sensor is also checked in ohmmeter mode.
The fact is that the resistor can change resistance over time, which leads to incorrect sensor readings. Resistance should be checked with the tank empty, 50% full and full. If it is determined that the resistance is not normal, it is better to immediately install a new sensor.
We also add that if, after installing a new FLS, the sensor does not accurately determine the fuel level in the tank, this is often due to the fact that the resistance deviates from the nominal one. In fact, we can say that the wrong sensor is installed.
As a rule, when choosing, it is important to consider that although fuel level sensors are visually similar, they usually have different resistance values. In fact, this is what leads to errors.
For this reason, you need to purchase a sensor that has the required resistance.
Fuel level sensor float and other problems
In cases where the fuel level indicator does not work, in some cases it is directly related to the float. Floats can be of two types:
- hollow float made of plastic or thin metal;
- the so-called “foam” float, which is made of a porous base;
In the first case, the float may gradually wear out and become damaged; the fuel level indicator needle gradually fails to reach the maximum when filling a full tank.
Fuel can get inside the hollow float, causing the level sensor to show incorrect data. To fix the problem and carry out repairs, it is necessary to replace the float of the fuel level sensor in the tank.
You also need to understand that if the fuel sensor is lying, you should not exclude the possibility of mechanical damage to the gas tank itself. If the tank is damaged, then the float may simply jam.
As a rule, in this case the pointer works accurately, but the range is very limited. The fuel level arrow may also be “stuck” in only one position. In fact, the problem is not the most harmless and often requires a complete replacement of the gas tank to solve it.
By the way, often when buying a used car, you can hear from the seller that the fuel pump screen was recently cleaned or the fuel pump was replaced, after which the fuel level sensor, etc., stopped working.
At the same time, the seller claims that there is simply no time to fix such a minor breakdown. In fact, if the fuel level sensor in a car does not work, this can be caused either by a failure of the sensor itself or the float, or by deformation of the gas tank. Naturally, changing the tank is quite expensive.
We also note that if the FLS does not indicate the fuel level correctly, the bending of the lever may also be the cause. In this case, the pointer arrow is not able to reach the extreme marks.
The lever can be corrected, but it is important to understand that the problem itself occurs as a result of one or another mechanical effect on the tank. Also, after editing, the float may still jam
Again, in such a situation, it may be that the tank itself needs to be repaired or replaced.
The list of possible problems with the FLS is completed by the fuel level indicator. To understand why the fuel sensor does not work, you need to consider that the problem may be not only in the sensor, but also in the indicator.
In this case, the incorrect fuel level is displayed due to the fact that the movable winding of the indicator is jammed. In turn, this leads to the fact that it is not possible to move freely, and the data on the indicator itself will be inaccurate.
The fuel level indicator of the Honda DIO 35 ZX behaves somewhat strangely.
#1 Vzhik99
- Participant
- Group: Users
- Posts: 12
- Registration: 20 September 08
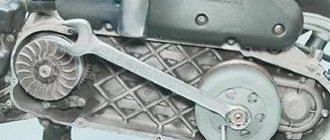
After a slight overhaul of my Honda - the battery was changed, the belt, the weights - for some reason the fuel gauge stopped working.
When you turn on the ignition, it doesn’t even twitch. I went and filled up “under the traffic jam” - the arrow showed a full tank and went as far as “F”. I drove a little bit and I saw that it was falling slowly, and after three hundred meters the needle went to zero. Actually, the question is - is the sensor fooling? Or did the float “sink”?
Post edited by Vzhik99: September 20, 2008 - 18:03
Source
Main malfunctions in the sensor operation
If the sensor does not display the fuel level correctly, you can judge that a certain breakdown has occurred and needs to be repaired. Modern sensors that record the fuel level, like all vehicle parts, fail from time to time. In this case, it is necessary to repair the fuel level sensor.
Malfunction in indicators
The main sign of a sensor failure is the display of false data displayed on the pointer. Based on its “behavior,” certain conclusions can be drawn regarding the resulting breakdown. Here are the most basic types of breakdowns and their causes:
The indicator is at zero, regardless of the fuel level. The problem is that the float stop is broken. The pointer moves, but still drops to the zero mark. In this case, you need to pay attention to the general condition of the device winding, as well as the reliability of the contact between the sensor and the current collector. Fluctuations in fuel quantity indicators. This malfunction indicates sufficient wear on the contacts. When starting the engine, the fuel gauge does not rise above the zero mark. Such a malfunction is directly related to the electronics of the vehicle
Here it is important to check the wires for possible breaks and the degree of reliability of the connection. It is important to ensure the overall integrity of the fuse. Low fuel light does not light up
This problem is often associated with device failure. The fuel level sensor is lying. In such a situation, it will be necessary to check the float for the level of tightness.
According to modern traffic regulations, operating a car with a faulty indicator is strictly prohibited. Problems that arise with sensors must be eliminated as promptly as possible.
Mechanical and functional malfunction
Along with problems that are expressed in incorrect indicators, sensor failure can manifest itself in the following malfunctions:
- loss of tightness of the built-in float;
- strong bending of the wire holder;
- violation of the general tightness of the housing and the resulting decrease in the level of resistance;
- mechanical break of the variable resistor;
- loss of tightness at the point where the device is attached to the fuel tank.
After the float loses proper tightness, the control device, with a full tank, will indicate an incomplete fuel level. If there is a sufficiently strong loss of tightness, the indicator will immediately show the minimum fuel level. In this case, the actual quantity will not matter. To fix this problem, you will need to remove the sensor and replace the float. If it is not possible to purchase a float, you will need to completely replace the entire device.
Quite often, the sensor fails due to long-term movement over rough or uneven terrain. Repeated impacts on the tank will cause serious damage to the wire holder of the built-in float.
With such bends, the behavior of the indicator will directly depend on where the holder was bent. If the bend is directed upward, the parameters will always be increased, if downward, the parameters will be underestimated. If the breakdown involves such a bend, you just need to straighten the wire holder and give it its original shape.
Often the seal of the sensor housing is broken. This happens after an accident has occurred, as well as after long-term use of low quality fuel. If gasoline gets into the device, it will malfunction and, as a result, cause incorrect sensor readings. These malfunctions can only be eliminated by completely replacing the device.
If the variable resistor breaks, this will cause the sensor to always show a full or completely empty tank. Similar signs can be observed in the process of a break in the signal wire running from the sensor to the display unit. Before removing the sensor, you will need to connect a variable resistor with a resistance level of 100 - 200 Ohms to the car body and to the signal contact. As you rotate the knob, you need to make sure that the sensor readings change. In this case, the malfunction can only be eliminated by completely replacing the device.
The main sign of a complete loss of tightness at the installation site of the device is the appearance of the smell of gasoline in the cabin.
Troubleshooting the scooter's power system
General principle of troubleshooting a scooter Checking the condition of the scooter's piston group Finding a fault in the scooter's power system Finding a fault in the scooter's ignition system Diagnostics of the condition of the scooter's CPG elements Diagnostics of the condition of the scooter's crankshaft Checking the condition of the scooter's clutch Checking the condition of the scooter's spark plug Repairing the scooter's gas tank
When troubleshooting a scooter’s power system, it is assumed that the central piston group of the scooter is in order and creates sufficient vacuum at the inlet to “draw” gasoline into the combustion chamber, as well as the integrity of the scooter’s crankshaft seals and the spark plug are also in order.
To determine whether gasoline is entering the combustion chamber, the easiest way is to unscrew the spark plug and make sure it is wet. If the spark plug remains dry even after several confident pumpings with the kick starter, you need to go from the very beginning of the power system: find out whether gasoline is flowing from the tank to the scooter’s carburetor.
To do this, remove the gas hose from the carburetor and direct it into some container.
Let's remove the vacuum hose and create a vacuum in it using a rubber bulb or some other method. Gasoline should flow out of the supply hose. If this does not happen, you need to dismantle the tank and find out the reason for the failure of the scooter's automatic fuel valve.
If it turns out that fuel is being supplied from the tank to the tank, the next step is to check the presence of fuel in the float chamber of the scooter carburetor. To make sure of this, you need to unscrew the drain screw at the very bottom of the scooter’s carburetor, next to the fitting with a transparent tube on it. Fuel poured out of the tube - obviously gasoline was getting into the carburetor, the float chamber was filled with gasoline. In this case, most likely, the nozzle is clogged, or the piston jet does not create sufficient vacuum to “draw” gasoline from the carburetor.
The next step is to check the scooter's reed valve located under the carburetor. The reed valve is involved in the distribution of the working mixture, preventing it from flying back into the carburetor during the reverse stroke. If the reed valve is damaged, which is expressed even in slightly open petals, the piston scooter will not start even with a completely new one. However, if this was achieved in some way, for example, with the help of ether, the scooter’s engine will work more or less confidently, but in the future it will still be difficult to start. We dismantle the petal valve. There is no need to remove the oil supply pipes from the scooter carburetor pipe; it is much easier to remove the pipe along with the oil pump (for two-stroke scooters).
By looking at the valve petals in the light, you can diagnose the presence of a gap between the petal and its seat. Such a valve must be replaced, although repairs are allowed in extreme cases. After removing the petals, you can bend them a little. But, attention, this can only be done with your hands! The use of the tool is not permitted! Such a repair can be regarded as a half-measure, since it is obvious that fatigue has already accumulated in the petals, and quite soon the scooter will again experience starting problems, especially when the engine is cold. If we are sure that fuel is flowing into the scooter's carburetor (the jets are not clogged), the reed valve is in order, but the scooter's spark plug is still dry, we can try the following: by removing the scooter's air filter pipe, closing the carburetor channel with the palm of your hand, pump it confidently several times kick starter.
The palm should be damp from gasoline. If this does not happen, you should make sure that the scooter’s piston group is creating sufficient vacuum. Even if the compression ratio is in order, the main seals may be damaged, allowing air from outside to pass through, instead of creating a vacuum in the carburetor, ensuring its operation. Damage to the scooter's seals can be diagnosed by the characteristic sweating around them by dismantling the variator and the scooter's generator rotor. If the spark plug is wet, but the scooter engine does not start, it makes sense to first check whether old gasoline is poured into the tank. If not, then there are probably problems with the scooter's CPG or ignition.
See also Carburetor problems.
Author - Lapaev D.A.
How to troubleshoot a fuel level sensor yourself?
If the fuel level sensor does not work, has ceased to cope with the main function assigned to it, or does not control gasoline consumption, special repair work will be required.
Removing the sensor
Depending on the vehicle model, the process for removing the device may vary slightly. In any case, certain points are similar. Here are the main steps to remove a failed sensor:
- Initially, the negative terminal from the vehicle battery is reset.
- Provides access to the sensor. To do this, you need to remove the upholstery in the trunk. In some cases, it will be necessary to remove one of the rear seats.
- All sensors are equipped with a special fixing safety plate. To remove it, you need to unscrew the mounting bolts.
- It is imperative to clean the sensor from dust and dirt if you plan to use it again after repair.
- All mounting bolts and wires are removed from the device.
After completing all the described manipulations, the device can be removed. This process must be performed carefully so that its structure is not damaged.
Sensor Installation
Installation of the fuel consumption monitoring device is carried out in the reverse order of dismantling. At this stage, it is advisable to ensure that the fuel level sensor connection diagram is taken as an example. The sequence of actions here is as follows:
The seat of the device is cleared of any remaining sealant. If you purchased a new device, you can count on the fact that it comes with a high-quality rubber gasket. It needs to be placed on the tank to align the holes for the bolts. After this, the sensor is inserted into the fuel tank
It is important not to confuse the direction of the built-in float. All bolts are carefully tightened and tightened. If the kit does not come with a new seal, you can use the old one. For this purpose, it is necessary to smear the place where the sensor will be installed with a small layer of automotive sealant. A sealant is placed on top and the holes for the mounting bolts are aligned. The top also needs to be coated with sealant. The sensor is inserted, all mounting holes are aligned and carefully tightened. All wires and battery are connected. The ignition is turned on and the indicator readings are studied.
If the vehicle is more than 15 years old, it is worth using a sealant even with a new seal.
Eliminating the causes of malfunctions - repairing the automotive fuel level sensor
Some fuel sensor malfunctions can be resolved yourself. A damaged float can be easily changed, either in tandem with a lever or without it (depending on the make of the vehicle). Broken or damaged wires are repaired using a regular soldering iron. The resistive element plates can be replaced with new ones. However, you need to choose the right parts according to the make and model of your car.
In most cases, in order to avoid serious breakdowns, you need to contact a specialized service to diagnose the FLS, identify the exact causes of malfunctions and take adequate measures to eliminate them. Most often, carrying out repair work is not economically feasible.
Experienced specialists are ready to provide a full range of services in this area. If the fuel level sensor does not work, contact our company to replace the faulty element. The cost of a new part is quite affordable.