Adjusting the Suzuki Sepia carburetor
Before the procedure, you should remember that when changing parts such as a cylinder, filters, muffler, the old carburetor settings will be invalid and you will have to make adjustments again. It is also extremely important to adjust the jets when the engine is already warm. The process is carried out as follows:
- Adjustment of needle and venturi tube size at 1/3 gas;
- Adjusting idle speed and mixture quality.
Scooter switch - scooter electronic ignition device
Scooter engine - device Scooter carburetor - device, setup Scooter crankshaft Scooter gearbox - device Scooter clutch - device, setup Scooter variator - device Scooter chain drive device Scooter electrics Scooter brake system Switch - electronic ignition of the scooter Scooter speed limiters
See also Diagram of a simple switch, without electronic advance. Scooter ignition advance
Operating principle and device of electronic ignition / switch. An excellent article about this is taken from the site ntscooters.moy.su
Over the years of developing cars and motorcycles, we came to the conclusion that this scooter system should be as reliable as possible, because scooters are intended for carefree people
Therefore, Japanese scooters do not have cam ignition systems like IZ motorcycles and scoops (old mopeds). Even the oldest Hondas use an electric sensor. But more on that later. After all, not all scooters have it. For example, Suzuki Sepia has a rather clever shaft position control system. Therefore, you will not find diagrams of this switch on the Internet. It is quite complex in its internal architecture. I'll tell you about this later. Now I want to classify and break down the existing ignition systems on Japanese, Chinese, Korean and European scooters.
Depending on the type of engine, several systems are distinguished. 2-stroke Chinese mopeds have a system exactly copied from Sepia. But in terms of reliability it is simply terrible! The switches in it are on fire, only the noise is there! Personally, they brought me about 5 such mopeds with this symptom. Maybe a defective batch, but still take note. I’ll immediately note a significant difference between this system and Honda’s and Yamaha’s: the absence of an ignition sensor (also known as an induction sensor). I will describe the entire internal process later.
Japanese mopeds from Honda have several types of switches. I won’t write about tuning, we’ll limit ourselves to the standard. 18E engines have the simplest and most reliable ignition system of all scooters. In its design, it strongly resembles the ignition of the Carpathian mopeds, if it does not copy it exactly, which is quite likely. It differs from narrow ignition by the presence of an ignition sensor (induction) and a separate coil on the generator, which is in no way connected with the rest of the scooter’s electronics. This has advantages: if the generator is overloaded with lighting fixtures and other things, the ignition system will not fail. But it also has one significant drawback. A large amplitude voltage comes out of this coil on the generator, about 160-600 volts (at different speeds), which can be felt if water gets lightly on the contacts of the switch. Also, this coil can, under certain conditions, simply short out in turns (due to the amplitude), and then your scooter will stop, and you won’t even understand what’s wrong. You will spend a very long time looking for the cause of a weak or completely absent spark. Also, tuning switches for this system are complex in design. After all, you know that they non-linearly change the ignition timing at different speeds. And here there is also current and voltage jumping. Therefore, it is necessary to create a stabilization system, and a serious one at that. This is not the case with stock switches, but if you want to understand the nuances at low levels, then you need to know this.
For some reason I have a hunch that the tuning switches do not have microcircuits, and the advance is done simply by an RC timing chain, but this is just a guess.
I will also write about the ignition system of the 34 Honda engine. Things are a little different here. There is also an induction ignition sensor, it is identical to the sensor from the 18th engine. But the switch is powered not from a separate ignition coil, but from a common battery charging circuit. That is, in other words, from the battery. Also the regulator is a little different. More current is supplied to the battery here so that it is not discharged by the switch.
There was a case with me: I was driving from the dacha, due to inexperience in assembling the engine, the wires coming from the generator were hanging at the bottom of the engine. I somehow didn't notice them. It was already starting to get dark when I ran over some rock. The headlight immediately turned off. I thought the lamp had burned out. But switching the headlight mode did not correct the situation: there was no light. I stopped and checked the taillight. It didn't burn either. I thought that the wiring had broken or the regulator had run out. Since I wasn’t particularly strong in electronics at that time, I gave up and went home. There were 4 kilometers left to the house. I arrived safely, but in the morning I discovered that the wires coming from the generator were simply broken. Except for the ignition sensor wire. The battery was in the trash. It turns out I was driving it! Of course, in some cases this can be seen as a plus!
Now for some science. This system was developed in order to completely free the scooter from water dependence, increase the reliability of the generator and get rid of “extra wires”. The design of the switch is more complex due to the lower supply voltage. But now we can easily install elements sensitive to energy surges. Therefore, it is not advisable to ride such scooters without a battery. It seems to smooth out ripples and stabilize the mains voltage.
Yamaha and Suzuki scooters, as well as Chinese scooters, have similar ignition systems.
Now I’ll tell you a little about how the switch works. With the generator, I think everything is clear. It produces an alternating voltage of a given amplitude at certain crankshaft speeds. In order for an arc to occur, it is necessary to know the dielectric properties of air. The breakdown voltage per 1 mm is approximately 3 thousand volts. Also, for reliable ignition, you need to create a spark of a certain duration. The main energy converter for igniting fuel on a scooter is the ignition bobbin or coil. It turns 100 - 400 volts into approximately 6000 - 20000 volts. However, the current also decreases proportionally. Those who have ever touched high-voltage wires know what it is.
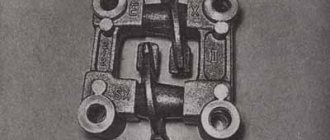
Well, okay, the reel is not very complicated and practically eternal... Although, if we are not talking about a Sepia switch. It contains both the bobbin and the switch itself - in one.
The task of the switch is to apply an impulse to the reel at a certain point in time, of a certain duration and amplitude. What I will write next may not be clear to many, but radio technicians will definitely understand.
We will consider only thyristor or so-called. capacitor ignition systems. They are used in all the scooters described here... The commutator has a capacitor that stores energy. As soon as the moment of sparking arrives, this capacitor will short-circuit to the primary winding of the ignition coil. And this process is controlled by a thyristor. Therefore, the system is called thyristor or capacitor.
The stock commutator for the 18E engine on Honda and many Chinese cars works on this principle. In order for the amplitude to reach its operating value at the bobbin output, the capacitor must be charged with a capacity of 0.5 -1 µF and an amplitude of about 200 volts. And as you may have guessed, the switch has to be powered with high voltage in any case. Therefore, switches with 34 motors contain a pulse voltage converter. It makes 200-300 volts from 12 volts. And another plus is that at any speed the spark will be the same in power, which increases stability at idle and makes starting easier. This is the difference between the commutator of the 18th motor and the 34th. I have not seen such switches on Chinese mopeds, because... in production they are much more expensive than the previous ones. It is quite possible that they use them there too. I would also like to say something about limiters. They are performed in different ways, most often using a timing chain. And if you change the condenser, the limiter will move to one side or the other on the scale. There are also other types of limiters.
It is worth mentioning separately the switch from Suzuki Sepia; I repeat that the same is used by the Chinese, which our magazine does not recommend. That is, with a pipe curved in the letter S and a two-stroke engine. In them, the basic principle of operation is no different from the switch with the 18th motor. However, the shaft position control system is different. Exactly what it is, one can only guess. Personally, I have not disassembled any such switch. The Japanese deliberately made this knot uniform and mysterious so that no one would want to copy it, but there were still craftsmen in China.
Material used from www.ntscooters.moy.su.
Scooter engine - device Scooter carburetor - device, setup Scooter crankshaft Scooter gearbox - device Scooter clutch - device, setup Scooter variator - device Scooter chain drive device Scooter electrics Scooter brake system Switch - electronic ignition of the scooter Scooter speed limiters
Tweet
#1 Alexander
31 May 2010 16:40
What could it be? I changed the spark plug, the carburetor, and the filter and the scooter goes 500m and stalls, waits for a minute and then goes 500m and the same thing happens again. Help me please!!!!
#2 Vyacheslav
01 June 2010 10:16
Alexander! blow out the gasoline pipe! Wash the carburetor in an ultra sound bath! Maybe he’ll go that way!
#3 Vyacheslav
01 June 2010 10:18
I have a suzuki sepia, I also drive about 100 meters and it stalls. I stop and it starts AGAIN. I blew out the gas line and washed the carburetor in an ultra-sonic bath! and drives like a darling! TRY TO DO THE TOO!!!!
#4 Igor
10 June 2010 18:07
Hello
#5 Igor
10 June 2010 18:08
I start my scooter, turn it off, don’t turn it off, tell me
#6 Evgeniy Konstantinovich
13 June 2010 15:42
Chinese scooter, 2-cylinder, chain, ТХМ50A-1, does not start, excellent spark, compression 8.6; quality needle 2 turns, quantity 2.5 turns, spark plug is new, still wet from the first kick. It looks like the ignition timing is wrong, how can I adjust it? Thank you in advance.
#7 dock
15 June 2010 23:25
Igor, check the ignition switch, maybe it’s disconnected. But my headlight burns at full incandescence, before you jump on bumps.
#8 Igor
16 June 2010 10:30
I CHECKED NO WAY I WILL START IT WITHOUT KEYS
#9 Alexander
22 June 2010 15:23
In general, this is the case. The scooter stalled. 4t. It was like this - 2 weeks ago we put it on the steering wheel and seat to secure the silencer. We drove later, everything was fine. A little bit of oil dripped through the filter. A week ago we went with a friend to drive, drove 5-6 km. There is a straight road, for drag racing. We decided to make the most of the scooter. We squeezed out 80 km per hour. Well, we finally decided I went on to drive. I got behind the wheel and when I started accelerating along the same straight line, at 79 km per hour there was a shooting, but it was quiet. the scooter suddenly began to slow down and the tachometer needle went crazy, it would drop to 4,000, then it would fly up to 9,500 (although there is a limiter at 9,000)))). doesn’t catch on. With the kick it’s also 0. We waited for another 5 minutes. Then suddenly it started up with the kick. I let it run for 1 minute and turned it off. I thought let it rest. Okay, we calmed down, we think we’ll drive again. A friend got behind the wheel. Let’s go... at 40 km per hour there were gunshots again, but louder than before. And they had bluish smoke. By the way, when I started it, there was no smoke. It actually fired 3 times and died. After that, it finally didn’t want to start... it went away a quarter of the way to the house and decided to try their luck again and start one. Once on the 5th hit on the kick it started up. The rpm was immediately at 6000, but as soon as I let off the gas a little, it stalled. And after that it never started up. What could it be? They thought after the revolutions something was poured on the “head” with oil. but we traveled for 2-3 weeks after that. I cleaned the spark plug from carbon deposits. The needle in the carburetor is in place.
#10 DenisSochi
23 June 2010 18:21
on the Chinese YH 50 QT Fortune the spark is gone, tell me where to find the switch, the working switch is interrupted from the sensor, with the magneto when starting from the button it gives 1.5 volts. When calling, what should be the indicators??????????
#11 Nikolai
23 June 2010 19:37
Which switch is similar to SYM jet 50
#12 Nikolai
27 June 2010 12:18
I was driving and the wire fell off the spark plug! Now it won’t start at all. tell me what to do
#13 Fedor
02 July 2010 15:49
Tell me, is it possible to do without a switch in the ignition system?
#14 Alex
08 July 2010 10:57
It is forbidden!!!
#15 Fedor
12 July 2010 09:42
In short, we need a Chinese car with only a broken ignition from 2007, call 89607930300, I think we’ll agree on the price!!!!
#16 Gennady
19 July 2010 22:55
changed the oil, turned the starter to drain the oil from the pump, now it won’t start, no spark, how to ring the wiring of an eagle 150 china
#17 Vyacheslav Zubkov
23 July 2010 07:55
Guys, I have a Yamaha Jog Cool Style. One day something got stuck on me and the bolts were stuck to the frame! the spark is gone! Tell me what could have burned???
#18 Tiger
24 July 2010 22:51
Where is the switch on the Chinese Honling Summer? I saw somewhere that it was under the seat on the frame, but there was only a coil there and nowhere else
#19 Igor
25 July 2010 20:22
I bought a new battery after 2-3 days of driving, the battery dies, I charged it and drove again for 2-3 days, tell me who knows what to do for communication
#20 Sanya
25 July 2010 20:59
And the battery is probably not good for 7ah, but it will be more!?!?
Home Scooter device Scooter switch - scooter electronic ignition device
Setting up the carburetor in a Suzuki Sepia scooter
The Japanese scooter Suzuki Sepia is considered a fairly popular model in Russia and other countries, in particular due to its attractive appearance and simple design of the engine and other parts. But problems with this scooter are quite common and are caused by malfunctions of such components as the CPG, carburetor and variator. It is important to carefully monitor their condition to prevent damage. As for the carburetor, the Mikuni carburetor is used here; the Suzuki Sepia is ideal for this carburetor model, which is also used on other equipment. In particular, you can see a similar model on the no less famous Suzuki Adress scooter. The carburetor is characterized by its simple design, good quality and the ability to quickly adjust. But judging by the frequent problems of owners, it will be extremely difficult to adjust the carburetor for optimal operation of the scooter; the entire procedure will have to be carried out exactly according to the specified rules. If you are the owner of a Suzuki Sepia, get ready to clean the carburetor frequently, because its location is so inconvenient that the carburetor becomes clogged with dust very often. Below is a carburetor setting option.
Characteristics and settings of the carburetor of the Suzuki Sepia scooter
The Japanese scooter Suzuki Sepia is considered a fairly popular model in Russia and other countries, in particular due to its attractive appearance and simple design of the engine and other parts. But problems with this scooter are quite common and are caused by malfunctions of such components as the CPG, carburetor and variator. It is important to carefully monitor their condition to prevent damage. As for the carburetor, the Mikuni carburetor is used here; the Suzuki Sepia is ideal for this carburetor model, which is also used on other equipment. In particular, you can see a similar model on the no less famous Suzuki Adress scooter. The carburetor is characterized by its simple design, good quality and the ability to quickly adjust. But judging by the frequent problems of owners, it will be extremely difficult to adjust the carburetor for optimal operation of the scooter; the entire procedure will have to be carried out exactly according to the specified rules. If you are the owner of a Suzuki Sepia, get ready to clean the carburetor frequently, because its location is so inconvenient that the carburetor becomes clogged with dust very often. Below is a carburetor setting option.
Adjusting the Suzuki Sepia carburetor
Before the procedure, you should remember that when changing parts such as a cylinder, filters, muffler, the old carburetor settings will be invalid and you will have to make adjustments again. It is also extremely important to adjust the jets when the engine is already warm. The process is carried out as follows:
- Adjustment of needle and venturi tube size at 1/3 gas;
- Adjusting idle speed and mixture quality.
Needle adjustment
The peculiarity of this carburetor is the absence of a jet for the quality of the mixture; its adjustment here occurs by raising or lowering the locking ring on the needle. If you notice that the mixture is too lean, you will have to install the ring higher by 1 or 2 grooves; accordingly, the mixture will be rich when installing the same ring on the 4th or 5th step. The center position on the 3rd groove indicates the standard throttle needle setting. If configured correctly, the scooter will have good traction, speed and consume fuel according to the specified characteristics.
Setting the air screw
The carburetor also has a jet responsible for the amount of air located under the cover. The jet is located in the air channel, so when you tighten the screw, the throttle rises and the air flow increases. At the same time, the engine speed increases.
Configuration is carried out as follows:
- completely tighten the screw and unscrew it 4-5 turns;
- the engine should start to stall;
- gradually tighten the screw until the speed increases to maximum;
- upon reaching maximum speed, you can unscrew the screw ¼ turn;
- adjust the idle speed screw for optimal speed.
Idle speed: settings features
Adjusting the Suzuki Sepia carburetor is impossible without using the idle speed. It regulates the number of revolutions, where when the screw is tightened, the speed indicator increases and the wheel spins independently without the throttle. When you unscrew the idle screw, the scooter will start only when you add more revolutions with the throttle. It is advisable to adjust this jet last, that is, first adjust the quality of the mixture, the needle in the throttle valve, and, if necessary, the air screw, and then adjust the idle speed.
This procedure may differ from those used by other specialists, but the Suzuki Sepia carburetor is very unpredictable and therefore requires an individual approach when tuning. Probably every owner of a Japanese model has encountered this problem, so it is important to learn how to adjust all the jets and clean the Mikuni carburetor in a timely manner.
Video
see also
topkarting.ru
Needle adjustment
The peculiarity of this carburetor is the absence of a jet for the quality of the mixture; its adjustment here occurs by raising or lowering the locking ring on the needle. If you notice that the mixture is too lean, you will have to install the ring higher by 1 or 2 grooves; accordingly, the mixture will be rich when installing the same ring on the 4th or 5th step. The center position on the 3rd groove indicates the standard throttle needle setting. If configured correctly, the scooter will have good traction, speed and consume fuel according to the specified characteristics.
Why do you need to regulate?
During the adjustment process, the scooter carburetor needle is adjusted, the position of which affects the proportions of the air-fuel mixture, as well as a number of other adjustments.
Adjusting the scooter carburetor needle is done during the adjustment process
Each tuning operation has a different effect on engine operation and fuel preparation:
- adjusting the idle speed ensures stable operation of a running engine when the transmission is turned off;
- changing the quality of the air-gasoline mixture using a special screw allows you to deplete or enrich it;
- adjusting the position of the carburetor needle affects the change in the quality of the fuel mixture;
- Ensuring a stable level of gasoline inside the float chamber avoids flooding of spark plugs.
Setting the air screw
The carburetor also has a jet responsible for the amount of air located under the cover. The jet is located in the air channel, so when you tighten the screw, the throttle rises and the air flow increases. At the same time, the engine speed increases.
Configuration is carried out as follows:
- completely tighten the screw and unscrew it 4-5 turns;
- the engine should start to stall;
- gradually tighten the screw until the speed increases to maximum;
- upon reaching maximum speed, you can unscrew the screw ¼ turn;
- adjust the idle speed screw for optimal speed.
How to set up and adjust the carburetor on a scooter
Having bought a motorcycle, scooter or other motorized equipment, owners have to become familiar with the operation and adjustment of their main components. One of the important elements of a two-stroke or four-stroke power unit is the carburetor, which is responsible for supplying fuel to the combustion chamber and mixing gasoline with air in the required ratio. Many people do not know how to adjust the carburetor on a scooter using the adjusting screw. This need arises if the device does not start well, shows increased appetite, or the tachometer needle indicates unstable speed.
Idle speed: settings features
Adjusting the Suzuki Sepia carburetor is impossible without using the idle speed. It regulates the number of revolutions, where when the screw is tightened, the speed indicator increases and the wheel spins independently without the throttle. When you unscrew the idle screw, the scooter will start only when you add more revolutions with the throttle. It is advisable to adjust this jet last, that is, first adjust the quality of the mixture, the needle in the throttle valve, and, if necessary, the air screw, and then adjust the idle speed.
Purpose and principle of operation of the carburetor
The carburetor is an important component of an internal combustion engine, responsible for preparing the air-fuel mixture and supplying it to the working cylinder in the required ratio. A scooter engine with an unadjusted carburetor cannot function properly. The stability of speed, the power developed by the engine, gasoline consumption, response to turning the throttle, as well as ease of starting in the cold season depend on the correct settings of the engine power supply.
An important component of an internal combustion engine is the carburetor.
This unit is responsible for preparing the air-gasoline mixture, the concentration of the components of which affects the nature of the operation of the power plant. The standard ratio is 1:15. Leaning the mixture to a ratio of 1:13 ensures stable engine operation at idle. Sometimes it also becomes necessary to enrich the mixture by maintaining a ratio of 1:17.
Knowing the structure of the carburetor and knowing how to adjust it, you can ensure stable operation of the engine on two-stroke and four-stroke scooters.
Thanks to a properly configured carburetor, easy and quick starting of the vehicle engine is ensured, as well as stable operation of the engine, regardless of the ambient temperature. Any carburetor is equipped with jets with calibrated holes, a float chamber, a needle that regulates the cross-section of the fuel channel, as well as special adjusting screws.
The adjustment process involves specially rotating the screw in a clockwise direction or in the opposite direction, which causes, respectively, the enrichment or depletion of the working mixture. Adjustment measures are carried out on a warmed-up engine. In this case, the carburetor unit must first be thoroughly washed and cleared of blockages.
SUZUKI SEPIA. Design, maintenance and repair
Semenov V.N. Fuel injection pump UTN SERIES
Semenov V. N. Fuel injection pump of the UTN SERIES Moscow Legion-Avtodata 2010 UDC 629.314.6 BBK 39.335.52 T49 Semenov V. N. Fuel pump of the UTN series. - M.: Legion-Avtodata, 2009. 80 p.: ill. ISBN 5-88850-107-7 (Code 1459) V. N. Semenov
More details
I am my own mechanic. BMW 3 Series. Models E21/E release with gasoline engines 1.6; 1.8; 2.0; 2.3; 2.5 l
Self-service mechanic BMW 3 Series Models E21/E30 1975-1990. release with gasoline engines 1.6; 1.8; 2.0; 2.3; 2.5 l Repair and Maintenance Manual CAR LOVER SERIES Moscow Legion-Avtodata
More details
DYNA 100/150 TOYOACE, HIACE
Take on the road/hand over to a mechanic Toyota DYNA 100/150 TOYOACE, HIACE Models 1984-1995. release with diesel 2L (2.4 l), 3L (2.8 l) and gasoline 1Y (1.6 l), 2Y (1.8 l), 3Y (2.0 l) engines Manual
More details
Isuzu ELF. Design, maintenance and repair
Isuzu ELF Models up to 1993 with diesel engines 4JA1 (2.5 l), 4JB1 (2.8 l), 4JB1-T (2.8 l, Turbo), 4BC2 (3.3 l), 4BE1/4BE2 ( 3.6 l), 4BD1 (3.9 l), 4BD1-T (3.9 l, Turbo) Device, technical
More details
CONTENT. Publishing house "Monolith"
1 2 CONTENTS 1. OPERATING MANUAL 1. General information about the vehicle... 1 1 2. Instrument panel and vehicle controls...1 4 3. Vehicle equipment... 1 12 4. Emergency procedures
More details
CHRYSLER LHS, Concorde, 300M. Dodge Intrepid. Models release with 2.7 liter petrol engines; 3.2 l; 3.5 l
CHRYSLER LHS, Concorde, 300M Dodge Intrepid Models 1998-2001 release with 2.7 liter petrol engines; 3.2 l; 3.5 l Repair and maintenance manual Moscow Legion-Avtodata 2014 UDC
More details
Cylinder head
Page 1 3.2.12. Cylinder head GENERAL INFORMATION Sequence of tightening the cylinder head bolts Tightening the cylinder head bolts to the required torque Tightening
More details
CONTENTS CONTENTS
CONTENTS CONTENTS 1. OPERATING MANUAL General information about the vehicle... 1 1 Instruments and indicators... 1 2 Vehicle controls... 1 7 Vehicle equipment... Read more
Parts catalog MOPED LF50QT-26
Catalog of parts for MOPED LF0QT - “Chongqing Lifan Industry (Group) Co., Ltd” JSC “Plant named after. V.A. Degtyarev" INTRODUCTION This vehicle - a moped - is a new development that combines all the features
More details
Petrol engine 3S-FE
Gasoline engine 3S-FE Checking and adjusting the clearances in the valve drive Note: check and adjust the clearance in the valve drive on a cold engine. 2. Disconnect high voltage
More details
Price list for car service services
Price list for car service services Repair of foreign cars Name of services Price (rub.) 1 Oil change and oil filter without internal protection 400 2 Oil change with flushing 600 3 Spark plug replacement Read more
ENGINE COOLING SYSTEM
ENGINE Price Price including VAT Removal and installation of PAZ, KAVZ engine from RUB 14,300.00. Disassembly, washing, defect detection, assembly of the GAZ 53 engine RUB 26,650.00. Disassembly, washing, defect detection, assembly of engine D 245 26,000.00 rub.
More details
Grand Vitara Grand Vitara XL-7 Grand Escudo Escudo
SUZUKI Grand Vitara Grand Vitara XL-7 Grand Escudo Escudo Operating instructions Moscow Legion-Avtodata 2009 UDC 629.314.6 BBK 39.335.52 C89 Suzuki GRAND VITARA, GRAND VITARA XL-7, GRAND ESCUDO, ESCUDO.
More details
CONTENTS CONTENTS
CONTENTS CONTENTS CHAPTER. MANUAL. Before you start moving... Management and control bodies…. Vehicle Maintenance... CHAPTER. ENGINE. Specifications….
More details
System checks and adjustments
xxx xxx 12345xxxxx Date 05.Jan.2014 Engine management System checks and adjustments Preconditions The engine is warmed up to normal operating temperature. The ignition system is in good condition.
More details
Stud nut M820.87 25.77 fastening (2.13 2.63) inlet pipe and exhaust manifold
Part Thread Tightening torque, N m (kgf m) Engine Fastening bolt M12x1.25 cylinder head Stud nut M820.87 25.77 fastening (2.13 2.63) of the intake pipe and exhaust manifold Fastening nut M10x1.25
More details
BODY ELEMENTS, PLASTIC
Spare parts catalogue. Motorcycle IRBIS GARPIA EAN code Name BODY ELEMENTS, PLASTIC 1 6 4650066004878 Side plastic GARPIA (pair) 5 4650066004885 Front fender GARPIA 1 std Bolt M6 12 7 std Washer
More details
BODY ELEMENTS, PLASTIC
Spare parts catalogue. ATV IRBIS ATV250S EAN code Name BODY ELEMENTS, PLASTIC 1 4627072932334 Plastic steering wheel (head) ATV250Sb 2 std Washer 6 3 std Bolt M6 16 4 4627072932341 Headlight
More details
Price list for
Engine Oil and oil filter replacement Computer diagnostics Comprehensive diagnostics (engine, chassis) Air filter replacement Cabin filter replacement Spark plug replacement Spark plug replacement
More details
HINO ENGINES J05C, S05C, S05C-B, S05C-TA, S05C-TB, S05D. Design, maintenance and repair
HINO ENGINES J05C, S05C, S05C-B, S05C-TA, S05C-TB, S05D Design, maintenance and repair Modifications of these engines were installed on the following models: Hino Dutro, Toyota Dyna/ToyoAce and various
More details
Gasoline engines 1JZ-GE, 2JZ-GE, 1JZ-GTE
Gasoline engines 1JZ-GE, 2JZ-GE, 1JZ-GTE Checking and adjusting thermal clearances in valves Note: check and adjust thermal clearances in valves on a cold engine. 1. Disconnect
More details
1.4 Specifications
1.4 Technical characteristics Parameter VAZ-1111 VAZ-11113 General data Number of seats 4 Number of seats with the rear seat folded 2 Useful weight, kg 340 Weight of transported cargo, kg: driver and three passengers
More details
Body. Front end. Rear end
2 level 3 level 4 level 5 level Front windows Main headlights High beam headlights Front turn signal lights Front parking lights, side lights Front fastening parts Body Front part
More details
ALLPASS F2.5. Upper fairing
Upper fairing Upper fairing Article No. Description Qty. 1 ALF2.5-06000000 Upper fairing assembly 1 2 ALF2.5-06000002 Upper fairing cover 1 3 ALF2.5-06000003 Holder 1 4 ALF2.5-06000001
More details
Page 1 of 6 22: Crankshaft Oil Pump/Front Seal Replacement, B5204T2 S70, 1997, B5204T2, LHD, YV1LS4606V2426703, 426703 5/23/2013 PRINT 22: Oil Pump/Front Seal Replacement
More details
Removal and installation of manual transmission
13.1.4 Removing and installing a manual transmission Removing and installing a manual transmission REMOVAL PROCEDURE 1. Disconnect both wires from the battery (negative first). Remove the battery and its support tray (see Chapter Electrical Equipment
More details
docplayer.ru
The principle of operation of ignition in a 4-stroke scooter engine
Modern scooters are equipped with contactless systems. They are considered the most reliable and easy to use, do not require complex connections, and provide a constant good spark on time. However, the setting is still important; even the presence of a spark does not always allow the fuel mixture to ignite, since its power also plays a role.
The main reasons for the operation of the ignition system are quite simple: its task is to create a spark to detonate the fuel mixture. If this does not happen, you need to carefully examine each node and find out why the spark disappeared.
- In order to check whether there is a spark at all, you need to unscrew the spark plug and apply it to the engine ground; this can be done using metal objects that are not covered with paint. You cannot hold it with your hand: if there is a spark, it can give you an electric shock, and the discharge reaches 40,000 volts, which the coil creates.
Broken ignition is the cause of engine failure
An incorrectly configured or faulty ignition often causes engine failure. It would be wrong to immediately climb into the cylinder and examine the insides of the scooter, especially since this will not solve the problem. Before touching the ignition system, you need to check for other reasons why the scooter may not work.
Frequently asked questions about SUZUKI Let's repairs.
What to do if you need to fill in a different type of oil. 1. We will need a clean container with a volume of 1.5 liters.
2. It is advisable to remove the rear plastic
3.Then disconnect the oil line (shown by the blue arrow) from the oil pump (oil will immediately flow out). Remove the oil filter (white cylinder).
4. We rinse the oil tank with a small amount of clean gasoline. We drain the “flushing” gasoline.
5.Assemble in reverse order.
6. Fill in the required oil. I'm just speaking from experience! Because in the village they got the scooters started... Firstly 1: Decide that your engine requires this fuel mixture. (of course, if there is gasoline and a spark on the spark plug) i.e.: cover the carburetor with your palm, (without an air filter) You should feel it “ask” with your hand. And if he asks for this request, then spits it back, (like an ungrateful listener) try to look at the house (look at the forum, and don’t ask!!! I’ll kill you) And in the end, feeling the breath of the engine’s inhalation, you can feel that its breath is tantamount to agony , which in turn determines: at best, the death of the oil seals (or CPG) because it works on both suction and compression, and it is already felt on the kick starter. And if there is no “chain” to read this “chewed” chain, give it up, give it to the master, and may the Almighty dawn on you when observing from the side, because you will call yourself words...unprintable......! Good luck with the repair!!! When you press the “start” button, something starts to crack somewhere in the area of the battery. What is it and how is it treated?
The starter relay, which is located next to the switch, is crackling. The most common reason is a dead or dead battery. You need to charge it if it was put on hold, for example by music or by standing on the signal for a long time. If the battery is “dead” - that is, does not hold a charge, then it needs to be replaced with a working one.
Checking the battery circuit: https://www.youtube.com/watch?v=88GqF66YCv8
Dimensions of engine silent blocks - 33x10x25, shock absorber - 23x10x16
According to GrizlipupiFront Fork Repair
Standard https://let-s.ru/forum/viewtopic.php?t=27 With disc brake https://let-s.ru/forum/viewtopic.php?t=1347 Marking of NGK spark plugs Original spark plugs in the first post FAQa .Lats2 has an engine silent block (on the engine) 28*10*22 shock absorbers (on the engine) 23*10*20 Setting the headlights: https://www.motovelosport.ru/cat/suzuki_sepia_directive/19.php
link from MuKeHaHEADLIGHT ADJUSTMENT
The headlight should be adjusted on a level surface with the low beam on. In this case, the vehicle must stand on wheels without using a central stand, and the driver must sit behind the wheel. To adjust the headlight light, use a special screw, usually located under the headlight. You can get to this nut without removing the fairing. It is more convenient to do the work together. By rotating the screw, it is necessary to achieve the location of the light beam in the manner shown in the diagram. When installing a new lamp, especially a halogen lamp, do not touch the lamp bulb with your hands. The type and power of the lamps are set by the manufacturer; the use of more powerful lamps is not allowed due to the possibility of disrupting the thermal conditions of the headlight, and less powerful ones will not properly illuminate the road.
A more complex method You can check and adjust the headlights in a darkened room, such as a garage. The wall (let's call it the screen) on which the adjustment or test will be carried out must be vertical and have a light, rough surface.
The motorcycle must be fueled and simulate its position on the roadway as much as possible (it is not advisable to place it on a stand; the driver must sit on the motorcycle while adjusting the lights). The adjustment should be made with the motorcycle's low beam on.
When checking, the motorcycle is placed on a horizontal floor so that its longitudinal axis is perpendicular to the screen, after which the headlight is checked (or if there are two of them, then each separately - right and left, while one of the headlights is covered with thick dark paper or cardboard). Wall for checking and adjusting headlights: O–O - vertical axis of the motorcycle; А–А — longitudinal axis of the motorcycle; B–B—lower boundary of the light spot; D–D — line of the center of light spots; L–L and P–R are the vertical axes of the left and right headlights of the motorcycle, respectively.
The screen is marked depending on the height of the headlights and the distance of the motorcycle from the screen according to the following formula:
h = H - ( 14 * l * H ) / 1000000; mm.
where h is the height (distance) of the center of the light spot on the screen; H – distance from the center of the headlight lens to the floor level on which the motorcycle stands; l – distance between the screen and the headlight lens.
For example, if l = 9500 mm, H = 860 mm, then:
h = 860 - (14 * 9500 * 860) / 1000000 = 745 mm
On motorcycles with one headlight, the center of the light spot must coincide with the O–O and A–A axes. On motorcycles with two headlights, the distance between the headlights should be identical to the distance between the L-L and P-R axes.
This arrangement of the high beam spot ensures that, at normal headlight intensity, illumination of the road in front of the motorcycle is at least 100 meters.
Material taken from the following pages How to adjust the gasoline gauge needle?
| F0cus wrote: |
| Keep in mind that the fuel gauge does not have a return spiral like the speedometer. Setting the exact reading of the gasoline sensor. First, fill the tank full of gasoline. Then remove the arrow from the gasoline sensor and turn on the ignition. The sensor will raise the arrow to indicate a full tank (wait about 1.5 minutes), during this time the sensor will indicate the maximum position (without an arrow), then set the arrow to the maximum position on the tidy (without twisting the mechanism itself), you will still get accurate sensor readings. You may ask why you can’t immediately set the arrow to the minimum? I explain: because the mechanism goes further than the minimum (there is a locking cutout on the instrument panel that prevents the arrow from going lower), that is, when you eat, your minimum will move higher, and you think that the tank is still a little full, but it is already empty. (Tested from personal experience) Therefore, my advice is to adjust the needle on a full tank. F0cus (c) |
Speedometer drive gear.
9 teeth. Comparison of Lets1 and Lets2 forks Clean from Lets 1, dirty from Lets 2. The fork from Lets 1 is wider (apparently due to the fender above the wheel). Keep in mind. For those who “halved” the engine and encountered air leaks: Method for checking crankcase tightness: https://scootera.dinfo.ru/remont/pressdvigla.htm https://scooterclub.kharkov.ua/publ/3-1-0 -199 CombiBrake device Red arrow - Front brake handle input Yellow arrow - Rear brake handle input Green arrow - Front brake output Blue arrow - Rear brake output Carburetor enricher setting:
When I got tired of warming it up for 5 minutes every time, I just took it and set up the enricher. How? I lowered its needle lower by screwing the lower half of this device into the upper one. Then, with the carburetor removed and disassembled, I checked how it turned out. So, if before the adjustment the channel closed in 3 minutes, then it began to close in 40 seconds (the time depends on the degree of screwing - it is selected experimentally, but after each test it is necessary to allow it to cool for 10 minutes so that the system returns to its original state). That's all. From that time on there was no need to warm it up. I started it and drove off, without any tricks. Be it in warm weather or in cold weather. P.S. At stock it was made with a reserve, most likely for a reliable start. If the piston is not normal, then you may get a bad cold start, but if everything is in order, then everything will be fine - it will start and drive without warming up, or rather with minimal warming up - the same 40 -60 seconds. If I drive mine instantly as soon as I start it cold, then just in the first minute a slight overflow is observed - the engine slows down a little after 30 km/h, up to 30 it’s normal.
Place a hose of a suitable diameter on the tube, which is under the enricher inside the carburetor and blow into it. Then apply 12 V voltage to the enrichment device, turn on the stopwatch and sit and blow into your hose. And you will see how long it will take for the sulking to begin to get worse, and then it will stop altogether. Just put the hose deep, otherwise the side holes in that tube will remain uncovered. I set it up so that initially it would blow easily (so as not to disturb the startup), but almost immediately after turning it on (15-20 seconds) it began to blow worse and after about a minute it stopped blowing completely. You need to set it up at a temperature of about 20 degrees, i.e. not in the cold but not in the heat either. In this case, the adjustment will occur automatically, i.e. In hot weather, the warm-up time will decrease; in cold weather, it will increase. Let's II Switch
Let's and Let's II Voltage Regulator
To unscrew the clutch bell you need a key like this:
Or like this
on right
You cannot hold the rear brake, otherwise you can damage the gears of the gearbox. Setting the level in the float chamber:
Lift the drain hose (it is usually translucent) so that it sticks up. On the carburetor, if you look closely, there is a mark in the form of a tubercle (on the side of the adjusting screws, just above (4 mm) the plane of connection of the bottom cover with the rest of the carb). Bring the drain hose closer to the mark and unscrew the drain bolt. Remove the vacuum hose and suck it in so that the carb makes up for the loss of gasoline that escapes through the drain hose. The gasoline level in the hose should be at the same level as the mark. If it’s higher, the level is higher than normal; if lower, it’s lower than normal. The level is adjusted by bending the tongue of the fuel needle, and then checked again. In this case, the carb should be horizontal.
Taken from the Service Manual About the speed limiter. In the Suzuki Let's scooter, the switch does not monitor the speed. The limiter in the switch operates only at certain engine speeds. Moreover, it varies on different models, sometimes at 7000 rpm, and sometimes at 8000 rpm. And sometimes it’s not there. This is the maximum safe engine speed; exceeding it leads to a reduction in engine life.
The SPEED light on the dashboard also has nothing to do with the switch; it turns on from a simple contact near the speedometer needle. This light is not a limiter, but only an indicator of speeding, because in Japan for “fifty dollars” the speed is limited to 30 km/h.
If the scooter does not accelerate above 55 km/h, then most likely the reason is a worn belt and worn-out rollers of the variator, because wear of these parts leads to a change in the transmission gear ratio. Comparison of Suzuki Let's II and Suzuki Address110 forks
| goga04187 wrote: |
| How to remove a stuck variator: What to hook it to: |
zloyshadow.blogspot.com
How to set the ignition on a scooter
With minimal experience, but good theoretical knowledge, you can set the ignition yourself. To do this, you just need to strictly follow the instructions below.
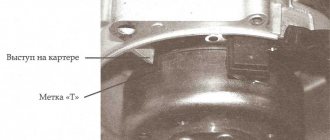
The most important part of tuning is to find the correct position for the timing sprocket to sit. In order to find it, they use special marks that are applied at the factory during engine assembly. The desired mark looks like the letter "T". In this position, the piston is at dead center. This is the extreme position after which the piston will return back. You need to rotate the rotor until the protrusion on the crankcase and the letter “T” coincide. This can be done using your hands or a kick starter. An electric starter does not need to be used.
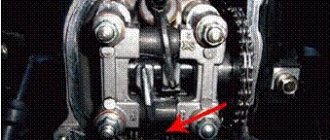
If the piston has only moved down minimally, turn it further until the marks line up. It's not always possible to get the right position the first time. After they match, you need to study the other marks: they are located on the timing star. Usually these are three points or holes that are located on the outside of the star. They form a triangular shape if you connect them visually. Notice that one point is larger than the others. After adjusting the ignition, it should be on top, and the other two marks should remain opposite each other. They must stand horizontally.
If the ignition is contactless, it is adjusted as follows. In order for the engine to run smoothly and correctly, you need to adjust the ignition of the mixture at the right moment. To do this, after all the tags are installed in the right places, you need to understand how the contactless principle works in general.
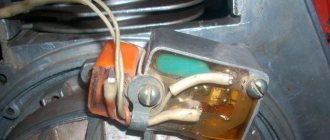
A special feature of the BZS is the presence of special sensors, a switch, and two types of ignition coil winding. When the sensor is closed using a rotor equipped with a magnet, a pulse is generated that enters the commutator, it pumps up the current coming from the generator and directs it to the primary winding of the coil. After this, the charge enters the secondary winding, where a high voltage is generated, with the help of which a spark appears, used to detonate the gasoline mixture. Adjusting the ignition is the alignment of the marks on the crankcase and the star. Usually you have to remove the valve cover.
After this you need to do the following:
- Labels are set in the manner described above.
- In order to set the ignition angle, you can release the stator mount and adjust it in accordance with the technical requirements of your vehicle.
- Make sure that the marks or holes are in the correct position.
How to set the ignition on a Suzuki scooter to sepia
MAGNETO - scooter ignition
starting the Suzuki Sepia engine without a scooter
ignition timing on a scooter
Scooter Suzuki Sepia ZZ-carburetor
How to remove a Suzuki Sepia generator
Workshop Pit_Stop: review and design of the Mikuni carburetor (Suzuki Sepia)
Honda Dio 27 won't start
Adjusting the enrichment on a scooter
The switch on the Suzuki Let`s I burned out? It doesn’t matter!
SUZUKI Sepia - the easiest way to remove the bell
Also see:
- Simple reliable practical car Nissan Almera
- Compare Opel Astra and Volkswagen Polo sedan
- Dashboard Opel Zafira 2004
- Weaknesses of the Mercedes 210 body
- BMW E63 E64 everything for tuning
- Repair kit ZIL KAMAZ pressure regulator RAAZ
- Honda SBR 954 engine repair
- How to change springs on a Mitsubishi L200
- How to change hydraulic lifters on a Hyundai Accent
- Shock absorbers for Citroen C4 hatchback new
- Lexus paint number plate
- Wheel alignment on KAMAZ 65115
- Hyundai sonata ef tagaz 1999 2011
- How to change the air filter on a BMW 116 video
- E34 BMW 520i M50 reviews
Home » New items » How to set the ignition on a Suzuki scooter sepia
stk-auto.ru
What is advance ignition
The quality of the mixture supplied to the engine cylinder determines the behavior of the scooter in cold weather, as well as how high the wear of the cylinder itself will be. For example, with a rich mixture, the engine starts better, but carbon deposits form; with a lean mixture, the cylinder quickly wears out and traction is lost.
In order to facilitate the process of starting the engine, you can set the ignition to advance, this will make it easier to start the engine regardless of the weather outside, slightly increase engine power, and significantly increase traction. The peculiarities of such settings are that a charge is formed in the spark plug before the piston reaches the dead center. This makes it easier to start the engine and increases engine power. However, it is worth remembering that cylinder wear may increase.
The procedure is carried out in approximately the same way as a regular ignition adjustment, but has its own nuances. To do this, all the same actions are carried out, only the tags are not completely connected. The discrepancy should be approximately half a centimeter. This is enough to get the desired effect.
How to set the lead angle (video)
About adjusting the ignition of a 4t scooter
Knowing how to set up the ignition of a 4T scooter on your own, you can save time and money, since you will not need to contact a motorcycle repair shop. The procedure is simple, even if you have no experience it takes a little time, but you will need to be patient. Regardless of the type of ignition, an important role is played by how the marks are set.
Correct adjustment is a guarantee of stable and smooth engine operation even in cold weather conditions. Often, in used vehicles, the ignition is broken: this can happen for various reasons, ranging from elementary shaking when driving to improper handling of the equipment. In order for the scooter not to let you down and for you to be able to start it whenever you want, you will need to learn how to carry out this procedure yourself. To do this, you will need to have several keys that allow you to remove the valve cover if the engine is four-stroke.
Setting up the Vision scooter ignition system
If the ignition is knocked out, this may be the reason the scooter does not work. Restoring it is not difficult if you understand how it is done.
Advice: before starting work, carefully check and clean the carburetor: this may be the reason. Adjust the quality of the mixture. In addition, it doesn't hurt to check the spark plugs.
You need to start adjusting by setting the timing belt in the desired position. As a rule, there are marks on it for this purpose; they are set at the factory. The cylinder must be installed at dead center. The mark may be indicated by the letter T or another symbol. Now make sure that the mark installed on the rotor matches the mark found on the magneto. To do this, you need to gently press the kickstarter. The rotor can also be turned using your hands, but this is more difficult.
There are also marks on the timing star in the form of holes or dots; they must be set so that the largest hole is on top and located exactly in the center. The remaining points should be below and located horizontally opposite each other. Setting the ignition advance makes sense if you want to increase the engine's power a little and make it start easily. The adjustment will help make the spark plug produce a spark earlier than the standard time. That is, a spark will appear even before the piston reaches the dead center. In cold weather, a moped configured in this way will start better.
In order to configure the scooter in this way, you will need to repeat the procedure described above. However, there is a difference: the marks should not coincide clearly, and not reach each other by about 0.5 cm. The main difficulty lies in connecting the marks.
How to set the ignition on a Suzuki scooter to sepia
MAGNETO - scooter ignition
starting the Suzuki Sepia engine without a scooter
ignition timing on a scooter
Scooter Suzuki Sepia ZZ-carburetor
How to remove a Suzuki Sepia generator
Workshop Pit_Stop: review and design of the Mikuni carburetor (Suzuki Sepia)
Honda Dio 27 won't start
Adjusting the enrichment on a scooter
2T.Scooter - there is a spark, but it won’t start! All the reasons here are the elimination of ..Scooter
SUZUKI Sepia - the easiest way to remove the bell
Also see:
- Ford Focus 3 restyling 2015 or
- How to understand Mercedes models
- Wheels Nissan Almera classic parameters
- Adjusting the throttle position sensor on a Mazda Demio
- Toyota Town Ice front driveshaft
- Pan gasket for manual transmission Chevrolet Lanos
- Mercedes A 150 2005
- Steering wheel braid for Nissan Almera n16
- Piston for Honda Dio 34 Taiwan
- Tire pressure Chevrolet Lacetti hatchback
- Rear left wing of BMW E39
- DRL for Mazda 6 2011
- Door lock cylinder Mercedes 124
- Puller for BMW shock absorber springs
- Subaru Outback vs Mazda CX5
Home » New items » How to set the ignition on a Suzuki scooter sepia
avtotrans2013.ru