The ignition system plays an important role: without it, not a single vehicle with a gasoline or diesel engine will move. The quality of engine operation, whether it will start in cold weather, and whether it will work correctly depends on how it is configured. Depending on how the ignition is set and what spark plugs are selected on the scooter, it depends on whether it will go or not. From this material you will learn how to set the ignition on a scooter yourself, what you will need for this, and how to set up a contactless system.
How to set the ignition on a scooter
The ignition system plays an important role: without it, not a single vehicle with a gasoline or diesel engine will move. The quality of engine operation, whether it will start in cold weather, and whether it will work correctly depends on how it is configured. Depending on how the ignition is set and what spark plugs are selected on the scooter, it depends on whether it will go or not. From this material you will learn how to set the ignition on a scooter yourself, what you will need for this, and how to set up a contactless system.
How to set timing marks on an alpha moped
Checking the timing belt by marks on the Delta EX 50 moped
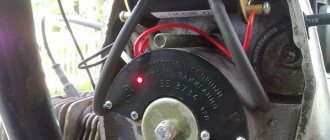
engine 1P39FMB (139FMB)
Comments from those interested:
Roman Khimchenko 2 weeks. reverse And if it doesn’t match WHAT to do
Vladimir Voronov 2 weeks. reverse Set it to match.
Valentin Sidorov 1 month ago Thanks for the video. Features of the engine timing The valves on the Alpha moped are made How to set the ignition. Everything is described carefully and clearly, in Russian. 598 Removing the generator rotor on an alpha alpha moped. how to remove Remove the generator. How to replace the starter chain on an alpha moped video. I can’t remove the rotor on the alpha moped, there is no seal on the market, I haven’t found it, so I’m thinking about the best way to remove it, has anyone removed it and in what ways. If you continue to make videos like this, I will be all for it!
Vladimir Voronov 1 month ago This is nice. )) And of course there will be new videos, just wait a little.
Danil Pugachev 1 month ago no, we don’t even know where the head with the boiler is attached, we installed two gaskets, we thought it wouldn’t knock, the valves knock loudly when you turn the starter, okay, thanks for the hint
Vladimir Voronov 1 month ago Yes! Another thing, don’t install two gaskets; it won’t make things any better; an increase in the combustion chamber will result in a drop in power.
Danil Pugachev 1 month ago no, we don’t even know where the head with the boiler is attached, we installed two gaskets, we thought it wouldn’t knock, the valves knock loudly when you turn the starter, okay, thanks for the hint
Hunter38767 3 weeks reverse And if you have a 50cc head and a 72cc piston, then you need to change the head.
Danil Pugachev 1 month ago no, we don’t even know where the head with the boiler is attached, we installed two gaskets, we thought it wouldn’t knock, the valves knock loudly when you turn the starter, okay, thanks for the hint
Hunter38767 3 weeks reverse Two gaskets are not allowed, look, the valves may be overtightened, unscrew the two caps on the head, and look at the gap, it should be 0.05 on the feeler gauge. But if they hit the piston, then there is no gap.
Sergey Vasiliev 1 month back Vadim, thank you, I read a lot of useful information, thank you, I will be glad to see new videos on alpha, I’m really looking forward to it
Arkady Novoselov 1 month back, well done, thank you for you!
Danil Pugachev 1 month ago no, we don’t even know where the head with the boiler is attached, we installed two gaskets, we thought it wouldn’t knock, the valves knock loudly when you turn the starter, okay, thanks for the hint
The principle of operation of ignition in a 4-stroke scooter engine
Modern scooters are equipped with contactless systems. They are considered the most reliable and easy to use, do not require complex connections, and provide a constant good spark on time. However, the setting is still important; even the presence of a spark does not always allow the fuel mixture to ignite, since its power also plays a role.
The main reasons for the operation of the ignition system are quite simple: its task is to create a spark to detonate the fuel mixture. If this does not happen, you need to carefully examine each node and find out why the spark disappeared.
Broken ignition is the cause of engine failure
An incorrectly configured or faulty ignition often causes engine failure. It would be wrong to immediately climb into the cylinder and examine the insides of the scooter, especially since this will not solve the problem. Before touching the ignition system, you need to check for other reasons why the scooter may not work.
How to set the ignition on a scooter
With minimal experience, but good theoretical knowledge, you can set the ignition yourself. To do this, you just need to strictly follow the instructions below.
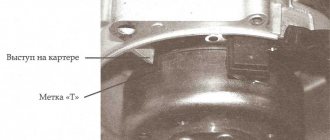
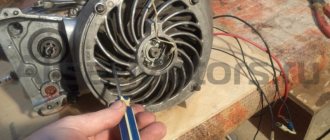
The most important part of tuning is to find the correct position for the timing sprocket to sit. In order to find it, they use special marks that are applied at the factory during engine assembly. The desired mark looks like the letter "T". In this position, the piston is at dead center. This is the extreme position after which the piston will return back. You need to rotate the rotor until the protrusion on the crankcase and the letter “T” coincide. This can be done using your hands or a kick starter. An electric starter does not need to be used.
If the piston has only moved down minimally, turn it further until the marks line up. It's not always possible to get the right position the first time. After they match, you need to study the other marks: they are located on the timing star. Usually these are three points or holes that are located on the outside of the star. They form a triangular shape if you connect them visually. Notice that one point is larger than the others. After adjusting the ignition, it should be on top, and the other two marks should remain opposite each other. They must stand horizontally.
If the ignition is contactless, it is adjusted as follows. In order for the engine to run smoothly and correctly, you need to adjust the ignition of the mixture at the right moment. To do this, after all the tags are installed in the right places, you need to understand how the contactless principle works in general.
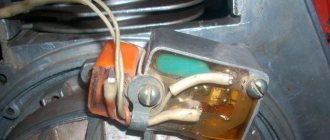
A special feature of the BZS is the presence of special sensors, a switch, and two types of ignition coil winding. When the sensor is closed using a rotor equipped with a magnet, a pulse is generated that enters the commutator, it pumps up the current coming from the generator and directs it to the primary winding of the coil. After this, the charge enters the secondary winding, where a high voltage is generated, with the help of which a spark appears, used to detonate the gasoline mixture. Adjusting the ignition is the alignment of the marks on the crankcase and the star. Usually you have to remove the valve cover.
After this you need to do the following:
How to tell if replacement is needed
It is clear that the circuit must be changed when there is obvious dysfunction. When the chain wears out a lot, it makes a loud noise. Well, or jumped over the tooth of a star. Or it fell off, which indicates its stretching and wear.
Standard chain lifespans should be close to the lifespan of the scooter engine itself. It's logical. Each owner operates the vehicle differently, but the average chain lifespan is somewhere between 15,000-18,000 km. In a situation where the engine was halved to eliminate other faults, and the chain was immediately replaced after using it for, for example, 9000 km, everything is clear.
There are options for shortening the chain when stretched. But there are some caveats: if the step does not match, the star begins to erase, i.e. the stretched chain eats the camshaft sprocket. If the wear on the star is small, you can isolate the link and ride it a little. You need to do this correctly, adjusting the chain tension with a tensioner, and not forcibly. Otherwise, you will completely damage the chain.
What is typical for a worn chain: A small point: to check, you need to remove it.
The degree of wear can be assessed by the angle of horizontal deflection. If it sags downwards, going almost vertically, change it 100%. The new chain deviates approximately 45 degrees from horizontal. And by laying out the old and new chains on the surface, you will see that the first one will be longer. Also, the wear of the scooter's timing chain can be indirectly judged by the level of extension of the tensioner rod. Critical wear is when the rod extends completely.
What is advance ignition
The quality of the mixture supplied to the engine cylinder determines the behavior of the scooter in cold weather, as well as how high the wear of the cylinder itself will be. For example, with a rich mixture, the engine starts better, but carbon deposits form; with a lean mixture, the cylinder quickly wears out and traction is lost.
In order to facilitate the process of starting the engine, you can set the ignition to advance, this will make it easier to start the engine regardless of the weather outside, slightly increase engine power, and significantly increase traction. The peculiarities of such settings are that a charge is formed in the spark plug before the piston reaches the dead center. This makes it easier to start the engine and increases engine power. However, it is worth remembering that cylinder wear may increase.
The procedure is carried out in approximately the same way as a regular ignition adjustment, but has its own nuances. To do this, all the same actions are carried out, only the tags are not completely connected. The discrepancy should be approximately half a centimeter. This is enough to get the desired effect.
How to set the lead angle (video)
Ignition advance
How to set the ignition on a 4t scooter with advance? There is an opinion that if you do this, the speed and power of the motor will increase. In theory, this is true. If the spark at the moment of compression occurs slightly before the moment the cylinder passes the dead center, this should give the desired effect. But the technical implementation of such an ignition setting on a scooter is associated with the transfer of its protrusion on the generator rotor housing. There is a method that is simpler and safer, which gives a certain effect. You can make a step on the ignition ledge. To do this, you need to remove a layer of 0.5 mm from half the surface of the protrusion. The step should start from the side that first contacts the ignition sensor. The resulting dual spark will provide more predictable engine starting and will also increase the likelihood of ignition when exposed to adverse weather conditions and improper fuel and air settings.
About adjusting the ignition of a 4t scooter
Knowing how to set up the ignition of a 4T scooter on your own, you can save time and money, since you will not need to contact a motorcycle repair shop. The procedure is simple, even if you have no experience it takes a little time, but you will need to be patient. Regardless of the type of ignition, an important role is played by how the marks are set.
Correct adjustment is a guarantee of stable and smooth engine operation even in cold weather conditions. Often, in used vehicles, the ignition is broken: this can happen for various reasons, ranging from elementary shaking when driving to improper handling of the equipment. In order for the scooter not to let you down and for you to be able to start it whenever you want, you will need to learn how to carry out this procedure yourself. To do this, you will need to have several keys that allow you to remove the valve cover if the engine is four-stroke.
Setting up the Vision scooter ignition system
If the ignition is knocked out, this may be the reason the scooter does not work. Restoring it is not difficult if you understand how it is done.
Advice: before starting work, carefully check and clean the carburetor: this may be the reason. Adjust the quality of the mixture. In addition, it doesn't hurt to check the spark plugs.
You need to start adjusting by setting the timing belt in the desired position. As a rule, there are marks on it for this purpose; they are set at the factory. The cylinder must be installed at dead center. The mark may be indicated by the letter T or another symbol. Now make sure that the mark installed on the rotor matches the mark found on the magneto. To do this, you need to gently press the kickstarter. The rotor can also be turned using your hands, but this is more difficult.
Replacing the timing chain on a 139qmb engine the easy way
How I replaced the timing chain on a 139qmb engine of a Chinese scooter, and at the same time checked the possibility of shortening the timing chain
When I first opened the valve cover on the 139qmb engine, shortly after purchasing a used scooter, it was discovered that the timing chain was stretched to the limit and even more. The tensioner was pulled all the way out, but the chain was still loose. with spare parts for scooters in our area, and attempts to find them in stores led to nothing. I've been driving like this so far. But soon there were two instances of the chain slipping on the camshaft or crankshaft sprocket, but in any case in such a situation, having turned off the engine, it was impossible to start it again until the camshaft was installed according to the marks. Since there is still no timing chain Under the cylinder from thick (2 mm) cardboard, under the head - from metal asbestos, also about 2 mm thick. The chain no longer jumped on the teeth, but it was still rather weak. You won't be able to travel like this for long. There was an idea - to shorten the chain by throwing out one link, but then on one site I found an acceptable option for me to purchase a chain through an online store by mail with cash on delivery - honlingzakaz.ru - Timing chain 50cc (139QMB). Simple registration, the only thing is that the minimum order price was no less than 400 rubles and in addition I ordered head and cylinder gaskets. Placed an order by registering on the website (you need a valid e-mail and phone number). After some time they contacted me and I confirmed the order. A week later I received the parcel at the post office.
We adjust the contactless ignition system
The contactless system operates through a sensor, switch, primary and secondary ignition windings. When the rotor with magnet closes the sensor, it sends a signal to the commutator, which, in turn, begins to accumulate current from the generator and transmit it to the primary winding. At this moment, high voltage appears in the secondary ignition winding. Its purpose is to ignite the spark. If there are any malfunctions listed above, adjustment is carried out by simply aligning the crankcase and ignition marks; to do this, remove the valve cover. The next steps are:
It is important to ensure that two of the three holes in the gear for the chain are at the level of the cylinder, and the remaining one is above the plane in which the cylinder and the mentioned holes are located
Each type of vehicle requires you to approach and work with parts differently, so bring the service manual to the garage. If suddenly all the machinations did not help, and you are sure that the remaining units are in good working order, you should replace the switch, since it cannot be repaired and is inexpensive.
TROUBLESHOOTING IN THE IGNITION SYSTEM OF SCOOTERS
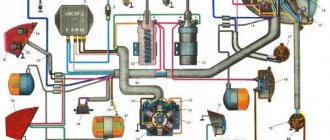
If the stool's engine suddenly stops, perform check No. 1: is there gasoline in the tank? There are mines, look for an “ambush” in the ignition system. You always want to believe in the simplest thing - the candle has “run out”. Hence check number 2: install a known working spark plug, crank the engine with an electric starter or kick. Has the engine started? It's her fault. Didn't work? Look further. Let's try to revive the VM Galaxy scooter; its electrical circuit is typical for devices of this class (the only differences are in the Suzuki Sepia).
Remove the plastic and look for the elements of the ignition system. The switch is not difficult to find: it is a small plastic box with a connector that accepts 5 or 6 wires with insulation of different colors. It is even easier to detect the ignition coil: a high-voltage wire leads to it from the spark plug (it is thicker than others). The electromagnetic sensor and generator are located in the engine, but their functionality can be checked without disassembling it.
Imagine how an electrical system works. The voltage comes from the generator to the switch and accumulates in the capacitor. Based on a signal from the electromagnetic sensor, the capacitor is instantly discharged to the ignition coil. In it, the voltage of this impulse increases to several thousand volts and is supplied to the spark plug through a high-voltage wire, through the spark plug cap. A wire runs from the switch or sensor to the ignition switch - it is used to turn off the engine: when the switch is turned off, the wire is shorted to ground. Your task is to check all these circuits.
Arm yourself with a digital multimeter and set it to resistance measurement mode. Make sure the motor is in electrical contact with the scooter frame. Then determine the purpose of the wires that go to the switch connector. Start with the ground wire (usually green) - there should be zero resistance between it and the frame. Two wires approach the ignition coil: one is connected to ground, the other goes to the switch. Look at the color of the “switch” (you will find it in the switch connector).
Disassemble the scooter beak. Remove the ignition switch from the protective cap.
Select from among the wires those that are suitable for it. The one that matches the color of one of the wires on the switch connector is the “jamming” wire. It remains to determine the purpose of two wires - from the generator supply coil and from the electromagnetic sensor. Black with a red stripe, usually from the pickup, the other from the supply coil. To make sure that you have not made a mistake, measure the resistance between them and the “ground”: the sensor resistance is 2-3 times greater than that of the high-voltage winding of the generator.
The electrical circuit of the Suzuki Sepia differs from the one described: it has a switch and an ignition coil combined into one housing. Here you can only check the wires going to it and the resistance of the generator winding, which is also a sensor.
It is more convenient and reliable to check nodes if you measure the resistance at the terminals of the wires going to the switch. At the same time, check the wiring: it happens that the electrical circuit is broken in it. If the multimeter shows that the resistance of one of them is equal to infinity, then, “moving” along it, you will find a break.
Start the “movement” with the spark plug cap. Having looked into it, make sure that the spring installed on the contact is not lost, and the cap itself is put on the spark plug with noticeable force (if the fastening is unreliable, the engine will run intermittently). This part must be equipped with a rubber o-ring - otherwise in wet weather the spark will “run away” to ground.
It is easier to check the secondary winding at the same time as inspecting the high-voltage wire and spark plug cap. Remove the cap from the spark plug and check the resistance between the terminal that fits onto the spark plug and ground. We got about 7.5 Ohms. Now disconnect the cap from the wire and determine the resistance between the wire conductor and the ground - it should be about 2.5 kOhms. Therefore, the resistance of the noise suppression resistor is 5 kOhm. The wire resistance should be zero.
If you need to replace a high-voltage wire, look only for the one with a metal core. Automotive high-resistance, having a wire core with carbon filler, is unsuitable here!
Now it’s the turn of the ignition coil. Here you need a digital voltmeter - the resistance of the primary winding is insignificant, and a dial gauge will not give accurate data. Check the resistance between the wire that goes to the coil and ground. There is a peculiarity here. If you short-circuit the probes of a digital ohmmeter, its reading is usually greater than zero. Remember exactly how much and subtract this value from the reading when checking the coil. The difference should be equal to 0.2-0.3 Ohm - this is the resistance of the primary winding. Is the ignition coil ok? Go ahead.
The next stage is the motor “stub” circuit. Connect a multimeter to the wire running from the switch block to the ignition switch. Turn the ignition key: in the “off” position the device should show zero, in the “start” position - “infinity”.
It remains to check the condition of the electromagnetic sensor and the supply winding of the generator. Find a black wire with a red stripe in the switch connector, measure its resistance relative to ground with a multimeter: it should be about 500 Ohms. This is a sensor. The resistance of the supply winding wire (in our case it is blue with a white stripe) is 150-200 Ohms. If the value is noticeably less, there may be an internal short circuit in the supply coil. In this case, it will no longer provide sufficient voltage for a spark. If you have any doubts about the functionality of the part, contact a workshop: special equipment will be required to dismantle and diagnose the generator. If you try to disassemble the generator on your own, you may break it.
If all of the above elements of the ignition system are in order, and the ground wires are securely connected to ground, but there is still no spark, then the switch is faulty. It is impossible to check it in a garage - you will have to contact a technical service or, in order not to fool yourself, buy a new switch. When you look for the reason for the “death” of the replaced one, do not listen to those who say that the accident occurred because you drove without a battery. It's a bullshit! The power supply systems, which include the battery and ignition, are completely independent on scooters.
And now about the easiest way to destroy electrical equipment. Sooner or later, something needs to be done on an “old” scooter. Remember, if you work with electric welding, even if you just need to “grab” something or “put an end to it”, be sure to disconnect the switch and voltage stabilizer - otherwise you will ruin them. During welding, secure the welding machine ground as close to the welding site as possible. Please note that the power units of most scooters are attached to the frame through silent blocks - they do not allow current to pass through. This means that the current will flow through the “mass” wires. And this is like death: in a few seconds the welding current will turn the wires into a lump of “reinforced” molten plastic.
Broken ignition as a cause of engine failure
First of all, I would like to talk about what can cause a four-stroke scooter engine to fail, and whether misconfigured ignition should be blamed for this. Answering this question, we can answer with one hundred percent confidence that an incorrectly configured or simply faulty ignition may well become the cause of engine failure. However, it is too early to blame everything on a faulty ignition system until you check the main parts that affect the performance of the engine. Let's talk about them in more detail.
The first and perhaps most obvious is a lack of fuel or a clogged carburetor. Before you start trying to adjust the ignition, thoroughly clean the carburetor and make sure that fuel is flowing to the engine. Also, check that the carburetor is providing sufficient air supply.
The second, most common reason why an engine refuses to start is faulty spark plugs. Make sure that the spark plugs used in the scooter are not punctured and have a good enough spark. Simply replacing the spark plugs usually helps.
If you are completely convinced that there are no more reasons for the engine not to start, then you can dig deeper and look for the problem in an incorrectly configured ignition. Let's figure out how to set the ignition on a scooter.
Reasons for failure of a 4-stroke scooter engine
If the scooter engine does not start, there can be a variety of reasons: 1. There is no fuel supply to the combustion chamber. 2. Air supply is not adjusted. 3. There is no compression. Burnt and deformed valves do not provide compression. The reason for the lack of compression may be incorrect assembly of the cylinder-piston group, as well as a malfunction of the cylinder itself. 4. The gas distribution mechanism responsible for the operation of the valves is faulty. 5. The spark plug is faulty. 6. An ignition spark is not produced during the mechanical operation of the generator.
What is ignition and how does it work?
So, let's start getting answers. The ignition system in a scooter is responsible for the correct operation of its engine and the appropriate moment of ignition of the mixture of fuel and air. The required proportions of these components are provided in the carburetor, and then the combustible composition enters the cylinder. At the moment of the highest degree of compression, a spark is supplied to the spark plug, which ignites the mixture. The spark voltage in some engines reaches 40 thousand volts.
The ignition system of a scooter is responsible for ensuring all this; it has a similar principle of operation in a moped, walk-behind tractor and any other mechanical vehicle with a gasoline engine. The result of its correct operation are such characteristics as a quick increase in engine speed, the usual level of exhaust gases emitted from the pipe and the absence of suspicious pops.
If suddenly, after repairs, you sit on your own “iron horse”, and for some reason it no longer gallops with the agility inherent in it, it’s worth checking the spark plugs. They must have a light brown soot. If the spark plugs have a black, tarry, thick layer, this is not a good symbol; in general, any deviation from the norm may be evidence of a malfunction of the ignition system.
Read
How to set the ignition on a 2t scooter
It’s great when in the warm season you have the opportunity to go out into nature, to the countryside, or just ride with the breeze. To do this, it is not necessary to have an expensive car or a fancy motorcycle model. You can get by with a fairly budget option and choose the optimal vehicle that can get you anywhere. We are talking about a type of light motorcycle, which is called how to set the ignition on a 2 ton scooter. Even a teenager can learn to drive light vehicles.
If you are excellent at handling a bicycle and like to ride with the breeze, then you simply need to purchase a vehicle with an engine. The best option would be the kickstand of an Izh motorcycle or scooter. You no longer have to pedal like a bicycle, which means you can enjoy the ride even more and get much more positive. You will never be tired, even if you travel the length and breadth of the city.
There are many models of scooters. The most common are models with an engine capacity of up to fifty cubic centimeters. Such devices do not require a full category “A” driver’s license, which means you will save on insurance and mandatory technical inspection. Plus, you won't have to pay road tax.
how to set the ignition on a 2t Honda scooter
The principle of operation of ignition in a 4-stroke scooter engine
Modern scooters are equipped with contactless systems. They are considered the most reliable and easy to use, do not require complex connections, and provide a constant good spark on time. However, the setting is still important; even the presence of a spark does not always allow the fuel mixture to ignite, since its power also plays a role.
The main reasons for the operation of the ignition system are quite simple: its task is to create a spark to detonate the fuel mixture. If this does not happen, you need to carefully examine each node and find out why the spark disappeared.
Broken ignition is the cause of engine failure
An incorrectly configured or faulty ignition often causes engine failure. It would be wrong to immediately climb into the cylinder and examine the insides of the scooter, especially since this will not solve the problem. Before touching the ignition system, you need to check for other reasons why the scooter may not work.
Notes
Experienced repair technicians for devices such as mopeds explain the frequent ignition failure of these devices as follows. Even at the manufacturer’s factory, the moped is equipped with a late ignition, which results in incredibly sluggish ignition response to the accelerator handle and accumulating carbon deposits on the spark plug.
Therefore, it is important to know the method of how to set the engine to start in order to independently bring it back to life
Operating a scooter and enjoying its ownership brings a lot of positive emotions to the owner. In general, a scooter is a truly unique motor scooter, which is an almost universal transport. The scooter is great for driving around the city and for traveling outside of it. And everything would be fine, but sooner or later the moment comes when it has to be repaired and maintained, something that motorcyclists like to do much less of. Also, you often have to adjust and set the ignition, which few people know how to do correctly. It’s exactly how to set the ignition on a scooter that will be discussed in today’s article.
How to set the ignition on a scooter
With minimal experience, but good theoretical knowledge, you can set the ignition yourself. To do this, you just need to strictly follow the instructions below.
The most important part of tuning is to find the correct position for the timing sprocket to sit. In order to find it, they use special marks that are applied at the factory when assembling the engine.
The desired mark looks like the letter "T". In this position, the piston is at dead center. This is the extreme position after which the piston will return back. You need to rotate the rotor until the protrusion on the crankcase and the letter “T” coincide. This can be done using your hands or a kick starter. An electric starter does not need to be used.
To adjust, you need to align the “T” mark and the protrusion on the engine crankcase
Labels may look different on different scooters
If the piston has only moved down minimally, turn it further until the marks line up. It's not always possible to get the right position the first time. After they match, you need to study the other marks: they are located on the timing star. Usually these are three points or holes that are located on the outside of the star. They form a triangular shape if you connect them visually
Notice that one point is larger than the others. After adjusting the ignition, it should be on top, and the other two marks should remain opposite each other
They must stand horizontally.
Markings on the timing star
If the ignition is contactless, it is adjusted as follows. In order for the engine to run smoothly and correctly, you need to adjust the ignition of the mixture at the right moment. To do this, after all the tags are installed in the right places, you need to understand how the contactless principle works in general.
A special feature of the BZS is the presence of special sensors, a switch, and two types of ignition coil winding. When the sensor is closed using a rotor equipped with a magnet, a pulse is generated that enters the commutator, it pumps up the current coming from the generator and directs it to the primary winding of the coil. After this, the charge enters the secondary winding, where a high voltage is generated, with the help of which a spark appears, used to detonate the gasoline mixture. Adjusting the ignition is the alignment of the marks on the crankcase and the star. Usually you have to remove the valve cover.
After this you need to do the following:
Conclusion
Don't be afraid of the ignition system. It’s easy to set up, the main thing is to check the entire circuit; much more often the switch fails, there is no gasoline or the spark plug needs to be replaced. Only after making sure that there are no physical malfunctions should you start setting up the ignition. If it is set correctly, you will hear and notice, as the engine will start easily and run smoothly.
Often, scooter owners need to set the ignition. In this article we will talk about how to properly adjust the ignition and in what cases this procedure should be carried out.
So, what can indicate that the ignition on a scooter is not configured correctly? Typically, the following signs may indicate problems with ignition:
— The engine is trembling, that is, it is working unstably (extraneous uncharacteristic sounds are heard, vibration is felt, floating speed is noticeable at idle); — Popping noises are heard in the muffler; — Power drops; — The scooter smokes more than usual; — The engine does not pick up speed well.
If you observe one or more of these signs, then it is worth checking the operation of the ignition system. A good place to start is by checking the spark plug. As a rule, the appearance of the spark plug can shed light on the reasons for the engine's malfunction. You need to pay attention to the color of the end of the insulator that goes into the cylinder. During normal ignition operation, it has a sandy tint. If the end of the insulator is black, then this indicates that there is soot on it, and this is a reason to figure out whether everything is in order with the ignition.
Before taking a closer look at the process of setting the ignition, it is necessary to briefly touch upon the principle of operation of the ignition itself. Actually, unstable engine operation can be observed with premature and late ignition. With premature or early ignition, the fuel-air mixture is ignited by the spark plug at a time when the piston is not yet at top dead center. With late ignition, the fuel-air mixture is ignited when the piston is almost down, that is, the mixture ignites and passes through the exhaust rings of the cylinder, which leads to pops and smoke from the muffler. The optimal moment for ignition - ignition of the fuel-air mixture occurs at the moment the piston begins to move from the dead center down. This is a very specific figure, which is usually indicated in the scooter’s operating instructions. Typically, the amount of downward displacement of the piston at which the best ignition timing occurs is from 2 to 4 mm.
It is worth noting that there are two types of ignition - contact and non-contact. They all produce a spark, but their operating principles are different. Contact ignition is based on a mechanical interrupt system. However, this type of ignition is considered obsolete and is practically not used on modern motorcycles. Today, most modern scooters use a non-contact ignition system, which is based on the operation of a sensor, switch, primary and secondary ignition windings.
To set the ignition on the contact system, you first need to disassemble the crankcase. Then on the contact group you need to set the maximum allowable gap for a full circle of shaft rotation. Next, you need to set the piston to the distance from the dead center specified in the scooter's operating instructions. Then you should loosen the stator fastening and adjust it until the contact closes. Next, we assemble the crankcase in reverse order.
To set the optimal moment for a spark on a scooter with a contactless ignition system, you must first disassemble the crankcase. Then you need to make a mark on the crankcase and rotor at the position of the top dead center of the piston. In this case, the spark plug must be unscrewed. After which it is necessary, by turning the shaft, to record the moment the spark appears. Next, we make another mark on the crankcase. Thus, the distance between the two marks is a very important parameter, which is usually called ignition timing. The distance between the two marks gives us the so-called ignition advance. Now you need to loosen the bolts on the generator stator and set the ignition to the level specified in the scooter's operating instructions.
How to adjust the ignition on a scooter
Therefore, it will be important to acquire at least minimal setup skills and understand the main causes of possible breakdowns. One of the options for gaining knowledge about the principle of operation and the need for repairs or adjustment nuances would be to understand the basic techniques for setting the ignition
So, let's figure out how to set the ignition on a scooter, what it is and how important this knowledge is. A non-functioning ignition system or any of its circuits is the reason the entire scooter mechanism, or rather its main part, the engine, does not work. The ignition system itself is necessary so that the fuel ignites and moves the pistons, which move the wheels and, in fact, the vehicle.
Naturally, according to these conditions, the ignition system is one of the most important parts, the operation and configuration of which must be known in order to stay overnight on the road. The process of igniting the combustible mixture in the gas chamber begins with candles. They can become the main cause of the malfunction, which the unlucky driver will have to deal with when the need arises. To adjust the ignition and check the operation of the spark plug, it will not be enough to check for a spark, as in other types of transport. This is due to the fact that even with a spark on the spark plug, there may not be enough power to ignite the fuel.
Which method is preferable?
It is logical that the first option with complete disassembly of the scooter engine is more complicated and takes more time and effort. But, as you can see, it is more reliable. Firstly, the factory integrity of the circuit is not compromised; secondly, when disassembling the scooter engine, you can see any defects, such as cracks, wear, change the seals, clean the parts.
The second option is more simplified and can be used when you only need to replace the chain. And you are confident in the quality of your work.
Final word
The scooter is a fairly popular vehicle and is in increasing demand. Because it leaves traffic jams behind, has low operating costs and is economical in terms of fuel and lubricants. Many people prefer to do scooter repairs on their own, especially since four-stroke engines are simple and reliable to use. Timely technical inspections, careful operation and the above article will allow you to enjoy riding this miracle of the Asian motorcycle industry for a long time.
How to adjust valves on a 4-stroke scooter Information, operation, maintenance
So, maybe after replacing the CPG, your scooter has stopped selecting revs, or you just want to improve the performance of your scooter.
Adjusting the valves will help with this.
First you need to remove the cover from the cylinder head; to do this, unscrew the four bolts.
Next, it is important to set the dead center, it is done like this. Remove the protection from the cooling fan and look at the marks on the plate
After that we return to the valves. Let's look at how the camshaft sprocket is located, it is better to remember approximately how the marks are located
We begin to remove the bed with rocker arms
It is very important to unscrew the nuts evenly from the studs, crosswise. That is, a revolution of the upper left is a revolution of the lower right, a revolution of the upper right is a revolution of the lower right
When the nuts already begin to spin without tension, feel free to unscrew them, it may no longer be evenly distributed.
Unscrew the nuts and remove the bed, holding the camshaft.
Next, remove the timing chain from the camshaft sprocket and rotate the camshaft so that the marks on the sprocket coincide with the edges of the cylinder head, put on the timing chain.
We check the marks again, if they are level, we return the bed with the rocker arms and tighten it. You need to tighten it in the same way as you untwisted it, evenly, otherwise the cylinder head and/or cylinder may become warped. Then you will have to completely disassemble the CPG, and most likely change the gaskets.
Afterwards we put everything back together in reverse order. We start it and check it.
Whatever it is: better, worse, or the same. Most likely you will want to try to do better.
Don't forget to set the dead center.
We disassemble again until the rocker arms are removed. Next, slightly raise the side of the camshaft on which there is no sprocket. So that the timing chain would be slightly loosened and it would be possible to lift it from the sprocket and rotate the sprocket. Scroll the sprocket one tooth forward or backward. How
you'll want to. We twist it and check it.
If it’s worse, we set the dead center, unwind it and scroll it two teeth back. We twist it and check it.
Thus, by trial and error you will definitely set it the way you like it.
From personal experience I can say that once you set it correctly, you will never have problems with this matter.
How to replace the timing chain in an engine
Having decided on such an action as replacing the timing chain of a scooter, you need to decide on how to implement your plan.
There are two replacement options:
- With a thorough disassembly of the scooter engine
- No engine disassembly.
How to change, everyone decides for themselves. Both methods, advantages and disadvantages are described in detail below.
With disassembly
You should choose the right tools - generator and variator pullers (you can make them yourself), a kickstarter sprocket puller, 8, 10, 12 and 17 mm sockets, a hammer, two screwdrivers (flat, Phillips).
The engine is removed from its place, the oil is poured out, all parts are wiped and cleaned. Next, remove the muffler and cooling casing. We remove the generator only with a puller. To do this, unscrew the bolts from the impeller and remove it from the rotor. It is necessary to fix the rotor with a puller and unscrew the nut. Then we tear the rotor off the crankshaft journal. Remove the variator cover. Also, secure the impeller with a puller, unscrew the nut, and remove the variator from the axle.
Below the variator is the kickstarter gear. Likewise, a puller is required for it. Then we clean the cylinder connector, valve covers and cylinder head. After unscrewing the bolts on the valve covers, remove it. Next, remove the scooter's timing chain tensioner. After unscrewing the bolts on the cylinder head, we pull out the camshaft bed.
Next, remove the chain from the camshaft and pull it out of bed. To avoid losing the guide bushings that center the parts relative to each other, you need to remove them and put them away. We remove the cylinder head, the cylinder itself, and the piston (to do this, remove the retaining ring and pin from the upper connecting rod head).
After unscrewing the bolts on the crankcase cover, tapping it a little, remove it from the engine. We take out the starter intermediate gear, use a screwdriver and a hammer to unscrew the overrunning clutch nut (clockwise) and remove the gear and housing from the trunnion. We reached the chain!
Remove the protective shield from the oil pump. Place a metal stick under the chain, twist the nut on the oil pump sprocket, remove it and remove the chain.
No disassembly
We take the following tools: a Phillips screwdriver, pliers, a new chain and a special puller. More details about it will be below. We flare the new chain - to do this, use a puller to press the pin out of the joint of the links, but not completely.
A little about the puller
It is called a timing chain puller. It can be made by a turner by turning a threaded extruding pin and rolling a strong pin into it with a diameter similar to that of a chain pin. You can purchase a ready-made bicycle one. Just narrow the pin a little to the desired size.
Remove the cooling casing from the scooter engine, then the cylinder head cover. Next you need to remove the chain tensioner. We remove the camshaft bed, take out the shaft, remove the star.
We take the puller, center it with the pin, and gradually press out the pin. You can press it out completely, it will not be useful. We compare the links of the new and old chains, thread the wire into the seat of the pin and fix the ends of both chains. We turn the cooling impeller counterclockwise, gradually replacing the old chain with a new one.
Then we separate the ends of the chains, throw out the old one, and combine the new links from the ends. We check the alignment, install the pin, and use pliers to carefully press the pin in so as not to damage the new chain. We first check the mobility of the links. We finalize the pin with a puller. Again we control mobility. This point is very important: if you install the pin unevenly and miss it, it will begin to rest against one of the links and squeeze out the next one.
As a result, the subsequent pin or link bends, causing it to jam and become immobile.
Next, we assemble the engine in reverse order, placing marks on the rotor. When installing the camshaft bed, after tightening the nuts, you need to check the valve clearances with a feeler gauge. Upper valve – inlet: 0.05mm, lower – exhaust: – 0.1. The feeler gauge should fit freely between the valve and the adjusting bolt.
Then install the chain tensioner. We unscrew the bolt on the top of the tensioner, install a screwdriver in the groove, and, turning it, push the rod back. We fix everything else back according to the diagram.
Ignition setup steps
The first possible breakdown is checked with a stroboscope; to do this, you need to check whether there are measured risks in the ignition synchronization. Rarely does anyone have an expensive strobe light for free use, but if you have the opportunity to ask your friends for it, then it’s better to start working with this check.
In order to start checking the synchronization of the marks on the system, you need to thoroughly warm up the moped motor. There is no need to strain the moped too much.
Connecting a strobe
After this, you should connect the strobe. If the technician is working with the device for the first time, he must first carefully study the operating instructions. Two wires come from the device, one of which should be connected to the moped’s power supply, and the second induction wire is connected to the spark plug.
A simple strobe for setting up the ignition of a moped
As soon as a spark appears on the spark plug during startup, the bright light of the strobe will indicate this. Now you should direct this light that appears to the location of the measuring marks and see how they are located relative to each other. If everything is correct, the risks are exactly the same, then the setup went as expected, no further adjustment is required.
Adjusting the ignition timing
If the measuring marks are not synchronously coupled with each other, or they are not visible, then you will have to adjust the start of the moped. More precisely, you will have to adjust the ignition timing. Different models of Chinese mopeds may have different adjustment methods. Therefore, before starting work, it is necessary to study the documentation attached to the moped. Adjustments must be made in accordance with the instructions.
If it is not clear where these measuring marks should be located, you should carefully inspect the generator flywheel, as well as the flywheel housing, and they will immediately show up.
Further work requires a careful approach and strict adherence to safety measures, since you will have to inspect and adjust the system with the engine running.