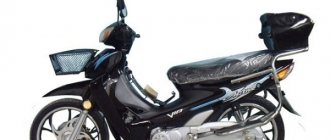
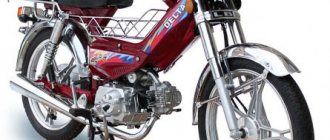
What does a city dweller need to feel free and escape from the bustle of the city into nature? That's right, a two-wheeled friend that can take the owner not only on asphalt roads, but also over rough terrain. And best of all, Delta mopeds from China cope with this role, which delight with their bright design and ease of maintenance.
This appearance immediately attracts everyone's interest
Adjusting fork softness on a bicycle
Pre-setting the travel of the suspension fork - preload - allows you to set the spring stiffness.
When in optimal condition, the damping system dampens vibrations where needed and maintains firmness on level surfaces. The adjustment consists of changing the distance between the upper “unloaded” and lower point of maximum pressure.
Let's look at a few examples:
1 – load is minimal, fork is soft; 2 – high rigidity; 3 – correct setting
In the first case, the fork travel is close to the maximum possible. On the roads this will result in constant oscillations of the springs “up and down” under the pressure of the cyclist. Interestingly, such a fork will handle obstacles in the form of bumps and potholes poorly.
The second option is high fork rigidity, stroke length less than 50% of the original. This value is not enough for the smooth passage of large obstacles.
In the third situation, the shock absorber is fully tuned, allowing it to effectively absorb impacts without compromising the dynamics of the bike. On average, the correct setting is 70% to 90% of the fork travel of the unloaded distance.
The preload method depends on the shock absorber type:
- On spring models, the compression amount is changed manually using a special regulator. When replacing a spring, a stiffer shock absorber is selected to increase the load, and vice versa.
- For spring-air forks, the stiffness is adjusted through the pressure in the chamber.
- On air shock absorbers, the fork travel is controlled by changing the pressure in the positive sector.
You can measure the load in a stationary position, sitting on a bicycle or while moving. For accurate results, adjustments are recommended to be made in small increments.
Fork repair and disassembly process
Manipulations for complete replacement of oil, seals or oil seals and elimination of breakdowns require complete or selective disassembly of the front fork. This procedure is performed as follows:
- set the bike with the saddle down, loosen the brake, remove the front wheel, handlebars with stem and pipe;
- remove the fork, being careful not to lose the bearing balls. To remove the rod ring, you should use some sharp object.
Using a spring-elastomer design, we will try to understand in what sequence the fork needs to be disassembled:
- Unscrew the lower mounting bolts using hexagons.
- Unscrew the bolt that coordinates the force of the spring, remembering its stroke.
- Pull out the elastomer and, if necessary, change its size by simply cutting off the excess.
- Unscrew the bolts and remove the “pants”, from which, using a screwdriver, remove the anthers and bushings, rotating them clockwise.
Then all elements should be examined for the presence of defects and washed in kerosene. Parts that require lubrication must be treated with a suitable product. Experts recommend lubricating the spring with a thick product - this will make the fork work more efficiently. The assembly procedure is exactly the opposite and does not require additional explanation. Replacing a shock-absorbing bicycle fork should be entrusted to a person specializing in such work, or this procedure should be carried out in full accordance with his recommendations.
Experienced cyclists can repair the fork with their own hands, because during the process of use, a person who is interested in the structure of his vehicle gradually remembers the names and functions of the elements, and therefore it will not be difficult for him to detect the problem and fix it. Those who have recently become the owner of this type of transport and have not yet acquired the necessary skills and knowledge should turn to a bicycle workshop for help.
Horse Motors scooter 056 no light, what to do
I was just driving in the evening with low beam and suddenly it suddenly went out, I switched to high beam and everything was fine) and all at once. The tachometer backlight was also not on. what could this be? I drive without a battery, but everything worked fine)
Somewhere the contact was lost!
Electrics is the science of contacts. The absence of where one should be and the presence of where one should not be.
I had a problem where the near one disappeared and the far one was there. At home I pulled out the light bulb and there the spiral of the near one simply fell off and everything was fine on the far one. I advise you to check the light bulb first, maybe the same problem and at the same time check the contacts there)
On Chinese scooters the weak point is the buttons on the steering wheel. They are sold as a set for the entire steering wheel. Buy yourself a couple of sets, they will come in handy around the house. Then you take a tester and follow the circuit from the light bulb, and of course you can look into the circuit.
Familiar. A couple of days ago, all my light disappeared, on a hummock - in one fell swoop, and even in the dead of night. It was a lot of fun coming home and catching all the holes. The next day I attacked the scooter, gutted all the electrics, even unwound the power harnesses, calling everything and everyone with a tester. Then it turned out that only one connector on the generator had come loose. Well, there were swear words. The connector appeared to be closed, but in fact it was slightly loose. That's all. Start with something simple - contacts, then lamps, and only then check the wiring and look for a break. Otherwise you will repeat my mistake.
Troubleshooting and repair of electrical equipment of the Delta moped
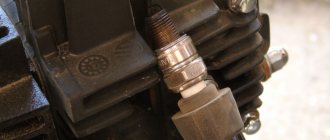
- The absence of a spark or its strength is not sufficient for ignition. To do this, unscrew the spark plug and evaluate its appearance. You should also check for a spark when turned out.
- When troubleshooting the ignition system, install a working spark plug and try to start the engine.
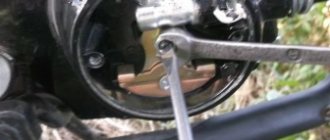
- Using a multimeter, check the contact between the motor and the frame.
- The performance of the generator can be assessed by measuring the coil resistance. Resistance is measured between ground and a black wire with a red stripe. If there is no resistance or it is very low, the generator is to blame for the problem. To confirm this fact, you should dismantle the generator and check the resistance directly on the coil.
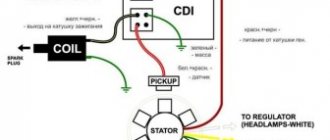
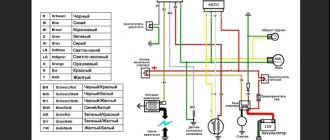
- If the generator is working, check the integrity of the circuit. The electrical diagram of the Delta moped allows you to determine the procedure for troubleshooting and troubleshooting.
- Then the resistance at the terminals of the ignition unit is checked. Since this element cannot be repaired, if problems are identified, it should be replaced.
There may also be problems with the battery charging system. A sign of problems will be a constantly discharged battery. The cause may be a malfunction in the power supply system. Problem identification is done using a multimeter.
If the power supply system is damaged, no current flows to the battery. Until the battery is discharged, the scooter will work, and then the engine can only be started by charging the battery or replacing it with a new one.
The electrical circuit of the Delta moped simplifies the troubleshooting process. When performing welding work, you should remember that without disconnecting the switch you can easily destroy all electrical equipment.
Modern scooters made in China have a similar layout. The engineers of the Celestial Empire did not bother and assembled all the critical components according to a single scheme. Even if there are differences, they are minimal.
This statement is also true for the electrical components of the moped. Any owner periodically encounters problems associated with these nodes. The electrical circuit of a Chinese 4t scooter is not a complex system; it contains only the main elements necessary for the full operation of the unit.
Knowing the main electrical wiring components and their purpose, you can quickly find the problem and fix it.
We recommend reading:
Another electrical connection diagram from the spare parts catalog for the Delta. Features of electrical equipment. The wiring for the Delta and all electrical equipment is quite traditional. However, this is exactly what will help toughen the motorcycle owner in the face of eternal breakdowns and make him a real ace in the electricity of his motorcycle.
The starting relay receives a thick red wire from the positive terminal of the battery. There are models where the motorcycle is completely converted to direct current, but these are old models and they are quite rare. ALPHA WIRING! ALPHA 110! MOPEDA WIRING
Setting the ignition timing
This operation will need to be carried out if the risks do not correlate with one another. It is recommended to use a strobe light that has a sensor for counting crankshaft revolutions. If this element is missing, you will need to check the engine starting at idle speed.
To learn how to quickly adjust the carburetor on a moped, watch the video:
Complete ignition settings are carried out as follows:
- the crankcase is disassembled, and the maximum permissible gap for a full circle of shaft rotation is set on the contact group;
- the piston is placed in a position that coincides with what is indicated in the instructions for the moped;
- the stator fastenings are loosened, it is adjusted to the position where the contact closes.
Everything is put together in reverse order. Ignition must be either synchronized or slightly advanced (but literally by a fraction of a second). The advantage of the latter method lies in the fact that the spark is produced a little earlier than the piston inside the cylinder reaches its top dead center. This manipulation results in a low increase in power and easier engine starting, which is especially important in regions with temperature changes and simply in the cold.
Useful videos with step-by-step instructions:
Possible breakdowns
You can often find discussions on forums that the Delta moped has low generator voltage. The spark may be weak and the battery may not charge well. These are clear signs of a generator failure. This happens for several reasons:
- The wire is burnt out or broken.
- A short circuit has occurred.
- The rotor magnetization dropped significantly.
If the voltage of the Delta moped generator drops, Nostalgia Kanuni, the cause may be a fall of the two-wheeler. Sometimes the explanation for why the rotor has become demagnetized is being near a high magnetic field. If the generator is not working properly, it becomes impossible to operate the moped.
"Chezet"
The history of the legendary “Cezet” goes back to pre-war times, when the Czechoslovak arms factory Ceska Zbrojovka (CZ) decided to start producing motorcycles. In 1936, the plant produced prototypes of the Cheset, on the basis of which motorcycles with engines of 250 and 350 cc were later developed.
In 1960, CZ launched the Cheset motorcycles into mass production. In the USSR, CZ experienced unprecedented success. Along with the Java, this motorcycle was a success among rockers, and the black Cheset became the dream of an entire generation.
The famous cross-country Cezet was born in 1962. The motorcycle was equipped with a 250 cc single-cylinder two-stroke engine. Cheset's finest hour lasted until the end of the 60s. Racers from the USSR, Belgium and the GDR competed on it and won championships.
How to adjust carburetor stroke
This carburetor setting gives the correct mixture during the power stroke. This setting needs to be done when:
- If you have ridden or ridden your moped and have black carbon deposits on the unscrewed spark plug;
- If you set off and the moped doesn’t pick up speed well, and when the spark plug is unscrewed, you have white carbon deposits.
The working stroke is regulated by a needle installed in the carburetor throttle valve. To do this, we need to unscrew the throttle valve nut and remove the throttle with the needle from the carburetor.
The needle has 5 grooves. When purchasing a new Alpha moped. The fixing plate is located on the middle groove.
If you have a lean mixture, white carbon deposits on the spark plug, then you need to fix the plate down one notch. Thus, we raise the needle by one notch and increase the amount of fuel entering the combustion chamber.
And vice versa. If you have an enriched mixture and black carbon deposits on the candle, then the needle needs to be lowered down.
After this procedure, we install the needle in place, assemble the carburetor and try to ride it. We look at the behavior of the moped engine after adjustment, and go for a ride.
The end result of correctly adjusting the carburetor stroke should be brown carbon deposits on the spark plug.
Checking the part
How to check the generator on a Delta moped? First you need to check the output voltage of the node. To do this, you need to disconnect the wires in place of which the control device is connected. After this, you need to start the motor and measure the output voltage. The minimum indicator is at 5 V at idle speed. Next, the operation of the switch is checked:
- The switch wires must be connected to the generator stator.
- The commutator cable is disconnected from the terminal on the primary winding.
- One pin must be connected to the motor ground.
- The second terminal is connected to the main cable of the ignition coil.
- The tester is set to the “direct current” position.
- You need to crank the engine and look at the result on a multimeter.
- The procedure is repeated again to obtain an average reading.
Alfa 110 moped wiring diagram
This abbreviation stands for Capacitor Discharge Ignition - ignition from a capacitor discharge. Sprinkle talcum powder on the inside of the tire.
Electrical diagram of Delta 50 mopeds without a tachometer The photo below shows a schematic electrical diagram of the Alfa, Delta moped and other mopeds that do not have a tachometer.
Change the oil in the gearbox with a warm engine after the first km, and then regularly after km in the following order: remove the filler and drain plugs; drain the used oil; Screw in the drain plug and fill in approximately cm3 of oil; screw in the filler plug; let the engine run for 3-5 minutes, shift gears alternately. When starting a cold engine, press the float stop 22 fig. Problem identification is done using a multimeter. Place part of one bead of the tire in the recess of the rim, use a spudger and a wrench to push the entire bead of the tire onto the rim and slide it towards the rim flange.
Brakes To adjust the front brake, a stop is installed on the brake pad disc. Check the operation of the gear shift mechanisms, clutch, and brakes. Protect the paper element from contact with oil and gasoline. Obe3obPasha Leave a comment Over the past few decades, the domestic moped manufacturer has completely left our market, and Chinese analogues and new models have taken its place. Electrical wiring for the 157QMJ engine (Simplified) or how to start the engine without a moped
general information
Consumer qualities
Buyers, first of all, are attracted not only by the fairly affordable price of mopeds of this brand, but also by:
- the ability to service the moped with your own hands;
- availability and availability of spare parts;
- ease of carrying out scheduled maintenance;
- Possibility of year-round operation.
Technical features
For convenience, technical information about the most popular moped from China is grouped into a table:
Chongqing Wonjan motorcycle China
For reference: the wiring of the Delta moped is designed for capacitor ignition. The photo below shows its schematic diagram.
Relay regulator
This is the same rectifier that converts alternating voltage to direct voltage, with a range of 13.5-14.9 V. C
.
The regulator is located under the plastic cover of the scooter at the front. It is attached to a metal backing for better heat dissipation.
The main circuits of the relay circuit are:
- The green wire is common.
- Red – output of converted and stabilized voltage within the established limits.
- White and yellow – AC input to the regulator. Due to electronics, the voltage is converted into powerful impulses. The yellow wire supplies power to a heavy load on the on-board network - headlights and instrument panel lighting.
The current for lamps is not stabilized, but is limited to acceptable values. At high generator speeds, the voltage goes beyond the operating ranges of the lamps, which leads to their burnout. The situation is very familiar to those who have encountered faulty relay regulators.
Because of one unit, you can lose all the light bulbs in a matter of seconds, so you should monitor the on-board voltage regularly.
Basic Concepts
In order to understand wiring, you need to understand a little about the types of current. A constant is one that does not change its direction and magnitude. Variable is one where the voltage and current change their value after some time, or the current flows in the opposite direction. Often direct current, as can be seen in the wiring diagram of the Alpha moped, is needed for light bulbs: headlights, turn signals, foot. There are models where the motorcycle is completely converted to direct current, but these are old models and they are quite rare.
The alternating current must be rectified somewhere, and a voltage-stabilized rectifier is designed to do this. In simple terms – a voltage regulator. Why is it needed? The generator outputs 40 V, but this amount quickly burns out the light bulbs. Therefore, the rectifier reduces this figure to 13.8 V. The Alpha has two power lines: the first is the power supply to the on-board network of the electric starter, headlights, turn signals, dimensions, relays, signal and stop. The second is the power line for the generator, ignition coil and spark plug.
Alfa 72cc moped wiring diagram with tachometer
There is alternating voltage on the white wire, which is immediately sent for rectification and stabilization. Current from the battery is supplied to the main circuits of the scooter.
Brakes To adjust the front brake, a stop is installed on the brake pad disc. Before starting operation, check the tightness of all connections; presence of oil in the gearbox and fuel in the tank; correct adjustment of gear shifting mechanisms, clutch, brakes; tire air pressure; tension of the chain and wheel spokes; operation of lighting and signal devices.
If second gear does not engage, then the free end of the cable is small. To do this, you need to disengage the clutch, simultaneously reduce the engine speed and engage second gear. Problem identification is done using a multimeter. Starting the engine Before starting, after a long break in operation, engage first gear and roll the engine back and forth two or three times, squeezing the clutch. To open it, you need to remove the decorative plastic.
You should not drive for a long time in first gear, as the engine overheats, quickly wears out and overuses fuel. When lubricating, it is necessary to remove the old grease and wash the parts in kerosene.
Chinese mopeds
Since then it has been ready to launch. It goes directly to the spark plug, where it is converted into a spark. Ignition Circuit Components The ignition system is an important element in the operation of the entire scooter. Front fork 1 - bolt; 2 — upper bridge; 3 - spring; 4 — nylon bushing; 5 — fork frame; 6 — bushing; 7 — internal pipe; 8 — cover; 9 — bearing; 10 — protective washer; 11 - nut; 12 - lock nut. This abbreviation stands for Capacitor Discharge Ignition - ignition from a capacitor discharge.
Repair the camera according to the instructions included with the first aid kit. In this case, the wiring for the Delta moped is supplemented with several elements for connection. Sound signal The purpose of the sound horn is clear to everyone. During operation, the brake pads wear out, and then the brake mechanism cannot be adjusted using the above method.
Voltage is supplied only when the ignition switch is turned on. The remaining positions close the black and white wire from the ignition module to the ground of the scooter. You should not drive for a long time in first gear, as the engine overheats, quickly wears out and overuses fuel. Repair wiring on moped Alpha
Chinese mopeds
Single platform models
Today's realities are such that you can no longer see domestic models on public roads.
- Alpha;
- Delta (DELTA);
- Dino;
- Irbis;
- Viper (VIPER);
- Zip Star;
- Leader;
- Mustang;
- Breeze;
- Dingo;
and other similar models, equipped with everything necessary for travel. These are all Delta “co-platforms” produced by the Chinese manufacturer Chongqing Wonjan motorcycle and the companies that bought a license from it.
For reference: It should be noted that Chinese technology has significantly displaced the products of domestic motorcycle manufacturers on the Russian market. This is noticeable not only in the form of finished products, but also in all kinds of components. For example, the Kovrov Motor Plant abandoned its own production of power units and installed the Lifan engine on its models.
Similarity of design
It is noteworthy that the electrical wiring of the Delta moped is similar to other models, which facilitates maintenance and increases the popularity of the vehicles. Although seemingly complex at first glance, the electrical connection diagram is quite traditional.
Note! The photo above shows the wiring diagram for a Delta moped that does not have a tachometer on the instrument panel. It is identical for all models of this manufacturer, and differs only in the control of the semi-automatic transmission (Delta Racer model).
The video in this article will provide information regarding maintenance of similar models. For products with an instrument panel containing a tachometer, we publish part of the diagram, which also has differences in the controls. In this case, the wiring for the Delta moped is supplemented with several elements for connection. The photo shows part of the electrical circuit of the Delta model with a tachometer
Adjusting the shock absorber rebound speed
The rebound of the shock absorber characterizes the speed at which the fork returns to its original position under load. The response speed of the breaker mechanism must be such that the shock absorber does not shoot out immediately and can absorb the shock from the next obstacle.
How to determine the rebound efficiency of a bicycle fork? When driving over uneven surfaces, impacts are absorbed before they hit the steering wheel - the rebound is well tuned. The shock absorber does not work on small obstacles - minor adjustments are required. And finally, an advanced case when the end call is very late.
Rebound adjustment bolt: hare - increase speed, tortoise - slow down rebound
Adjusting rebound on the fly:
- Find a road or path with uneven surfaces.
- Set the regulator to the fastest rebound.
- Accelerate, feel how hard it hits the steering wheel.
- Tighten the adjuster until the beating stops.
It's important to set up the Rebound so that the shocks don't hit the wheel, but still maintain a soft ride. If the rebound is set to the correct value but the shock behaves unpredictably, the fork travel and compression may need to be readjusted. It is recommended to adjust the front fork not immediately, but in the sequence “Preload – Compression – Rebound”
Individual selection of each parameter will improve the performance of the shock absorber and provide comfortable trips
It is recommended to adjust the front fork not immediately, but in the sequence “Preload – Compression – Rebound”. Individual selection of each parameter will improve the performance of the shock absorber and provide comfortable trips.
Depreciation
This process is carried out in the fork using a spring and damper. It’s easy to guess that when the wheel hits an obstacle, the spring compresses, leveling the impact. Well, the damper plays the opposite role. It is necessary so that after an impact there is no rebound - a sharp return of the spring to its original position. Both elements are named conventionally. That is, a spring, for example, is not always a metal spiral. Its functions can be performed by various substances, including air.
Depending on the type of spring and damper, bicycle forks are:
- Spring. In such bicycle forks, there is no damper. The main element here is a simple steel spring. Despite the simplicity of the design, riding with such a fork on uneven roads is much more comfortable than with a rigid analogue.
- Spring-elastomer. In these forks, a damper works in tandem with a steel spring. The latter is an elastomer - an element made of soft plastic. Such a damper performs its tasks well, but serves little purpose. Due to rapid wear, the elastomer only lasts for a season of more or less active driving.
- Airborne. In such forks, air acts as both a spring and a damper. The low weight of this design is its main advantage. Air shock absorbers also have disadvantages. Among them are air leakage in cold weather and lack of adjustment. Air is pumped into forks of this type using a high-pressure bicycle pump.
- Oil-air. This type of forks is considered the best. The role of the spring is played by air, and the role of damper is played by oil. Thanks to the smooth recovery of air after compression, oil flows from one section to another. Such forks are considered optimal in terms of weight and have a large number of settings.
- Oil-spring. As the name suggests, the spring element in these forks is a steel spring, and the damper is oil. Shock absorbers of this design have the greatest weight. They also have a significant advantage - excellent shock absorption and smooth running.
Generator
Owners of 50cc who are familiar with the design of the scooter will immediately understand the purpose of this device. It produces an alternating electric current that powers the moped when the engine is running. But the second main task is to charge the battery while working. That is, the battery ensures the operation of the devices when the engine is turned off, and then the generator takes on this task.
The connection is made according to the following principle. There are several wires coming from the generator. The negative tire is attached to the frame of the scooter. There is alternating voltage on the white wire, which is immediately sent for rectification and stabilization.
In the electrical circuit, the yellow wire powers the low and high beam lights. Additionally, a Hall sensor is located in the generator housing. Its task is to generate impulses to control sparking. It is not electrically connected to the generator; it is connected to a white-green and red-black wire. The sensor is connected to the CDI block.
Valuable advice
It is no secret that the insulation of the wires is made of cheap plastic and it is better to replace the insulation with rubber before it crumbles after a few rains. The two networks in Chinese motorcycles do not intersect, therefore, when disassembling the power supply of the on-board network of the electric starter, headlights, turn signals and stop, you should remember several points:
- The green wire is always ground or, as it is also called, ground.
- Pink and yellow (two yellows) come from the generator, where there is still alternating current.
- Blue comes from an impulse from a magnetic sensor.
- Black and red – battery power.
Alpha as standard has
- Electric starter.
- Electronic ignition 12V.
- Electronic tachometer on the dashboard.
- A simple diagram of the electrical equipment of an alpha moped allows you to replace failed elements with your own hands.
The source of energy in the Alpha moped is the battery. Additionally, a relay regulator is installed. The wiring is protected against voltage surges. The six-coil generator maintains voltage at any engine speed, and also ensures uninterrupted operation of the lighting and alarm systems.
Installation of additional lighting fixtures is not provided. Also, you cannot replace lamps with more powerful ones. The absence of complex connections in the electrical circuit allows even a novice to carry out repairs, which also affects the popularity of Alpha.
An electronic tachometer on the dashboard improves vehicle controllability and increases ride comfort. The low cost of Alpha leads to the fact that many factory components are not of high quality. Thus, the wiring insulation is made from cheap plastic. As practice shows, operation in the harsh Russian climate leads to the insulation cracking.
That is why many recommend replacing the factory plastic wiring with a new one with rubber insulation immediately after making the purchase. In this way you can insure yourself against various operational problems.
The problem with the Chinese Alpha motorcycle is in several things: shock absorbers, metal and wiring. The rest is replaced by the owner quickly enough (oil, gasoline, factory tires). It is the wiring that has many possible breakdowns and forces owners of Chinese mopeds to spend a lot of nerves trying to fix it. As a result, the wiring of the Alpha moped very soon begins to look like some kind of bird’s nest and you can’t do without a diagram. How to sort out tangled wires?
Read also: Lenses for xenon headlights
How to check, replace
Checking is carried out using a multimeter. This device is used in electromechanics and is sold in hardware stores. There are models without a sound signal - they do not differ in appearance, and therefore you have to ask the sellers. Without a sound signal or “ringing” it is inconvenient to constantly look at the panel, but it is possible to carry out the check. Sequentially, starting from the battery to the ignition circuit and generator, all the wiring of the Alpha moped is checked. The multimeter has two probes: red and black. Red ones need to touch the plus, and black ones need to touch the mass or ground.
Thus, the wiring of the Alpha moped is a complex and vulnerable place for this vehicle. However, this is exactly what will help toughen the motorcycle owner in the face of eternal breakdowns and make him a real ace in the electricity of his motorcycle.
About adjusting the ignition of a 4t scooter
Knowing how to set up the ignition of a 4T scooter on your own, you can save time and money, since you will not need to contact a motorcycle repair shop. The procedure is simple, even if you have no experience it takes a little time, but you will need to be patient. Regardless of the type of ignition, an important role is played by how the marks are set.
Correct adjustment is a guarantee of stable and smooth engine operation even in cold weather conditions. Often, in used vehicles, the ignition is broken: this can happen for various reasons, ranging from elementary shaking when driving to improper handling of the equipment. In order for the scooter not to let you down and for you to be able to start it whenever you want, you will need to learn how to carry out this procedure yourself. To do this, you will need to have several keys that allow you to remove the valve cover if the engine is four-stroke.
Setting up the Vision scooter ignition system
If the ignition is knocked out, this may be the reason the scooter does not work. Restoring it is not difficult if you understand how it is done.
You need to start adjusting by setting the timing belt in the desired position. As a rule, there are marks on it for this purpose; they are set at the factory. The cylinder must be installed at dead center. The mark may be indicated by the letter T or another symbol. Now make sure that the mark installed on the rotor matches the mark found on the magneto. To do this, you need to gently press the kickstarter. The rotor can also be turned using your hands, but this is more difficult.
There are also marks on the timing star in the form of holes or dots; they must be set so that the largest hole is on top and located exactly in the center. The remaining points should be below and located horizontally opposite each other. Setting the ignition advance makes sense if you want to increase the engine's power a little and make it start easily. The adjustment will help make the spark plug produce a spark earlier than the standard time. That is, a spark will appear even before the piston reaches the dead center. In cold weather, a moped configured in this way will start better.
Read more: How to pump up a PGU on Kraz
In order to configure the scooter in this way, you will need to repeat the procedure described above. However, there is a difference: the marks should not coincide clearly, and not reach each other by about 0.5 cm. The main difficulty lies in connecting the marks.
Overheat.
Plug Type: Extremely white insulator with small black flecks and premature electrode erosion.
Consequences: loss of scooter power at high speed or under load.
Probable causes: the spark plug is not screwed in enough; The scooter's engine cooling system is not working properly; ignition of the scooter too early; The thermal range is incorrectly selected - the candle is too “hot”.
Remedy: check the torque of the scooter's spark plug; operation of the scooter engine cooling system; adjust the ignition timing; select the correct spark plug heat rating.
Type of spark plug: melted and burned central and grounding electrodes (or one of the electrodes) of the scooter spark plug; bubbling insulator with metal deposits on it.
Consequences: significant loss of scooter engine power; ignition interruptions. Continued use of such spark plugs may cause serious damage to the scooter engine.
Probable causes: thermal overload; significant overheating of spark plug parts due to glow ignition - combustion begins before a proper ignition spark appears; use of low-quality fuel; burning out of the remaining air-fuel mixture in the combustion chamber due to an incorrectly adjusted fuel system of the scooter or the ignition timing of the scooter; The thermal range is incorrectly selected - the spark plug is too “hot”.
Remedy: check the scooter engine, ignition system and fuel system, as well as the quality of the working mixture and the ignition timing of the scooter. Install new spark plugs with the correct heat rating.
Ignition circuit components
The ignition system is an important element in the operation of the entire scooter. The formation of a spark and a precisely calculated impulse that ignites the fuel depend on it.
The scooter ignition circuit includes many components that are responsible for a specific job.
CDI ignition module
The first item in the list is the CDI module. This abbreviation stands for Capacitor Discharge Ignition - ignition from a capacitor discharge.
The switch module is made in a non-separable box, so if it fails, it is replaced with a new one. 5 wires are connected to it, distributed throughout the entire ignition circuit of the scooter.
Features of electrical equipment
Unlike domestic motorcycles and mopeds, Alfa already in its basic version has a number of advantages:
- Electronic 12V ignition;
- Electric starter;
- Electronic tachometer on the instrument panel.
Energy sources
The moped uses a circuit with a battery power source. The manufacturer does not recommend its operation without a battery, and the wiring diagram for the Alpha moped is additionally equipped with a relay regulator (see also the wiring diagram for UAZ 31512).
The six-coil generator also copes well with its duties:
- Maintains voltage throughout the entire engine speed range;
- Ensures that the headlights and headlights work while driving.
Control and management bodies
The presence of informative devices makes the operation of the moped quite simple, which attracts many buyers. Moreover, which is typical, a fairly large number of beginners decide to buy a two-wheeled vehicle, choosing Alpha mopeds.
The equally simple operation of the moped also contributes to its popularity. All the main functions of the vehicle are displayed on the steering wheel, and their status is displayed on the instrument panel:
- Speed mode;
- Engine speed;
- Battery charge state;
- Daily and total mileage (see also Ural motorcycle wiring diagram).
Chinese mopeds
Single platform models
Today's realities are such that you can no longer see domestic models on public roads.
Times are changing, and the weakened banner of freedom from the hands of the domestic “Carpathians” and “Verkhovyna” was picked up by Chinese mopeds of the following series:
Let us state a fact: products from China have become widespread in the domestic motorcycle market.
- Alpha;
- Delta (DELTA);
- Dino;
- Irbis;
- Viper (VIPER);
- Zip Star;
- Leader;
- Mustang;
- Breeze;
- Dingo;
And other similar models, equipped with everything necessary for travel. These are all Delta “co-platforms” produced by the Chinese manufacturer Chongqing Wonjan motorcycle and the companies that bought a license from it.
For reference: It should be noted that Chinese technology has significantly displaced the products of domestic motorcycle manufacturers on the Russian market. This is noticeable not only in the form of finished products, but also in all kinds of components. For example, the Kovrov Motor Plant abandoned its own production of power units and installed the Lifan engine on its models.
Similarity of design
It is noteworthy that the electrical wiring of the Delta moped is similar to other models, which facilitates maintenance and increases the popularity of the vehicles.
Although seemingly complex at first glance, the electrical connection diagram is quite traditional.
Note! The photo above shows the wiring diagram for a Delta moped that does not have a tachometer on the instrument panel. It is identical for all models of this manufacturer, and differs only in the control of the semi-automatic transmission (Delta Racer model).
The photo shows part of the electrical circuit of the Delta model with a tachometer
Conclusion
Don't be afraid of the ignition system. It’s easy to set up, the main thing is to check the entire circuit; much more often the switch fails, there is no gasoline or the spark plug needs to be replaced. Only after making sure that there are no physical malfunctions should you start setting up the ignition. If it is set correctly, you will hear and notice, as the engine will start easily and run smoothly.
The stability and reliability of starting the engine of an Alpha moped depends on several factors, including correctly configured ignition. The absence of problems due to an incorrectly configured unit guarantees ease of driving the vehicle at any time of the year - it will start at every kickstart without any extra effort. You will need to adjust the ignition only if the moped was purchased very cheaply and needs to be restored to working condition.
The electrical equipment system (and, accordingly, spark supply) consists of the following elements:
- power supply;
- additional devices;
- other nodes that consume energy.
According to statements, there is no need to adjust the ignition after purchasing a new vehicle, but in reality everything is somewhat different - the conditions of transportation and storage impose their own problems. Most likely, you will have to eliminate the consequences of incorrect ignition settings - in Alpha vehicles it is set on the principle of too much advance. In addition, disassembling the engine inevitably entails the need to adjust the ignition without fail.
You just need to follow the instructions for disassembling and reassembling the moped to achieve an optimal result that will last until the next time the engine is dismantled for maintenance or replacement. Uncertain operation of the engine while driving causes not only discomfort, but also troubles in the form of an increased accident risk on a busy highway, where a sudden stop is extremely dangerous.
Wiring work
The large black wire connects: 2 yellow, green and red, where direct current flows. Red goes into the ignition switch, from which by turning the key you can close the system and make it work. On the reverse side, the harness goes to the console, where it is connected to the switches. If voltage has been lost, then you should look at the operation of this harness - does the voltage go out from the ignition switch into this black harness.
The second line serves to power the battery (black-red), pulse from the magnetic sensor (blue-white) and has ground (green). There is a lot of voltage going to the battery, and therefore you can only touch the wires with the engine off. If the question arises about how to connect the wiring on an Alpha moped if there are problems with this line, then you should pay attention to the armored wire - the large black wire that goes to the spark plug from the ignition coil. And a rather dangerous symptom allows you to suspect a break in the black-yellow wire: if the moped does not stall, but will work until the gas runs out. This wire turns yellow in the middle and goes to the ignition coil.