Attention, in most cases the internal diameter of the faceplate is less than necessary and needs to be improved. A boring of approximately 1 mm is required. You should refrain from purchasing if it is not possible to make the required modifications under your conditions.
Attention, most of these washers have cosmetic defects such as leaks, leaks, and cavities that do not affect performance and reliability.
Also, often the technological holes may not perfectly match your equipment, so local adjustment may be required.
Why is it worth ordering spare parts from us?
If you have already selected a suitable option, simply fill out the online form on the website, and if you can’t make a choice, call our consultants. Depending on the nature of the breakdown, we will help you decide on the purchase of rare spare parts for the Izh, Jupiter and Planet motorcycles. All specified components come with a quality guarantee. You will return your vehicle to working order with minimal investment of time and money.
The advantages of working with us are the extensive experience of our specialists in selecting components for Soviet motorcycles, the availability of even rare samples and the supply of only original and high-quality spare parts from reliable manufacturers.
Setting up a Czech speedometer
Hi all! I'll tell you about such an outlandish thing as setting the speedometer.
The speedometer for the project was taken from the Czech company PAL and was installed on Java 634-638. He was satisfied with the design and size. Moreover, its counting step is the same as the Izhevsk one - both speedometers count a kilometer on the odometer after 1000 revolutions of the cable. But the speedometer readings...
We have the following initial data: at 1000 rpm (rotation speed of the cable), the speedometer should show 60 km/h.
What to spin? We have in our arsenal a screwdriver (550 rpm), a drill (2700 rpm) and a drill (5000-32000 rpm). We tilt the drill to the side, especially since it turns in the other direction. From a screwdriver the speedometer should show ~33 km/h, and from a drill ~162 km/h.
Test measurement. Izhevsk native speedometer (new Soviet, from the 5th series of IZhs with daily mileage) - 33 km/h from a screwdriver, from a drill it hit the limiter - it went beyond 160, about 180-185 km/h showed. IZHEVODA, THINK ABOUT THESE NUMBERS!!! He lies wildly.
PAL Czech - 12 km/h from a screwdriver, 135 km/h from a drill.
Well, we all know that the Java drives the speedometer from the secondary shaft, while the Izh drives the speedometer from the front wheel, hence the whole error. It just won't work...
Well, this is a fixable matter. The stiffness of the return spring in the speedometer is responsible for adjusting the speedometer readings (but not the odometer). By changing its rigidity we will adjust the readings...
I think everyone is familiar with the analysis of a speedometer. The setup itself took about 4-5 hours of constant fitting, checking, and tinkering. It’s a fun activity, I’ll tell you... But there is still a result - now my speedometer is an order of magnitude more accurate than the Izhevsky one - from a screwdriver we have 33 km/h, and from a drill 158 km/h. Well, an error of 2-3% is a solid indicator even for foreign-made speedometers!
Now you will say, my dear friend, that “it’s easier to buy a new one,” “are you sure that he’s not lying,” “just install the Izhevsk one and don’t worry.” No, it's not easier. As you can see from the test, even the Izhevsk pi....shows extra speed))) But I believe in numbers and calculations more. So I can say with 97% confidence that he’s not lying! I won’t put Izhevsk, firstly, he is terrible, huge, and he is also a big liar, as I already wrote above.
The PAL speedometer is not a remake, a pure original Czech Republic with a rolled-up odometer. I reeled it in myself. We don’t need someone else’s mileage here, even though it was only 1524 km. While I was setting it up, I covered 65 km))).
Thank you to everyone who has mastered this dry technical text. Maybe someone will find my numbers useful)
I didn't take pictures of the process, sorry. There was no time for a camera)
Tags
- Java speedometer on Izh
- speedometer setting
- correction of speedometer readings
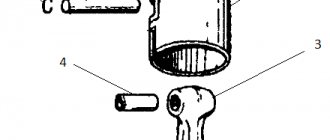
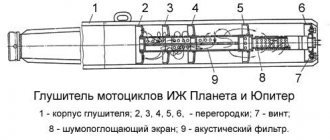
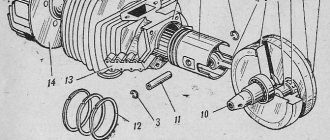
Photo report: Replacing the connecting rod bushing “Izh-Planet”, “Ant”
I don’t understand these designers who put plain bearings in the upper head of the connecting rod (meaning 2T engines in which it is impossible to lubricate the upper head of the connecting rod under pressure). For what? This engine unit already gets the full brunt of high temperatures, lack of lubrication, and significant loads; under such conditions, the rolling bearing quickly fails. There is a long-proven solution that consists in installing a rolling bearing (cage), but no... So the “lucky” owners of “sovietcycles” have to take the rap for the technical mistakes of the manufacturer.
I think there is no point in showing in detail how the bushing is changed on all models of motorcycles, so I will show you the whole process on the crankshaft from the Ant scooter.
So, as we see, the bushing of this connecting rod was harshly “knocked off”, so whether you like it or not, you will have to change it.
The working surface, to put it mildly, is far from ideal.
To press out the old bushing we will need: a long pin or bolt with a nut, several washers, any bushing or piece of tube whose outer diameter is slightly smaller than the inner diameter of the connecting rod head, another bushing whose inner diameter is slightly larger than the outer diameter of the bushing itself.
The 12 head, which easily passes through the connecting rod, worked well for me as a bushing for pressing out. We pass the bolt through the head, then through the connecting rod, on the other side we put another bushing, put on the washer and screw on the nut. I came up with something like this design.
Tighten the nut.
As you can see, the process has begun.
A couple of minutes of work and voila, the bushing is removed.
Now the hardest part is installation. The most difficult part of installation is ensuring maximum tension in the mating of the two bushings. You must try to make the tension as large as possible, otherwise the bushing may turn in the connecting rod head and then all is lost.
To ensure the necessary tension, the joint of the bushing must be filed, then try to install it, see how the bushing “behaves”; if you cut a lot, the bushing will fit into the head very easily, which is not acceptable. If you cut a little, the bushing will be deformed when pressed.
I won’t tell you the exact numbers when filing a joint, I do everything by eye, sometimes the required tension can be achieved only the second or third time, so I buy several bushings at once so as not to have to go to the store again. Sometimes I came across bushings on sale that there was no need to saw off - they fit into the connecting rod with a very good fit, but this is rare, usually you have to saw off.
I file the joint with a regular hacksaw. I had to cut twice, first one pass, then I lightly pressed the sleeve with pliers so that the joints would meet and sawed again.
After filing the joint, using exactly the same principle, using a bolt and washers, we press the bushing into place; when pressing the bushing, try to position the joint towards the lower head of the connecting rod.
The bushing turned out to be slightly wider than the connecting rod, so during pressing it rested against the washer. To press it a little on the other side, I put the bushing in and pressed it a little so that it came out equally on both sides.
We use needle files to saw through the window for lubrication.
We take a sliding reamer and slowly begin to calibrate the hole little by little until the piston pin, lubricated with engine oil, moves into place with the force of a finger.
Izhevsk Fork: myths and reality
Izhevskaya fork…
Many say that this miracle has been dead since birth, and there are even myths and legends about those who saw IZH with a fully working plug)))
I didn’t take pictures of the process of restoring and tuning the fork, honestly I didn’t have time for that. I’ll describe the process in detail, and I’m only attaching photos of the final result (some changes are clearly visible in them). I thought I’d get it done faster. Yeah, right now... The reanimation of the fork ate up all three of my weekends...
I had three forks available. Different years, different condition. Looking ahead, I’ll say that even with three forks there weren’t enough spare parts...
Day 1. I started by gutting the forks. Two were with straight stays, and two were with bent support pipes. The disassembly was fun) One of the forks was obviously filled with salidol instead of oil (well, the consistency is accurate), the others clearly suffered from a lack of oil. After disassembling all the forks, I realized that none of them were assembled correctly. On one there were no lower guide bushings at all, on the other the shock absorber cups were bent (don’t ask, I’m tormented by guesses)…
I chose more or less living supporting pipes (for restoration), sliding pipes, springs, shock absorbers, and washed all this first in gasoline, then in solvent. It was necessary to make new lower guide bushings and cups (which are textolite in stock). I selected blanks for them according to size, drew up drawings and took them to the turner. The bushings were sharpened from ShKh13 (for those not familiar with metal, bearing steel), and the cups were made from special blue polyurethane (a relative of polyurethane, not very distant).
Day 2. Support pipes. Bringing fear and horror to all Izhevods) What is the main reason for the “snotty” seals? That's right, lifted carriers. So I spent the whole day restoring them. First, on a grinder (a polishing machine, I usually polish knives on it) they began to remove all the scratches. I started with a sanding belt grit of 240. Then 600-800-1500-2000-3000. And at the finish, a felt circle on the grinder and GOI paste #4.
Why do oil seals leak on almost new forks? Yes, because the quality of pipe polishing from the factory leaves much to be desired. When compared, the factory quality of polishing hardly reaches the level of cleanliness.” Felt was shoved over the seals, and even soaked in oil?!? Felt itself is also a dust collector, but together with oil we get very rough sandpaper right above the seals. Why do we need it? Apart from IZh, I have never seen such a seal assembly on any other fork (maybe there is, but that’s not the point).
I gutted the new oil seal assemblies, threw out the felt, and pressed a third oil seal in its place, only upside down. All three oil seals have shortened springs. Now we have three oil seals on each feather)))
Well, further assembly is basically according to the manual. By the way, yes, I finally sandblasted and sanded the traverses and clip-ons for testing. Needs tweaking, but overall not bad. Motul Fork oil expert 10w was poured into the fork, as before into the shock absorber. Would you say this is too much for Izh? And for me it’s just right)
What do we do next? Either the tail, saddle and wings, or engine overhaul, I haven’t decided yet in what order we will work)
Good luck to all)
Tags
- Front suspension
- Izh fork
- improvements to the Izhevsk fork
Piston ringing, what is it really, detonation or pin, bushing, piston?
We are talking about IZH Planet 5. The fact is that for many, as in my case, when replacing a piston with a new one, a ringing metallic sound appears at the top of the head, whether it goes away or not... I had 3 piston ones and I filled everything with 92 liter gasoline, it was everywhere metallic ringing at the top of the head...
But how can this be logical?, when: - the piston is tight in the sleeve - the pin is driven hot into the piston - the pin sits tightly in the bushing - the kv has no play, like the connecting rod
We need to find out the reason for this phenomenon and get down to business!
As it turned out, when measuring the stock and fan combustion chambers, the following was revealed: Stock head = 56-57ml Fan head = 46-47ml
From this comes the following compression ratio according to the formula 340cc divided by the combustion chamber +1 = approximately: Stock head = 7.2 Fan head = 8.2 - 8.5
The gasket under the cylinder head is 1 mm, that is, an increase in the combustion chamber, in turn, a decrease in the compression ratio. 1 mm of height displaces 4-5 ml of liquid; displacement of the piston sphere 3 ml (3.5) of liquid when summing up is rounded to about 7-8 ml
I have a cylinder without a gasket and the combustion chamber is 40 ml, a total of 9.5 compression ratio, when using 92 gasoline, the ringing increases with increasing speed.
And so in my case we have a piston diameter of 72, a piston stroke of 85 = 340cc \ 40ml +1 = using these data you can calculate how much you need to trim the head or put a gasket to adjust the compression ratio to the desired gasoline: - head with gasket = 8.2 - head without gasket = 9.5 (provided that the piston protrudes from the cylinder by 1mm in height) - a head that is cut to 1mm = 4-5 ml of liquid, displacement by the piston is 3-4 ml, that is = 7-8 ml, everyone can calculate further calculations for themselves.
If you believe data from the Internet, then the ratio of the compression ratio to the octane number of gasoline: 92 - up to 10.5 95 - 10-12.5 98 - 12-14.5
Why did I do all this?, but to fight DETONATION !!! After all, the ringing at the top of the head is always confused with the ringing of a finger, piston, skirt and everything else.
Solutions: - reconfigure the ignition, the higher the octane number, the longer the mixture burns, which means, for example, for 92 you need 1.5mm before TDC, 95 - 2.5mm before TDC. You can select experimentally from 1 to 3 mm. - enrich the mixture, a lean mixture leads to detonation. — try to fill in gasoline with a different octane number. — try with head gaskets and trimming the head until detonation is eliminated.
Ignoring such a ringing can lead, as in my case, to the melting of the piston; nevertheless, pistons are no longer made from the best alloys.