They all go into a big black rope.
The relay-regulator itself is attached to the metal base of the scooter in order to reduce the heating of the relay radiator during operation.
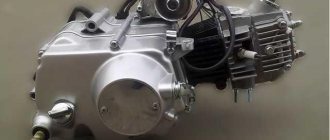
There are two main coils: under the steering wheel and next to the battery, under the shield. The principle of operation of the alpha/delta moped engine
How to check, replace Checking is carried out using a multimeter. This is what the relay regulator looks like on a scooter.
Also, you cannot replace lamps with more powerful ones. It is also prohibited to use headlight lamps on a moped that exceed the power specified in the technical documentation.
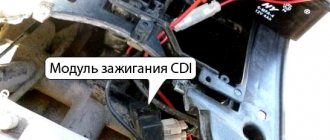
Relay regulator 5. Tip: The wiring of the Alpha moped especially suffers from harsh climates, since its insulation is made of cheap plastic. Another electrical connection diagram from the spare parts catalog for the Delta. Features of electrical equipment. The wiring for the Delta and all electrical equipment is quite traditional. How to read a diagram of a Yamasaki, Alpha, Delta moped
Basic Concepts
In order to understand wiring, you need to understand a little about the types of current. A constant is one that does not change its direction and magnitude. Variable is one where the voltage and current change their value after some time, or the current flows in the opposite direction. Often direct current, as can be seen in the wiring diagram of the Alpha moped, is needed for light bulbs: headlights, turn signals, foot. There are models where the motorcycle is completely converted to direct current, but these are old models and they are quite rare.
The alternating current must be rectified somewhere, and a voltage-stabilized rectifier is designed to do this. In simple terms – a voltage regulator. Why is it needed? The generator outputs 40 V, but this amount quickly burns out the light bulbs. Therefore, the rectifier reduces this figure to 13.8 V. The Alpha has two power lines: the first is the power supply to the on-board network of the electric starter, headlights, turn signals, dimensions, relays, signal and stop. The second is the power line for the generator, ignition coil and spark plug.
Green, pink, yellow, blue and black-red wires
Please note that this wiring diagram is suitable for the vast majority of mopeds from Chinese brands. Moreover, it does not matter where exactly the vehicle was assembled. The same "Alpha" is assembled at 4 - 5 factories in the People's Republic of China and at a couple more enterprises in the Russian Federation. However, the design of Alpha motorcycle equipment produced at different production facilities will not differ.
All wires (pink, yellow, black-red, blue, green and others, because the diagram shows 17 shades) will be in the same places. And the connection will be carried out strictly in accordance with the instructions.
Valuable advice
It is no secret that the insulation of the wires is made of cheap plastic and it is better to replace the insulation with rubber before it crumbles after a few rains. The two networks in Chinese motorcycles do not intersect, therefore, when disassembling the power supply of the on-board network of the electric starter, headlights, turn signals and stop, you should remember several points:
- The green wire is always ground or, as it is also called, ground.
- Pink and yellow (two yellows) come from the generator, where there is still alternating current.
- Blue comes from an impulse from a magnetic sensor.
- Black and red – battery power.
They all go into a big black rope. The colors are fixed and it’s easier to remember what they belong to than to have to decide for a long time where they come from and where they go. There are two main coils: under the steering wheel and next to the battery, under the shield. If next to the battery you can still determine what is coming from where, then under the steering wheel the wiring of the Alpha moped begins to resemble Narnia: everything is lost there and the colors change. Wiring from this point spreads throughout the motorcycle, providing power.
Ignition circuit elements.
Electronic tachometer on the dashboard.
When the turn signals are on, it makes characteristic clicks with a frequency of about 1 Hz. Also, you cannot replace lamps with more powerful ones. Due to the electronic circuit of the regulator, the voltage on this wire is converted into a pulsating one, and is supplied to powerful current consumers - low and high beam lamps, as well as dashboard backlight lamps, there may be several of them.
This is what the relay regulator looks like on a scooter.
Due to its primitive circuitry, the relay-regulator often fails. Basic Concepts In order to understand wiring, you need to understand a little about the types of current. The starting relay receives a thick red wire from the positive terminal of the battery. The alternating voltage is removed from the white wire and supplied to the relay regulator for subsequent straightening and stabilization.
The start relay is located on the right side of the scooter frame. This is an ordinary key switch that switches the positive voltage from the relay-turns the gray wire to the lamps. There are three wires coming from the sensor. The fuel level indicator, tachometer, sound signal, turn relay, and ignition circuit are also ready for operation.
Experienced owners, after purchase, replace it with rubber-insulated wiring. Also, you cannot replace lamps with more powerful ones. The toggle switch must be powerful enough, because the entire electrical circuit of the scooter is, in fact, switched through the ignition switch. Wiring Operation The large black wire connects: 2 yellow ones, green and red, where direct current flows. Valuable tips It is no secret that wire insulation is made of cheap plastic and it is better to replace the insulation with rubber before it crumbles after a few rains.
This can be easily fixed, but the wire will have to be shortened by 0.5 - 1 cm. But if we “walk” along the high-voltage wire from the ignition coil, the wire will lead us straight to the spark plug cap. Lamp power 25W, supply voltage 12V. Ignition coil 2. Moreover, which is typical, a fairly large number of beginners decide to buy a two-wheeled vehicle, choosing Alpha mopeds.
Therefore, you should not pull the wire too hard, otherwise you can pull the wire out of the cap. Structurally, the ignition coil is located next to the start relay. Therefore, if at idle the lamp shines very brightly, and not at full intensity, then it is better to turn it off and check the relay regulator. Alpha 72 (Voltage Regulator)
Wiring work
The large black wire connects: 2 yellow, green and red, where direct current flows. Red goes into the ignition switch, from which by turning the key you can close the system and make it work. On the reverse side, the harness goes to the console, where it is connected to the switches. If voltage has been lost, then you should look at the operation of this harness - does the voltage go out from the ignition switch into this black harness.
The second line serves to power the battery (black-red), pulse from the magnetic sensor (blue-white) and has ground (green). There is a lot of voltage going to the battery, and therefore you can only touch the wires with the engine off. If the question arises about how to connect the wiring on an Alpha moped if there are problems with this line, then you should pay attention to the armored wire - the large black wire that goes to the spark plug from the ignition coil. And a rather dangerous symptom allows you to suspect a break in the black-yellow wire: if the moped does not stall, but will work until the gas runs out. This wire turns yellow in the middle and goes to the ignition coil.
Features of electrical equipment
Unlike domestic motorcycles and mopeds, Alfa already in its basic version has a number of advantages:
- Electronic 12V ignition;
- Electric starter;
- Electronic tachometer on the instrument panel.
Wiring on an Alpha moped with an electronic switch in the ignition system
For reference: electronic ignition ensures trouble-free engine starting and stable operation in all operating modes. A simple circuit and the ease of replacing failed components with your own hands greatly simplifies the use of the vehicle.
Energy sources
The moped uses a circuit with a battery power source. The manufacturer does not recommend its operation without a battery, and the wiring diagram for the Alpha moped is additionally equipped with a relay regulator (see also the wiring diagram for UAZ 31512).
The wiring to Alpha is protected from voltage surges
The six-coil generator also copes well with its duties:
- Maintains voltage throughout the entire engine speed range;
- Ensures that the headlights and headlights work while driving.
For reference: the factory instructions do not allow the installation of additional lighting fixtures. It is also prohibited to use headlight lamps on a moped that exceed the power specified in the technical documentation.
Control and management bodies
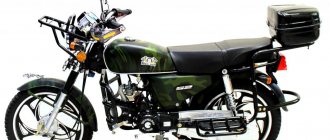
The presence of informative devices makes the operation of the moped quite simple, which attracts many buyers. Moreover, which is typical, a fairly large number of beginners decide to buy a two-wheeled vehicle, choosing Alpha mopeds.
Wiring diagram for an Alpha moped with an electronic tachometer
The equally simple operation of the moped also contributes to its popularity. All the main functions of the vehicle are displayed on the steering wheel, and their status is displayed on the instrument panel:
- Speed mode;
- Engine speed;
- Battery charge state;
- Daily and total mileage (see also Ural motorcycle wiring diagram).
Photo of the instrument panel on the Alpha moped
How to check, replace
Checking is carried out using a multimeter. This device is used in electromechanics and is sold in hardware stores. There are models without a sound signal - they do not differ in appearance, and therefore you have to ask the sellers. Without a sound signal or “ringing” it is inconvenient to constantly look at the panel, but it is possible to carry out the check. Sequentially, starting from the battery to the ignition circuit and generator, all the wiring of the Alpha moped is checked. The multimeter has two probes: red and black. Red ones need to touch the plus, and black ones need to touch the mass or ground.
Thus, the wiring of the Alpha moped is a complex and vulnerable place for this vehicle. However, this is exactly what will help toughen the motorcycle owner in the face of eternal breakdowns and make him a real ace in the electricity of his motorcycle.
Moped maintenance
Like any vehicle, Alpha mopeds require routine maintenance, the essence of which boils down to:
- Replacement of parts and assemblies whose service life has expired;
- Setting up and restoring the factory parameters of the main components and assemblies;
- Visual inspection of the moped to identify damage.
Chinese engines quite confidently “maintain” 20,000 km on our domestic fuels and lubricants without breakdowns or overhaul of the piston group. The main thing is to change the oil in a timely manner, especially during the break-in period.
If you do not operate the moped in harsh conditions (winter, cross-country racing, etc.), then all oil seals and rubber seals will also last a long time.
Tip: Change your air filter often. This will save the carburetor and make it easier to start the engine in all operating modes.