What bearings are in the Izh Planet 5 engine?
Reader A. Ustinov from Kemerovo asks what bearings and seals are used on the IZH-Planet and IZH-Jupiter motorcycles, and asks for their numbers.
The crankshaft of the Planet motorcycle (all models) rests on two 2505K roller bearings and one 304 ball bearing (on the left). Its trunnions are sealed with an oil seal designated IZH-49 sb. 1-30-1 with cover (right) and seal IZH-49 sb. 1-40-3 (left).
The Jupiter crankshaft (also of all models) is mounted on three 205 ball bearings and on 304 ball bearings (on the left). The oil seals are as follows: right - IZH-49 sb 1-30-3 with a cover, left - IZH-Yu sb. 1-50 and one oil seal IZH-Yu sb. 1-14-1 in each of the two crank chamber covers.
The secondary shaft of the gearbox for both Planeta and Jupiter is supported by roller bearing 192906 K1M and sealed with an IZH-49 sb oil seal. 1-28-1.
The primary shaft of all motorcycles on the left rests on a 204 ball bearing, and on the right - on a bronze bushing inside the secondary shaft
The outer clutch drum of the IZH Jupiter and Planet-3 motorcycles rotates in bearing 104, and the shaft of the starting mechanism (kick starter) is sealed in the left crankcase cover with an IZH-Yu2 sb oil seal. 1-52 (only for “Jupiters”).
For all these motorcycles, the front fork in the steering column of the frame is supported by two thrust ball bearings 778706.
The wheel bearings of all these same motorcycles (two per wheel) are ball bearings 203 (or 60203), and the rear wheel sprocket bearing is ball bearings - 205. To protect wheel bearings from dust, simple felt seals were used until 1965, and then special rubber seals were used - IZH-56 Sat 4-27.
The axis of the pendulum fork is sealed with two felt seals IZH-56. 2-90 and two rubber ones with a spring - IZH-56 sb. 2-99.
The front fork stays also have two oil seals each: felt - IZH-49. 3-23 and rubber - IZH-P sb. 3-7
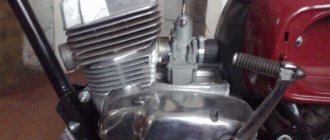
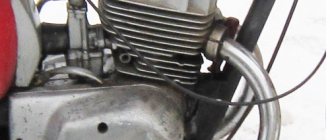
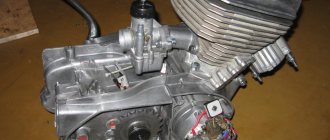
Engine of the Planet[#2] Elimination of axial play of the input shaft.
Hi all!
In today’s article I will share my personal experience on how to overcome one of the reasons for the eternal departure of the 2nd gear on Izh Planet 5. Let’s begin.
I would like to immediately insert a certain preface: this method does not guarantee a 100% cure for the problem of the 2nd gear sticking out, because there is another reason why the 2nd gear can lose its brains, this reason lies in the worm shaft, or rather in its wear, and If the method I outlined did not help you, or you did not have any play in the input shaft at all, but the 2nd one still flies out, you should know that the problem is in the worm shaft, and not in the input shaft. There are grooves in the worm shaft that tend to wear out under the influence of crappy oil, such as M8B, for example, everyone’s favorite and fucking “Autool”, and so, when the groove of the second gear has a lot of wear, it starts to fly out of the groove like this the so-called groove, which actually runs along this very groove, as a result of this the speed also flies out, what do you think, basically? That's right, 2nd. But we won’t talk about this problem today, because it is not the main one, but the main one is considered to be the problem of the axial play of the input shaft. This is what we will talk about today.
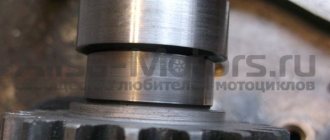
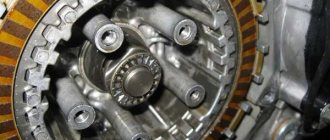
In order to solve the problem of input shaft play, we will need to remove the clutch basket cover, after draining all the oil from the gearbox. After this, we unscrew all the bolts around the perimeter of the clutch cover, take a mallet and, with soft blows of the rubber tip, try to move the cover along with the gasket; if everything goes smoothly, the cover will be removed without problems, and with it the gasket. Next, you need to remove the clutch basket, it is removed together with the motor transmission gear and the motor chain. To do this, we open the hex washer on the motor transmission and unscrew the bolt, honestly, I don’t remember whether it’s a left or right thread, look in the book, it’s definitely all there. Next, unscrew the 5 bolts with the clutch springs, remove the bolts and the clutch pressure plate. Next, take out all the clutch discs and unscrew the clutch basket nut (LEFT THREAD!). Then we remove the entire motor transmission assembly, that is, together with the MP gear, MP chain and basket. Behind the clutch basket we see a certain “bar” that sits on 5 bolts for, of course, your “favorite” screwdriver. unscrew the bolts and remove the “bar” CAUTION, under it there are adjusting washers, each motorcycle has them differently, I personally had so many of them: 2 for the input shaft and 2 for the intermediate shaft. But again, you may have more/less, it all depends on the adjustment. Next, when we have removed all the washers and the “bar” holding these same washers in place, we inspect it for bents, bends, etc. and so on. IT SHOULD BE PERFECTLY Smooth, WITHOUT BENDS, ETC. If everything is in order, we move on. We see the bearing, inside of which the very input shaft of the gearbox is installed, we take a screwdriver and our favorite tool, which all Soviet motorcycles are so afraid of, and we begin the ritual. We place a screwdriver in the outer race of the bearing, and with light blows of a hammer we knock it into place until the play of the input shaft in it stops. By the way, yes, before that we pull the shaft with our hand and see if there is any play. There should be a slight play, according to the book it is 0.2 mm. not 1 mm, and especially not 1.5 or 2 mm, as it was for me. So, we put the screwdriver as shown in the photo and with soft blows we hammer it behind the OUTER race, into place this same bearing. As soon as the backlash is gone, we put all our miracle tools aside.
Now we look at the gap, as shown in the photo below, I repeat, it is on the basis of this gap that they determine at the factory how many washers to put there, but over time the gap grows, and the thickness of the washers is no longer enough to hold the input shaft bearing in place, the shaft begins to “run” and “dancing” begins from the 2nd.
We take a caliper and measure this gap with a depth gauge.
As you can see from the photo, for me it was exactly 2.5 mm.
Now we do the following. We take the washers that we had in the box (in my case it’s 2 washers) and measure their thickness.
As you can see from the photo, each is 0.75 mm, that’s 1.5 mm, but we need 2.5. That is, now we do the following, we run to the store or to Uncle Vasya, and take from him a set of adjusting washers for the Planet gearbox, standardly there are two washers we need, about the same thickness of 0.75, but the thickness may differ! We take one washer from the kit, then we take all 3 of our washers and measure their total thickness, I got 2.25, and that’s what we need.
Why 2.25 and not 2.5? The gap is 2.5 mm, not 2.25 you might say, but there is one BUT. But the BUT is that we need a small gap, remember above I talked about the geometry of the “bar”? So, it will bend, precisely because there is no provided free clearance for the shaft, only because of this, why this happens, I think everyone has already understood for themselves, it will take a long time to explain.
Next, we turn the engine over (if it is removed) to the generator side, and put all these washers in the same bearing gap, DON’T FORGET ABOUT THE INTERMEDIATE SHAFT WASHERS, in my case there were 2 of them. If the engine is not removed from the motorcycle, then put the 3rd washer It will be problematic, it will fall out, take lithol, smear the washers together, thereby “gluing” them together, and place them in the bearing gap. Next, we carefully close the whole thing with a “bar” and fasten the “bar” with five bolts, I recommend lubricating the bolts with a red fastener before installation, before disassembling it all, I was extremely surprised that not the basket, not the motor gear, not this bar was not screwed on normally, everything was unscrewed by hand, vibrations of the Planet...Feature, what to do with it...
In your case, that's all. We take the basket, the gear, basically everything that was removed, and put it back together in reverse order. We drive and enjoy the normal 2nd gear.
In my case, there are still some problems with this whole mechanism, but they will be discussed in other, specially dedicated articles.
That’s all, people, I wrote this whole thing while sleepy, if there’s anything wrong, please correct me, don’t judge harshly;)
Smooth roads, warm snow, and patience to everyone, it will come in handy for us motorcyclists, especially in winter;) Good luck!
Tags
- Planet 5
- Planet
- Izh Planet 5
- Izh luxury
- luxury
- Izh Planet 5 Lux
- Orion
- checkpoint
- Checkpoint Planet
- Primary shaft
- Box
- Izh box
Five random motorcycles:
Assembling the crankcase halves
We degrease the connector of the halves, knock out the guide bushings a little so that they extend 5-6 mm above the plane. Depending on your desire, we assemble the checkpoint. Personally, I assemble the gearbox only after assembling the engine, it’s more convenient for me.
We apply any automotive sealant to the connector, install the second half of the crankcase, tap it with a mallet, install the gearbox cover and tighten the crankcase with bolts.
We do not pull the bolts anyhow, but strictly according to Feng Shui: we pull about a third of the force, first the middle crosswise, then the periphery, and gradually increasing the force over several circles, we tighten the bolts as much as is sufficient.
Five random articles about motorcycles:
Using a chain cover from a motorcycle Voskhod on Java 634
Covers for Java On some Java-634 motorcycles (from the first batches of delivery), chain covers fail quite quickly, and it is still difficult to purchase new ones. Instead, you can use covers from the Voskhod motorcycle to protect the chain. Alteration of the casing: 1— frame; 2—plate; 3— spacer sleeve; 4 - old part of the casing; 5 - extension To secure them. it is necessary to make two extensions 5 (see figure) and two spacer bushings 3, through which we connect the halves of the casing. We make extensions using a mandrel. We weld (or solder) frames 1 to them, which we first cut off from the old casings using a thin chisel. It is advisable to seal all connections on the casing by soldering or another method. For more reliable fastening of the covers, you should make new clamps or strengthen the old ones by welding metal plates to them. On my motorcycle, after a run of 5,000 kilometers, the covers have their original appearance.A. KORNILOV 606230, Gorky region.
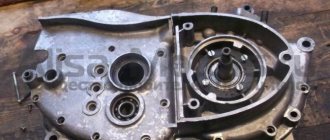
Installation of bearings and seals
We install a retaining ring in the left half of the crankcase.
Depending on the model of the main oil seal, we install a spacer sleeve in the mounting hole of the main bearing, or, if the oil seal was initially wide (there are some), we heat the crankcase and, on the inside of the crankcase, place the oil seal until it stops against the retaining ring.
My engine had a regular narrow oil seal, so I put in a bushing.
Using a mandrel, install the main oil seal into the preheated crankcase.
Quickly, before the crankcase cools down, place the oil guide washer on the oil seal. The oil guide washer has a saucer-shaped profile. We place it on the oil seal so that the concave side faces us, and the curved side faces the clutch basket.
While the crankcase has not cooled down, we press the outer race of the main bearing into it using a mandrel.
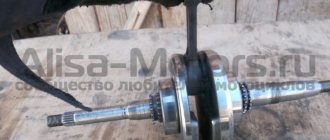
If you are going to replace the main bearings with new ones, don’t be lazy: find a sheet of iron 7-8 mm thick, cut a wedge in it for the connecting rod, pass the sheet of iron between the cheeks of the crankshaft and use a mandrel to drive the main bearing onto the axle.
This way you will protect yourself from damage to the crankshaft. The main bearing has a very high interference and fits into the axle with a very large force. It is not uncommon for people to simply knock out the axle (the axle on the planetary crankshaft is pressed into the cheek) inside the crankshaft, but they were never able to put the bearing on.
Native made in USSR 2505 KM
Bearings IZH-7.107 “Planet-5”. Catalog 2002
Attention: The electronic auto parts catalog is intended for reference purposes! Our company only sells those products that have prices listed.
| Number | 203 |
| Name | Bearing GOST8338-75 |
| Quantity per "for IZH 7.107 (Planet 5); for IZH 7.107-01 (Planet 5-0" | 2 |
| OKPO class | 46 Rolling bearings |
| Number | 203 |
| Name | Bearing GOST8338-75 |
| Quantity per "for IZH 7.107 (Planet 5); for IZH 7.107-01 (Planet 5-0" | 2 |
| OKPO class | 46 Rolling bearings |
Part number on drawing: 1
Bearing GOST8338-75
Serial number: 203 Quantity per model: 2
| Number | 304 |
| Name | Radial ball bearing (d=20, D=52, B=15) |
| Quantity per "for IZH 7.107 (Planet 5); for IZH 7.107-01 (Planet 5-0" | 1 |
| OKPO class | 46 Rolling bearings |
Motorcycle repair IZH JUPITER 5
Izh Jupiter 5 repair
Cylinder-piston group. Cylinder head
The group number is indicated on the plane of the horizontal edge of the head from below.
Pistons and cylinders. The amount of wear is determined by measuring the diameters of the pistons and cylinders. If the gap between the piston and cylinder is greater than 0.3. 0.4 mm, they need to be repaired. Repair is also necessary if the cylinders have deep marks and burrs on the working surface. Engine repair Izh Jupiter 5,
as a rule, it is produced:
Crankshaft bearings Izh Planet (2505KM 2 pieces metal cage)
Characteristics of bearing 2505 / N2205
| Parameter | Designation | Meaning | Units |
| Bearing inner diameter | d | 25 | mm |
| Bearing outer diameter | D | 52 | mm |
| Bearing width | IN | 18 | mm |
Please note, these are new bearings. They are declared to be manufactured in Russia, although in fact it is impossible to verify the manufacturer of the components, since often modern Russian factories are only assembly sites.
Bearings
(use in motorcycles IZH-Yu, IZH-Yu2, IZH-Yu3, IZH-Yu5) On the website of the Tehnoprofsnab Company, in the section “Bearings (application)”, you will find information about the applicability of bearings in motorcycles, brands such as: IZH- Yu, IZH-Yu2, IZH-Yu3, IZH-Yu5. The information is presented in the form of tables, which indicate: Bearing designation, Bearing type, Bearing installation location, Quantity (in this unit). The brand of equipment is indicated at the top of the table. Follow the links below with a description of the model you are interested in.
Installation of the cylinder-piston group
It is not advisable to remove the gearbox cover until the sealant has dried; there is no need to rush in this matter. It’s better not to rush things and install the cylinder while the sealant dries.
Add some motor oil:
- into the upper head of the connecting rod
- lower connecting rod head
- into both oil channels of the crank chamber
To improve lubrication, it is advisable to drill holes in the piston bosses. But you don’t have to drill - it depends on your desire.
Install the piston pin retaining ring into the boss. Before installation, it is advisable to bend the locking ring a little and be sure to check how it fits after installation:
- If the retaining ring dangles, straighten it or replace it with a new one.
- If the retaining ring is not completely flat, replace it with a new one.