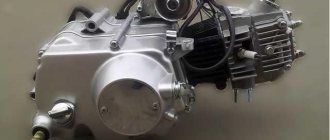
Engine repair IZH Planet 5
The IZH Planet 5 motorcycle, created in 1987 by the Izhevsk plant, is still popular among motorcyclists.
This is a very high-quality and reliable bike, characterized by durability, simplicity and affordability. Disassembling the IZH Planet 5 engine is quite simple even for amateurs. The design of the motorcycle itself does not contain complex elements. Like its counterpart, Jupiter 5, IZH Planet 5, whose engine performance is not much inferior to its “brother,” has a strict classic style. However, it has a number of advantages over Jupiter, the main of which are:
However, there is also a big disadvantage . The Planet's crankshaft is much more massive, so it operates at lower speeds, which makes it less powerful. Although the design of the IZH Planet 5 engine is practically no different from the Jupiter one. True, breakdowns occur no less frequently, so if you switched from one motorcycle to another, there should not be any special problems with operation and maintenance.
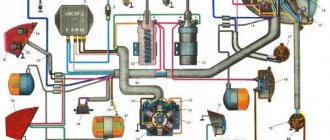
IZH Planet 5 engine diagram
| 1 - spark plug; | 2 - cylinder head; |
| 3 - cylinder: | 4 - piston; |
| 5 - piston ring; | 6 - piston pin: |
| 7 - crankcase; | 8 — channel for lubrication of the main bearing; |
| 9 — roller bearing; | 10 — left oil seal; P - left cover; |
| 12 — motor chain; | 13 - ball bearing; |
| 14 — crankshaft sprocket: | 15 — outer drum of the clutch; 16 — clutch disc; |
| 17 - inner drum: | 18 — pressure disk; |
| 19 — spring; | 20 - shaped nut; |
| 21 - pusher; | |
| 22 — ball bearing; | 23 — trigger gear; |
| 24 — gear shift lever; | 25 — trigger lever: |
| 26 — trigger shaft; | 27 — gear shift shaft; |
| 28 — trigger sector; | 29 - spring: |
| 30, 31, 32. 39, 40, 42 — gearbox gears; | 33 — gear shift fork; |
| 34 — emphasis; | 35 — gear shift shaft; |
| 36 — gearbox cover; | 37 — installation sleeve; |
| 38 — right cover; | |
| 41 - intermediate shaft; | 43 - ball bearing; |
| 44 - roller bearing: | 45 - secondary shaft; |
| 46 - input shaft: | 47 — clutch adjusting screw: |
| 48 - worm ball; | 49 — clutch worm; |
| 50 — cap of the secondary shaft nut; | 51 - oil seal; |
| 52 — asterisk; | 53 - generator; |
| 54 — right oil seal; | 55 — roller bearing; |
| 56 - gasket; | 57 - crankshaft; |
| 58 - bypass channel; | 59 — exhaust window; |
| 60 - decompressor |
With a power of 22 horsepower, the engine capacity of the IZH Planet 5 is 346 cc . This is a very good indicator for such a small volume. For normal use, a speed of 120 km/h is sufficient. True, the dynamics of the Planet are slightly worse than Jupiter, and unnecessary vibrations are disturbing on the road. However, not everyone is satisfied with such indicators, so many are thinking about how to increase the engine power of the IZH Planet 5.
In general, the bike has standard electrical equipment, an air cooling system, a multi-disc clutch and a 4-speed gearbox. The engine itself operates in two strokes. An oil-gasoline mixture is used for refueling. As you can see, the performance of IZH Planet 5, whose engine characteristics are not much different from Jupiter, can allow it to act as a “workhorse”.
menex.ru
Retro is a rather abstract art-historical term used to describe various categories of antique things that have some cultural and/or material value, and, as a rule, are rarely encountered in modern everyday life with its deliberate practicality and the desire to get rid of “extra” details .
I wanted to try to restore an old motorcycle. A 1973 IZH Planeta 3 was at hand. The motorcycle was in very good condition, i.e. all parts were in place and the engine was working. So the restoration came down to painting. For this purpose it was disassembled, prepared and painted.
The process of such recovery brought a lot of emotions and a lot of good mood. Although there were those who, looking at this process, could not understand why bother with such “junk”.
But despite the sidelong glances, Planet 3 booms pleasantly with its pleasant-to-the-ear exhaust and brings a lot of pleasure to weekend drives.
Start
The motorcycle was disassembled and brought to the garage.
In the garage, each spare part was processed: the old paint was removed, puttyed, and primed.
Separately, I would like to talk about the repair of the wings. Since IZ Planet has one cylinder, vibration does its job. So the wings had cracks in some places. Due to the lack of a good welding machine at hand, these cracks were repaired using tin plating. The cracks were cleaned to bare metal, etched with soldering acid, and tinned with tin using a powerful soldering iron. Tin cans were soldered on the inside to give rigidity.
In general, for tinning, it is better to use a gas torch, heat the soldering area with it, and fuse the tin rod onto the metal. And then reheat it well and rub the tin with a dry cloth. This way it will cover the metal with an even, thin layer.
Wheels
The wheels were in good condition, but the chrome was rusty and they were dirty. I had to lift them to the fifth floor and bathe them in a warm bath))) The chrome was cleaned of rust with foil. Which carried out a fine abrasive, there was no other way.
Frame
The frame was welded shut because it had burst in several places. Washed and removed from old paint. Some elements had to be boiled in boiling water, since dirt and oil are very difficult to wash off. And the priming began.
Motorcycle painting
After priming, parts of the motorcycle were painted. I took the paint from Stepanych, he is one of the best at selecting paint, and secondly, he conducted a mini master class on paint and painting technologies with automotive enamels. He gave me the treasured jars of blue and fawn paints and a jar of varnish. He also gave me a can of thinner and gave instructions to dilute it only with it and not with any solvents.
Technology of painting old motorcycle and auto equipment
Before painting IL, I watched a bunch of videos and read various tips. But no matter how you adopt someone else’s experience, you still need to master everything with your own hands. After reading the literature about painting and from personal experience, I formed my own technology in my head.
Before painting, you need to prepare everything; preparatory work is the most time-consuming and labor-intensive. To paint a gas tank on a motorcycle, most sites advise: “Yes, it’s as easy as shelling pears, we turn the bulges into holes with a hammer, and cover the holes with putty. We prime and paint.” Indeed, what could be simpler, use a hammer to make a hole all over the gas tank, apply a centimeter layer of putty, which will then fall off. As it turned out, everything was a little more complicated. In order for the quality of the paint to really be at its best, you need to do things a little differently, be it the gas tank or any other part.
First you need to remove all the paint, since the old paint was mostly nitro paint. And under the new paint, she can behave unpredictably - take on a fur coat. Therefore, the old paint must be removed. This is a very labor-intensive process; here you can try heating it and then scraping it off with a spatula. Wire brushes are only effective on rust and loose paint; they are not effective on tough paint. Since in order to remove paint, you need to process the surface longer, it, in turn, heats up, the paint melts and smears. Also, the metal from the brush transfers to the metal of the processed part, which subsequently leads to corrosion and swelling of fresh paint.
Foam abrasive wheels, which you can buy on Aliexpress, work very well for removing paint. Since in hardware stores. I didn't find any such products.
All irregularities need to be straightened, bulges need to be upset, and dents need to be “pulled out” with a reverse hammer. You need to straighten the surface so smoothly that you use as little polyester putty as possible. Instead, the unevenness could be filled with a “thicker” layer of epoxy primer and treated with sandpaper. Since the primer is like a “shell” that completely envelops the part, it will stick to the part much stronger than putty.
Straightening is a labor-intensive process that some people don’t bother with, but the further quality and service life of the part being painted depends on it.
Irregularities on the putty are treated with sandpaper P360 - 500. Then we degrease, it is necessary to degrease after each operation, this stage in the repair cannot be neglected, since a non-degreased surface after painting will manifest itself as some kind of hemorrhoids.
For irregularities that could not be removed with a straightening tool. And there will be some, since old equipment is often in poor condition, and sometimes it is necessary to apply patches, which leave welded seams. You need to apply putty and sand it with sandpaper, first P180 and then P360. When all irregularities are removed from the surface, it is matted with P500-600 sandpaper. Afterwards we apply acrylic primer. Once dry, sand it with P400-600 sandpaper. Degrease and apply paint. You can use the paint that suits your taste and price. But the main thing is also not to “cheap”, so that all the work does not go down the drain.
The paint system can be different, sometimes there is regular (cheap) paint without varnish, and sometimes with varnish. These paints are very different. Those without varnish are more durable in themselves. And those that are varnished, the paint itself without varnish is not durable, it must be covered with varnish. This makes the surface to be painted durable and better in color than one without varnish.
Sandpaper can be ordered from Aliexpress, where it is much cheaper than in our auto stores.
Key points when painting:
- Rikhtov, you need to align all the parts as best as possible at the initial stage;
- be sure to remove the old paint and clean the surface to bare metal;
- the first layer is an epoxy primer, putty is applied only to it; putty cannot be applied to metal;
- before the paint layer, you need acrylic primer;
- Each layer must be degreased, only after degreasing apply a new layer;
- the putty layer should be as small as possible;
- follow the technology recommended by the paint manufacturer;
- For paint and primers, use only thinner; solvent is prohibited.
Assembly
After the varnish had dried, the motorcycle was assembled and began to please the eye with its appearance and pleasant sound from the exhaust pipe. The saddle was reupholstered with new dermontin, but just as hard as it was from the factory))).
After recovery
A video about how a motorcycle is not running on a dead 12V battery for a year, thanks to the fact that the motorcycle is powered by 6V. It starts well even from a “dead” battery.
Assembly and disassembly
Before you think about power, you need to understand motorcycle maintenance. Often, chasing speed and appearance, owners forget about the basic rules for operating their pet. Due to negligence, and not only, various types of breakdowns occur. You can troubleshoot problems yourself. Considering that disassembling and assembling the IZH Planet 5 engine is very simple, they can be done at home. However, it is recommended that you consult the factory-produced motorcycle operation and maintenance book.
There are cases when the maintenance book was lost long ago, or was not received at all upon purchase. In this case, here is a simple procedure for disassembling the engine:
It should be noted that the cleaner your workplace is, the better the repair will be done, since dirt that gets inside the engine can make it difficult to operate and even cause another breakdown. Don't be too lazy to wash the engine well before work .
Write down or mark the progress of your actions. This will help with assembly. Group the parts in the order they are disassembled and assemble them by location. The more organized the disassembly process is, the faster you will assemble the IZH Planet 5 engine, the technical characteristics of which will once again delight you.
Tuning the Izh motorcycle. We are converting Izh to a 12V ignition system.
Despite the fact that it is already the 21st century, there are still many motorcycles left with a 6-volt ignition system. A weak headlight makes driving in the dark completely unsafe. Spare parts for the 6-volt ignition system have not been produced for a long time. Finding a replacement for a failed generator or charge relay is almost impossible, although the motorcycle itself can still serve its owner well. To switch to 12 volts, you need to prepare the following things: a 12V battery, a 12V generator, a 12V charge relay, a piece of wiring from the generator to the charge relay from an Izh motorcycle with a 12-volt ignition system, ignition coils also need 12V, all the lights and turn relays also need to be replaced with 12 V.
It is also necessary to make an adapter plate.
After all the necessary accessories are available, we begin dismantling the old generator and charge relay. We also change the ignition coils to 12 V. We install the adapter plate into the mounting points of the old generator on the right crankcase cover. We install a new anchor on the shaft. We attach the new generator to the adapter plate.
We install the new charge relay in place of the old one; if necessary, we alter the points at which the relay is attached to the motorcycle frame under the seat.
We connect the charge relay to the generator using a bundle of existing wires. We carefully isolate everything. We leave the wires from the contacts from the old wiring; we connect them to the negatives of the ignition coils. We connect a new battery, check the spark on the spark plugs by opening the contacts. We set the ignition timing as usual and start! We measure the voltage in the motorcycle network with a tester. With a correctly assembled circuit, the voltage in a running engine should be about 14 - 14.5V.
Review of IZH Planet Sport 350 (1978)
I had the opportunity to serve in the army with guys who rode motorcycles a lot, some in the villages, some in the city. Before that, I NEVER imagined that I would be interested in motorcycles. But it happened, and after demobilization I began to think seriously about my father’s 1978 Izh Planet Sport, which had been sitting in a friend’s garage for several years. I really loved the Japanese and British motifs that permeated the Triumph Bonneville and Kawasaki W800/650, since the Planet Sport looked very much like Japanese motorcycles of the 60s and 70s.
After studying at a driving school, I began to study it. The knocking piston pin ordered the replacement of the piston with rings and itself, the rear shock absorbers with springs and the rear chamber were replaced. The motorcycle was no longer from the series that was equipped with Mikuni carburetors and imported electrics; there was no separate lubrication system. The car had a Soviet K-62 carburetor and wheels with thick spokes. The carburetor also asked for a replacement, and the K-62 had not been made for a long time, so the K-65 with the same characteristics came to the rescue. By the way, Sports with Mikuni had 4 hp. more powerful due to a larger diffuser; my Planet has a power of 28 hp.
At the end of winter they began to tinker, try, change. A problem emerged: the motorcycle started relatively easily, but responded to the application of gas with a loss of traction. And after it was turned off, it flatly refused to start again. This was my first time dealing with a motorcycle, so I dealt with knowledgeable people. As a result, suspicions remained about the capacitor, high-voltage wire and contacts. The contacts were removed, inspected, cleaned, the gap was set - all the same. They changed the wire and a miracle happened. He started working!
Then we found out that he is afraid of motorcycle equipment - it gets worse if you are wearing a helmet and motorcycle jeans. Then I got used to it, really.
I heard that Minsk often starts in the opposite direction, getting 4 reverse gears and not one forward
I myself tried to move back twice on my own - apparently, I didn’t press the kick starter all the way. By the way, the latter almost never hits his leg, but my father told me how he got it until he turned on the ignition. It feels like the clutch is slipping a little.
The effort on the controls, of course, cannot be compared with my BM Classic 200: the clutch is tight, the gears are also not so easy to engage. But the seating position is very comfortable, the rear brake, and the gear ratios are chosen more rationally, except, perhaps, for first gear. At idle I would like to roll more slowly, the VM at first just crawls if necessary. I’m used to using the front brake on the VM to a greater extent, unless a radical reduction in speed is required, but on the Planet there is a drum in front, which does not slow down much, plus it is not connected to the brake light switch, so the rear brake always helps. The tank seemed narrow to me, so it was difficult to wrap my knees around it. But the motorcycle is very easy to lean in turns, although I don’t race. Initially there was one rectangular mirror at the end of the left handle, it became loose from strong vibrations and lived its own life, so I replaced it with two round ones on high stands. The turn signals are very bright, but the headlamp is already too dim.
The motorcycle lacks a side stand so that it can be quickly positioned. Plus, the Izhmash designers thought that it would be great to make the center stand hook on the right and the handle on the left, but I had already gotten used to lifting the motorcycle while standing to the right of it. A two-stroke engine causes a lot of trouble, so I got myself a measuring jar for oil. I use Lukoil for 2-stroke engines 1:50. The Sport instructions require MS-20 oil in a ratio of 1:25, but this oil is very rare for the average person, so Lukoil works quite well. There is a little smoke in the exhaust, but when the oil is overfilled (more than 1:50), the engine runs very poorly, is unstable, and throws the spark plug. It feels very good when there is too much oil.
Recently I rode it out onto a highway, and when turning onto a dirt road, the front wheel rolled across the sand and the motorcycle fell over. Fortunately, I was driving in first gear at idle, so I caught it on my right leg and held on. Lack of experience is taking its toll.
A warmed-up engine starts from the first or second pumping, but not everything is smooth with idle speed. I adjusted the idle speed with the screw on the carb, drove it - the engine in neutral roared like mad. I turn it down, drive a little, and when it stops, it’s already choking, trying to stall. I don’t understand what’s the matter.
Friends, a huge hello to everyone! I decided to create a short story about the restoration of the IZH-56 engine. I have never devoted a post to one engine, but then an interesting unit turned up, and the owner of the engine himself gave me the idea. The hero of the occasion is the IZH 56 engine from 1959. The story began when a stranger to me wrote with an offer to repair his engine, as I understand it, he found me just from the posts on this site)) (by the way, this is not the first time). It was a surprise to me that this engine would come to me from Vladivostok! Almost across the country! All the details below))) Everyone is welcome - you are welcome! A little background from the owner’s words: “The motorcycle sat motionless for 37 years, stored in a 5-foot container converted into a barn with a pile of household belongings, old chairs, clothes, carpets, etc. The original speedometer had a white cloth, and the mileage on it was a ridiculous 3,000 kopecks. I found the motor already rusty in a cobweb, transported it to the city in parts, and dismantled it on the spot. There weren’t even phones at that time to take photos. I brought it to the city in 2001 or 2002 in disassembled form, and that’s how it is stored to this day, now a frame on wheels, without attachments. The first owner, according to the registration certificate, bought it new in the village of Razdolnoye, Primorsky Territory, and sold it to my grandfather in 1961.” Now it's time to revive it! To be honest, I try to stay away from 56 engines, especially if I need to restore them to their original condition. When you need an original, you start dancing with a tambourine to find the necessary original spare parts. And the beauty is that the 56s, compared to Planet-1 and beyond, have a completely different gearbox, clutch drum, and cylinder. I had experience with 2 engines and each of them frankly created problems for me. This one was no exception. To be honest, I didn’t want to take the engine initially, because I had an idea of what awaited me, but the man was sure that everything would work out and for some reason, without any doubt, he sent the engine and even offered to pay for the repairs right away. But everything needs to be done in a timely manner, as they said in the film 12 Chairs, “money in the morning, chairs in the evening,” but in our way, “engine in the morning, money in the evening.” The long-awaited traveler has arrived! It was immediately clear that we would have to tinker with the sink. Frankly, this is my least favorite activity. And the black spots of dirt and oil between the cylinder ribs simply anticipated that there would be a little bloodshed here.
Started disassembling. As usual, I started from the top. Nagarische! M8, no less
Behind the gearbox cover, surprisingly, everything was more or less clean and tidy.
And here are the sores. The tooth was broken off - the chain was not tensioned. Or maybe it fell away from old age... Well, that’s not the point.
Score-free cylinder! But the piston is already 000, which means they changed it. The boring is 100%, but anyway, then we will measure the cylinder to an ellipse. Practice shows that in 9 out of 10 cases it is necessary to bore.
I looked... and left the cylinder for a “snack”. It’s still the last thing to be installed, so we’ll have time to wash it.
But this is tough! Apparently, there was no way to tighten the kick-starter clamp and things went from bad to worse. This is what I really saw for the first time. Well, of course, I drove for so many years in my native sector!
Let's see what's in the clutch. I was so carried away that I forgot to drain the oil. Well, like butter... it was almost margarine, and it had such a specific smell of stagnant butter that it couldn’t be confused with anything. It flowed out slowly... The motor chain was coming off. A home-made gasket means you’ve already climbed. Well, it would be too surprising if it had never been opened.
But the clutch drum was already in terrible condition. He traveled for so long, experienced so much that he went bald...
Textolite wheels... well, everything is clear))) But the iron ones! Surprisingly, they showed no signs of overheating and were still almost like new in thickness.
And here is one of the features of the engine. The fit on the input shaft of the drum itself is completely different here than in later models. Because of this, I had to look for the same drum in good condition. Surprisingly, an almost new one was found, somewhere in the Stavropol Territory. Spare parts are coming from all over the country)
A completely standard situation - the ratchet spring has come off, plus an incomprehensible washer on the crankshaft. And the most surprising thing is the speedometer drive. It was he who caused trouble later!
The screws could not be unscrewed with a screwdriver... As soon as one screw was loosened with an impact screwdriver, the whole structure fell apart. Here you go! Holy shit... I've been looking for this part with a cable for 2 months. There must also be an oil seal in the crankcase itself and the cable must somehow be inserted. I found an ancient catalog, looked, more or less understood, but I didn’t find the cuff, and even more so the cable, but this is not so important yet.
When removing the piston, I saw that the pin on one side had no hole. I’ve also seen these on Java, but never on IZH! Maybe he made it himself... Previously, there was a lathe in every village - they did almost everything.
The oil glued the shafts together so much that they couldn’t be removed so easily! So the fun began. The whole thing looked as if it had been dipped in boiling resin and left there. One plus - nothing rusted. A huge disadvantage is hemorrhoids during disassembly and cleaning.
Honestly, I somehow got hold of this property! But the oil did not want to leak out and stuck everywhere.
Well, the latch antenna is broken. It’s interesting, but the input shaft bearing was cracked, and it’s unclear how it worked. And the halves were glued together... with what? The hardest floor paint. This is worse than sealant, somehow I scraped this miracle out of all the cracks (well, it’s clear before, there were no sealants, but we did what we could, and specifically we could do it...)
And the paint is really strong! My grandmother in the village has had the floor of her hut painted with this paint, probably since the time of Old Man Makhno, and it’s still like new, but there’s nothing to say here - forever!
We begin cleaning the parts and at the same time perform troubleshooting. And no matter how sad it was, half of the parts were no longer suitable. Time and exploitation have taken their toll. I will inform the campaign about all replaced spare parts.
Having sweated quite a bit, we washed the crankcase. First I washed it with the harshest chemicals, then with hot water from a car wash. Then again with chemicals and then washed it off with gasoline. Well, then he dried it and wiped everything dry. And then once again I had to rinse everything out of the washing machine with a powerful stream of gasoline. In the photo, the white coating is before the last procedure with gasoline. And at the end, we blow everything with compressed air and blow out absolutely all the dirt. Chic, shine, beauty.
Let's start assembly! Finally. And then small incidents began. On the left half the tension under the bearing race was still normal, but on the right half it was already loose. For reliability, I placed the left clip on a fastener, but I had to work with the right clip. In general, I had to give it to an argonist and a turner to weld a little onto the crankcase and process it. As a result, the clip was also sealed onto the retainer. Everything is ready here.
That's it, halved. The bearings must be lubricated with grease to ensure a supply of lubricant for the first time of operation. The crankcase is tightened - the crankshaft is spinning, this is good.
But some people really don’t like these bolts, because they forget to insert them before installing the gearbox cover. And when it comes time to install the engine, this loss is simply like a blow below the belt. In order not to forget them, when pulling the halves together, I always insert them and tighten them - at the same time, the crankcases are pressed as much as possible and evenly. If we don’t tighten them, it turns out that we will only press the part where the crankshaft is located.
I also additionally tighten the screws that are already installed on the gearbox cover. This is also for maximum contraction. It will not be worse.
Well, at the end we remove the excess sealant so that everything looks neat.
Now it’s the checkpoint’s turn. And here it was “fun” too.
The thrust plate was from P5, but cut to the desired shape. The old plate was curved and the metal had already become very soft - there was no point in it. We also installed this speedometer drive.
After installing the bearings, the problem again is that the input shaft is not installed.
There was a feeling that there was an extra 2 hundred square meters of diameter on the seat. And if you remember the beginning of the post, I mentioned there that the bearing race on the input shaft was cracked. Cause? - too much tension. To check, I took another shaft from the 56th Izha. I measured the diameter of the seat and compared it with the dimensions in the book. I won't bother you with numbers. The standard for this connection is the maximum tension is 0.01 mm, and both shafts had an extra 2 hundred parts. Well, we go to the next garage and finish it on the machine. And what is it all for? The input shaft should be installed almost effortlessly into the bearing, so that when adjusting the gaps in the gearbox, you can just feel these gaps.
Well, that’s it, after adjusting the gaps on each shaft, we perform a test installation. Oh, yes, we replaced the worn-out shift shaft assembly and gear lock, since the upper part of the old one had been broken off (but it’s not easy here either! The old one had to be drilled out, since the regular Planetovsky one was of a different design, but what’s it worth to us...) .
Collected. Tags combined. 3rd and 4th gears engaged perfectly, but 1st and 2nd didn’t want to at all. Hm…
We assemble the gearbox on the cover and check all the switching. As a result, I had to replace the follower shaft and the thrust washer under it, since the old washer did not match the thickness of the other shaft. It seems that the last or the year before the 56th engine also blew my mind with the gearbox.
Control assembly. By the way, all gaps are adjustable with a gasket under the gearbox cover! If you adjust without it, the gaps will increase during final installation.
Well, everything is fine and switches smoothly. The checkpoint is ready. Now it's the clutch's turn. The old kick starter shaft was a corpse. In the bins I found the 56th shaft assembled with a sector and a spring. On the old shaft, even the spring lost its elasticity.
That's all. The clutch is assembled! The motor chain of Latvia, otherwise the Kirov ones began to quickly stretch. We can finish this with the left side. Then install the lid and you're done.
The rotor had to be replaced (I also rummaged through the bins). The old man was so beaten up that just looking at him made him feel sad and melancholy.
The right side is almost ready. The screws, holes for the tracing shaft and guides, plus the bearing plug are carefully sealed with sealant to prevent oil leakage. Now it will always be clean here, and there will be nothing except lubrication of the chain. The generator also had to be installed from stock, since the old one had breaks in the windings. We will adjust the ignition when the cylinder is installed.
The engine side covers have been slightly improved. Fine sandpaper, water, GOI paste and a polishing wheel did the job. Unfortunately, it was not possible to make a perfectly flat surface, since the quality of the casting left much to be desired, after all, it was 1959. For example, covers of 3,4,5 models are much better amenable to polishing.
And here the piston group is ready. The cylinder was bored out for 1 repair. It turned out that the cylinder had to be installed not original. On the original cylinder, the purge channel covers simply fell apart when they were removed, since the alloy turned out to be very fragile over time. And no one sells such caps separately... I had to look for a cylinder. Practice has shown that it is better not to remove these covers at all, so as not to create problems.
Having selected the required piston pin, adjusted the gap at the junction of the piston rings, we install the whole thing in its place. An individual gasket was cut out for the cylinder, since store-bought gaskets most often do not suit the thickness, and the necessary sides were also cut out for the purge channels.
Installing the cylinder head...
Was anyone confused by the P5 head? This is temporary to set the ignition according to the dial indicator. Since on the original head the spark plug holes are located at an angle on the left and right sides, the accuracy of the adjustment is no longer the same and you can make a mistake when tuning. And here everything will be exactly right. They often ask why I don’t install BSZ. I don’t see any point in putting it on the planet, since the tuned cam ignition and lubricated eccentric have never failed. On my Planet 4, having set up the ignition in 2009, it has never failed so far, so I don’t see the point in redoing it, since the owner needs the original.
Well, the engine is almost ready. Looks much better than it was.
There was a carburetor left... More precisely, 2. Of everything sent, it was necessary to assemble one. At first glance, it was clear that everything here was already so tired that nothing would come together.
But after disassembling, cleaning and purging, the best spare parts were selected, which were still in good condition.
The carburetor is assembled. Yes! Finish line! Although, this is only 98% readiness. The remaining 2 percent is a test run and carburetor adjustment.
This can sum up the results of the repair of this miracle. This is what rebuilding a 61 year old engine looks like. Of course, we had to change almost the entire interior, but few motorcycle engines will survive to that age. But with the parts installed, it will last a long time, and maybe it will even outlive us. Some people are skeptical about new-made parts, BUT, the connecting rods are now of good quality and run no worse than the factory ones, the pistons just need to be chosen with the correct geometry and bored to the required clearance. Also, careful running-in and the use of good 2t oil will extend the life of the engine.
Also, a word to the haters of these engines, who, having watched the video “why don’t I repair scoops” by some scooter repairman, will say - at the moment this engine will not conquer high speeds and set records at Bonneville. It's completely different here! It’s not for nothing that people restore Soviet equipment, more often to preserve good memories of childhood, adolescence, youth, or simply to preserve it as a family item. And all this comparison with other foreign cars is nonsense. It is necessary to compare with something similar and not the engine of 59 and a modern engine.
All in all! Let's be happy for the old man's second life)) Let him now travel further and please his owner.
Thank you all, see you again.
Frame from scratch
The frame chosen for the project was quite interesting. Visually complete stock. I'm sorry, there is no photo of the frame in its original form...
Frame from the Sh-53 motorcycle (motorcycle for road racing based on the planet). I got the frame with a pendulum. I think the pendulum should be given special attention.
The pendulum is on two roller bearings, 50 mm longer than the standard one. And no collective farm! There are no “bunch of washers”, welding seams a la “Uncle Vasya’s neighbor welded for a bottle.” Everything is done on bushings, the extension is done quite competently, the pendulum is reinforced with additional gussets. It is likely that the pendulum is factory-made. It's very neatly executed. The rear engine is mounted on the same axis as the pendulum. 3 mm thick plates with holes (and not on the frame and with slots, as in the factory version. How to install the engine assembled with the gearbox, you ask? But more on that later...)
Well, the rest is completely stock.
The overcooking of the frame was planned to be global, so the frame was cut and welded on a slipway so that there would be no distortion and violation of the basic geometry. It was immediately decided to switch to mono suspension. For these purposes, the pendulum was welded, a thrust frame and a mount for the lower end of the shock absorber were welded. The front end of the shock absorber is mounted in the lower part of the upper frame tube. The rear part of the frame has been shortened and reconfigured; glove compartments are not in the plans. Let me make a reservation right away: the angle of the seat tubes has not been changed. No raised tail!
All unnecessary fastenings were removed from the frame (under the side trailer, fastening the central step, rear fender, fastening the pump and the second ignition coil, etc.). All factory seams, upon closer inspection, turned out to be of good quality, but without proper processing, which I did without thinking. Double-seam welding of the frame, thorough cleaning...
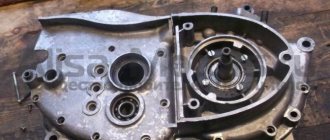
Installation of bearings and seals
We install a retaining ring in the left half of the crankcase.
Depending on the model of the main oil seal, we install a spacer sleeve in the mounting hole of the main bearing, or, if the oil seal was initially wide (there are some), we heat the crankcase and, on the inside of the crankcase, place the oil seal until it stops against the retaining ring.
My engine had a regular narrow oil seal, so I put in a bushing.
Using a mandrel, install the main oil seal into the preheated crankcase.
Quickly, before the crankcase cools down, place the oil guide washer on the oil seal. The oil guide washer has a saucer-shaped profile. We place it on the oil seal so that the concave side faces us, and the curved side faces the clutch basket.
While the crankcase has not cooled down, we press the outer race of the main bearing into it using a mandrel.
If you are going to replace the main bearings with new ones, don’t be lazy: find a sheet of iron 7-8 mm thick, cut a wedge in it for the connecting rod, pass the sheet of iron between the cheeks of the crankshaft and use a mandrel to drive the main bearing onto the axle.
This way you will protect yourself from damage to the crankshaft. The main bearing has a very high interference and fits into the axle with a very large force. It is not uncommon for people to simply knock out the axle (the axle on the planetary crankshaft is pressed into the cheek) inside the crankshaft, but they were never able to put the bearing on.
Native made in USSR 2505 KM
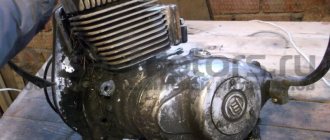
Photo report: Engine repair of the Izh-Planet motorcycle (SZD sidecar)
The engine that we will be repairing today was bought by me several years ago through an advertisement in the newspaper. The person who sold it swore that he bought this engine from “some grandfather” back in “those times”, or rather, he bought a motorized wheelchair (“disabled person”) from “his grandfather”, then cut it “into metal”, and the engine together I removed the gearbox and other bells and whistles in order to later make a tractor based on it, but as always, something didn’t work out, it went wrong...
As the seller assured, the engine was supposedly in perfect technical condition, the mileage of the motorized stroller was about 5,000 km, which is not very much for a “Planet”. He asked for a small price for it, so the engine was purchased without delay and delivered to the garage on the same day.
After disassembly, it turned out that the seller’s talk about ideal condition was greatly exaggerated: the crankshaft was practically jammed, the connecting rod had to be replaced, the piston had critical wear, the motor chain was stretched, the oil seals, clutch discs and crankshaft support bearing were worn out, but overall the engine was in excellent condition condition and, most importantly, this engine has never been “opened”, so this purchase can safely be called a success.
It is always easier to restore even a very worn-out engine if, after factory assembly, no one has yet managed to stick their drunken face in there before you, than after all sorts of tusks...
For those who don’t know: the engine of the Izh-planet and the SZD of the motorized stroller are almost identical in design, with the exception of minor details, so you can safely apply everything you read in this article to your “Planets” without fear.
So, before assembling the engine, we thoroughly wash all the parts, check the condition of the crankcase and threaded connections, clean and blow through two oil channels (marked with an arrow) located in the upper part of the crank chamber, prepare a clean work area, take two planks and place the left half of the crankcase on them.
Using a special puller, install the crankshaft oil seal retaining ring into the left half of the crankcase.
From the inside of the crank chamber, we install a spacer ring into the mounting hole of the main bearing.
We heat the mounting hole of the main bearing with a technical hair dryer and, using a mandrel, install the oil seal all the way and immediately, so that later you do not forget to lubricate the edges of the oil seal with clean engine oil.
Place the oil guide washer on the oil seal; the washer has a convex shape similar to a plate; when installing, orient its convex side towards the oil seal.
We again heat the crankcase mounting hole with a hairdryer and, using a mandrel, install the outer race of the crankshaft main bearing into it. In the second half of the crankcase, the main bearing race is installed exactly according to the same principle.
We are looking for a metal plate 7-8 millimeters thick, cut a small wedge in it so that the connecting rod fits easily into this cutout. We place the crankshaft on the plate so that it fits between the cheeks, take the main bearing and, using a mandrel, slowly and without much effort, press it onto the crankshaft journal - first on one, then on the other.
It is worth cautioning: many people who are unfamiliar with technology prefer to press the main bearings onto the crankshaft in the classic collective farm way: they take a hammer or sledgehammer and simply, with all their heart and soul, brazenly hammer the bearing into place.
As a result, either the bearing race bursts (as always, the Chinese or traders are to blame for this...), or the journal comes out of the cheek into the crankshaft, which leads to blocking of the connecting rod, or the crankshaft is deformed, which leads to a divergence of its axes, as a result to loss of engine power. But more often than not, both things happen...
Thoroughly lubricate the lip of the oil seal and the race of the main bearing with clean engine oil, then very carefully, so as not to accidentally wrap the cuff on the oil seal, twist the crankshaft a little into the left half of the crankcase. Depending on the situation, we either hammer or knock out the crankcase guide bushings (marked with arrows) so that they extend 5-6 millimeters above the crankcase connector plane.
We degrease the crankcase planes of both halves of the crankcase, apply a layer of engine sealant to one of them, lubricate the main bearing and the oil seal edge of the second half of the crankcase well with oil, and tap the crankcase halves a little with a wooden mallet.
Immediately put the gearbox cover in its place without the gasket and tighten the crankcase bolts. The bolts should be tightened according to this principle: we start tightening the crankcase with the bolts located in its middle and then tighten the remaining bolts crosswise, gradually increasing the force over several circles and tighten them completely.
We turn the engine over, heat the seat with a hair dryer and, using a mandrel, install the crankshaft support bearing in its place, then install the retaining ring there.
The retaining ring should be flush against the bearing. If you end up with a gap of more than 0.1 mm between the retaining ring and the outer race of the bearing, remove it with an adjusting washer. Otherwise, the crankshaft will have large axial play.
Because of this, the crankshaft will “run” along its axis, knock and cling to the walls of the crank chamber, so excessive axial play must be eliminated without fail. After everything has been done, leave the engine alone until the sealant dries.
An important point: when you install the oil seal on the generator side, do not place the oil seal flange on the sealant. You will ask why? Because there is a special oil channel (marked with an arrow) through which the right main bearing and oil seal are lubricated.
Many people unknowingly cover this channel with sealant, which naturally leads to the destruction of the oil seal and the main bearing (an example of the destruction of the main bearing is shown at the end of the article). The standard gasket does its job perfectly, so there is absolutely no need to apply sealant to this place.
Unfortunately, it will not be possible to display all the stages of assembling this engine in one article, primarily for technical reasons. Therefore, the repair of other components of this engine will be described in the following articles, and as they are added, links will be provided in this article. And that's all for today.
Gear diagram of the engine of the IZH Planet 5 motorcycle:
1) Gearbox input shaft. 2) Gearbox second gear. 3) Thrust washer. 4) Installation ring. 5) Gear of the second and fourth gears of the gearbox. 6) The assembled gearbox input shaft. 7) Puck.
Gearbox secondary shaft with bearing. 9) Gearbox secondary shaft star. 10) Lock washer. 11) Secondary gearbox shaft nut. 12) Cap of the secondary gearbox shaft nut. 13) Ring. 14) Gearbox intermediate shaft. 15) Gearbox third gear. 16) Installation ring. 17) Gear of the first and third gears of the gearbox. 18) Gear of the first and third gears of the gearbox.
Engine assembly
When restoring the engine, remember that its main characteristics will depend on the accuracy and thoroughness of your actions in fitting and installing engine parts.1. All removed engine parts and spare parts must be thoroughly washed with kerosene or white spirit and inspected for chips or other serious defects. Such parts must be replaced with new ones.2. All mating surfaces must be cleaned of traces of gaskets or sealant.3. Polish the shift forks until they shine.4. Using sandpaper, remove any roughness from the crankcase halves, then wash the housing parts in water and detergent.5. Fill the left oil seal with grease and install it in place along with the bearing ring and spacer. Next, install a shaped washer in the left half of the crankcase.6. Install the retaining ring and check the accuracy of its installation.7. Install the main bearing rollers and lubricate them generously with grease.8. Cut a mandrel from a plastic bottle and install it on the left oil seal.9. We mount the crankshaft with the left end up. Carefully place the left crankcase half onto the crankshaft.10. Remove the plastic seal mandrel, install a pre-lubricated ball bearing on the shaft and press it in until it stops using a 19 mm tool head.11. Install the spacer washers, followed by the retaining ring.12. Lubricate the connecting rod bearing with a small amount of engine oil and check how easily the crankshaft rotates. All subsequent steps for assembling the engine are carried out in the reverse order of disassembly. The grease-free connecting planes of the crankcase connector and the threads of the bolts must be lubricated with heat-resistant sealant, but only after checking that the crankshaft and other parts rotate freely. The sealant should be applied in a thin layer without breaking. It is also necessary to lubricate the bearings, their seats and gears. Lightly tapping the parts with a mallet, connect the crankcase halves.