The purpose and principle of operation of a scooter speedometer
The standard scooter speedometer is designed to display:
- the speed at which the vehicle is moving;
- the amount of gasoline in his gas tank.
However, such devices often show inflated speed indicators, that is, instead of the real 60 - 70 km/h, the scale will show 80 - 90 km/h. Perhaps, in this way, the creators of scooters wanted to make their technical characteristics more attractive to buyers. And, perhaps, this will protect dashing riders from speeds that are excessively high for mopeds. After all, everyone knows that the higher the speed, the worse the stability and controllability of the scooter on the road.
A standard scooter speedometer consists of:
The operating principle of the speed measurement system is to transmit torque from the front wheel to the speedometer magnet. To do this, a speedometer cable drive machine is installed on the front wheel, inside which gears are located. They then rotate the cable, the end of which rotates the magnet inside the cylinder to create a strong magnetic field.
Under its influence, the cylinder begins to rotate, while compressing the spring (moreover, the higher the speed of the scooter, the stronger it will be compressed). The spring, in turn, acts on the speedometer needle, which deviates to a specific indicator on the scale. This number is the speed at which the scooter is moving at a given time. If the wheel stops rotating, then the influence of the system parts on the spring stops. It unwinds, trying to take its original position, and the arrow returns to zero.
Why do you need to replace your scooter speedometer?
The first and most important reason for disassembling the speed control system and replacing the speedometer is its breakdown. If other components and parts of the system are in working order, and the arrow on the scale does not deviate, it means that the speedometer is not working for some reason (damaged or broken). In this case, it is necessary to remove it and replace it with a new one.
Another common reason for replacing a speed gauge is if it reads incorrectly. Therefore, lovers of accurate data often replace the standard scooter device with an electronic bicycle speedometer. This device allows you to:
- obtain the most accurate scooter speed data;
- determine the exact time;
- record the daily mileage of the vehicle;
- receive data on the total mileage of the scooter.
Why doesn't the speedometer on a moped work?
A speedometer is a must for every vehicle, because it not only shows the speed of movement, but also determines the distance that the moped has traveled over the entire time.
The speedometer on a moped (scooter) does not work. What to do?
There are three reasons why the speedometer does not work:
- The speedometer itself is faulty.
- The speedometer cable is damaged.
- Front wheel drive problems.
How to change the speedometer cable on a moped (scooter)?
First of all, you should check the speedometer cable, because it can break (usually it breaks near the front wheel). It's easy to change. First, unscrew the end of the cable from the drive of the moped (scooter) located on the wheel, then try to pull it out. It should have square ends that drive the speedometer. How to change the speedometer cable is shown in detail in the video below.
Why doesn't the speedometer on a moped work? Link to main publication
What is the price
In Ukraine, a Honda today af61 moped costs from 9,378 to 15,630 hryvnia. 2 year warranty. Delivery is free.
In Russia, this model can be bought from 18,000 to 65,000 rubles. Warranty and return by agreement with the client. There is no delivery - you will have to pick up the transport yourself. Payment can be made in cash or to a Sberbank card.
Spare parts for Honda Today scooters
| Detail | price, rub. |
| Corrugations | 275 |
| Switch | 1 355 |
| Piston group | 2 400 |
| Muffler cover | 470 |
| CPG | 9 000 |
| Batteries | 700 |
| Plastic | 2 510 |
| Fork springs | 400 |
| Luggage case | 270 |
| Head cover gasket | 1 160 |
| Gasket set | 360 |
| Vacuum gas filter | 2 500 |
| Beak | 720 |
| Engine | 10 000 |
Photo report: Repair of speedometer gearbox gear of a moped, scooter
It is impossible to predict fate, let alone avoid it, but to deceive it is quite possible! Fate: the gear drives of the speedometer gearbox, which is usually located in the front wheel support (in most small-capacity Chinese garbage dumps equipped with drum brakes, the speedometer drive gearbox is located there) - at one time some “figure” broke off.
“Activists” break this part very often: they farm their garbage dumps and instead of checking whether the gear drives are in the grooves on the wheel, they put the wheel on at random, clamp the axle and then think for a long time about why the speedometer stopped working. How will it work if the gear drive leads did not fall into the mating grooves during wheel assembly and became bent or broken off?
For example, the drive pins of this gear are bent
Let's tighten the leashes slightly and the speedometer will begin its vigorous activity again. We bend it carefully: the metal is hot, if you bend it a little, it will break.
At first glance, the fate of this gear is quite predictable: replacement with a new one so the leads are broken off.
Price: 150-200 rubles + time to travel to the store + transportation costs. Is it necessary? We are looking for a suitable strip of metal with a thickness of 1.5-2 mm, welding new leads (of course we weld with a thin electrode - 1.6 mm and the lowest possible current).
We get used to the role of Michaelangelo - we cut off everything unnecessary.
We lubricate the gear, insert it with the drivers strictly into the grooves, close it with the support, and install the wheel.
Specifications
| Model | Today BA-AF61 FI/E (Honda Today AF 61) |
| Length | 1.695 m |
| Width | 0.630 m |
| Height | 1,030 m |
| Weight, kg | 75 (dry weight 71 kg) |
| Capacity | 1 person |
| Fuel consumption | 65 km/l (at 30 km/h) |
| Minimum turning radius | 1.8 m |
| Engine | 4-stroke air-cooled, single cylinder |
| engine's type | AF61E |
| The full amount | 49 cm3 |
| Bore × stroke | 37.8 × 44.0 mm |
| Compression ratio | 10,1 |
| Maximum output power | 2.8 kW (3.8 hp) at 8000 rpm |
| Torque | 3.6 N*m (0.37 kg*m) at 6500 rpm |
| Fuel supply form | Carburetor VK00A |
| Starting system | Electric starter and kick starter |
| Ignition | CDI |
| Lubrication | Separation by lubricant |
| Fuel tank volume | 5.0 l |
| Clutch | Dry multiplates |
| Transmission type | CVT (V-Matic belt) |
| Tires (front and rear) | 80/100-10 46J |
| Brakes (front and rear) | Mechanical drum |
| Suspension type (front) | Telescopic |
| Suspension type (rear) | Spring |
Other answers in this thread
#2 Zuko
- Participant
- Group: Stalled
- Posts: 307
- Registration: 27 November 07
#3 genri_grin
- Participant
- Group: Users
- Posts: 353
- Registration: 20 January 08
#4 Jarrus
- Participant
- Group: Users
- Posts: 78
- Registration: 15 October 07
#5 Italian
- Participant
- Group: Users
- Posts: 209
- Registration: 06 November 06
Zuko (25.3.2008, 16:38) wrote:
#6 Jarrus
- Participant
- Group: Users
- Posts: 78
- Registration: 15 October 07
#7 Hind
- Participant
- Group: Users
- Posts: 420
- Registration: 05 June 06
#8 SPONSOR32
- Participant
- Group: Users
- Posts: 27
- Registration: 27 June 08
#9 Andrij_SH
- Participant
- Group: Users
- Posts: 16
- Registration: 11 June 08
#10 Alliance
- Participant
- Group: Users
- Posts: 302
- Registration: 22 November 06
SPONSOR32 (22.7.2008, 9:50) wrote:
#11 Airpound
- Participant
- Group: Users
- Posts: 17
- Registration: 04 April 08
Attached images
Post edited by Airpound: 09 April 2009 - 14:30
Photo report: Repair of speedometer gearbox gear of a moped, scooter
It is impossible to predict fate, let alone avoid it, but to deceive it is quite possible! Fate: the gear drives of the speedometer gearbox, which is usually located in the front wheel support (in most small-capacity Chinese garbage dumps equipped with drum brakes, the speedometer drive gearbox is located there) - at one time some “figure” broke off.
“Activists” break this part very often: they farm their garbage dumps and instead of checking whether the gear drives are in the grooves on the wheel, they put the wheel on at random, clamp the axle and then think for a long time about why the speedometer stopped working. How will it work if the gear drive leads did not fall into the mating grooves during wheel assembly and became bent or broken off?
For example, the drive pins of this gear are bent
Let's tighten the leashes slightly and the speedometer will begin its vigorous activity again. We bend it carefully: the metal is hot, if you bend it a little, it will break.
At first glance, the fate of this gear is quite predictable: replacement with a new one so the leads are broken off.
Price: 150-200 rubles + time to travel to the store + transportation costs. Is it necessary? We are looking for a suitable strip of metal with a thickness of 1.5-2 mm, welding new leads (of course we weld with a thin electrode - 1.6 mm and the lowest possible current).
We get used to the role of Michaelangelo - we cut off everything unnecessary.
We lubricate the gear, insert it with the drivers strictly into the grooves, close it with the support, and install the wheel.
Replacing and repairing the speedometer on a scooter| Information, operation, maintenance
The structure of the speedometer system and the principle of its operation.
The scooter speed measurement system consists of:
- speedometer;
- speedometer cable;
- cable drive machines.
In turn, the machine consists of:
- a large gear that is attached to the wheel;
- a small gear connected to the speedometer cable;
- oil filling holes;
- stubs.
The structure of the speedometer itself consists of the following parts:
The principle of operation of the system is quite simple - rotational motion is transmitted from the front wheel of the scooter to the speedometer cable using gears. The other end of the cable spins a magnet inside the cylinder, which creates a strong magnetic field. It sets the cylinder in motion, which, in turn, compresses the spring when rotated. The spring acts on the speedometer needle and it deflects, indicating the speed. The faster the wheel, and therefore the speedometer magnet, rotates, the higher the speed reading the needle will show. When the wheel stops, the transmission of rotation to other parts of the system also stops. The cable and magnet stop rotating, and the cylinder no longer twists the spring. It returns to its original state and the speedometer needle moves back to zero.
We disassemble the gearbox
- Unscrew the five bolts securing the cover.
Please note and remember that two long bolts are located where the gearbox cover guide bushings are located.
This will be needed during reassembly.
- Place a flat, large container under the gearbox to drain the oil. We put a 12mm spanner on the shaft and screw the nut back by hand until the end of the thread. Then, carefully, tapping the spanner with the flat side of a hammer, disconnect the gearbox cover. And the oil will pour into the substituted container.
The cover cannot be pulled out using a knife or screwdriver, inserting them between the cover and the gearbox housing. Damage the gasket and break the seal. You will have to put the lid on the sealant.
We look at the condition of the bearings. They must be intact and rotate freely, without jamming, without axial and radial play. The shafts should not be loose. If there are defects, then change the bearings along with the seals without hesitation. It's better to use native Japanese ones.
On the output shaft (on which the wheel fits), the bearing is difficult to pull out. You need a special puller or you will have to remove the engine to press out the bearing.
But it can be made simpler. Unhook the rear brake cable. Take a blowtorch or a tourist gas can with a burner and heat the gearbox from the outside.
The housing will expand, and the output shaft bearing along with the oil seal will easily come out using a hammer and an extension from a set of sockets.
The input shaft with bearing will also easily come out of the heated gearbox cover.
Before heating, be sure to disconnect the breather (rubber tube).
Photo report: Repair of speedometer gearbox gear of a moped, scooter
It is impossible to predict fate, let alone avoid it, but to deceive it is quite possible! Fate: the gear drives of the speedometer gearbox, which is usually located in the front wheel support (in most small-capacity Chinese garbage dumps equipped with drum brakes, the speedometer drive gearbox is located there) - at one time some “figure” broke off.
“Activists” break this part very often: they farm their garbage dumps and instead of checking whether the gear drives are in the grooves on the wheel, they put the wheel on at random, clamp the axle and then think for a long time about why the speedometer stopped working. How will it work if the gear drive leads did not fall into the mating grooves during wheel assembly and became bent or broken off?
For example, the drive pins of this gear are bent
Let's tighten the leashes slightly and the speedometer will begin its vigorous activity again. We bend it carefully: the metal is hot, if you bend it a little, it will break.
At first glance, the fate of this gear is quite predictable: replacement with a new one so the leads are broken off.
Price: 150-200 rubles + time to travel to the store + transportation costs. Is it necessary? We are looking for a suitable strip of metal with a thickness of 1.5-2 mm, welding new leads (of course we weld with a thin electrode - 1.6 mm and the lowest possible current).
We get used to the role of Michaelangelo - we cut off everything unnecessary.
We lubricate the gear, insert it with the drivers strictly into the grooves, close it with the support, and install the wheel.
Speedometer car
It’s annoying when the speedometer on a scooter doesn’t work, and along with it the odometer. Of course, this does not affect the speed, but there is some discomfort. It’s good if the cable just breaks, but it often happens when the drive itself fails. The speedometer cable drive machine (hereinafter referred to as the machine) is usually located on the front wheel. It sits on the wheel axle and drives the speedometer cable. Unfortunately, the detail does not last forever. And it usually breaks through no fault of its own. Admit it, have you ever washed it or at least lubricated it? No? In vain. But this part rotates at a decent speed, in addition, it is susceptible to attack by sand, moisture and dust.
The device is simple and... In general, the part is officially non-separable. Of course, you can disassemble it, but you can’t assemble it without welding.
Two gears are hidden inside - a worm gear. The large gear is driven by the front wheel. The speedometer cable is inserted into the second (small) gear.
And now dust gets into this mechanism and the gear turning the worm begins to jam and shear off. At a certain point, all the edges on the gear or the splines on its drive are cut off.
How to service this matter? Normal machines have a lubrication hole (2), which is closed with a plastic plug. It is through this hole that you need to push the thick lubricant in a timely manner. It is better to use graphite-containing heat-resistant lubricants. During the maintenance period, it is useful to remove the speedometer cable from the car (if it has not yet become stuck) and lubricate its seat (3). (Due to my inexperience, I didn’t do this, and when the speedometer cable got twisted on my scooter, I couldn’t get it out of the car, I had to order two parts instead of one).
But everything is so simple when you have a well-maintained and new car. And when she has already smelled dust and dirt, this will not help. We need to wash it. Remove the car from the front fork, first disconnecting the speedometer cable. Then open the plug (2) and immerse the whole thing in a bath of gasoline. There, at a depth, turn the drive by the lever, simulating movement. Alternate this operation with blowing compressed air through all available cracks. The operation should be continued until the rustling of sand in the machine gearbox disappears. After that, lubricate it through the holes with oil and turn the gearbox again. After the excess oil has drained out, you can recharge the lubricant.
Replacing and repairing the speedometer on a scooter| Information, operation, maintenance
The structure of the speedometer system and the principle of its operation.
The scooter speed measurement system consists of:
- speedometer;
- speedometer cable;
- cable drive machines.
In turn, the machine consists of:
- a large gear that is attached to the wheel;
- a small gear connected to the speedometer cable;
- oil filling holes;
- stubs.
The structure of the speedometer itself consists of the following parts:
The principle of operation of the system is quite simple - rotational motion is transmitted from the front wheel of the scooter to the speedometer cable using gears. The other end of the cable spins a magnet inside the cylinder, which creates a strong magnetic field. It sets the cylinder in motion, which, in turn, compresses the spring when rotated. The spring acts on the speedometer needle and it deflects, indicating the speed. The faster the wheel, and therefore the speedometer magnet, rotates, the higher the speed reading the needle will show. When the wheel stops, the transmission of rotation to other parts of the system also stops. The cable and magnet stop rotating, and the cylinder no longer twists the spring. It returns to its original state and the speedometer needle moves back to zero.
Installing an electronic bicycle speedometer on a scooter - what is it for?
Standard speedometers of modern scooters often show overestimated scooter speed data. Perhaps the creators are in this way trying to protect fans of extreme speeds from possible accidents (after all, at 100 km/h the scale will actually read 80 km/h). Or they simply want to increase the maximum speed of the scooter due to incorrect indicators (in the instructions and on the scale, the maximum speed is, for example, 80 -90 km/h, but in reality - 60 - 70 km/h).
For more accurate speed readings, you can install an electronic bicycle speedometer on the scooter. Such a device can be equipped with backlight and provides data:
- speed;
- exact time;
- daily mileage;
- total mileage of the scooter.
Additional options for the device directly depend on its price. In addition, the later a model is created, the more functions it has.
The installation and operating principle of the system is quite simple. A magnet is mounted on the front wheel, and a sealed contact is mounted on the fork parts. When the wheel rotates, the magnet creates a magnetic field that closes the reed switch circuit. The sealed contact terminals transmit data to the speedometer, which divides the wheel circumference (this figure must be entered in advance) by the time between closures. The display shows the actual speed of the scooter. You can attach the bicycle speedometer to the dashboard or plastic steering wheel. The standard cable included with such a device will not be enough for installation on a scooter. In this case, you need to either buy a wire of the required length, or add a part to the standard one. In this case, the connection point should be made in the form of loops to avoid breaking the wire in this place.
And also, if you install wheels with a larger or smaller tire diameter on a scooter, the speedometer will also show incorrect speed data. Therefore, tires should be purchased in the size specified in the instructions for the scooter.
Correct operation of the speed measurement system and its vulnerabilities
The drive machine, to which the speedometer cable is attached, is located on the front wheel. This means that this spare part of the system is subject to intense contamination with dust, small debris and dirt. Their penetration into the assembly occurs through the cable fastening mechanism. The accumulation of dust in the drive machine inevitably leads to abrasion of the ribbed surface of the gears and their breakage, and since this scooter unit is not dismountable, the machine will have to be replaced with a new one.
Caring for the speedometer cable drive machine consists of its timely cleaning and lubrication. To clean (rinse) this part, it must first be removed from the scooter. To do this, disconnect the cable by unscrewing the fixing bolt. Then remove the machine itself, freeing all its fastenings on the wheel. Next, after opening the plug on the oil fill hole, you need to immerse the machine in a container with gasoline. Turn the drive lever several times for better access of gasoline to the internal parts.
Then you need to take out the machine and thoroughly blow out the system with compressed air. Alternating these procedures, the system should be completely cleaned of foreign impurities. After this, you need to pour oil into the unit and wait until it drains out. Next, you need to push thick graphite-containing lubricant inside and reassemble everything in the reverse order. The drive machine parts need to be lubricated regularly depending on the operating conditions of the scooter.
The story of how one day in the off-season my hands itched 
That’s how I decided to remake the panel on my scooter, and what came out of it, let’s look further...
Greetings to all bikeposters and I apologize in advance, because it was a very long time ago and I didn’t have a camera then, so I took pictures on my phone. The essence of the question was this: there was a standard dashboard:
And I wanted to make it like the one shown in the picture in the header of the post. Why did you have to remove part of the speedometer scale? It was simply not possible to register the scooter as a cubic meter and I had to pretend to be fifty dollars, so I had to mark the speedometer to 80, and take up the free space with displays of a clock and a thermometer) So, let's start making... Having printed an image of the future panel on photographic paper, I laminated it and cut it out in the right places places of the hole, the result is this blank: I’ll say right away, who wants to print a panel in this way - print only with pigment ink and laminate with a matte laminate. Pigment ink produces a black color that does not show through and only the numbers will glow. And matte laminate is more pleasant to look at)
Then, from a piece of thin plastic (as thick as the original dashboard plate), I cut out a copy of the old plate and sawed holes for the displays, then glued the laminated design to the new plate - this was the first step. The second step - the arrows...the standard ones were made of orange plastic and weren’t anything special - that’s not interesting! In the construction of automobile dashboards, a “prism” system is used to distribute light in the desired direction, so I thought - why not try it?))) Having set about the simplest thing - making a fuel level indicator needle (since it is small), I armed myself with an engraver, sharpening disks, polishing wheels, a clear head - he began to create and the first arrow was born:
The arrow itself was made simply - on the base of the old one, a circle of matte plastic covered the mounting holes from the old arrow, and a piece of plastic was cut out in the rim so that a new arrow could be inserted into the body... The arrow itself was cut out of a piece of transparent plastic 1.4 mm wide and the length of a standard arrow, then polished until transparent. Now a little theory: If you take a piece of plastic, then its polished side will be transparent on the outside, but on the inside it will look like a mirror, which is what I used in this design. One end of the arrow is ground at an angle of 45 degrees, which means that if we apply light perpendicular to the arrow from bottom to top, then the light refracted at 90 degrees will be directed along the arrow, which will make it glow. Turning the arrow over, we will see how it works: The arrow is inserted and filled with glue, the white film (which is the background of the arrow) is not glued completely - we leave a window for light to enter. There is a metal counterweight inserted into the arrow housing; it cannot be removed. As a result, to complete the structure, all that was needed was a light source... it seemed that there was nothing complicated about taking it and illuminating the arrow? But that was not the case - there was so little space in the dashboard in the area of the arrows that it was simply unrealistic to place an LED there, unless it was SMD, but I didn’t have such small ones at that moment. As a result, an LED was made that met my requirements, this is a 3 mm LED, ground from the sides right up to the metal crib of the crystal, which ultimately gave a fairly small thickness of the LED and allowed it to be inserted between the device body and the panel... but that didn’t end there process, then the LED was ground down like the arrow at 45 degrees and this cut was polished... We have an LED lying on a horizontal plane and emitting light vertically upward. With this manufacturing, the LED can provide normal illumination of the needle in the range of its movement within an angle of approximately 0 to 70 degrees... Having drilled out a little hole for the arrow, I installed an LED: One LED is quite enough to illuminate the fuel indicator needle in the entire range of its movement... because the light is already after the prism, the LED diverges at an angle of approximately 60 degrees and the further it is from the “served” surface, the larger the area it illuminates... The same operation was done with the speedometer needle, but there are already two LEDs to illuminate it, and no more is needed, because my scale only goes up to 80 km/h. The dashboard was illuminated with three white SUPER FLUX LEDs, which turned out to be quite enough. I didn’t bother too much and just glued them to the body of the tidy: This is what the tidy looks like, illuminated by a lamp, but with the arrows already installed: And now it’s the turn of the displays. The backlighting of the displays is homemade - I removed the gray backing and placed an acrylic plate with a white background, illuminating the ends with LEDs. Instead of black numbers on a gray background, I suddenly wanted the numbers to glow, and not the background. Here the matter is simple - you need to carefully remove the upper or lower polarizer (developer) from the display with a scalpel and turn it over until the screen turns black and just leave the polarizer in this position, but the main thing is that no moisture gets between the display and the polarizer, otherwise there will be droplets of moisture spoil the view. As a result, we will get the following effect: The photo shows a converted watch, from which the cable fell off and we had to introduce it to the trash bin))) Having modified the thermometer and the new watch to match the same style, I began assembling and stuck all the parts in place, leading the wires to free space , connected a control panel with a battery to the clock, which also powered the thermometer, so as not to bother with power supply from the scooter’s on-board network. And now the dashboard is almost assembled: And in the body: And like this on the scooter:
I’ll end here, I hope someone will find something useful for themselves) Thank you all for your attention) Positive, kindness and smooth roads to you, friends!
Photo report: Repair of speedometer gearbox gear of a moped, scooter
It is impossible to predict fate, let alone avoid it, but to deceive it is quite possible! Fate: the gear drives of the speedometer gearbox, which is usually located in the front wheel support (in most small-capacity Chinese garbage dumps equipped with drum brakes, the speedometer drive gearbox is located there) - at one time some “figure” broke off.
“Activists” break this part very often: they farm their garbage dumps and instead of checking whether the gear drives are in the grooves on the wheel, they put the wheel on at random, clamp the axle and then think for a long time about why the speedometer stopped working. How will it work if the gear drive leads did not fall into the mating grooves during wheel assembly and became bent or broken off?
For example, the drive pins of this gear are bent
Let's tighten the leashes slightly and the speedometer will begin its vigorous activity again. We bend it carefully: the metal is hot, if you bend it a little, it will break.
At first glance, the fate of this gear is quite predictable: replacement with a new one so the leads are broken off.
Price: 150-200 rubles + time to travel to the store + transportation costs. Is it necessary? We are looking for a suitable strip of metal with a thickness of 1.5-2 mm, welding new leads (of course we weld with a thin electrode - 1.6 mm and the lowest possible current).
We get used to the role of Michaelangelo - we cut off everything unnecessary.
We lubricate the gear, insert it with the drivers strictly into the grooves, close it with the support, and install the wheel.
Speedometer car
It’s annoying when the speedometer on a scooter doesn’t work, and along with it the odometer. Of course, this does not affect the speed, but there is some discomfort. It’s good if the cable just breaks, but it often happens when the drive itself fails. The speedometer cable drive machine (hereinafter referred to as the machine) is usually located on the front wheel. It sits on the wheel axle and drives the speedometer cable. Unfortunately, the detail does not last forever. And it usually breaks through no fault of its own. Admit it, have you ever washed it or at least lubricated it? No? In vain. But this part rotates at a decent speed, in addition, it is susceptible to attack by sand, moisture and dust.
The device is simple and... In general, the part is officially non-separable. Of course, you can disassemble it, but you can’t assemble it without welding.
Two gears are hidden inside - a worm gear. The large gear is driven by the front wheel. The speedometer cable is inserted into the second (small) gear.
And now dust gets into this mechanism and the gear turning the worm begins to jam and shear off. At a certain point, all the edges on the gear or the splines on its drive are cut off.
How to service this matter? Normal machines have a lubrication hole (2), which is closed with a plastic plug. It is through this hole that you need to push the thick lubricant in a timely manner. It is better to use graphite-containing heat-resistant lubricants. During the maintenance period, it is useful to remove the speedometer cable from the car (if it has not yet become stuck) and lubricate its seat (3). (Due to my inexperience, I didn’t do this, and when the speedometer cable got twisted on my scooter, I couldn’t get it out of the car, I had to order two parts instead of one).
But everything is so simple when you have a well-maintained and new car. And when she has already smelled dust and dirt, this will not help. We need to wash it. Remove the car from the front fork, first disconnecting the speedometer cable. Then open the plug (2) and immerse the whole thing in a bath of gasoline. There, at a depth, turn the drive by the lever, simulating movement. Alternate this operation with blowing compressed air through all available cracks. The operation should be continued until the rustling of sand in the machine gearbox disappears. After that, lubricate it through the holes with oil and turn the gearbox again. After the excess oil has drained out, you can recharge the lubricant.
After this method, oil may leak from the machine for some time, but this is a trifle - the main unit is reliably lubricated. If you have two non-working machines, try making one of them. Remove the rollers from the hub. Place the machine on the pipe and knock out the machine axle bushing. After reassembly, the machine will not be the same, but it will be quite usable. The number (1) shows the “eaten” gear.
Mini radio controlled car
TO DRIVE THE SPEEDOMETER CABLE
It’s annoying when the speedometer on a scooter doesn’t work, and along with it the odometer. Of course, this does not affect the speed, but there is some discomfort. It’s good if the cable just breaks, but it often happens when the drive itself fails. The speedometer cable drive machine (hereinafter referred to as the machine) is usually located on the front wheel. It sits on the wheel axle and drives the speedometer cable. Unfortunately, the detail does not last forever. And it usually breaks through no fault of its own. Admit it, have you ever washed it or at least lubricated it? No? In vain. But this part rotates at a decent speed, in addition, it is susceptible to attack by sand, moisture and dust. The device is simple and... In general, the part is officially non-separable. Of course, you can disassemble it, but you can’t assemble it without welding. Two gears are hidden inside - a worm gear. The large gear is driven by the front wheel. The speedometer cable is inserted into the second (small) gear. And now dust gets into this mechanism and the gear turning the worm begins to jam and shear off. At a certain point, all the edges on the gear or the splines on its drive are cut off.
How to service this matter? Normal machines have a lubrication hole (2), which is closed with a plastic plug. It is through this hole that you need to push the thick lubricant in a timely manner. It is better to use graphite-containing heat-resistant lubricants. During the maintenance period, it is useful to remove the speedometer cable from the car (if it has not yet become stuck) and lubricate its seat (3). (Due to my inexperience, I didn’t do this, and when the speedometer cable got twisted on my scooter, I couldn’t get it out of the car, I had to order two parts instead of one). But everything is so simple when you have a well-maintained, new car. And when she has already smelled dust and dirt, this will not help. We need to wash it. Remove the car from the front fork, first disconnecting the speedometer cable. Then open the plug (2) and immerse the whole thing in a bath of gasoline. There, at a depth, turn the drive by the lever, simulating movement. Alternate this operation with blowing compressed air through all available cracks. The operation should be continued until the rustling of sand in the machine gearbox disappears. After that, lubricate it through the holes with oil and turn the gearbox again. After the excess oil has drained out, you can recharge the lubricant. After this method, oil may leak from the machine for some time, but this is a trifle - the main unit is reliably lubricated. If you have two non-working machines, try making one of them. Remove the rollers from the hub. Place the machine on the pipe and knock out the machine axle bushing. After reassembly, the machine will not be the same, but it will be quite usable. Number (1) indicates “departure”
Preparing to disassemble the gearbox
- Remove the exhaust pipe and rear wheel. On a Honda Dio 34, 35, it is better to do this by placing the scooter on its side on a rag so as not to scratch the plastic.
- Remove the air filter and air duct.
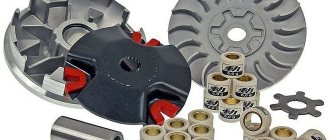
- Remove the variator casing.
- Unscrew the clutch drum nut. To do this, you need to fix the drum with some kind of device. Or the nut can be easily unscrewed with a pneumatic gun.
Then we press on the variator belt with the mounting tool and push it deeper between the cheeks of the variator to remove the clutch.