Deterioration in traction, a drop in maximum speed, blue smoke from the muffler and weak dynamics of the scooter are a sure sign of worn piston rings or a worn cylinder-piston group. Most often they wear out because The diameter of the piston group in scooters is small, the working area of the rings is very small and therefore they do not run for so long.
So, if you are faced with the need to replace piston rings on a scooter, and in addition to the main problem that they need to be changed, there is another one - how to correctly put the rings on the piston. You can't just take any ring and put it in any of the "grooves" on the piston. You need to understand which ring is the upper compression ring, which is the lower compression ring, and also how to correctly install the oil scraper ring.
Installing piston rings on a 4-stroke Chinese scooter. The photo below shows which piston ring is which.
As you may have noticed, the piston ring set consists of two compression rings (upper and lower), as well as an oil scraper ring, which consists of two regular (thin) rings and a central expander.
The second compression ring is dark black
color, as well as unique (beveled) geometry.
The color of the rings may vary among different manufacturers, for example, for the CMR company - the lower compression ring is red
color.
The following diagram shows the correct placement of the rings.
You can see inscriptions on the compression rings, they may be different depending on the brand of the rings, but their essence is the same - installation of the rings should be done with the inscriptions UP
! Those. the inscriptions must be directed towards the cylinder head.
As a rule, there is no inscription on the oil scraper rings (two thin ones), so they can be placed on either side, the main thing is that a so-called expander is installed between them, as shown in the photo below.
We will omit the process of installing the rings, because... there is nothing complicated there. You should only be careful when inserting the rings into the grooves, because The rings are made of high-strength cast iron and strong tensile stress may cause the rings to break. If you did everything correctly, then in the end the rings on the piston should be installed, as shown in the following photo.
At this point, all the features of installing piston rings on a four-stroke scooter have been announced; now you can install the piston in the cylinder, having previously lubricated the rings and cylinder with oil.
Installing piston rings on a 2-stroke scooter. So, let's say you purchased a new piston with rings and want to install it on your scooter. The piston kit for a two-stroke scooter comes with only two compression rings.
In some cases, depending on the scooter model, the rings may also include a so-called expander or, as it is also called, an expander. Such an expander is installed under the second (lower) ring.
Before you begin installing the rings on the piston, you need to understand where the upper compression ring is and where the lower one is. Because The rings are very different in geometry; incorrect installation of one of the rings will lead to its breakage. Please note that the top ring has an internal bevel, please inspect each ring carefully before installation. Below is an installation diagram that clearly shows where which ring should be placed, as well as where the expander is installed, if one is included in the kit.
There is nothing complicated about installing rings on the piston of a two-stroke scooter, as well as a four-stroke scooter, and many people know this. But most scooter riders who have only recently acquired such equipment have no idea how to replace the piston on a scooter, how to correctly install the rings on the piston, where the arrow on the piston should point, and much more. In this lesson, I will tell you how to properly put the rings on the piston and assemble the piston in place. Since we have already talked about four-stroke engines before, here we will talk only about two-stroke engines. So, our piston is worn out and requires replacement.
The rings and piston wear out first, and usually only those need to be replaced. If the piston is severely worn, it is necessary to bore the cylinder. It is also bored when the piston jams in the cylinder, forming deep scratches on the walls of the latter. There's nothing wrong with that, and if your new cylinder has been properly bored (for which you'll only need to shell out about $10), it will need a ring repair kit with a new piston. Such rings are marked 0.25. The second boring is 0.5, respectively, etc. to one.
After purchasing a piston, it needs to be assembled. In the kit, as a rule, you will find the piston itself, two compression rings, a third thin corrugated ring (more on its purpose later), a piston pin and two piston pin retaining rings.
Now about the third ring in the set. Its purpose is to spring the lower compression ring. It installs it directly under it, and usually does not provide any benefit during operation. You can throw this ring away or you can put it in, it makes no difference. Many piston manufacturers do not include it at all.
It's time to put everything back in place. Depending on the scooter model, compression rings may be the same or vary in thickness and cross-section. Most pistons for Honda scooters, for example, have different rings, where the upper one is thinner than the lower one and has a different cross-section.
You should definitely pay attention to this when installing; the top one is thinner and ground at an angle.
Also pay attention to the inscription on the ring (usually the letter T or repair size); the inscription should always be on top, that is, opposite to the finger. First you need to put on the bottom, then the top. There is no need to stretch or bend them. These manipulations must be carried out carefully.
There are locks in the grooves for the rings that prevent the rings from turning during operation, so the ring gap must be in these locks, otherwise you will not stick the piston into the cylinder.
And the last important point is the arrow (1) on the bottom of the piston or the inscription EX. Both the arrow and the inscription must be directed towards the exhaust (2). In this case, the ring locks will be located on the side of the reed valve. If the locks are placed towards the exhaust, the piston will not last long, the rings will be pulled into the exhaust port and gradually grind it down.
During all manipulations with the piston, it is imperative to put a rag in the crankcase window so that nothing inadvertently gets in there; we still need a crankshaft with bearings.
When installing the piston pin, pay attention to the condition of the separator (bearing); it may need to be replaced. Before installing the piston pin, install the snap ring on one side before installing the piston (usually on the side where you won't be able to fit the pin and the second snap ring in). Then place the pin with the bearing and the second retaining ring; when fixed in the groove, it will make a certain click.
That's all, now put on the cylinder, not the piston (remembering to check the condition of the gaskets and lubricate the piston and cylinder walls with engine oil), the cylinder head and tighten the bolts one by one in a cross pattern.
If you have any questions during the piston replacement process, you can ask them in the comments field or on the forum of our website. Good luck with the repair.
There is nothing complicated about installing rings on the piston of a two-stroke scooter, as well as a four-stroke scooter, and many people know this. But most scooter riders who have only recently acquired such equipment have no idea how to replace the piston on a scooter
,
how to correctly install the rings on the piston
,
where the arrow on the piston should point
and much more. In this lesson, I will tell you how to properly put the rings on the piston and assemble the piston in place. Since we have already talked about four-stroke engines before, here we will talk only about two-stroke engines. So, our piston is worn out and requires replacement. The rings and piston wear out first, and usually only those need to be replaced. If the piston is severely worn, it is necessary to bore the cylinder. It is also bored when the piston jams in the cylinder, forming deep scratches on the walls of the latter. There's nothing wrong with that, and if your new cylinder has been properly bored (for which you'll only need to shell out about $10), it will need a ring repair kit with a new piston. Such rings are marked 0.25. The second boring is 0.5, respectively, etc. to one.
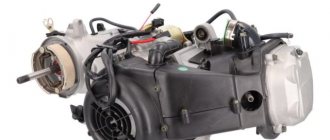
History of the 139QMB engine
The largest and most popular category is four-stroke engines, the most popular and famous among which is the 139QMB model. The first model of the 139QMB engine was developed in the 90s. Ten years later, the development was used by China for mass production of engines. The final version, after numerous modifications, has become one of the best engines for motor vehicles: today Japan is actively involved in its purchase and subsequent sale under the Honda brand.
Engine Features
The official manufacturer of the 139QMB scooter engine is Hongling Corporation, which equips motorcycles not only of its own brand, but also of other brands with this engine.
The corporation sells power units to other manufacturers. The motor itself is very recognizable: the design features of the 139QMB engine and its markings on the left side of the crankcase immediately make it clear what kind of heart beats the scooter.
The motor has no flaws, does not require special treatment and calmly tolerates minor negligence and negligence. The manufacturer provides a guarantee for its products that covers the first 5 thousand kilometers. This mileage is enough for the new 139QMB 4t scooter engine to fully run in and grind in all elements and components of the systems.
The total service life of the engine is about 20 thousand kilometers, with the exception of 5 thousand running-in at an average driving speed of 90 km/h. The technical characteristics of the 139QMB engine are not bad: its power is enough for a two-seater full-size scooter.
Preparation
So that you don’t have green snot later about the fact that the tuning piston does not fit into the crankcase and you were allegedly deceived here - remove the old piston from the engine and measure the hole for the liner with a caliper. If the hole is smaller than the tuning piston sleeve, the “meat” of the crankcase allows it, hands grow from where it is needed - a round file will help you (only before boring - disassemble the engine, assemble the empty crankcase with bolts, bore the hole, make sure that the piston enters the crankcase without problems - wash the parts from shavings and reassemble the engine. Or, as a last resort, coat the crankcase and file with grease to at least somehow protect yourself from sawdust getting into the inside of the engine.)
The hole for the 162QMK engine sleeve (such engines are installed on Chinese scabs, more popularly known as “Leika”) in stock is 65 mm. Without boring, a piston of 57mm (150CC), 61mm (1700CC) and 62mm (180CC) easily fits into this crankcase. You won’t find a 62mm piston on sale during the day, so it was decided to install a regular 61mm piston on this engine.
By the way, for those who do not know, a piston with a diameter of 61 mm can be easily installed not only on the Leica engine, but also on any other Chinese 150 equipped with a 157QMJ series engine. There, if you put your hands to it, you can stick a piston at 62mm, but only if the “meat” of the crankcase allows it. Everything is individual, you need to look at the place. In any case, the distance along the studs is the same for both the 61mm piston and the 62mm piston.
From left to right: 61mm, 57mm
On the 139QMB series engine from a regular Chinese 80-six, you can easily install a piston 39mm (45CC), 47mm (72CC), 50mm (84CC)
From left to right: 39mm (45CC), 47mm (72CC), 50mm (84CC)
Analogues - engine 1P39QMB
Chinese developers have created an analogue of the Japanese 139QMB engine - a motor labeled 1P39QMB, which in appearance completely replicates the original. Despite all the similarities, you can still find differences: the valve clearances on the 1P39QMB are not adjustable. The situation is similar with the carburetor: before direct operation it requires thorough cleaning and correct adjustment. Chinese copies of 139QMB engines, of course, cope with their task, but their main purpose was to reduce the final cost of motor vehicles. Budget versions of scooters are equipped with exactly the same versions of engines that are good only for short trips at low speeds.
Before starting operation, be sure to carry out a full run-in of the 1P39QMB engine. The optimal operating mode of the engine begins only after 2 thousand kilometers, but after 10 thousand kilometers all its technical characteristics drop, and it loses dynamics and power.
Installing the timing chain tensioner
If you have a 157QMJ series engine, do the following: unscrew the plug on the tensioner body; We insert a thin flat screwdriver into it and begin to tighten the bolt until the tensioner rod goes inside the body.
Without releasing the screwdriver while simultaneously holding the tensioner body, with your free fingers, insert the tensioner into the cylinder, screw it in with bolts, and only then release the screwdriver and screw the plug into place.
If you have a 139QMB series engine, then do this: unscrew the plug from the tensioner housing and remove the spring; push the rod inside the body; install the tensioner in the cylinder; insert the spring into the housing and screw in the plug.
After installing the piston, do not forget to adjust the thermal clearances of the valves and break in the engine.
Engines 157QMJ
In addition to the very popular model - the 139QMB engines - Hongling Corporation produces other versions of power units, one of which is the 157QMJ. It is installed on expensive scooter models of famous brands. In terms of its technical parameters and indicators of functionality and reliability, this version is a complete analogue of 139QMB. In addition, the design features of the model are strongly reminiscent of other mass-produced Japanese engines.
The advantage of the 157QMJ is its increased service life - about 25 thousand kilometers. The engine boasts powerful dynamics and a high top speed. However, it also has its downside - the price is too high compared to previous versions of the engines.
Cleaning the cylinder, boring windows.
Improvement suitable for scooters with two-stroke engines. Their peculiarity is that very often the casting inside the drain and exhaust channels is defective, that is, it has roughness. These shortcomings lead to the fact that the piston is not blown through properly and, accordingly, loses power. Having removed the cylinder and armed with a rolling cutter, you can polish the channels, and then round off the sharp edges on the inside. When tuning scooters, in the photo you can see the differences between the motor before and after polishing. This action will help make the engine work easier at high speeds and potentially add a couple of kilometers to the top speed.
You can go further and increase the diameter of the inlet/outlet windows. For each 2T engine, this parameter is calculated individually. For example, it is enough to bore some 50 cc engines by 1 mm to obtain optimal intake/exhaust parameters. Do-it-yourself tuning of a 150cc scooter and other engine sizes is done in the same way.
Engine D1E41QMB
The D1E41QMB motor is the only two-stroke engine model made in China. A distinctive feature of this engine from other representatives of the category of power units is the presence of a chain reverse gear in the design. The uninterrupted operation of such an engine is ensured by mixing gasoline and oil in proportions of 40 to 1. The working life of the engine is about 10 thousand kilometers, after which the need for repairs arises. The disadvantage of the engine is the forced speed limit - no more than 50 km/h.
Tightening torques for threaded connections
| Tightening torques, Nm | |
| Generator rotor nut | 30-38 |
| Camshaft sprocket bolts | 7-11 |
| Clutch housing fastening nut | 38-45 |
| Footrest attachment | 20-25 |
| Rear shock absorber upper nut | 20-30 |
| Rear shock absorber lower nut | 25-30 |
| Engine, mounting nut M10 | 25-30 |
| Engine, mounting nut M8 | 20-25 |
| Rear footrest attachment | 35-50 |
| Muffler mounting nut | 20-25 |
| Left and right crankcase cover, screws | 5-10 |
| Front fork fastening nut | 18-23 |
| Connection of front fork and shock absorber | 15-20 |
| Seat nut | 6-10 |
| Attaching control handles | 6-10 |
| Steering wheel mount | 5-10 |
| Brake handle | 3-5 |
| Trunk mount | 5-10 |
| Wheel axle nuts: front rear | 50-60 110-120 |
| Crankshaft pulley nut | 80 |
| CVT rear pulley nut | 100 |
| Spark plug | 18-20 |
| Drain and fill plugs | 10 |
| Cylinder head nuts (bolts) | 10-15 |
| Other threaded connections | |
| M6 | 6-8 |
| M8 | 14-18 |
| M10 | 30-35 |
| M12 | 55-60 |
| M14 | 80-100 |
| M16 | 110-140 |
Note
:
These tightening torque values do not apply to fastening plastic parts.
Running in the engine
Incorrectly carried out running-in of the 139QMB engine in most cases leads to failure of the piston system. Friction occurs between the parts of the new CPG, which leads to an increase in engine temperature.
Running in the scooter motor is carried out as follows:
- The scooter is placed on the center stand.
- Within 5 minutes the engine starts at idle speed, the field of which cools down during the same time.
- Over the next 10 minutes, the engine also runs, after which it cools down for 15 minutes.
- The engine is restarted for 15 minutes, then turned off and left to cool for 15 minutes.
- The scooter is started again for 30 minutes, after which it is turned off and left for 20 minutes.
After carrying out such manipulations, you can run in the scooter itself. In the first 100 kilometers of the journey, you should not turn the throttle handle more than 1/3 of its full stroke. The maximum speed should not exceed 30 km/h. The speed can be increased by 15–20 km/h for the next 300 kilometers - during this time the engine should more or less reveal its potential.
After this break-in process, the oil must be changed.
Engine valves are adjusted every 500 kilometers.
Cylinder-piston group.
Finally, the most effective improvement for any engine is replacing the CPG. But not just a replacement, but the installation of a new, larger piston. Fortunately, there are now many ready-made kits on the market; you don’t have to sharpen or adjust anything, as with Soviet equipment. Moreover, there is even a lot to choose from. For example, for various models with a volume of 50 cubic meters, they offer kits to increase to 63, 72, 82 and even 90+ cubic cm. In some cases, this is an almost double increase in power.
The situation is similar with larger engines, for example, for 125 cubic meters, sets of 150 or 170 cubic meters are sold. Some, in the process of tuning a scooter, manage to increase 150 cubic meters with their own hands to 225 cubic meters. Choosing the right part is not the most difficult thing, the most difficult thing is installing it. After all, this process involves almost complete disassembly of the engine. You will be faced with the need to have several special removable keys in your arsenal; you can ask them from friends or borrow them for the evening at auto repair shops. We strongly recommend studying the technical component in order to properly disassemble, replace the necessary elements and assemble the motor.
Alas, for some, increased power does not promise anything other than breakdowns or inadequate performance. This is because by significantly increasing power, you inevitably entail work on all other nodes. Let's imagine that we installed a new 92 cc CPG on an old 50 cc engine. The first thing to check is the condition of the connecting rod, crankshaft and bearings. Otherwise, they will fly first, followed by our new system of both cylinder and piston.
Great, we added new bearings to the CPG, an elbow with a connecting rod, now we can be sure of reliability. But the engine does not go faster, and we decide to purchase a new carburetor. Now the mixture is too rich, and we understand that the exhaust needs to be changed. After such modifications, the engine sounds loud, accelerates perfectly, but the maximum speed is slightly higher than before and the variator sounds strange. After installing a high-speed CVT, for example from the Italian manufacturer Polini, the engine will be able to fully realize its new power. The last stage is an inspection of the brake system; you don’t want to find out at a speed of 60 km/h that the brakes are now comparable to bicycle ones.
As a result, after replacing almost all the components, we got a very fast “flea” that can surprise your friends and experts in this technology. Over time, you can make changes to the chassis system, replace shock absorbers, and install more attractive wheels. Often, the modernization process does not stop there, and after tuning a scooter 50, 150 with your own hands, impressive improvements in appearance are made. The moped is repainted, panels are changed, new devices, lighting, and so on appear.
Engine tuning
The first thing they try to change when tuning the 139QMB engine is the cubic capacity. For this purpose, the standard piston system is replaced with an 82cc one. At the same time, a new cylinder head with enlarged valves is installed. The piston system changes along with the camshaft, since a larger amount of fuel-air mixture is required for its correct operation. A new camshaft will help increase the volume of the incoming fuel mixture, but the carburetor will still need to be replaced.
How to install a piston on a scooter: remove the old one, install a new one
Getting to the piston cylinder will be easy if you follow the instructions. You need to start by removing the plastic lining of the scooter, and then disconnect the wires. The oil hose is disconnected, and the motor itself is removed by unscrewing the fasteners
The plastic cover should be set aside so as not to crush it due to careless movement.
To get to the piston, you ultimately need to remove the cylinder head, and then the cylinder itself.
Dismantling the piston itself is carried out in the following sequence:
- remove the CPG mounting bolts along with the head and gasket. Each bolt must be unscrewed in a criss-cross manner (diagonally) to avoid damaging the threads - installing the piston back requires using the same method. This will also prevent unwinding without the participation of the owner;
- directly dismantling the cylinder using upward movements - if you can’t pull it out, it is recommended to knock with a light wooden object. The product may become stuck due to the deposits listed above;
- turning the crankshaft for maximum piston lift. Be sure to cover the crankcase hole with a rag to prevent dirt from getting inside;
- you need to remove the retaining ring in order to remove the piston pin;
- In case of jamming, you need to use liquid to remove carbon deposits. An alternative is carburetor cleaner. As a result, after soaking, all plaque is easily removed, similarly with rings;
- cleaning ring grooves.
Step-by-step video on how to remove the piston from a scooter:
You will need to inspect the needle bearing for signs of burning, indicating wear of the part. If they are, a change is required immediately. Installation of a new CPG will not be effective for long in the absence of proper care.
Needle bearing
You should also pay attention to the following factors:
- if there is displacement of the needles inside the cage, the product as a whole is unusable;
- violation of geometry also indicates the need for replacement;
- There should not be much play when moving in the upper head of the connecting rod. In normal condition, the bearing simply moves freely.
As a result of changing the needle bearing, you can install a new piston for the scooter. Installation is carried out in reverse order. Several features of the procedure must be taken into account:
- Each new piston is supplemented with two rings (retaining rings), which allow the structure to be securely fixed. For four-stroke engines, the number of rings is already three due to the presence of an oil scraper ring;
- everything must be placed so that the rings and cylinder converge in the groove for reliable operation under any load;
- You should not put the plastic back before checking the functionality of the scooter;
- the upper part of the cylinder is indicated by the word “IN” on the cover - this way you won’t be able to confuse the direction;
- The inscription “EX” (exhaust) on the cover should be directed towards the exhaust port. Another option is to draw an arrow (it means the same thing). This factor depends on the specific scooter manufacturer.
Repairs can be carried out using a special kit containing all the necessary tools:
- piston ring remover (pliers);
- piston groove cleaning device;
- L-shaped screwdriver.
All this can be found separately. The main thing is to follow the dimensions that will suit a specific scooter model.
Step by step video on how to install a new piston on a scooter:
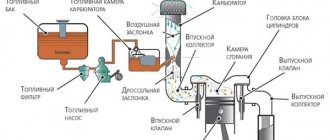
Air filter
It is not recommended to completely remove the filter element or replace it with a zero-resistance filter - this can lead to contamination of the carburetor. Experts usually recommend removing the plug that is installed at the inlet of the air filter.
Many reviews that affected the assembly of the 139QMB engine after tuning talk about installing a zero-resistance air filter. Despite the fact that this solution is one of the most popular, it is not always appropriate and justified.
The reason lies in the fact that installing such a filter leads to rapid contamination of the carburetor. The main reason for using a zero resistance filter is the need for a richer fuel mixture after installing a larger piston. However, this can be avoided by installing a new camshaft and replacing the jets in the carburetor.
Separately, it is worth noting that a standard carburetor equipped with a 16 mm diffuser is installed together with a 62–72cc piston system, while the 82cc piston system is equipped with a carburetor with an 18 mm diffuser.
For replacement, it is advisable to purchase a set of jets, since several different options may be needed to adjust the carburetor.
Setting the valve timing ch1 (in collective farm style - ignition)
We push the cylinder all the way into the crankcase and set the piston to top dead center (TDC). It is best to set the piston at TDC using an indicator or, at worst, visually/touch. You can also align the piston according to a special mark on the generator rotor, but I have more than once encountered the fact that the marks on some engines are stamped incorrectly and, in order to avoid troubles, I advise you to use them only as a last resort, for example, when the cylinder head is not removed and you need to adjust valve
We insert the cylinder head guide bushings and the lower timing chain guide into the cylinder, degrease the surface and install the gasket.
We install the cylinder head, insert the valve bed guide bushings.
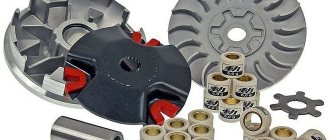
Variable speed drive
It is possible to increase the efficiency of a standard scooter variator and use its full potential only after installing an enlarged belt. At the same time, a set of new weights is purchased - they should all differ in weight. For a CVT, the required weight of the weights is selected extremely carefully and painstakingly, since the maximum speed of the motor vehicle and the dynamics of its acceleration depend on them.
What will be needed for replacement?
For such a procedure, it is worth preparing a set of wrenches, a ratchet with socket heads, a torque wrench, a piston ring puller and the set of rings itself.
You may be interested in: Mishlene tires: brand history, popular models
The tool for mounting/dismounting piston rings has a simple design and affordable price. Without this device, the replacement process can turn into an almost impossible task. Of course, in the past, car enthusiasts made do with a couple of screwdrivers. But it is better to have such a tool, otherwise without it you can damage the rings or the piston surface. Moreover, it is always available in auto stores.