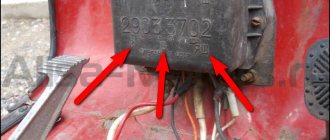
Main breakdowns and methods for solving them
On scooters, the electric starter often fails. Of course, Kickstarter can help out, but it’s not very convenient to use. The engine may not start due to a faulty battery: the contacts have come loose, the charge has run out, the device is worn out. If there is no spinning sound when the starter turns on, then the problem is in the battery. If you can’t charge it, it means it’s out of order, worn out and you’ll have to install a new one.
If pressing “Start” does not produce a click in the electric starter relay, the problem is more serious. The unit may be faulty and needs to be replaced. The problem can arise when various components wear out. Most often they need to be replaced.
You can fix some scooter problems yourself
Electric starter does not work
If the scooter does not start from the foot, then its operation is impaired. If the electrical circuit is working properly, but the relay clicks when you press “Start,” then the problem is a bad contact or a broken starter.
To evaluate its performance, you need to apply voltage to it without activating the relay. If the electric starter does not turn, then it needs to be replaced.
Starter relay failure
The relay maintains the voltage at the required level for further distribution to headlights, dashboard indicators and other elements. Its durability depends on the battery. If the voltage in the generator increases or decreases, the relay is faulty. Because of this, the starter does not start. In this case, the relay needs to be replaced.
Problems with the button
When the Start button is pressed, the starter rotates and drives the engine gears. If the scooter does not start with the electric starter button, there is a malfunction. The wiring in the engine starting system could have come loose. If the scooter starts from the foot, but not from the “Start” button, then the fuse is faulty: the voltage in the generator drops, so the button does not work.
To check the functionality of the fuse, you need to measure the voltage at the battery terminals and in the fuse. If losses are detected, a new fuse must be installed. After replacing the part, the moped will start from the “Start” button.
If the scooter breaks down, the electric starter may not work.
Broken brake contact (toad)
The brake system needs regular inspections, as driving safety depends on it. A breakdown of any other scooter system is easy to identify, since engine operation is disrupted. Brake failure can only be detected by diagnosing the vehicle. During the inspection, you need to check the integrity of all parts and the amount of brake fluid.
Replacing brake fluid is necessary every 8-11 months, depending on the intensity of use. In this case, you need to use the liquid recommended by the manufacturer. If the brake pads are worn down by 2 mm, they need to be replaced. Hoses need to be replaced if there are cracks or abrasions.
If system parts are worn out, brake contact is lost. Because of this, the engine will not start.
Contacts have come loose or oxidized
If the scooter does not start, the reason may be the contacts with the battery. It is necessary to check if they are charged. This must be done carefully to avoid electric shock. If there is no spark, you need to check the electronics. Most often the reason is oxidation of the terminals. When they become coated, the scooter does not start moving from the starter. You can clean the contacts with sandpaper or gasoline.
Contacts with the battery may be the reason if the scooter does not start
Bendix doesn't work
The starter fails due to careless handling of the bendix - the starter wire that engages with the engine flywheel and powers it. When the engine starts, a special mechanism with a relay pulls the bendix into the starter, stopping the engagement. Inexperienced drivers most often encounter Bendix breakdowns.
If in winter the engine does not start on the first try, they hold the "Start" button for a long time and spin the engine. The flywheel cannot rotate at the specified speed, causing the drive to jam. As a result, the starter overheats and the bendix fails. This may cause the starter housing to burst. Depending on the degree of damage, replacement of the bendix or the entire system is required.
The battery is dead or damaged
If the scooter refuses to move after starting the starter, you need to try starting it using the kickstarter. The battery may have run out. If you couldn't charge it, it means it's completely out of order.
Fuse blown
Due to damage to the power system, no current flows to the battery, so it does not charge. When the battery is charged, the engine stalls and does not start either with the kickstarter or the electric starter. The most common reason is that a fuse with a lower capacity than recommended by the manufacturer is installed. If the new fuse fails quickly, the electrical circuit is faulty. If a short circuit occurs, the wires need to be replaced.
Inexperienced drivers most often encounter bendix failure
Crankshaft seals are leaking
The front oil seal may leak after a mileage of more than 100 thousand km. In working condition, it fits tightly to the crankshaft. When the crankshaft beats, the inner surface of the oil seal cracks. Because of this, it cannot press tightly to the surface. Leakage can also occur due to the use of low-quality oil.
Another reason for the malfunction is related to engine failure. As pressure increases, crankcase gases create a gap in the oil seal through which oil flows out. The reason for leaking of the new oil seal may lie in the poor quality of the part itself or improper installation. If you bend the inner edge of the rubber when installing it, oil will flow out through it. In this case, the oil seal must be replaced.
If the rear oil seal leaks, oil can get onto the clutch disc and render it unusable. To replace it you will need to remove the box, clutch and flywheel.
Low compression
Compression in an engine is related to the mixing of fuel with air. The process is important for normal engine operation. A decrease in the indicator is very easy to determine: the engine does not start on the first try or does not start at all with low compression in all cylinders. Most often this occurs due to overheating or wear of the valves. Gases escape too quickly, causing compression to decrease.
The compression test takes about an hour. The indicator is measured by a compression meter. If low compression is detected, you need to check the condition of the cylinders, valves, gaskets and pistons. After replacing the damaged parts, compression will return to normal.
Old fuel
This problem occurs after winter. The tank is full of gasoline, but the electric starter does not start the engine. The reason is old gasoline. You need to drain it and fill the gas tank with new fuel.
No spark in spark plug
Diagnosing a breakdown is easy. You need to unscrew the spark plug, connect it to the ignition coil using a wire and place it on the cylinder. If there is no spark when the crankshaft rotates, the spark plug needs to be replaced.
Poor contact at battery terminals
Oxidation or poor terminal contact on the battery prevents the engine from starting. Diagnostics can be easily performed by visually inspecting the connection points between the terminals and the battery. If they are covered with a white coating, it means that the contact has been broken. It's easy to fix the situation. You need to remove the terminals and clean the deposits with sandpaper, then screw them onto the battery and cover the connection points with a special lubricant. If it is not there, you can use technical Vaseline.
Carburetor clogged
Difficulty starting the engine or failures in its operation occur when the carburetor becomes clogged.
To remove it, you need:
- unscrew the pipes;
- disconnect the terminals;
- remove the tube and drainage;
- remove the throttle cable;
- disassemble the carburetor assembly, clean it and put it back.
No compression
If the spark plug and battery are working fine, but the engine still won't start, then there is a compression problem. You need to check the pressure using a compression gauge. Lack of compression indicates a broken compressor ring. After replacing them, you can continue using the scooter. The procedure is quite complicated, so it is better to contact the service.
Cold weather
If the scooter stalls in the cold, it means that the spark plug cap or its connecting element is broken. It is necessary to unscrew the cap, bring the wire 3 mm to the motor element and rotate the crankshaft. In cold weather, a moped conducts current when a bare section of wire comes into contact with a metal element.
Relay clicks when starting
#1 OFFLINE Bumblebee
- users
- 591 messages
- Rostov-on-Don
- Bike:HD Sportster 1200
Greetings! This morning an incident happened: I inserted the ignition key, the lights on the dash are on normally, there is light, I press the electric starter button - it doesn’t turn and I hear a click under the seat every time I press it. I rolled the engine back and forth - I tried it again and everything was absolutely fine, it started without any problems. Oh guru, it’s time for “diagnosis from photography”, tell a noob what this could be connected with?
I even made a video. True vertical.
- Top
#2 OFFLINE Uncle OZZE
- photos&contacts
- Bike:BMW R1100R
Strip the contacts on the battery wires that go to ground (- ) (frame-engine) and + of the starter, and especially the contacts that go to the starter relay.
Post edited by Uncle OZZE: April 28, 2021 - 15:45
- 3
- Top
#3 OFFLINE Vovka
Awards
- 1
- Top
#4 ONLINE Dabbuger
- photos&contacts
- City: Rostov-on-Don, western
- Bike:Yamaha Majesty s155
This happens to me from time to time, I don’t worry too much. And about contacts, this is all correct, most likely there is no other reason
- Top
#5 OFFLINE Ksu
- photos&contacts
- City: Azov
- Bike:Suzuki V-Strom DL1000
I inserted the ignition key, the lights on the dash are lit normally, there is light,
Vit, I don’t know anything about the main problem, but here’s some advice about this phrase:
Do not turn on the light before starting.
That's where the bi-xenon is installed, it consumes a lot of energy when starting up
And your battery is almost a year old and has been in active use.
I quickly destroyed the previous tired battery with the lights not turned off upon arrival.
In the morning I turned the key, the light came on, I started it from the pusher)
Post edited by Ksyu: 28 April 2021 - 15:58
- 3
- Top
#6 OFFLINE ViK_Pro
- Rostov-on-Don
- Bike:HONDA CBR1100XX
A friend had the same symptoms last year. The starter relay clicks. He doesn’t like to figure it out himself, so he took me to MotoDon, and the investigation showed that the battery was faulty.
- Top
#7 OFFLINE Bumblebee
- Rostov-on-Don
- Bike:HD Sportster 1200
I understand the direction, thank you!
Ksyu, just yesterday I forgot to turn it off. Usually I extinguish everything or leave only the dimensions.
- Top
#8 OFFLINE Big_Ant
- City: Rostov
- Bike:YZF-R6 09′
From my experience - the relay clicked and did not start from the button because of the relay itself) I took it apart - the contacts inside were soured. Fortunately, the relays are universal, I replaced them with a new one.
- Top
#9 OFFLINE Ksu
- photos&contacts
- City: Azov
- Bike:Suzuki V-Strom DL1000
just yesterday and forgot to turn it off
- Top
#10 OFFLINE Kali
Awards
Contacts, button contacts, dying battery, you need to disassemble and clean the starter, maybe change the brushes on it.
- Top
#11 OFFLINE Bumblebee
- Rostov-on-Don
- Bike:HD Sportster 1200
Attached files
- IMG_8179.jpg 145.08K 0 Number of downloads:
- IMG_8180.jpg 187.32K 0 Number of downloads:
- Top
#12 ONLINE Seryoga gray cat
- Rostov-on-Don
- Bike: IZH-49 1947 Tula.
It greatly depends on how much the contacts are oxidized. Sandpaper is not very convenient there due to the complex shape of the contacts and the fact that sandpaper cannot reach all places. You can clean strong oxides with a small iron brush. And if possible, the tree is less traumatic for contacts. This is especially true for relay contacts. If you clean them on wood, there is usually no damage, but sandpaper removes the coating and then it will burn again. But of course, it happens that there is no way out and then you have to use only a fine one and then wipe it with alcohol to remove the remaining abrasive. And by the way, pay attention to the place where the wire hairs are pressed into contact. If the hairs themselves are visually strongly oxidized and there is oxidation around them, the inside may also be oxidized, and then only press on a new contact and it’s good if you can find them on sale. If you don’t have a tester, a small light bulb will help when checking. For example, put it on the battery and if, when you try to start it, it lights up just as brightly, then the battery is normal, and if it almost or completely goes out, then the battery needs at least a charge. And so on, before and after the starter relay. If it’s on, then it’s OK; if, for example, before the relay it’s on and then it goes out, then it’s a matter of the relay or the contacts around it.
- 1
- Top
Rules for operating a moped
The service life of a moped depends on maintenance. Care comes down to following the rules recommended by the manufacturer.
The main ones include:
- Testing a new scooter. The first concerns the running-in of a new scooter. The scooter must not be overloaded for the first 1000 km. When driving for a long time, you must stop every 30 minutes to prevent the engine from overheating.
- Correct use in winter. You need to drain the fuel before storing the scooter in the garage for the winter. Remaining fuel can destroy the tank and flood the carburetor. If you plan to use the scooter in winter, you need to change the fuel, check the battery charge, oil level, condition of the filters and tire pressure (it should be about 1.5 atmospheres).
- Correct use in summer. In hot weather, it is important to prevent the scooter from overheating. When driving for a long time at 30 degrees, the cylinders will be constantly overheated. This could cause the belt to break or the engine to break down. You should also not squeeze the throttle for too long, and when stopping, immediately turn off the engine.
- Use quality fuel. Gasoline must be at least 92. On a new moped, you need to change the oil for the first time after a run of 500 km. Subsequent replacement will be required every 1000 km. The first time to change the oil in the rear gearbox is after 200 km, then every 5000 km.
- Replacing the variator belt. This part is considered a consumable item, as it wears out quickly due to the high power load. If the moped stops squeezing out high speed, then the part and its components need to be replaced.
- Carburetor maintenance. The procedure includes a visual inspection for leaks and gasoline consumption levels, checking the condition of the connecting elements and the serviceability of the unit elements.
- Filtration quality control. The filter must be replaced promptly and impregnated with a special product after installation. This is necessary for high-quality air purification. Dirty air reduces the life of the motor.
If the electric starter on a scooter does not work, then there is always a kick starter that will help out.
But using a manual starter is not always convenient. Therefore, in this article we will find out why the starter on a scooter does not work. The electric starter is powered by a battery and passes through a special relay. Therefore, the first reason why the starter on a scooter does not work is the battery . It may have malfunctioned or simply run out of power. If you hear a spinning sound when starting the scooter through the electric starter, then the problem is with the battery. In this case, check the contact at the terminals . If it's not the contacts, it's the battery. If it is simply discharged, then it is enough to start the scooter with a manual starter and drive several tens of kilometers. This is enough to slightly charge the battery. If it still does not charge, then most likely it is faulty and needs to be replaced.
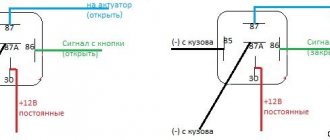
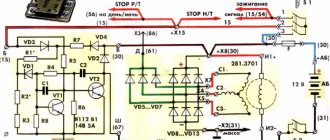
But if you hear the starter relay click when you press the starter button, then the problem will be more complicated. In this case, you can find out what the problem is by using the diagram:
Using this diagram, you can easily determine why the starter does not work on a scooter . This can be done quite quickly, since it does not require much effort and there are only a few things to check.
If you have any questions , leave them in the comments and you will receive an answer as soon as possible.
Now you know why the starter does not work on a scooter.
Order payment methods
Cash
— you can pay for your order in cash when purchasing in a store or upon receiving an order from a courier service employee;
Cashless payments
— this payment method is possible for individuals and legal entities. To pay for your order, we issue you an invoice for payment, which you can pay from any bank branch;
Payment by bank card - we accept payments by plastic cards both when paying for goods directly in the store, and online through the cart of our online store
;
To pay for goods using a bank card, when placing an order, you must click the “Payment by bank card” button.
Payment is made through the authorization server of the Bank's Processing Center using Bank credit cards of the following payment systems:
When paying for goods through an online store, you need to enter:
- Your credit card number;
- Expiration date of your credit card, month/year;
- CVV code for Visa cards / CVC code for Master Card (last 3 digits on the back of the card):
The scooter does not start - the starter does not turn: causes and solutions to the problem
The driver of any vehicle may encounter a malfunction such as a non-working engine. The inability to start the power unit, in particular on mopeds and scooters, may be due to failure of the starter device. What to do if the scooter does not start, the starter does not turn - the main recommendations for diagnosing and repairing the mechanism are described in this article.
Features of the starter on a scooter and moped
First, let's analyze the structure of the mechanism. Structurally, this unit is quite simple in structure.
The starter is a DC electric motor, which consists of:
- permanent magnet;
- rotary device;
- collector;
- brush assembly;
- bearing;
- oil seal;
- as well as the housing in which all the constituent elements are enclosed.
Photo gallery “Location and device”
Principle of operation
The rotor mechanism is a cylindrical part, which is also called an armature. An insulated wire is wound on this element in a certain order, which forms several coils, and they are independent of each other. At the ends of these coils there are contacts connecting the device to the collector. Directly in the body itself there is a permanent magnet, or rather two, that go around the rotor device.
When the driver tries to start the engine, voltage from the battery is supplied to the power contacts of the unit, the brush assembly, and then through the contacts of one of the windings. As a result, a constant magnetic field is formed around the armature axis, which contributes to the appearance of direct current. This field will then interact with the field of the installed permanent magnets. The commutator element rotates, the next pair of contacts fits onto the brush assembly, as a result of which the rotor mechanism again deflects. This way the unit will work until the driver stops turning the starter.
Working principle of VR
A constant plus is supplied from the battery to the upper power bolt of the “traction” bolt. In the free state, the contact plate does not touch the “nickels” of the power bolts in the cover. Both windings – the pull winding (VO) and the holding winding (CU), are connected with one terminal to a small “control” terminal, which receives the starting pulse from the ignition key (plus). The second output - a more powerful VO - goes to the jumper with the lower power bolt (plus of the starter electric motor), and the OU - to the “ground” (housing).
Starter connection diagram
As soon as the ignition key closes the power supply circuit to the VO, the current in it will create a magnetic field, under the influence of which the core will move inside the housing, push the bendix forward, and press the plate to the terminals. The plate will create a “short path” for high voltage current - from the top bolt, to the bottom and to the starter brushes. When the current flows through it, the “minus” disappears from the traction winding. Now only the holding one starts working, which is still energized (and will be as long as the ignition key remains in the “Start” position).
Possible starter malfunctions: causes and symptoms
What malfunctions are typical for a moped starter:
- Worn brush assembly. This problem is usually associated with natural wear and tear of the mechanism, so it cannot be prevented. Brushes can also become stuck over time.
- Collector contamination. This problem can be caused either by wear or by engine fluid entering the mechanism housing, which can come out of the crankcase of the power unit. If the commutator element becomes dirty, this will not allow current to pass through the assembly to the winding contacts. The problem can be solved by dismantling and cleaning the parts.
- Short circuit of winding elements.
- Interturn closure. Such problems are solved by replacing the rotor device.
- Loss of contact between the winding output and the contacts of the collector component.
- Violation of the wiring insulation, which can also be associated with its burning (the author of the video is the Moto-Scooter fanat channel).
As for the signs of problems, symptoms of a unit malfunction can be indicated by the appearance of uncharacteristic noise during operation, a sharp decrease in engine speed, and overheating of the mechanism. If the disassembly and cleaning procedure does not produce results, most likely the reason lies in the windings. As stated above, they could burn out, be damaged, in particular, we are talking about a breakdown to ground, or simply short out.
Starter diagnostics before replacement
The mechanism can be checked without removing it from the motor. Find the power contact on the case, then disconnect the cable from it. The battery should be removed from the moped, but you must be sure that it is charged. You will need two pieces of copper cable, which should be thick - they are connected to the battery terminals on one side, and the other - the negative wire is connected to the mechanism body, and the positive wire to its power terminal.
Then the following should happen:
- If the device works, this indicates that it is working; accordingly, the cause of the malfunction will be in the relay, ignition switch or wiring that is connected to the device.
- If the mechanism does not start, this indicates its failure. As stated above, there may be several reasons, so the device will need to be dismantled and disassembled (the author of the video is Sanya Slesar).
DIY mechanism repair and replacement
How to dismantle and disassemble the starter:
- First, you should find the device - as a rule, it is located in the upper part of the power unit, immediately behind the cylinder. There is a power connection on the case; it should be disconnected.
- Next, unscrew the screws that secure the device to the power unit housing, and then remove it from the vehicle. If the device is equipped with a flange mount, then its screws will be located at the base of the case.
- After this, you need to unscrew the screws that secure both parts of the device’s body; their number may vary depending on the design features of the model. The shaft should be visible from the housing; it should be carefully clamped, and then, slowly, disconnect the halves.
- Having done this, you can remove the rotor element from the device body. Carefully inspect the condition of the commutator, as well as the brush assembly. If you notice that the first one is dirty, then you should clean it of dirt and then treat it with clean fuel. As for the brushes, worn components should also be removed and replaced with new ones. Before changing them, check their length - in optimal condition it should be at least 5-6 mm.
- All worn parts must be replaced. As stated above, problems with windings are usually not solved.
Why does the starter on a scooter not work?
If the electric starter on a scooter does not work, then there is always a kick starter that will help out. But using a manual starter is not always convenient. Therefore, in this article we will find out why the starter on a scooter does not work.
The electric starter is powered by a battery and passes through a special relay. Therefore, the first reason why the starter on a scooter does not work is the battery. It may have malfunctioned or simply run out of power. If you hear a spinning sound when starting the scooter through the electric starter, then the problem is with the battery. In this case, check the contact at the terminals. If it's not the contacts, it's the battery. If it is simply discharged, then it is enough to start the scooter with a manual starter and drive several tens of kilometers. This is enough to slightly charge the battery. If it still does not charge, then most likely it is faulty and needs to be replaced.
But if you hear the starter relay click when you press the starter button, then the problem will be more complicated. In this case, you can find out what the problem is by using the diagram:
Using this diagram, you can easily determine why the starter does not work on a scooter. This can be done quite quickly, since it does not require much effort and there are only a few things to check.
If you have any questions, leave them in the comments and you will receive an answer as soon as possible.
Now you know why the starter does not work on a scooter.
The relay does not click. Starter malfunction
Important! The starter is not designed to operate for a long time. It consumes too much electrical energy, and the battery reserves are not unlimited. Its reserves are barely enough for 10 - 15 seconds, during which the car will have time to advance a maximum of 100 - 120 meters.
When the starter is working properly, a click can be clearly heard. This sound is made by the relay when the bendex is retracted. If the starter relay does not click, then one of three problems is happening:
- The power supply has been interrupted. Moreover, there may be current, but the voltage reading will be too low. Checking the wires and connections will confirm (or refute) this suspicion. However, the most common reason is battery discharge.
- Mechanical damage to individual starter elements. Accumulated wear, repeated attempts to start the engine incorrectly, and failure to inspect this part during regular maintenance are all aggravating factors for mechanical damage.
- Relay failure. This fact can only be confirmed by professional diagnostics.
There are also situations not related to the relay when a starter malfunction is detected. In this case, there must be firm confidence that the battery is fully charged. For example:
- The starter works, but the flywheel does not rotate. The cause is a worn ring on the flywheel. Replacing it, as well as turning the crankshaft a few centimeters, completely solves this problem.
- Immobilizers block the vehicle's electrical circuits, making it impossible to activate the starter (no current is supplied). Before starting, turn off the anti-theft system.
- The brushes (and brush holders) are worn out. This is, in general, the weak point of the starter. With their help, voltage is transmitted to the rotating rotor. Constant friction leads to rapid wear.
- Damage to the winding insulation leads to a short circuit in its turns. Smoke and an unpleasant burning smell may appear. Such a starter cannot be restored without replacing the winding.
- Poor shaft alignment leading to jamming or stiff rotation of the starter.
- Gear wear leads to inconsistency between the bendix and the flywheel. It simply slides through the teeth without catching them. The problem is solved by replacing the gear.
The scooter does not start - the starter does not turn: causes and solutions to the problem
The driver of any vehicle may encounter a malfunction such as a non-working engine. The inability to start the power unit, in particular on mopeds and scooters, may be due to failure of the starter device. What to do if the scooter does not start, the starter does not turn - the main recommendations for diagnosing and repairing the mechanism are described in this article.
First, let's analyze the structure of the mechanism. Structurally, this unit is quite simple in structure.
The starter is a DC electric motor, which consists of:
- permanent magnet;
- rotary device;
- collector;
- brush assembly;
- bearing;
- oil seal;
- as well as the housing in which all the constituent elements are enclosed.
Photo gallery “Location and device”
Principle of operation
The rotor mechanism is a cylindrical part, which is also called an armature. An insulated wire is wound on this element in a certain order, which forms several coils, and they are independent of each other. At the ends of these coils there are contacts connecting the device to the collector. Directly in the body itself there is a permanent magnet, or rather two, that go around the rotor device.
When the driver tries to start the engine, voltage from the battery is supplied to the power contacts of the unit, the brush assembly, and then through the contacts of one of the windings. As a result, a constant magnetic field is formed around the armature axis, which contributes to the appearance of direct current. This field will then interact with the field of the installed permanent magnets. The commutator element rotates, the next pair of contacts fits onto the brush assembly, as a result of which the rotor mechanism again deflects. This way the unit will work until the driver stops turning the starter.
Possible starter malfunctions: causes and symptoms
What malfunctions are typical for a moped starter:
- Worn brush assembly. This problem is usually associated with natural wear and tear of the mechanism, so it cannot be prevented. Brushes can also become stuck over time.
- Collector contamination. This problem can be caused either by wear or by engine fluid entering the mechanism housing, which can come out of the crankcase of the power unit. If the commutator element becomes dirty, this will not allow current to pass through the assembly to the winding contacts. The problem can be solved by dismantling and cleaning the parts.
- Short circuit of winding elements.
- Interturn closure. Such problems are solved by replacing the rotor device.
- Loss of contact between the winding output and the contacts of the collector component.
- Violation of the wiring insulation, which can also be associated with its burning (video author - Moto-Scooter fanat channel).
As for the signs of problems, symptoms of a unit malfunction can be indicated by the appearance of uncharacteristic noise during operation, a sharp decrease in engine speed, and overheating of the mechanism. If the disassembly and cleaning procedure does not produce results, most likely the reason lies in the windings. As stated above, they could burn out, be damaged, in particular, we are talking about a breakdown to ground, or simply short out.
Starter diagnostics before replacement
The mechanism can be checked without removing it from the motor. Find the power contact on the case, then disconnect the cable from it. The battery should be removed from the moped, but you must be sure that it is charged. You will need two pieces of copper cable, which should be thick - they are connected to the battery terminals on one side, and the other - the negative wire is connected to the mechanism body, and the positive wire to its power terminal.
Then the following should happen:
- If the device works, this indicates that it is working; accordingly, the cause of the malfunction will be in the relay, ignition switch or wiring that is connected to the device.
- If the mechanism does not start, this indicates its failure. As stated above, there may be several reasons, so the device will need to be dismantled and disassembled (the author of the video is Sanya Slesar).
DIY mechanism repair and replacement
How to dismantle and disassemble the starter:
- First, you should find the device - as a rule, it is located in the upper part of the power unit, immediately behind the cylinder. There is a power connection on the case; it should be disconnected.
- Next, unscrew the screws that secure the device to the power unit housing, and then remove it from the vehicle. If the device is equipped with a flange mount, then its screws will be located at the base of the case.
- After this, you need to unscrew the screws that secure both parts of the device’s body; their number may vary depending on the design features of the model. The shaft should be visible from the housing; it should be carefully clamped, and then, slowly, disconnect the halves.
- Having done this, you can remove the rotor element from the device body. Carefully inspect the condition of the commutator, as well as the brush assembly. If you notice that the first one is dirty, then you should clean it of dirt and then treat it with clean fuel. As for the brushes, worn components should also be removed and replaced with new ones. Before changing them, check their length - in optimal condition it should be at least 5-6 mm.
- All worn parts must be replaced. As stated above, problems with windings are usually not solved.
How to check the solenoid relay
You can check the VR in two ways - without removing it from the car and after removing it together with the starter. If you suspect that the signal from the lock is lost somewhere in the circuit, first carry out a regular test on the car, then, based on the results, the unit can be removed and checked more accurately - with a multimeter.
Check without removing from the car:
- Put the car on the handbrake, make sure it is in neutral gear.
- Turn on the ignition and leave the key in the lock.
- Remove the connector (thin wire) from the control terminal BP.
- Using a screwdriver, close the terminal with the upper power bolt (plus from the battery).
If after this the car starts, the problem is in the control circuit (the pulse from the lock does not reach the terminal). If the starter continues to click but does not turn, check the devices separately. To do this, the “traction” needs to be disconnected from the starter housing (it’s easier to remove them from the car together, and then separate them).
Check after removal:
- Turn the multimeter into audible dialing mode.
- Connect one probe of the device to the control terminal.
- The second one has a lower power bolt (terminal for brushes).
- If there is a signal, the pull-in winding is intact.
- Leaving the first probe on the terminal, attach the second one to the body.
- If there is a signal, the holding coil is also intact.
- Install the device vertically, on the anchor, with the terminals facing up.
- Throw the probes onto the bolts - one on the top, the other on the bottom.
- Press the relay, pressing the armature all the way.
- If there is sound, the power terminals are closed correctly, the plate is working.
- If there is no sound, but the display displays numbers, it does not work. The reason is external resistance.
Checking the solenoid relay with a multimeter
If at least one breakdown is detected, the part is replaced with a new one or a known good one. If both coils are intact, and the plate closes the “nickels” normally, all that remains is to test the force with which the spare part moves the armature plunger. To do this, first measure the free play of the plunger by inserting the relay into place in the housing until the loop tightly touches the fork lever, and use a ruler to measure the distance between the electric starter housing and the retractor itself. Pull out the part, push the plunger in until it touches the spring, now set the resulting distance on the plunger from the edge of the body. Mark (with marker or awl).
From the equipment you will need: a charged battery, three pieces of wire with a cross-section of 2 squares, with alligator clips and a plug for the control terminal (connector 50).
- Fix two wires with one end to the “ground” (body) of the part.
- Connect one of these wires to the negative terminal of the battery.
- Place the third wire with the plug on the positive battery.
- With one hand, press the part to the surface, “squeezing” the plunger to the mark.
- Place the plug on connector 50.
- Touch the end of the free wire (from the housing) to the lower power bolt.
- If the core overcomes the resistance and retracts, there is no problem, the solenoid relay is working.
To evaluate the force, you need to securely fix the device (by the loop on the anchor) on a flat, solid base. The surface should not conduct current - for example, a wooden or cardboard-covered table.
Scooter starter malfunctions: identifying and fixing the problem
The presence of a starter in a scooter, unlike a car, is not mandatory. However, it makes life much easier for the driver, adding a little comfort while working. Everyone knows that the starter works thanks to the battery, and it consists of:
- brushes;
- covers;
- anchors;
- support washer;
- two springs;
- o-ring;
- metal stator housing.
The principle of its operation is no different from any other starter, although some breakdowns may differ from the usual ones.
Why doesn't the starter work?
Initially, you need to exclude battery discharge from the list of possible breakdowns. If this were the case and the battery suddenly became low, you would hear a peculiar sound when you press the “start” button. This sound indicates that the starter is not engaged with the bendix and is running without load, idle. If you still hear this sound when starting up, do certain things:
- you need to check the terminals and clean them if necessary;
- inspect the wiring for damage;
- Check the condition of the battery (voltage level), recharge or replace it if necessary.
In most cases, these points will help you solve the problem with your scooter.
However, there may be other breakdowns, which in themselves are considered more serious when compared to a dead battery. We are talking about audible clicks when the starter operates. This is a deeper problem and it is necessary to look for its causes.
Causes and solutions
Step 1: With the ignition on, try honking the horn. If everything worked out and you could hear a loud and ringing sound, everything is fine, you can start the engine. If the sound was very quiet or could not be heard at all, there were problems with the battery or power supply (recharge the battery, clean the terminals).
Step 2. When you press the engine start button, you hear the sound of the relay turning on. If yes, then try bridging the power terminals of the relay. If there is no sound, disconnect the relay from the power supply, and then use the wires to connect the battery and starter.
Step 3. Once you have connected the starter, it works fine. If yes, then you just need to replace the relay. If not, check the contacts of the start button, the wires from the starter, and replace all worn parts.
Step 4. If, after you bridge the power terminals of the relay, the starter begins to operate normally, replace the relay. If not, then you are faced with a more serious task: you need to disassemble the starter and check the condition of its parts (brushes, windings and springs).
By analyzing your scooter breakdown using these simple steps, you can easily identify and fix the breakdown. Of course, you don’t have to worry too much about this and just bring your scooter to a service station. But at the same time, you will spend your money and will not be able to gain that invaluable experience that you will gain when diagnosing and repairing yourself.
Procedure for returning and exchanging goods
Return Policy
The product is accepted for return/exchange if:
- a claim regarding the quality of a product is made before the expiration of the product’s warranty period - the guarantee provided by:
- The law of the Russian Federation is 14 days, not counting the date of purchase (in accordance with the Federal Law of the Russian Federation, Article 25, clause 2, paragraph 2);
- Warranty provided by the motorcycle and bicycle market “Tourist”;
- Warranty provided for the product by the manufacturer;
- the detected defect is not a consequence of improper use of the product - there is a cash register or sales receipt (FZoPP, Article 25, clause 1, paragraph 3);
ELECTRONICS OF ALPHA AND DELTA MOPEDS
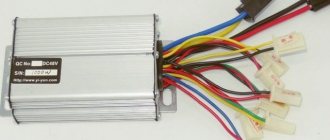
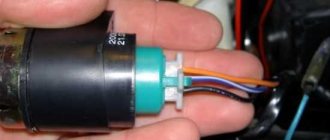
Due to the fact that more and more owners of devices with engines of the 139FMB type and lights at recess are faced with six-coil generators (replacing the motor or preferably a more powerful generator), there is a need to write this article. First, let's figure out what the differences are. The picture shows a diagram
The electrical equipment of the mopeds under consideration consists of a source and consumers of electronic energy, auxiliary devices and an electronic network. Electrical equipment ensures timely ignition of the working mixture in the engine cylinder, operation of lighting devices and
The most popular scooter in Russia and Ukraine is the Viper Active. And here everything is very simple, a decent appearance, an established network of product suppliers, a reasonable price and a truly bassy and beautiful exhaust sound, which is sometimes misleading, and creates the memory that the Viper Active is installed on
about all the electronics on a moped. In this video we will tell you in general terms how the wiring in the bike works. Enjoy watching. Wiring on Chinese mopeds Alpha, Delta and its repair
Read
Drawings and photos of electrical circuits of mopeds. I sketched out a few things for anyone who needs to figure it out! There are also 2 types of voltage regulator: 4-pin and 5-pin. The diagrams show only 4-pin. Generators for them are different. You can find a generator for a 5k regulator by the fact that it does not have windings
1 Ignition module (CDI) 2 Ignition coil 3 Spark plug 4 Alternator 5 Voltage regulator 6 Battery 7 Fuse 8 Starter 9 Start button 10 Start relay 11 Tachometer 12 Ignition switch 13 Brake light 14 Transmission neutral indicator 15 Instrument panel backlight 16 Headlight
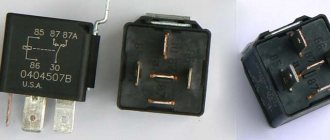
Starter relay for Chinese motorcycles and scooters - alternative replacement
The purpose of the video is to save the nerves and money of the owners of Chinese motorcycle equipment to check
your
relay
can follow the link.
How to check the starter relay on a scooter
Main tasks of the relay
. Problems with the electric starter itself are not considered.
The “Delta”, “Alpha”, “Leader” and “Mustang” mopeds use a 12 V battery with a capacity of 2.5, 3.0 or 5.0 A/h (Table 6.1). Inside the case, the battery is filled with a chemical reagent and electrolyte. Battery maintenance involves periodically checking the level and density of the electrolyte.
The source of electricity for mopeds is a generator (magneto), the rotor of which is mounted on the left axle of the engine crankshaft. Flywheel type generator, alternating current, with excitation from permanent magnets. To diagnose a generator, special equipment is required. Disassembly
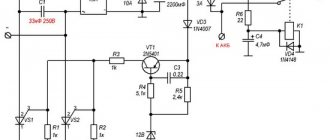
One of the main elements of the moped's electrical system is the voltage regulator-rectifier. The appearance of the voltage regulator-rectifier is shown in Fig. Rice. 6.6. The voltage regulator-rectifier performs two functions: it ensures the voltage in the moped network within the range of 12.0-14.5
Read
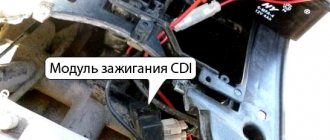
The Delta, Leader and Mustang mopeds use a contactless CDI ignition system. The CDI ignition system eliminates the weak link of the traditional ignition system
, i.e. wear out quickly and require frequent adjustment of breaker contacts. The abbreviation "CDI" comes from the first letters
Spark plugs (Fig. 6.11) recommended by the manufacturer for A7TC or A7RTC SX four-stroke engines. Analogues of these spark plugs are NGK C7HSA or NGK CR7HSA, Champion Z9Y. The technical characteristics of the spark plug are given in table. 6.9. The gap between the spark plug electrodes should be 0.6-0.7 mm. Regulatory replacement
The electromagnetic sensor of the ignition system (Fig. 6.12) is located on the stator mounting plate in the left engine cover. Checking the electromagnetic sensor of the ignition system You can test the electromagnetic sensor of the ignition system without removing it from the engine; for this you need to: measure
The starting system includes the starter, starter relay and starter drive. The appearance of the starter is shown in Fig. 6.13. The starter is a mixed-excitation DC electric motor and is designed to start the engine. On mopeds “Alpha”, “Delta”, “Leader”, “Mustang”, etc. can be installed
The starter is removed in the following order: placing the moped on a flat surface, disconnect the “-” terminal from the battery; disconnect the terminal wire from the starter (Fig. 6.17); Unclench the spring ring lock with pliers and remove the starter sprocket along with the chain from the splines (Fig.
If the starter does not turn when you press the start button, you can check
, connecting directly to the power source (Fig. 6.20).
With this connection, the starter should rotate. If the starter does not rotate, you need to disassemble the starter housing and check the starter parts: brush length
Why the scooter does not start with the button - we identify the reasons
A scooter is a practical vehicle, economical and easy to drive. Modern models are reliable and easy to maintain, but various problems may arise during the operation of the scooter.
One of the most common breakdowns is the failure of the scooter to start with the button.
As a rule, at first the scooter starts from the button every other time , and then does not start at all using the electric starter. How to be in this case?
To fix a problem, you need to identify the cause of its occurrence. As practice shows, there can be many such reasons, but there are also quite common ones.
What to check if the scooter does not start with the button
We list the most common reasons and give ways to solve them:
- Fuel sensor malfunction. No matter how trivial it may sound, this happens quite often: the sensor shows that there is still gasoline left in the tank, and the owner of the scooter looks for the cause of the “breakdown” in a completely different place. Therefore, it would not be superfluous to first look into the gas tank and make sure that there is fuel in it.
- The battery is low. This often happens when equipment is idle for a long time. To solve the problem, just charge the battery.
- Old fuel. Many scooter owners face this problem after winter. There seems to be gasoline in the tank, the electric starter seems to be turning, but something is missing to start the engine itself. The cause of this problem may be old gasoline, try draining it and adding fresh fuel.
- There is no spark in the spark plug. To check this version, you need to unscrew the spark plug, apply it to an unpainted part of the engine (for example, to the cylinder), and use the kickstarter to crank the crankshaft. At the same time, you should not neglect precautions: you should not hold the candle with your bare hands. If there is no spark, the spark plug must be cleaned of moisture and carbon deposits, sanded with zero-grit sandpaper and dried. Ideally, the spark should be white.
- Poor contact at the battery terminals - over time they can become covered with oxide, which is a dielectric. To get rid of this problem, just clean the contacts with the same fine sandpaper.
- The fuel tap and/or fuel line is clogged. If gasoline does not flow into the ignition system or is supplied intermittently, the scooter will not start either from the kickstarter or from the button. To fix the problem, these elements of the fuel system need to be cleaned.
- The carburetor is clogged. Difficulty starting the engine, “floating” speed, failures in engine operation - all this indicates that the carburetor needs cleaning. To remove the carburetor, you need to unscrew the inlet pipe and the air filter pipe, disconnect the terminals of the starter enrichment, remove the gasoline supply pipe and drainage. Then you need to disconnect the throttle cable and you can remove the carburetor. Next, you should carefully disassemble the power system assembly, clean it and put it back together. After cleaning the carburetor, do not forget to adjust the floats to a horizontal position!
- No compression. Inspect the piston group. When the piston moves to top dead center, pressure should appear in the cylinder. This can be checked using a special device - a compression meter. To do this, screw the compression gauge fitting in place of the spark plug and turn the crankshaft using the kickstarter. On 2-stroke scooters the compression should be 7-8 kg/cm2, on 4-stroke scooters - 9-10.
Procedure for returning and exchanging goods
Return Policy
The product is accepted for return/exchange if:
- a claim regarding the quality of a product is made before the expiration of the product’s warranty period - the guarantee provided by:
- The law of the Russian Federation is 14 days, not counting the date of purchase (in accordance with the Federal Law of the Russian Federation, Article 25, clause 2, paragraph 2);
- Warranty provided by the motorcycle and bicycle market “Tourist”;
- Warranty provided for the product by the manufacturer;
- the detected defect is not a consequence of improper use of the product - there is a cash register or sales receipt (FZoPP, Article 25, clause 1, paragraph 3);
ELECTRONICS OF ALPHA AND DELTA MOPEDS
Due to the fact that more and more owners of devices with engines of the 139FMB type and lights at recess are faced with six-coil generators (replacing the motor or preferably a more powerful generator), there is a need to write this article. First, let's figure out what the differences are. The picture shows a diagram
The electrical equipment of the mopeds under consideration consists of a source and consumers of electronic energy, auxiliary devices and an electronic network. Electrical equipment ensures timely ignition of the working mixture in the engine cylinder, operation of lighting devices and
The most popular scooter in Russia and Ukraine is the Viper Active. And here everything is very simple, a decent appearance, an established network of product suppliers, a reasonable price and a truly bassy and beautiful exhaust sound, which is sometimes misleading, and creates the memory that the Viper Active is installed on
about all the electronics on a moped. In this video we will tell you in general terms how the wiring in the bike works. Enjoy watching. Wiring on Chinese mopeds Alpha, Delta and its repair
Read
Drawings and photos of electrical circuits of mopeds. I sketched out a few things for anyone who needs to figure it out! There are also 2 types of voltage regulator: 4-pin and 5-pin. The diagrams show only 4-pin. Generators for them are different. You can find a generator for a 5k regulator by the fact that it does not have windings
1 Ignition module (CDI) 2 Ignition coil 3 Spark plug 4 Alternator 5 Voltage regulator 6 Battery 7 Fuse 8 Starter 9 Start button 10 Start relay 11 Tachometer 12 Ignition switch 13 Brake light 14 Transmission neutral indicator 15 Instrument panel backlight 16 Headlight
Starter relay for Chinese motorcycles and scooters - alternative replacement
The purpose of the video is to save the nerves and money of the owners of Chinese motorcycle equipment to check
your
relay
can follow the link.
How to check the starter relay on a scooter
Main tasks of the relay
. Problems with the electric starter itself are not considered.
The “Delta”, “Alpha”, “Leader” and “Mustang” mopeds use a 12 V battery with a capacity of 2.5, 3.0 or 5.0 A/h (Table 6.1). Inside the case, the battery is filled with a chemical reagent and electrolyte. Battery maintenance involves periodically checking the level and density of the electrolyte.
The source of electricity for mopeds is a generator (magneto), the rotor of which is mounted on the left axle of the engine crankshaft. Flywheel type generator, alternating current, with excitation from permanent magnets. To diagnose a generator, special equipment is required. Disassembly
One of the main elements of the moped's electrical system is the voltage regulator-rectifier. The appearance of the voltage regulator-rectifier is shown in Fig. Rice. 6.6. The voltage regulator-rectifier performs two functions: it ensures the voltage in the moped network within the range of 12.0-14.5
Read
The Delta, Leader and Mustang mopeds use a contactless CDI ignition system. The CDI ignition system eliminates the weak link of the traditional ignition system
, i.e. wear out quickly and require frequent adjustment of breaker contacts. The abbreviation "CDI" comes from the first letters
Spark plugs (Fig. 6.11) recommended by the manufacturer for A7TC or A7RTC SX four-stroke engines. Analogues of these spark plugs are NGK C7HSA or NGK CR7HSA, Champion Z9Y. The technical characteristics of the spark plug are given in table. 6.9. The gap between the spark plug electrodes should be 0.6-0.7 mm. Regulatory replacement
The electromagnetic sensor of the ignition system (Fig. 6.12) is located on the stator mounting plate in the left engine cover. Checking the electromagnetic sensor of the ignition system You can test the electromagnetic sensor of the ignition system without removing it from the engine; for this you need to: measure
If the scooter starts with the kickstarter, but does not start with the button
If the scooter starts without problems from the “leg”, but does not want to start from the electric start button, then you should pay attention to the central fuse (it is located in the compartment with the battery). If the voltage in the scooter’s electrical network is too low due to a faulty fuse, it will no longer start using the “Start” button.
To check the serviceability of the central fuse, you should measure the voltage at the battery terminals and compare with the voltage after the fuse.
If losses are detected during measurements, the fuse should be replaced. In most cases, after replacing the faulty fuse, the scooter starts without problems.
The problem when the starter button on a scooter does not work may not only be in the fuse. It is likely that the integrity of the connecting conductors in the engine starting circuit is broken.
VIDEO INSTRUCTIONS » alt=»»> It will be difficult for a beginner to deal with such a malfunction, so for a complete diagnosis of the electrical circuit it is better to contact an auto electrician.