It happens that machines appear on the market that will never become widely known and popular, for example, due to their special purpose. However, sometimes samples of equipment remain unknown because something went wrong in their mass production. Here are five domestic motorcycles that, according to 2Drive, were undeservedly forgotten.
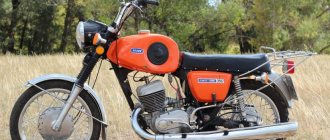
Voskhod-250
A unique model made in the mid-70s of the last century at the Degtyarev Plant. The motorcycle was equipped with a 250 cc engine, which was coupled with a 2-shaft 5-speed gearbox. The power of the power unit was 20 hp. He accelerated the motorcycle to 115 km/h. This in turn required the use of a reinforced frame.
The motorcycle is also notable for the fact that it was on it that 12-volt equipment was first used. The Soviet vehicle fully complied with the UNECE; it passed all factory and state tests. But it never got to production.
Why is it worth ordering spare parts from us?
If you have already selected a suitable option, simply fill out the online form on the website, and if you can’t make a choice, call our consultants. Depending on the nature of the breakdown, we will help you decide on the purchase of rare spare parts for the Izh, Jupiter and Planet motorcycles. All specified components come with a quality guarantee. You will return your vehicle to working order with minimal investment of time and money.
The advantages of working with us are the extensive experience of our specialists in selecting components for Soviet motorcycles, the availability of even rare samples and the supply of only original and high-quality spare parts from reliable manufacturers.
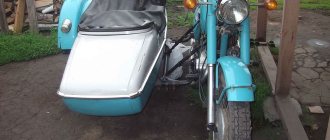
IMZ M63S "Strela-1"
An interesting road-ring motorcycle with a sidecar IMZ M63S, which received the beautiful name “Strela-1”. It worked on a 4-valve carburetor engine with a volume of 649 cc, while developing a power of 55-60 hp. The maximum speed of the motorcycle, according to 2Drive, could reach 150 km/h. The model was also notable for the presence of an aerodynamic shroud. A total of 20 of these machines were made.
MMVZ-3.227
This model was produced specifically for road racing between 1987 and 1991. During this time, a total of 250 copies were made. Moreover, each new batch was different from the previous one. The designers used a 24 horsepower engine, which worked with a 4-speed gearbox. Weighing 85 kg, this motorcycle accelerated to 160 km/h without any problems.
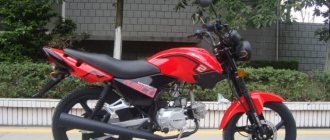
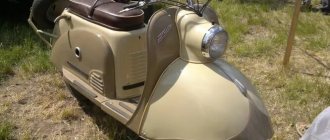
IZH 7.109 "Orion"
In the late 80s of the 20th century, the domestic media trumpeted this motorcycle as something truly revolutionary. The Orion was equipped with a 4-stroke Yamaha XT 550 engine with a displacement of 560 cm3. The vehicle was supposed to replace the older Planet motorcycle. However, the new model turned out to be too complex for mass production by the Soviet industry of that period. Unfortunately 2Drive, only a small experimental batch was released
Planet Pendant [#1] Orion Feathers. Analysis and troubleshooting.
Hi all!
In today’s article I will try to describe every process, even the smallest one, in the smallest detail, because the topic of today’s writing is quite serious, and finding something really worthwhile on the Internet is really difficult, it’s possible, but difficult. And, of course, I have a much greater desire to join a topic that is worth something than just writing a few words about how difficult and painful it is to disassemble ORION feathers. In general, that's enough to talk about, let's go figure it out.
So, let's start with the fact that the seats are already removed from the motorcycle, and in order to disassemble them, you need to have some tools, and make some yourself.
Tools we will need:
1. Impact screwdriver. NOWHERE without her. Believe it or not.
2. A good, and most importantly WIDE bit for a regular screwdriver slot.
3. Favorite tool of IZhevod, what is it IZhevod, scoop maker rather, yes, yes, we are talking about a hammer.
4. A self-made screwdriver, and here I want to make a small digression. Guys, I'm a bit of an asshole and didn't take a photo of the screwdriver I made... I apologize for that, but there's nothing complicated there, more on that below.
5. Comrade, girlfriend, wife, in general, any person, or 2 more hands that we will definitely need. This is certainly not a tool, but believe me, you can’t do it alone.
6. Yews. Such good, powerful yews.
7. Key for 14.
8. Construction hair dryer. WITHOUT IT, DON’T EVEN TRESSURE TO DISASSEMBLE THE FEATHERS, you screw the slot on the bolt and that’s it. Don’t be lazy to take it from a friend, or buy it in a store, it’s a very necessary thing in our business.
9. POSSIBLY, you will need a wrench with a 8-mm head, into which a WIDE bit will be inserted under a regular slot of a screwdriver; it will be more convenient to unscrew the damn bolt from the bottom of the pen cup, which sits on the varnish.
10. Key to 22.
11. Knife.
12. Narrow-nose pliers.
That's all from the tools, let's move on.
Making a special screwdriver.
Everything here is actually simple, I’m sure you’re not stupid and will understand me even without a photo, in general, why is it needed at all, the design features of the pen are such that the bolt that is screwed into the bottom of the glass secures the main, sliding pipe, inside this pipe there is a bolt with slots, it can be different, I had the one like in this photo.
As you can see from the photo, this is a PPC and not a bolt, and it’s not a bolt at all, it’s, I don’t know, a fitting or something, that doesn’t matter, for me it will be a bolt.
It is into this “super groove” that our screwdriver will be inserted.
We make a screwdriver from a 14 hex blank, I can’t say exactly the length, I know for sure that 50 cm will be enough.
We take a grinder and begin to make a certain slot at the end of our workpiece so that it fits into this very “super groove” on the bolt inside the feather. The length of the slot should be at least 15 mm, it’s better to make it 16, and then if you cut anything with a grinder. The thickness of the slot is somewhere around 1.5-2.5 mm. Why did we choose a hexagonal blank? Because it will be convenient to hold it with a key number 14, that’s the whole secret, in fact. Here's a photo, it's not mine, the guy there used a square blank instead of a hexagonal one, but the hexagonal one is more convenient.
feather disassembly
We take the key for 22 (In my opinion, for 22, if for 22 it is too small, we take it for 24) and unscrew the top cover of the pen, it has a nipple for pumping air, don’t touch it, there’s nothing there to break or get dirty, don’t go there, it’s worth and let it stand there, God bless it for another 100 years, so, take the key and unscrew this cap, but first press the nipple and release the air from the pen, if you have it there, of course, if so, congratulations, seals more or less they are still holding something, by the way, I had air) After releasing the air, carefully unscrew the lid, holding it, because there are two springs under it, they are not under tension, but who the fuck knows, be careful and follow all safety rules, eyes, lips and noses, I'm sure you don't have any spare ones.
Pen cap photo:
After that, we take out the springs, there are two of them, by the way, there is a special washer on the top of the spring, here it is:
If the lower one falls off the connecting plastic sleeve, the first one, the long one, will come out first, but this is not a problem, because the second (small) one is easy to get out, for example, with a wire with a bent tip. Here is a photo of the springs.
This is the connecting sleeve
Next, take some container with a volume of at least 300 ml, preferably 400, and, turning the pen upside down, drain the oil.
It seems to me that the glass is not oil, but some kind of liquid, this is normal, this oil is like a motorcycle, 27 years old...
Go ahead.
We take our feathers, which no longer contain the main springs and oil, and go to the garage to the yew trees. We take powerful yews, take some kind of rag, wrap a feather in it, and clamp this whole sandwich in the yew. We do not press too hard, but not too weak either. Be careful, the glass may burst and come, it will be a fiasco...
Next, we take our miracle screwdriver and push it inside the main pipe, there we catch the groove with a slot, take a 14 key and ask a friend to hold it firmly and securely, preventing the screwdriver from turning.
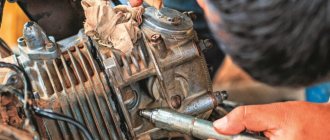
We take a hair dryer and begin to heat the bolt, which is located at the bottom of the glass.
I tried without a hairdryer, nothing worked, I just spoiled the groove and that’s it... In general, we heat it for 3-4 minutes, the better we heat it, the easier it will be for us, believe me, the bolt sits there very securely, and you won’t be able to unscrew it just like that, although after reading some articles on the Internet, I found copies that were easy to follow. However, we will not hope for this. After warming up our bolt with a hairdryer, we take an impact screwdriver, the favorite tool of the scoop driver, and begin to hit the screwdriver with all our strength with this tool, we ask our friend not to relax, otherwise our homemade screwdriver will be fucked, or rather the slot on it, this happened to me, and I made everything from scratch. Next, after several blows to the impact screwdriver, we take a wrench, or just a screwdriver with a wide groove, and begin to unscrew the bolt with our hands, applying as much force as possible, and force must be applied both to unscrew the bolt and to the end of the pen, so that the screwdriver does not jump off somewhere. , if it jumps off, your tongue will say so many pleasant words, you will be surprised. If everything worked out, well, what can I say, CONGRATULATIONS TO YOU! And your list of unperformed tasks will be reduced by one) This is what the bolt that secures the pipe looks like.
Look closely and you will see a small amount of varnish on it.
We do exactly the same action with the second feather.
After the bolts are unscrewed, we take the feathers and all our assistant tools and go, in my case) into the house, it’s warmer and more comfortable there. But if your garage is warm, or you’re just a super man, or a miracle woman, then we’re not going anywhere, and we do the following: Take the sliding pipe and remove it from the glass. On the other side of the pipe, the one that sinks to the bottom of the glass, there is another tube, this is what it looks like:
At its beginning, where there are 4 small holes, an aluminum bushing is put on, it looks like this:
Let's not lose it, by the way, pay attention to what is inside it, I had quite a lot of shavings there, it will definitely need to be removed, otherwise it will cause us some trouble, but more on that later.
At the end of the tube there is a rebound spring, the smallest of the springs (it can be seen in the photo above). Also at the end of this tube there is a slot into which a ring made of either textolite or plastic is inserted, with a slot along it. Don't break or lose it, that will also be a fiasco. It’s better not to take it off at all, out of harm’s way, there’s nothing to see there. Here's a closer photo:
In the photo, by the way, you can see the rebound spring, so desired by all Izhevods. bumps and swaying on the road.
Everything with the insides. This is how the feathers are basically disassembled, here is a photo of both feathers disassembled:
It turns out that it’s nothing complicated, right? How sometimes genius is simple... However, let's get back to work. We take all our feather components and run to wash everything in kerosene, not in gasoline, but in kerosene. You can also use diesel fuel, but it’s better in kerosene. Be sure to wipe everything dry with a rag and blow everything out with a compressor. We pay special attention to the holes in the smallest tube on which the rebound spring is mounted.
Next, a very difficult process begins. Removing the oil seals, well, like removing them, uprooting them from there with a screwdriver and a knife.
We take a screwdriver and remove the locking ring, it looks like this:
As you can see from the photo, it is quite rusty, and not only it, but the entire cavity where the oil seals are located, this is all because of our corrugations, which prevent the ingress of dust, but do not prevent the ingress of water, which stagnates there, and it begins that it begins, but what am I going to explain, you can see for yourself in what state everything arrives because of the water..
Next, we take a knife and a screwdriver, and try to use a hammer to knock them between the body of the glass and the seal itself, thereby disturbing its fit, and simplify the process, the seals are still subject to replacement, so you can be tougher with them.
Next, we grab the body of the oil seal with pliers and pull out the oil seal, yes, yes, because of the water, again, it will tear in all sorts of ways, by the way, at the base of the oil seal there is a metal plate, it, despite its not very thick, is quite strong, but we this doesn’t stop us, we grab the remaining body of the oil seal and pull it out.
After you pull it out, you should have something like this in your hands:
After the seals are pulled out, we wash everything there with a rag and run to blow out the entire glass again with compressed air. As a result, after washing and removing the seals, everything should look something like this:
As you can see from the photo, there is still not much wear on the sliding pipes, this is clearly visible from the shine in the lower places of the pipes. This is not critical, in general I must say that my feathers are in a state of 4 at least. Apparently, the corrugations still have the right to be on them, because they do their job, although not 100% (remember the water that stagnates in them).
Next comes the assembly of the feathers, but more on that in the next equally voluminous article..
Phew, that seems to be all, I wrote for 2 hours :) Probably the most voluminous article on my blog) By the way, when replacing oil seals, if suddenly anyone wants to pick up some imported analogues, you should know that this is not easy to do, but In any case, keep the thickness of the seals flush inside the feathers:
Almost 5 mm. I’ll say right away that most likely you will find a seal size in which they will be 1 mm narrower, and since there are two of them, this will give a total of 2 mm, in my opinion two such seals cost 800 rubles, and you need 4 of them , that’s 1600, when relatives cost about 120 rubles)) Of course, the quality there is completely different, but you won’t have to worry about how to compensate for these same 2 mm, but if you suddenly find oil seals exactly like the original in size, you’re welcome, write, share, and don't keep secrets;)
Thanks to everyone reading!
Have a good mood everyone, and a successful, quick hibernation;) See you!
Tags
- Planet 5
- Planet
- Izh Planet 5
- Izh luxury
- luxury
- Izh Planet 5 Lux
- Orion
- feathers orion
- disassembling Orion feathers
- fork
- orion fork
- feathers
- feather