What is a direct-flow exhaust system
To understand why to install a direct-flow muffler, it is important to know how the car’s exhaust system works.
Main goals:
- Filling the cylinders with a prepared fuel-air mixture, and in diesel cars - forming the fuel mixture in the combustion chamber;
- Ensuring the removal of spent fuel gases from the engine and passenger compartment outside the vehicle;
- Reducing the emission of toxic gases and harmful substances into the atmosphere thanks to the built-in catalytic converter;
- Reducing noise levels in the cabin and surrounding area.
The operating principle of the exhaust system is partly based on the law of inertia.
Thanks to the action of this law, a vacuum zone is formed behind the exhaust valve into which gases rush, and their place is immediately taken by a fresh portion of the fuel mixture.
This happens due to the fact that the phases of fuel intake and exhaust gases overlap each other, as is provided for in the design of modern engines.
After the exhaust valves are closed, next to the high-pressure zone formed as a result of exhaust gases escaping under pressure, another low-pressure zone is formed in the manifold, which moves along the exhaust pipe at the speed of sound.
Entering the muffler, the vacuum zone encounters resistance in the form of partitions, is reflected and goes in the opposite direction to the valves.
The ideal case is when this zone approaches the motor at the moment the valves open, but this depends on the frequency of the engine and the distance to the obstacle.
And since in modern cars such a distance is large, the vacuum zone from one cylinder, as a result, at the moment the valve opens, ends up in another, and not in the one from which it left.
Thanks to the design of the “spider” (exhaust manifold), where pipes of the same length are provided, the effect of vibration damping occurs, since the vacuum zones go from 4 pipes into one, where resistance is created at the junction of the latter, and they also partially dampen each other.
But the muffler plays a leading role in noise reduction, because the exhaust manifold and other elements are unable to greatly reduce noise.
But on many sports cars such a device may not be found; the role of a muffler there is played by a special turbine, which smoothes out vibrations and reduces the force of the exhaust by grinding the outgoing gas flow.
Why is this necessary?
It goes without saying that the modified exhaust system will give the car super-power, but the level of roar created by the engine can scare neighbors and passers-by who inadvertently find themselves next to the “swallow”. But on the highway, your car will be passed ahead and looked at with surprised glances by drivers of “cool” foreign cars, the engines of which have even more power than yours. But a conventional exhaust system that has not undergone modernization or so-called tuning does not allow the engine to operate at full power.
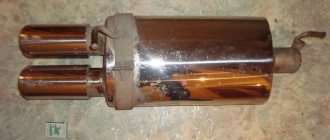
This is what a straight-through muffler looks like:
Direct flow muffler
Just two pipes of different diameters, placed one inside the other. But what an effect!
Types of devices
The standard exhaust system of a modern car includes a resonator (the first one comes from the engine) and the muffler itself.
The resonator cuts off low-frequency vibrations, and the muffler cuts both low-frequency and high-frequency vibrations, which together leads to a good result.
But the above scheme, both jointly and separately, may include the following types of mufflers:
- Made of aluminized steel;
- Stainless steel;
- Silencers, limiters, absorbers and reflectors;
- Resonator type;
- Direct-flow (sports) analogues.
Aluminized steel
Devices made of aluminized steel are characterized not only by a long service life, from 5 to 10 years, but also by a high price.
It will be difficult to choose such a muffler for your car, since only a few companies produce such devices, and making it yourself will be problematic.
Stainless steel
The devices are in the inexpensive segment, but their service life is only from 2 to 5 years. A big plus is that you can match the element to almost any car.
Limiters
They are usually used as an additional device installed in front of the main one.
The operating principle is based on creating low acoustic resistance.
Structurally, this is done like this: in the pipe, a large diameter turns into a small one, then there is a sharp increase in volume according to the principle of a large bottle with a narrow neck. The sound, entering a large space, decreases.
Reflectors
Used as a secondary muffler installed after the main one.
Exhaust gases entering the device encounter a group of acoustic mirrors on their way. Reflecting from them, the gases dissipate their energy one by one, and the output is a weak sound.
Absorbers
Can be used as a main muffler. The principle of operation is based on the absorption of vibrations by a porous material, usually glass wool, the fibers of which are heated by oscillating, thereby converting sound into thermal energy. Structurally close to direct-flow analogues.
They are considered ineffective because they absorb only high-frequency vibrations and transmit low-frequency ones.
Resonator type
As a rule, they are used first in exhaust systems as additional ones.
The principle of noise absorption is based on the presence of chambers of different sizes, through which the sound is effectively muffled.
Everything is arranged like this: a pipe with slots runs through the center of the resonator, which is surrounded by chambers of different volumes. Through the slots, exhaust gases penetrate into the chambers, where their energy is lost.
After this, the sounds enter the main device, where they are further reduced.
Direct flow
They are also called sports mufflers. As a rule, they are made of stainless steel. Installed on sports and tuned cars.
After installing a direct-flow muffler, the suction of the air-fuel mixture into the cylinders is improved, and the resistance in the exhaust system created by conventional analogues is reduced.
A direct-flow muffler is structurally somewhat similar to a resonator; there is the same pipe with holes and empty cavities separated by partitions. Only the cavities themselves are filled with basalt wool (or other material), which can withstand high temperatures.
Consisting of long mineral fibers, basalt wool absorbs sounds well, but only until it is blown out of the direct flow and even special protective metal mesh does not save the situation.
If the direct-flow muffler, when you tap on it, begins to sound like an empty metal container, then it needs to be filled again with cotton wool or replaced. And the sound produced by the exhaust system will be different.
Sounds made and their features
After installing a direct-flow exhaust system, the sound emanating from the car immediately changes; as a rule, it is low-frequency “growling”, “bass” and “mumbling”.
This happens because mineral wool placed in the co-current cavities removes only the high frequencies, while leaving the low bass unchanged.
The resistance to exhaust gases is also greatly reduced, and this affects the increase in engine power (but only in combination with other measures).
But the nature of the sounds largely depends on the number of holes and their diameter in the central pipe, as well as the characteristics of the material embedded in the cavity.
As was noted, mineral wool does not support low frequencies, and in most cases the engine produces sounds in the low range.
Therefore, it is not surprising when a car with direct flow makes sounds of engine operation through the muffler, and the higher the frequency the latter operates, the more it clogs the ears.
This is felt especially well inside the car, when such sounds, coinciding in frequency with body vibrations (and they are close to the frequency of the engine), lead to resonant vibrations inside the car and the strength of the sound increases significantly.
Therefore, it is almost impossible to make a quiet direct-flow muffler.
Resonator removal process
If a malfunction is detected, removal and installation of a new part will be required. To carry out such work you will need:
- new resonator;
- a set of special gaskets;
- fasteners with O-rings;
- anti-corrosion spray;
- set of wrenches.
Replacing the resonator must be done in the garage, as this will require a pit. The work scheme provides for the following actions. Before removing the part with a spray, for example WD-40, the bolted connections of the resonator are treated, after which they must be unscrewed.
When replacing the muffler resonator, you should pay attention to the quality of the connection between the part and the muffler. The element being tested should not have any gaps, as this leads to a decrease in the efficiency of the resonator and the appearance of loud noise when the engine is running.
Power and forward flow, three different opinions
Many owners of VAZ cars or, for example, Mitsubishi Lancer 10, Mazda 3, installing direct-flow exhaust systems on their vehicles pursue several goals, as a rule, there are two of them:
- Tuning your car;
- Increase the engine power, they say installing a sports analogue will leave many behind when starting at a traffic light.
The first opinion is that this is true. There is no debate about tuning; we are missing this point. But there is another opinion about increasing power, and it is the opposite.
The second opinion is that a sports muffler without deep tuning of the engine will not give an increase in power and partly it coincides with the opinion of experts.
The third opinion from professionals is that a noticeable increase in engine power is possible only after significant processing, and a direct-flow muffler is a secondary part of the issue.
The tuned power unit produces more exhaust gases, and, therefore, the standard exhaust system will not cope with its tasks, especially at high speeds.
Therefore, it will be necessary to increase the diameter of all pipes, install a tuned manifold, and only then a direct-flow muffler.
It is on sports cars that they install not simple engines, but ones that require special attention. And the direct-flow exhaust system fits into the overall picture of the tuning engine.
Conclusion
Whatever option you choose to muffle the exhaust, you should understand that you can simply buy a ready-made solution if finances allow, or you can muffle it yourself by making a device from improvised means.
Forward flow is an opportunity to increase the power of a car’s engine, add aggressiveness to the car and improve jerkiness. You can assemble and install it yourself by studying the step-by-step instructions.
Making a direct-flow muffler with your own hands
If you want to manufacture and install direct flow on your car, then it is better to conduct such experiments with domestic cars, for example, VAZ.
It is better to tune the exhaust system of Mitsubishi Lancer 10, Mazda 3 and other foreign cars by contacting special companies that do this professionally.
We discussed the design of the direct flow above. The difference between a sports muffler and a regular muffler is shown below.
We will be tuning the exhaust system of a VAZ-2110 (8 valve 1.6 liter volume).
To do this you will need the following materials and tools:
- Metal pipe with a diameter of 52 millimeters (a little more than 2 inches);
- Grinder with a disc for cutting metal 1 (1.6) mm;
- Welding machine, preferably inverter;
- Metal sponges (brushes) for cleaning dishes - at least 50 pcs.
Work progress
Dismantle the old device or prepare a similar one taken, for example, from disassembly.
Cut out the gutter and all the insides as shown below.
Leave a 4 cm protrusion on both sides so that a new pipe can be welded into this area.
Prepare a new pipe by cutting it to size and drilling holes with a diameter of 6-8 mm in it at a distance of 1-2 cm from each other.
This is labor-intensive work, so you can use an alternative method - using a grinder with a 1.6 - 3.2 mm disc, cut holes in the pipe in the shape of a herringbone at a distance of 1-2 cm from each other.
Weld a pipe with holes to the sections in the muffler and fill the entire space with metal pipe cleaners.
On the reverse side, the electrode may be missing, no problem, the hole left will be additional to the rest drilled or sawn. But if you go by principle, you will have to cut out the other side of the muffler.
Weld the outer part back and, if necessary, update the pipe running from the forward flow towards the exhaust.
Completely clean the device, prime it with primer and paint, this will extend its service life.
It’s worth taking a closer look at the filler. In the example described above, a metal mesh was used, but still the best option would be expanded clay (in the middle), and put fire-resistant mineral wool on top.
Self-repair of the exhaust system in a garage
Repairing a muffler with your own hands is not that difficult. First of all, it is necessary to dismantle the old exhaust system. As a rule, the dismantling procedure takes a minimum of time and effort. There are cases when the state of fastening will require additional time and effort.
Under constant exposure to reagents and moisture, fastening elements become severely rusty and “stick.” This problem usually occurs to motorists when removing a damaged resonator from a used car.
After you have freed the muffler from its mounts and removed it from under the car, first of all carry out a thorough visual inspection and identify the cause of the damage. In some cases, a visual inspection does not provide an answer to the causes of the breakdown, then the internal causes of exhaust system breakdowns remain.
Usually the problem is with the internal resonator. In this case, the procedure is simple: using gas welding, the failed one is cut out and a new resonator is welded back in again.
On the outer surface of the pipe there can simultaneously be both through holes from thermal burns and corrosion damage to the product. If small damage is found, it is recommended to use special compounds - sealants for repairing car mufflers, which are sold at any specialized auto store.
The sequence of such temporary repairs is as follows. To begin with, the edges of all identified holes are freed from the remains of burnt metal or rust. They are thoroughly cleaned and treated with special degreasing compounds.
Only after this is the repair sealant composition applied to the muffler in strict accordance with the instructions. Many modern sealant formulations are usually silicone based. It can withstand heating of the part up to 1000 degrees Celsius.
In cases where corrosion and thermal damage cover a large area, the exhaust system will have to be repaired according to a different scenario. Processing the edges of the holes is performed in the same sequence as in the previous case. However, the composition of the sealant changes to epoxy resin with additional additives.
According to the instructions, a special fiberglass cloth is glued to the surface of the exhaust pipe in the affected areas. All materials used are purchased from parts stores.
After restoration and repair of the muffler, it is installed in its original place. The owner idles the engine for one hour to allow the epoxy resin to cure under the high temperature generated by the exhaust gases. This condition must be met, otherwise all the work will go to waste.
There is another way in which you can repair the muffler. It consists in applying cold welding to the damaged area. After hardening, it becomes one with the muffler and lasts for a very long time.
If you have no desire to do everything that was suggested to you in this article, then contact a specialized center and entrust all the work to professionals.
Good luck to everyone and as few breakdowns as possible!
Do-it-yourself muffler pipe repair without welding video
We recommend: What is a catalyst?
Share information with friends:
We make direct flow from scratch
To do this you will need to use the services of a turner. We order two pipes:
- One made of steel 2 mm thick with a diameter of 130 mm and a length of 42 mm.
- The second is made of steel with a thickness of 2.5 mm, a diameter of 52 mm and a length of 42 mm with holes with a diameter of 8-10 mm, every 2 cm;
Two flanges with a diameter of 130 mm with an internal hole of 52 mm, metal thickness 2-2.5 mm can be ordered separately.
Prepared:
- Asbestos rope;
- Glass wool or mineral wool.
Asbestos rope is wrapped around the inner pipe. This is done in order to protect the mineral wool, which will be the top layer, from overheating.
We fill the top layer, assemble and scald the structure. We weld the fasteners and attach the forward flow to its regular place. For beauty, you can put a muffler attachment on it.
Another design of the device is shown below.
Blueprints
There are a lot of ways to make a direct-flow muffler; the main thing here is to understand the principle of operation of the device and use your imagination. And for car owners who find it difficult to do this, use the methods and drawings described above, they are simple and accessible to many.
Also tell us in the comments what type of forward flow is installed on your car and how you can do it yourself, this will help many people understand this topic.
Restoration work.
First, let's look at restoration using cold welding. Nowadays, almost every motorist has mastered this technique. The composition of this consistency quickly takes the required shape and hardens in it. At the same time, it is quite resistant to various influence factors. Today, there are two main types of sealants - liquid and flexible. Liquid sealants will also help to make bandages on the muffler. The combination of the two materials will give an improved result and give you back a quiet muffler. Flexible polymers that have a structure resembling plasticine in appearance. They attach well to metal, even with severe damage. Instructions for using sealant. First of all, you need to completely clean and degrease (you can use a handy product - gasoline) the surface. Then, we eliminate the unevenness using sandpaper.
Now, you need to prepare the composition for restoration. Flexible - first knead with your hands and stretch out the required amount. Liquid - stir until it reaches a homogeneous consistency. Apply the composition evenly to the damaged area. When using an already prepared composition, it is necessary to quickly apply it to the surface. These sealants quickly take on a solid state. After restoration, you must wait until the composition has completely hardened. If the car is used prematurely, the structure will be damaged. Depending on the material, drying time varies. Before carrying out work, carefully read the instructions for the composition.