Payment for goods and downloading of the book in electronic form (PDF format) is made on the website.
To do this, you need to find the book you are interested in and click on the “Buy” button. The price of the book is indicated on the button.
For convenience, the price on the website for residents of Russia, Belarus and Kazakhstan is presented in rubles.
For residents of Ukraine in hryvnias, and for all other countries - dollars.
After clicking on the “BUY” button, a payment window will open where you can select a payment system with which you can pay for the selected book using any bank card (Visa, MasterCard, MIR, etc.)
When you click on the “Pay by bank card” button, the Portmone payment system will open, which is the easiest way to make a payment.
In addition, the website offers four payment systems for payment:
- Yandex (payment from any bank cards, Yandex Money account, QIWI Wallet, terminals, etc.);
- Portmone (payment from any bank cards, Portmone account);
- PayPal (payment from any bank cards, PayPal account);
- WebMoney (payment from any bank cards, payment from WebMoney wallets).
Payment via Yandex Cashier
After selecting payment via Yandex, the Yandex Cashier payment system will launch, where you need to select a convenient payment method (bank card, QIWI, Yandex Money account, etc.)
After specifying payment details and confirming payment, payment for the goods will occur.
If you have a bank card in a currency other than the ruble, then the money will be debited from the card at the rate of the Central Bank of Russia at the time of the purchase.
This payment method is optimal for residents of Russia, Kazakhstan and Belarus.
Official website of the Yandex Kassa payment system https://kassa.yandex.ru
Adjusting the mixture quality on a scooter
We indicated above that the mixture can be optimal, rich or lean. So, manufacturers of a certain scooter model recommend using specified proportions, which means that sooner or later you will have to make adjustments. Most 4t scooters have an adjustment screw, otherwise the procedure is done using a needle in the throttle. The mixture is enriched by turning the screw clockwise; when the screw is turned counterclockwise, the mixture becomes lean. Adjusting the indicator on scooters without a mixture quality screw occurs by increasing or decreasing the height of the needle.
Payment via Portmone
After selecting payment through Portmone, the payment system will launch, where you need to select the payment method: bank card or Portmone account.
The price in the Portmone payment system is converted into dollars at the exchange rate of the Central Bank of the country where you are located.
If you have a bank card in a currency other than the dollar, then the money will be debited from the card at the rate of the Central Bank of your country at the time of the purchase.
After specifying payment details and confirming payment, payment for the goods will occur.
Official website of the Portmone payment system https://www.portmone.com
Tools
- Generator puller
- Variator puller (you can make it yourself)
- Kickstart sprocket puller (157QMJ engine only)
- Heads for 8, 10, 12, 17 mm
- Phillips and flathead screwdriver
- Small hammer
- Wish
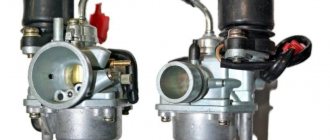
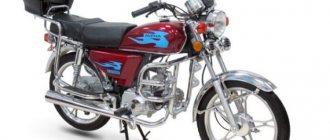
Most Chinese four-stroke scooter engines can be divided into two main types
- First type: 139QMB-series engine. This engine is very popular in the CIS countries and is installed on most Chinese four-stroke scooters
- Second type: 157QMJ-series engine. This engine has a larger volume than the first and, due to its higher price, is not so popular
Essentially, these two engines are a copy of the ancient Honda GY6 and differ from each other in displacement, kickstarter design, oil pump drive and electric starter drive. In all other respects, these engines are identical.
Typical 139QMB, in fact JL1P139QMB-2
And this is what a typical 157QMJ looks like, in fact LK162QMK
Payment via PayPal
After selecting payment via PayPal, the PayPal payment system will launch, where you need to select the payment method: bank card or PayPal account.
If you already have a PayPal account, then you need to log into it and make a payment.
If you do not have a PayPal account and you want to pay using a bank card via PayPal, you need to click on the “Create an Account” button - shown with an arrow in the picture.
PayPal will then prompt you to select your country and provide your credit card information.
After specifying the information required to make the payment, you must click on the “Pay Now” button.
Official website of the PayPal payment system https://www.paypal.com
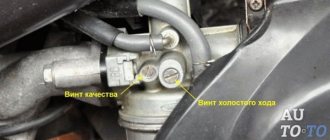
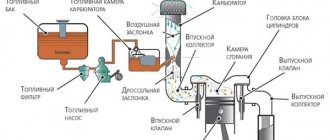
Adjusting the carburetor of a 4-stroke scooter
In general, the number of strokes in a scooter does not play such an important role when adjusting, because the jets are almost the same everywhere (fuel and idle), so the process occurs according to the individual indicators of the scooter.
Important
: Adjustment of the carburetor of a 4t 80cc scooter or other volume is carried out only on a warm engine. It is also important to consider that before adjusting, the carburetor must be disassembled and cleaned of dirt.
Setting up the carburetor includes several manipulations:
- Fuel level adjustment;
- Idle speed adjustment;
- Adjusting the quality of the mixture using a jet;
- Adjusting the quality of the mixture by setting the needle position.
Let's start with the simplest action - adjusting the idle speed.
Payment via WebMoney
After selecting payment via WebMoney, the payment system will launch, where you need to select the payment method: bank card or WebMoney wallet.
If you already have a WebMoney wallet, then you need to log into it and make a payment.
If you do not have a WebMoney wallet and you want to pay in another way, you need to select any of the methods that WebMoney offers and make the payment
After specifying payment details and confirming payment, payment for the goods will occur.
Official website of the WebMoney payment system https://www.webmoney.ru/
Setting the fuel level
This procedure is also carried out using a jet located at the very bottom of the float chamber. The first step is to unscrew this screw, but gasoline should not come out of the tube. The tube is located below the jet and is usually transparent. It shows the fuel level, so lift it in a vertical position. If the fuel level in the float chamber is normal, the gasoline in the tube will be slightly less than the cap curb.
Important
: You need to check this indicator only with a warm running engine.
Adjusting the fuel level in the carburetor of a 4t scooter is as follows: remove the float chamber and find the needle inside. The needle has marks and a small locking ring. You can increase the fuel level by installing the ring above this indicator, and decrease it by doing the opposite.
Downloading a book
After successfully completing the payment (by any method) and returning to the KrutilVertel store from the payment system website, you will be taken to the successful payment page:
On this page you need to indicate your e-mail, where access to download the book will be sent.
If you are already registered on our website, then simply follow the link to your personal account.
The book you purchased will be in your personal account, from where you can always download it.
Please note that after making the payment, you need to return back from the payment system website to the KrutilVertel website.
If for some reason you did not return back to the site and closed the payment system tab with a message about the successful completion of the payment, please let us know - we will send you a letter indicating access to download the book.
How to Remove an Engine from a Scooter ~ AUTOREVIEWZ.RU
How to remove the 3rd engine from a scooter
First, you need to prepare everything:
How to remove the engine from an ABM JIALING scooter
VK group: vk.com/alex_74_lp If you live in the Moscow region and want to give your equipment for review, write to the group.
a wrench with heads 8, 10, 12, 14 mm, a Phillips screwdriver, a flat screwdriver, a rubber hammer, a lot of clean rags, a decent-sized bowl of gasoline, a can of WD40 liquid, a spark plug source, an ordinary source for 10, a cap source for 10 mm with a long pen, a piece of paper and a pen.
CLEANITY is the deposit of success. During removal, be sure to soak all components and spray with gasoline and wipe, or treat with WD40 and wipe. Remove3 ALL Dirt!
1. Remove3 all plastic.
2. Place the scooter with a double stand on a good, wide, thick board (so that the butt is higher). Drive with a 14 mm head. Unscrew the shock absorber mounting screw from the engine (not from the frame). Then the entire rear lobe will fall down - it will be a wheel on the floor, and access to all parts of the motor will be seen. To avoid harm, it is better to turn the shock absorber towards the trunk (in general, if there is a desire, it can be removed3). Unscrew 3 bolts (10 mm) securing the plastic wing with a weightless filter, 2 bolts on the variator side, and once on the muffler. Remove3 weightless filter with wing. Get a filter component and wash it in gasoline (you can also read here >>>), and wash the filter housing with the wing.
3. Remove3 carburetor. To achieve the desired result, it is first better to carefully sketch on a piece of paper which hoses fit where (fuel supply, oil, vacuum tube to the fuel pump, 3 hoses from the thermal sensor on the engine, 2 hoses from the auxiliary air intake). Then carefully remove all these hoses3 (they have every chance of being stuck), unscrew the valve with the needle. The carburetor is secured with 2 bolts (10 mm), mounted on the pipe supplying the mixture to the engine. It is better to distinguish the carburetor, wash it in gasoline and blow out/clean all channels and jets, then reassemble it.
4. Remove the 3rd terminal with boot from the spark plug, unscrew the spark plug.
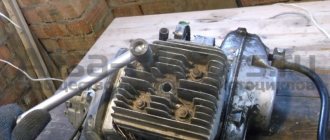
5. Remove3 the casing from the motor. First of all, you need to remove3 the muffler: unscrew the 2 nuts securing it to the exhaust window of the engine cylinder. It is fastened with 2 nuts (top and bottom) - the top one is unscrewed using a simple wrench, and the bottom one is unscrewed using a 10mm spanner with a long handle through a special (oblong) hole in the frame. Then a wrench with a 12 mm head. Unscrew the 2 bolts that secure the muffler to the body, to the left of the generator. Next you need to remove the 3 plastic cover, which acts as a channel for weightless cooling (3 8 mm bolts around the perimeter of the cover). Next you need to remove 3 rubber pads (2 pieces) on the motor casing (the antennae are carefully bent, the rubber bands have every chance of being glued, although they come off easily :-)) Then you need to remove 3 bolts (8 mm) that strengthen the casing to the body - once (if, being from the side of the variator, you look at the engine, then on the left/bottom (strengths it to the crankcase body), 2 on the right/bottom behind the edge of this very casing (strengths it to the variator body), 3rd from the top on the engine (close to the hole for the spark plug.) Then the casing splits into 2 halves, the 1st (larger), which is actually located on the generator side, can be easily removed, and the 2nd (much smaller), which is actually on the variator side, is removed subsequently, such as how to unscrew the thermal sensor from the motor housing (attached with 2 bolts - unscrewed with a Phillips screwdriver).
6. Disassembling the motor. First remove the 3 cylinder head. We unscrew the bolt (10 mm) well using a wrench with a head (they are perfectly screwed in - you need tension). The first few turns need to be unscrewed by half a turn of the bolt. The bolts are arranged in a quadrangle; they need to be unscrewed (like screwed in) at an angle. We take out the bolts. We remove the cylinder head (carefully - the gasket made of delicate metal can slip away). Then we insert the screwdriver between the lower rib of the cylinder and the crankcase and lightly tap it with a rubber hammer from top to bottom on the side of the screwdriver handle so that the stuck gasket between the cylinder and the crankcase comes off. Then we remove the cylinder. We stuff a bunch of clean rags into the crankcase so that nothing gets in there under any circumstances. To remove the piston 3 from the connecting rod you need:
1. Remove 3 retaining rings from the pin stock.
2. Place a square piece of wood (5 x 5 mm) prepared in advance against your finger and knock it out with a rubber mallet.
7. Next, we do everything we were going to do: a fresh piston, fresh rings, or check the condition of the piston and rings, if we discussed it in order to achieve the desired result, and put everything back together. Assembly is carried out in reverse order.
! It would certainly not be superfluous to remember that ALL REMOVED COMPONENTS MUST BE WASHED FROM DIRTY AND ALL WORK SHOULD BE CARRIED OUT CLEAN. If it is a garage, then it is better to sweep the garage in advance, because a grain of sand blown somewhere and raised by the wind can lead to sad results.
autoreviewz.ru
Problems when paying with bank cards
Sometimes difficulties may arise when paying with Visa/MasterCard bank cards. The most common of them:
- There is a restriction on the card for paying for online purchases
- A plastic card is not intended for making payments online.
- The plastic card is not activated for making payments online.
- There are not enough funds on the plastic card.
In order to solve these problems, you need to call or write to the technical support of the bank where you are served. Bank specialists will help you resolve them and make payments.
That's basically it. The entire process of paying for a book in PDF format on car repair on our website takes 1-2 minutes.
If you still have any questions, you can ask them using the feedback form, or write us an email at [email protected]
The first thing we will need to do:
- Remove the muffler
- Remove cooling shrouds
- Remove the generator
- Remove the variator
- Clean and blow out connectors
Removing the muffler is very easy and simple: unscrew the two nuts and two bolts on the cylinder head that secure the muffler to the frame (139QMB) or the rear wheel booster (157 QMJ)
Cooling shrouds are even easier to remove: unscrew all the bolts and screws that secure the shrouds to the engine and remove them.
Removing the generator
But with a generator it’s not so simple. The generator can only be removed with a puller. All your attempts to knock down the rotor with a hammer or pry it out with a crowbar are doomed to failure.
Unscrew the bolts on the cooling impeller and remove it and the rotor
Fix the rotor with a puller and unscrew the nut (right-hand thread)
Install the puller and pull the rotor off the crankshaft journal
We blow out the generator, unscrew the bolts and put it somewhere away
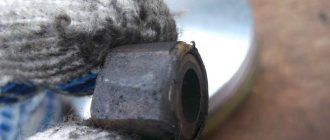
How do you know if the mixture is rich or lean?
To find out this indicator, you should look at the condition of the spark plug, namely at its electrodes. When the mixture is lean, the electrodes are quite white and traces of melting are visible; when the mixture is rich, the electrodes are too black and strong carbon deposits are visible. Of course, the optimal mixture is characterized by the normal state of the candle.
It might be useful to read:
- VW Transporter: Quadratish;
- Checking the engine number during registration How to find out whether an engine is wanted or not;
- How to drive in reverse correctly;
- See what “Modes of transport” are in other dictionaries;
- How often do you need to change spark plugs on a VAZ;
- Tires Kama (Nizhnekamskshina);
- GM-AvtoVAZ has begun preparations for the production of the second generation Chevrolet Niva;
- Maintenance of a Kia Rio car: quantity and list of works;