Without a working braking system, a motorcycle quickly becomes a very dangerous vehicle, both for the rider and for other road users. Before you bleed the brakes on your motorcycle, you will need to do some preparation. Bleeding may be necessary when replacing brake fluid, replacing hoses, a brake cylinder, removing air, or flushing.
The type of brake fluid should be indicated on the cap of the reservoir; most often it is DOT 4.
You will also need
- hose,
- set of open-end wrenches,
- Screwdriver Set.
If you don't know how to bleed the brakes on a motorcycle, the video instructions at the end of the article can help a lot. It is better to do all the work with an assistant, although some experts are capable of replacing the brake fluid on their own.
Removing fluid
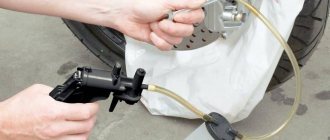
Before starting work, remove excess brake fluid from the reservoir. It’s easier to do this with a syringe, suck it out with a hose, or just pour it out. There should be some brake fluid left at the very bottom, covering the intake hole. Next, place the transparent hose onto the brake master cylinder fitting. Use an open-end wrench to loosen the fixing nut a little.
IMPORTANT!
The hose should be constantly immersed in the liquid that you drained from the tank. Before you bleed the front brakes on your motorcycle, you need to remove the old fluid. It will be dark in color. Using a back and forth motion while pressing the brake, pump the fluid until light (new) fluid comes out. All this time it is necessary to fill the expansion tank. At the end of the work, close the fitting with the key. Bleeding the front calipers involves repeating such actions for each of them.
Brake fluid is very caustic and can damage paint. Wear gloves and wipe up spills immediately.
Check your brakes
- End of work . When all work is done, make sure the expansion gasket on the tank is clean and close the tank. Press the gasket into place. Remove the catch bottle and tube and place the rubber caps on the drain screws.
- Clean up any spills . Make sure that brake fluid has not spilled. If anything spills, use brake spray to clean it up.
- Check the brakes . Squeeze the brakes several times with the engine not running until all slack in the line is removed. Then go for a slow test drive to check if the brakes are working properly before you go on a long drive.
Replacing brake fluid
Drain the old liquid from the tank into a container, but not completely, the bottom should be covered. To do this, you can unscrew the tank and tilt it, or you can suck out the liquid with a syringe or bulb. During the process, constantly monitor the level, and do not allow the intake hole of the tank to become exposed, otherwise a lot of air will get into the system and it will take a long time to pump it.
Place the hose onto the fitting of the working cylinder (caliper) - the old fluid is drained through it. It is advisable to move the pads on the caliper, for example, with a screwdriver.
Apply the brake and open the fitting (just loosen it a little).
After the fluid comes out and the brake fails, close the fitting, then release the brake.
Monitor the fluid level in the tank. If the level drops to the bottom and the master cylinder traps air, the system will need to be bled.
Do this several times until fresh liquid comes out.
For the front brake system, if two calipers are used, perform a similar operation for each caliper.
When replacing the fluid in this way, you don’t have to bleed the system, but we recommend bleeding it: it doesn’t last long and guarantees that there will be no air in the system. Although, if you did everything correctly and did not miss the fluid level in the tank, and your system was bled before replacing the fluid, it is not necessary to pump.
Required Tools
- Double ended wrench (combination open end and ring type)
- Release bottle with rubber connecting hose
- Ratchet Driver with Drive Socket
- Small hammer
- Water (To clean any spill)
Bleeding your brakes is part of your motorcycle's regular maintenance program.
- Step 1 - Protect the Motorcycle
It is important to place the motorcycle in a safe position and location. Place the motorcycle on its center stand. Make sure it is securely protected from falling. This can be a source of serious damage. Use pliers or wrenches to remove the brake calipers from the rotor.
- Step 2 - Drain the Brake Fluid
Align the steering wheel so that the master cylinder is balanced and level. It is recommended to use a suitable material to cover the outer surface of the motorcycle. Brake fluid easily damages paint on such surfaces.
- Step 3 - Pump
Remove the top cap of the brake fluid reservoir. Look and make sure it is filled with liquid. Place an old bucket under the caliper and pump until the piston comes out. Make sure the reservoir is always full. Add more brake fluid if necessary.
A G-clamp can be used to secure one piston if there are two. Continue alternating the G-clamp between the two pistons while keeping up with the bleeding. This makes them easy to remove. This process depletes the old brake fluid.
- Step 4 - Bleeding the Brakes
Reinstall the caliper and pistons. Use brake fluid for lubrication. You need to add brake fluid until there is enough fluid in the master cylinder. Take one end of the hose and place it on the cap. Place the other end in the bucket.
The pump must be clamped so that it continuously “brakes” for several minutes. On the caliper, carefully open the drain screw to release the fluid mixed with air. Return the screw and continue bleeding for a few minutes. This should be repeated several times until the air is released from the brake fluid.
It is recommended to tap the hose and bleed screw to help dislodge bubbles during bleeding. The setting can be left overnight. Continue the procedure, continuously bleeding and checking how air escapes from the brake fluid.
- Step 5 - Cleaning
Use water to clean any traces of brake fluid from the motorcycle body and work area.
Try to use tools that guarantee success when bleeding your motorcycle brakes. These can include sealed brake bleeders and vacuum bleeder kits. Beware of brake fluids as they can easily ruin your bike's paint job.
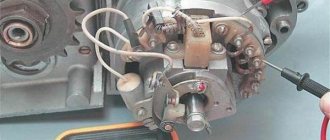
Bleeding the motorcycle brake system
Bleeding the brake system begins with bleeding the master cylinder.
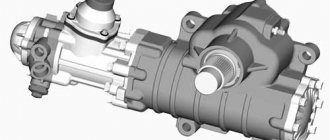
On some motorcycles, the master cylinder (brake machine) of the front brake system does not bleed. In our case, the master cylinder has an air bleed fitting, so it needs to be bled.
On all motorcycles, the rear brake master cylinders are not pumped; they automatically bleed air into the reservoir by shortening the brake lever.
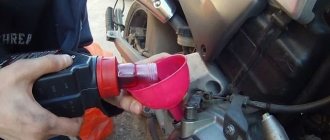
Pour brake fluid into the reservoir.
If the master cylinder has an air bleed fitting, bleeding begins from there, then the slave cylinder is pumped. Otherwise, only the worker is pumped.
We put the hose on the fitting. Lower the free end of the hose into the container.
We make several contractions of the brake lever (squeeze sharply, release slowly), then squeeze the lever and keep it tense (press). The fitting is closed.
Open the fitting. The brake lever “falls” and fluid comes out of the hose. Check for air bubbles in the escaping liquid. Close the fitting. If there are bubbles, repeat steps 4 and 5 until the bubbles disappear. Don’t forget to monitor the liquid level in the tank; when it drops, add more.
Add liquid to the reservoir to the maximum level. Not to capacity, but to the maximum level, which is indicated on the tank (see photo). We close the tank. The system is pumped.
Thus, for the rear brake system, only the slave cylinder needs to be bled. For the front - a master cylinder (if necessary) and two workers.
How motorcycle brakes should work
The problem occurs gradually over several weeks of driving, giving you plenty of time to fix the problem. Once the problem has started to appear and the motorcycle has not been ridden for a week or two, brake failure may be more sudden. Luckily, you'll feel this during a pre-ride inspection after your bike has been in the garage for a while (We hope you always check your brakes before the inspection, if not, you should definitely do so).
The braking system has a ratcheting action. Every time you apply the brakes, the pistons push the brake pad against the rotor, creating friction that slows your vehicle and also causes material to be lost on the brake pad itself. This wearing process happens slowly, otherwise we would be changing pads daily instead of after thousands of miles. When the lever is released, the pressure is released, and the set of springs and slight vibration and shock from the rotor cause the brake pads to push the pistons back slightly to remove friction from the rotor. As the pads become thinner from repeated application of the brake pedal, the pistons gradually move out of the caliper over time so that the brake lever engages more or less at the same distance from the handle. This is the so-called ratcheting action of the hydraulic braking system. How does this happen
Over time, dirt and brake dust coat the pistons in the brake caliper. Some of this dirt may itself get into the piston seal when the pistons retract slightly after pressing the brake pedal. Sometimes, instead of the piston sliding forward through the seal when the brakes are used, the piston sticks to the seal and rolls the seal forward when the brake lever is pressed. When the brake lever is released, the seal returns to its normal shape, causing the piston to be pulled back. The enhancing effect is lost. As the brakes wear, the piston gets further and further away from the friction point. As a result, the activation point of the brake lever moves closer and closer to the handle.
The speed at which the piston is retracted back into the caliper due to the elastic action of the seal is quite slow, so two quick pumps on the brake lever usually bring the pistons into contact with the pads and the lever operates at the correct distance from the lever. The reason the pump works is that the first pump moves the piston outward as far as the hydraulic fluid pushed into the system from the hand lever will allow, and the second pump pushes additional hydraulic fluid behind the piston, which moves it into the pad and creates enough friction to stop the motorcycle.
When to bleed the brakes on a motorcycle?
On a motorcycle, the brakes must be bled if there is air in the circuit or if the circuit has been drained. In all cases, bleeding the brakes is a vehicle maintenance operation. Therefore, it is advisable to bleed the brakes every 10,000 km .
Bleeding the brakes is most often done during a major overhaul of a motorcycle at a car dealership. If you ride motorcycles on the track, it may be beneficial to replace your original brake fluid with a more efficient brake fluid. In this case, purging will be required.