It would seem, what could be simpler? I drained the old oil and filled in new oil, but no... There are people who manage to mess up here too.
I won’t go far for examples: I had the opportunity to repair several scooters whose oil filter was simply clogged with debris. As a result, the oil could not flow through it to the rubbing parts and the engine seized. To my fair question to the owner: why didn’t you clean the filter when you changed the oil??? A typical answer followed, which frankly killed me: “why clean it?” “What filter is there?” (???).
I sometimes get the impression that many scooter owners compete with each other to see who can destroy their vehicle the fastest. And then they complain on every corner that the “Chinese” are shit a priori.
So, the most common mistake made when changing engine oil is when, out of ignorance or on purpose, the oil filter is not cleaned.
Look, the owner of this scooter never cleaned the filter, and he changed the oil regularly: every 2000 km. As a result, the filter became clogged and the engine seized.
The second most common mistake I have encountered is when the oil is drained not through the drain plug, but through the filter plug. By and large, this is not critical, but if you drain the oil through the plug, the oil does not completely drain from the engine, and when you fill it with fresh oil, it will mix with the old one, which will greatly worsen its performance.
When changing the oil in the gearbox, the situation is no better. Many owners do not even suspect that the scooter has a gearbox and the oil in it needs to be changed as often as in the engine. That is, every 2000 km.
Sometimes you open the gearbox of some old scooter, and instead of oil there is some kind of slurry there. What can I say - it’s slurry. They poured oil there at the factory, but no one has changed it yet.
I recently disassembled the gearbox of an old Honda and instead of oil there was a slurry that looked very much like dung... The bearings were naturally “taken away”, it’s good that I looked there in time, otherwise the rear wheel along with the axle in front of the scooter would have rolled, and the owner would have rolled into a ditch...
Look at the fluid in this gearbox... I wouldn’t be surprised if it’s still the original factory oil...
Actually, the oil change itself, both in the engine and in the gearbox, consists of two main stages: preparatory and, strictly speaking, the replacement itself.
Preparation
To ensure that all the used oil leaves the engine without any residue, the engine should be thoroughly warmed up before changing the oil. Or, what would be best, start changing the oil immediately after a 5-10 km trip.
The second preparatory stage is that we need to prepare in advance a flat area on which to install the scooter in the most level position possible and prepare a suitable container for used oil.
The tools you use also play an important role. Don't skimp - buy a new head with a knob. You will only need two of them: for 17 and 10. Those who neglect this point pay dearly later, and out of their own pocket.
Scooter with two-stroke engine
If the scooter engine is two-stroke, then the oil for it must be 2 tons. This type of scooter eats oil and is added in small doses to gasoline (in modern 2T scooters, oil is no longer diluted with gasoline thanks to a separate engine lubrication system). Therefore, the oil must be such that it mixes well with gasoline and does not settle at the bottom and clog the carburetor. 2t oil copes well with this.
What kind of oil to pour into a 2T scooter depends on your riding style. If you drive slowly around the city or on the highway, then semi-synthetic and mineral oil are suitable for you. But if you have severe frosts and bad weather conditions, or you are always moving at full throttle, then you need synthetic oil. It does not change its properties down to -35C. Of course, under such conditions it is not recommended to ride a scooter; in this case, a car would be more suitable. It is recommended to fill a scooter with a two-stroke engine with oil from the following manufacturers:
- Motul
- Mol Dynamic
- Castrol Power
- Castrol Act Evo
- Repsol Moto (Sintetico 2t, Off Road 2t, Racing 2t, Competicion 2T)
- And other quality oils.
And even if you have an old twenty-year-old scooter, do not neglect quality oil. It doesn’t matter whether the scooter is new or old, everyone is required to ride it.
This is interesting: Independent assessment of a car after an accident - protecting your interests
Changing engine oil
Draining used oil
We place the scooter on the center stand; if it is crooked, we straighten it. On the left side in the direction of travel of the scooter, at the very bottom of the engine, look for the drain plug, place a previously prepared container under the plug and unscrew the drain plug with a 17mm head.
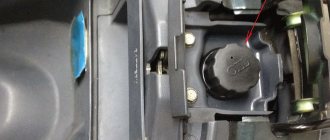
While the oil is draining, go to the right side of the scooter and unscrew the dipstick and the oil filter plug, which is located at the very bottom of the engine.
We put a good 17 socket on the plug, unscrew it and remove it with all its contents from the engine.
This is the oil filter. Immediately after unscrewing it, while the point is still important - throw all this junk into clean gasoline, give it a good shake, and then blow it out and dry it.
After the oil filter plug is removed from the engine. In order to remove any remaining oil from the engine, pump the engine several times using the kickstarter.
Then we wait about five minutes - wipe the drain holes dry, for greater reliability, apply sealant to the plugs and screw them into place.
Filling the engine with new oil and checking its level
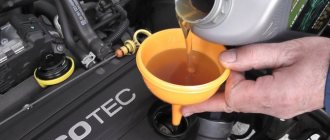
Depending on the design of the canister, pour oil into the neck either directly from the canister itself or through a funnel. The funnel must be clean!
Oil level control
The oil level is checked as follows: pour the first portion of oil into the engine, approximately 600-700 ml, wait a couple of minutes until the oil spreads evenly over the crankcase without twisting, insert the dipstick all the way into the filler neck, remove it and check the level.
The oil level must be within the control area.
- If the level is lower, add a little oil, wait a couple of minutes and take a measurement.
- If the oil level is higher than normal, drain it or, better yet, pump it out using a syringe with a tube from the neck.
The control area is indicated by red arrows. In my case, the oil level is exactly in the middle of the control section and is indicated by a blue arrow. Ideally, the oil level should be near the upper boundary of the control section. But this is ideal, but in practice, the average level is quite acceptable and does not in any way affect the reliability and durability of the engine.
Air filter - maintenance methods
Don't forget to periodically service your scooter's air filter. If the filter element is disposable, then replace it with a new one, otherwise service it in accordance with the instructions for the scooter. Usually, if the filter element is foam rubber, then it is washed in gasoline, then dried and treated with a special product for air filters. Without impregnation, the filter will not efficiently clean the air entering the engine, which will lead to rapid wear. The timing and frequency of air filter maintenance depend on the operating conditions of the scooter. When traveling on dusty roads, the filter has to be serviced much more often.
Changing the oil in the gearbox
At the very bottom of the engine, on the left side in the direction of travel, we are looking for the drain and filler plug of the gearbox. The filler plug is located on the side or on top, and the drain plug is always at the bottom.
Place a container under the drain plug and unscrew both plugs.
We wait about ten minutes until the old oil drains from the gearbox.
We wipe the drain hole and plug dry, apply sealant to the plug and screw it into place.
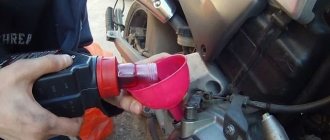
Let's take the oil. I take a liter canister, it’s cheaper and lasts for about 10 replacements. If you change oil infrequently, buy a special tube of branded oil for scooter gearboxes. There is more than enough of it for one replacement, and without unnecessary headaches, pump it into the filler hole using a special spout.
Like this
For those who prefer to save money, there is only one thing left to do: pump oil into the gearbox in small portions using a regular syringe. Unfortunately, there is no other way to fill the gearbox with oil because the filler hole is too small.
Checking the oil level in the gearbox
We pump oil into the filler hole, also known as the control hole, until it begins to flow out of it. As soon as the oil starts to flow, stop pouring, wait a couple of minutes for the excess to drain, and tighten the plug.
On some models of scooters, there is no control hole through which we can determine the required oil level and instead there is a filler located on top of the gearbox and a drain. In this case, the recommended oil level should be marked on the engine crankcase. This simplifies the work: measure out the required amount of oil and pour it through the filler hole into the gearbox.
Why is fresh scooter gear oil necessary?
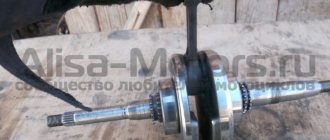
One of the most important components of a scooter can rightly be called the gearbox. It is responsible for timely reducing the speed of the driven shaft, thereby increasing torque. That is, it converts high shaft and clutch speeds into fairly powerful, but low wheel speeds. This part consists of a number of rubbing elements (gears and bearings) that undergo enormous loads, and, as expected, they need good care. It is the transmission oil that provides such care.
It is an oil doped with various functional additives. The main function of transmission fluids can be called protective, as they protect the surface from wear, corrosion, seizing, etc. In addition, thanks to them, energy losses are reduced and heat removal from friction surfaces is ensured. Shock loads, vibrations and noise in gear drives are also significantly reduced.
Oil cooling system 139QMB
#1 OFFLINE Aplerman
- SYM CLUB
- 448 messages
- 0 I'll go
- Tel.: +7 965 1030089
- Name: Roman
- Moscow city, Kudyaplikovo
- Wheels: SYM Orbit 50
- Top
- Complaint
#2 OFFLINE Kalix
- Name: _
- Top
- Complaint
#3 OFFLINE Aplerman
- Tel.: +7 965 1030089
- Name: Roman
- Moscow city, Kudyaplikovo
- Wheels: SYM Orbit 50
The system is good but quite dangerous. Any orbit 50-62-72-85 should not overheat if everything is configured correctly.
- Top
- Complaint
CPG tuning or standard?
I would like to immediately note that installing a larger-volume CPG (tuning) reduces engine life. Strongly or slightly is a separate question, but it reduces. Considering the generally small resource of Chinese motors for scooters, perhaps for some the question of reducing it will be critically important.
What does installing a larger volume (tuning) CPG on a scooter give?
- Increase engine torque!
- An increase in engine power is a consequence of an increase in torque.
What negative effects does CPG tuning have?
- Increased load on transmission components, especially on the variator and the variator belt;
- Increased load on the crankshaft bearings and connecting rod bearing;
- Increased fuel consumption (not always, highly dependent on driving style and operating conditions);
- High requirements for the quality of lubricants.
I would like to note that tuning a scooter needs to be done comprehensively; only with general tuning of all scooter systems (carburetor, variator, exhaust, switch) can you get the maximum benefit from installing a tuning CPG. But installing 70 cc instead of 50 on the 139QMB is practically a necessity, because the 139 engine doesn’t handle a 50 cc CPG at all.
Characteristics and tuning of the QMJ 157 engine
Various two-stroke and four-stroke engines are used to power Chinese scooters. The most popular are four-stroke motorcycles, which include the QMJ 157 power unit. Engine capacity is 9.2 liters. With. has one 150cc cylinder and is copied from the Japanese GY6 Honda engine model. The drive from the motor to the drive wheel is carried out through a variator included in the delivery package of the engine. Wanting to increase the speed that a motorcycle or scooter develops, they often perform engine tuning.
Engine QMJ 157 - characteristics and general description
Like most equipment produced by Chinese manufacturers, the QMJ 157 four-stroke engine is reproduced from its Japanese counterpart. The power unit installed on a Honda scooter was taken as a prototype. The motor has undergone long-term testing under various operating conditions, proving itself to be reliable, trouble-free and durable.
Various two-stroke and four-stroke engines are used to power Chinese scooters
All that remains for Chinese engineers is to adopt a proven design and begin mass production. How successful the motor turned out can be judged by its area of application. The one hundred and fifty-seventh engine model, the power of which is enough to accelerate a full-size two-seater scooter, is today installed both on expensive scooter models - Honling, Forsage, and on budget scooters like the Viper Storm 150. This power plant has become legendary among fans of Chinese scooters.
The limited speed threshold of the scooter, associated with the relatively small cubic capacity of the engine and the developed power, forces tuning enthusiasts to modernize the engine.
When planning to improve a fairly good motor, you should first familiarize yourself with its technical characteristics. Let's consider the operating parameters of the engine.
Compared to 50cc four-strokes, it has quite good cubic capacity and power. The cylinder has a volume of 149.6 cm3, and the maximum power reaches 6.8 kW. The piston has a diameter of 57.4 mm and a stroke of 57.8 mm. At maximum power, the revolutions reach 7.5 thousand per minute. At 6 thousand revolutions per minute, the maximum torque is 9.8 Nm. Idle speed ranges from 1600 to 1700 per minute. The engine weighs a little - 27 kg.
Before you start using it, you should break in the engine and drive the scooter for 2000 km in compliance with the speed limit. With proper running-in, the engine service life reaches 25,000 km. The motor quickly and dynamically accelerates the scooter with the driver and passenger. A run-in engine does not require intervention and can operate for a long time without major repairs. Then it will be necessary to replace the rings, which does not require a major investment.
This power plant has become legendary among fans of Chinese scooters.
Engine device
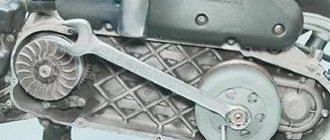
Beginning scooter riders, if they need to repair the motor, try to understand its design. Diagram 157QMJ will help you obtain information about the structure of the power unit and its components. Having dealt with it, you can not only purchase the necessary spare parts for the 157 QMJ engine, but also correctly perform the work of assembling and disassembling the engine. Structurally, the motor is practically no different from its GY6 counterpart. The 157 QMJ has the same cylinder-piston group, clutch, crankcase, camshaft and muffler.
The bearing numbers, sizes of silent blocks and gears, diameters of the variator pulleys and the design of the kickstarter, generator and electric starter also correspond. The engine is cooled by the oncoming air flow. Starting is carried out from an electric starter or kickstarter. Torque is transmitted through a variator, which is an automatic integral transmission.
Depending on the design features of the scooter on which the engine is installed, it can be equipped with a CVT having an extended box. The engine is equipped with a standard power system, providing fuel consumption reduced to 2.5-3 liters per hundred. The power unit operates quite quietly, providing almost silent acceleration of the scooter during maneuvers.
The motor is equipped with a standard power supply system
Engine tuning QMJ 157
Why do they tune a fairly reliable engine? Those who like to modernize their scooter explain the need for tuning by the limited speed threshold and the desire to increase power. The fact is that the engines of most scooters, having reached maximum speed, begin to run wild. This not only increases fuel consumption, but also significantly reduces the service life of the engine.
The design of the engine makes it possible to increase its cubic capacity from 150 to 170 cubic meters. To modernize, it is necessary to purchase a number of spare parts, as well as correctly perform the work of disassembling and assembling the motor.
It is important to properly break in the power unit after tuning. Let us dwell in detail on the complex of these issues.
Required spare parts
To carry out engine modernization work, you must purchase the following spare parts:
- four-valve cylinder head with a sports camshaft. The head includes rubber seals, a set of studs, a gasket and a camshaft chain;
- carburetor having an intake manifold with a diameter of 30 mm and equipped with a gasket. Installing a CVK Racing sports carburetor will provide power to the engine after increasing the cubic capacity;
- working cylinder with a sleeve with a diameter of 61 mm and a piston of the appropriate size. You will also need a piston pin, a pair of circlips, compression rings, an oil ring with a retainer and a paper gasket.
After tuning, it is important to properly break in the power unit
. By performing simple calculations, you can make sure that replacing a standard piston with a diameter of 57.4 mm with one increased to 61 mm will increase the volume of the working chamber to 169 cubes. At the same time, the piston stroke length, equal to 57.8 mm, remains unchanged.
Disassembly
Having purchased all the spare parts necessary for tuning, you should study the procedure for disassembling the engine. It is technically possible to complete the entire scope of work without dismantling the power unit itself from the scooter frame.
The work must be performed according to the following algorithm:
- remove the rubber mat and dismantle the seat. You will also need to remove the trunk, the plastic trim around the driver's seat and the exhaust pipe. The muffler remains in the same place. It is important not to confuse the locations of bolts of different lengths;
- dismantle the air purification filter assembled with the power supply system. Instead of the standard filter, which has a reduced throughput, you will need to install a Uni Filter. It will ensure the purification of the required amount of air for a 170 cm3 engine. To remove the carburetor, you will need to disconnect the throttle cable and remove the clamps from the gasoline hoses;
- unscrew the plastic covers that protect the engine from contamination and provide additional circulation of cooling air flows. The plastic casing is removed by unscrewing a group of screws. The plastic is then easily removed. Don't forget to cover the floor with old rags to absorb any oil that drips during disassembly;
Before tuning, study the procedure for disassembling the engine
- Unscrew the 4 M4 bolts securing the cylinder head cover. After this, the cover, under which the rubber gasket is located, will quickly be removed. Don't forget to disconnect the breather hose from the air filter. It will then be mated to the new oil trap;
- unscrew the M12 nuts securing the camshaft and cylinder heads. Remove the upper camshaft mounting elements, ensuring that it does not move. Unscrew the chain tension adjustment cover and loosen the tensioner fastening with a screwdriver. Next, you need to remove the timing chain from the camshaft sprocket;
- unscrew a pair of M8 bolts securing the cylinder head. Carefully remove the cylinder by moving it along the studs. The metal gasket will require replacement as it cannot be reused. Use thin pliers to remove the piston pin retaining ring, after which the piston can be disconnected from the connecting rod.
- install gaskets and rings. It is important not to block the channel in the cylinder intended for lubrication of the cylinder head. When installing compression and oil scraper rings, they should be placed so as to ensure that the gaps are located at an equal angular distance;
- Carefully install the piston inside the cylinder complete with rings. A small amount of lubricant will make the piston installation operation easier;
- Apply sealant to the heat-resistant paper gasket, align with the cavities and channels, and then install the cylinder along the studs. The IN marking on the piston should point towards the intake manifold;
- connect the piston after the connecting rod and pin holes match. Install the cotter pins and make sure the retaining rings are secure. They must coincide with the grooves of the piston. Before starting work, it is necessary to apply lubricant to the piston pin.
Remember that the increased height of the four-valve head will require replacing the four studs that secure the cylinder-piston group to the cylinder head.
How should the studs be installed?
To unscrew the original studs, a standard technique is used, which is used by engine tuning enthusiasts. Screw two nuts onto the threads of the stud and use wrenches to press them tightly together. Then you need to unscrew the bottom nut by rotating it counterclockwise. Before screwing in new studs, apply blue sealant to the threads to prevent turning. The pair of cylinder fixing fasteners on the right side of the engine does not need to be removed.
Assembly
Assembly work is carried out in reverse order. Procedure:
All that remains is to install a new timing chain, making sure that the marks on the engine housing and the generator match. Then you will need to put the cylinder head on the studs, install and fix the camshaft, and also adjust the valve clearance in the range of 0.05-0.1 mm. The final steps are installation of spark plugs, oil catcher, carburetor and air filter. Now you can try to start the engine and start running it in.
157 QMJ engine - characteristics, running and reviews
The performance of a scooter with a tuned engine will increase significantly. It will be able to accelerate to almost 100 km/h. It is important to ensure normal grinding of the rings. To do this, the first start of the engine should not exceed 5 minutes, and the speed should be 50%. After the engine has cooled, you can restart the engine for 10 minutes and slightly increase the speed. After the third 15-minute start, wait until the engine cools down and check for oil leaks. According to owner reviews, the upgraded engine will delight you with improved dynamics and pleasant sound.
Scooters Maintenance and repair
Often, when it is recommended to manually add oil to gasoline in a certain proportion when operating a two-stroke scooter, scooter owners cannot always quickly determine the required amount of oil, which can be poured directly into the tank or mixed in a canister.
This material will help you quickly understand the proportions and add the required amount of oil to a certain amount of gasoline in a matter of seconds without additional calculations.
When to add oil to gasoline
How much oil should be added to gasoline.
The proportions in each specific case are individual, so we deliberately do not indicate here the proportions for the above cases, so as not to mislead users.
Why is that? For example, a master can indicate the proportions after repair or tuning, when he knows the performance of the pump of a particular scooter and sets a certain proportion to replenish the missing amount of oil.
When running a two-stroke scooter, it is enough to add oil to gasoline at the rate of 1 to 30 with a fully functioning oil pump. You can find out more about this in the article:
Now, actually, the table itself. Very simple and intuitive. The leftmost column is the number of liters of gasoline to which we will add oil. In the header of the table we see the ratio that we need (1 to 20, 1 to 30, etc.). And in the body of the table we see the required amount of oil. For example, during break-in, you need to add the required amount of oil at the rate of 1 to 30 to the five-liter gas tank of a Honda Dio scooter.
In the left column we select the number 5, in the top line we select the ratio 1/30, in the intersection we see the number 167. This is the amount of oil that we need, i.e. 167 ml.
You can also read other articles on the topic: